Table of contents
Introduction
Welcome to Part 2 of my sound design series about implementing sound events using Unity and FMOD, which looks at making our games more sight-impaired-accessible. Designing for accessibility is not just great for inclusivity, it also helps make a more atmospheric game for everyone! This tutorial follows directly on from the last, so if you haven’t read Part 1, please check it out first here.
In Part 1 we set up an FMOD Studio project and integrated it into Unity. We then covered the basics of FMOD events, the foundation for most of our game audio logic, taking a lot of programming effort from Unity and presenting it in a more intuitive fashion in FMOD Studio. In this tutorial we will be learning about Multi Instruments to add more variation and setting up some more ambiance via changing footstep sounds based on the surface that the player is walking on. I have included a custom footsteps script that demonstrates accessing FMOD logic and firing events. Let’s get to it!
Import Sound Files Into FMOD Studio
Start by opening your existing project in Unity and also the integrated FMOD project in FMOD Studio. We will be using a combination of assets from Part 1 and Part 2 for this tutorial. The Part 2 assets add a 3d model of a printer, a printer sound and extra computer sounds we will be using to add more variation.
Did you come across any errors in this tutorial? Please let us know by completing this form and we’ll look into it! FINAL DAYS: Unlock coding courses in Unity, Godot, Unreal, Python and more.
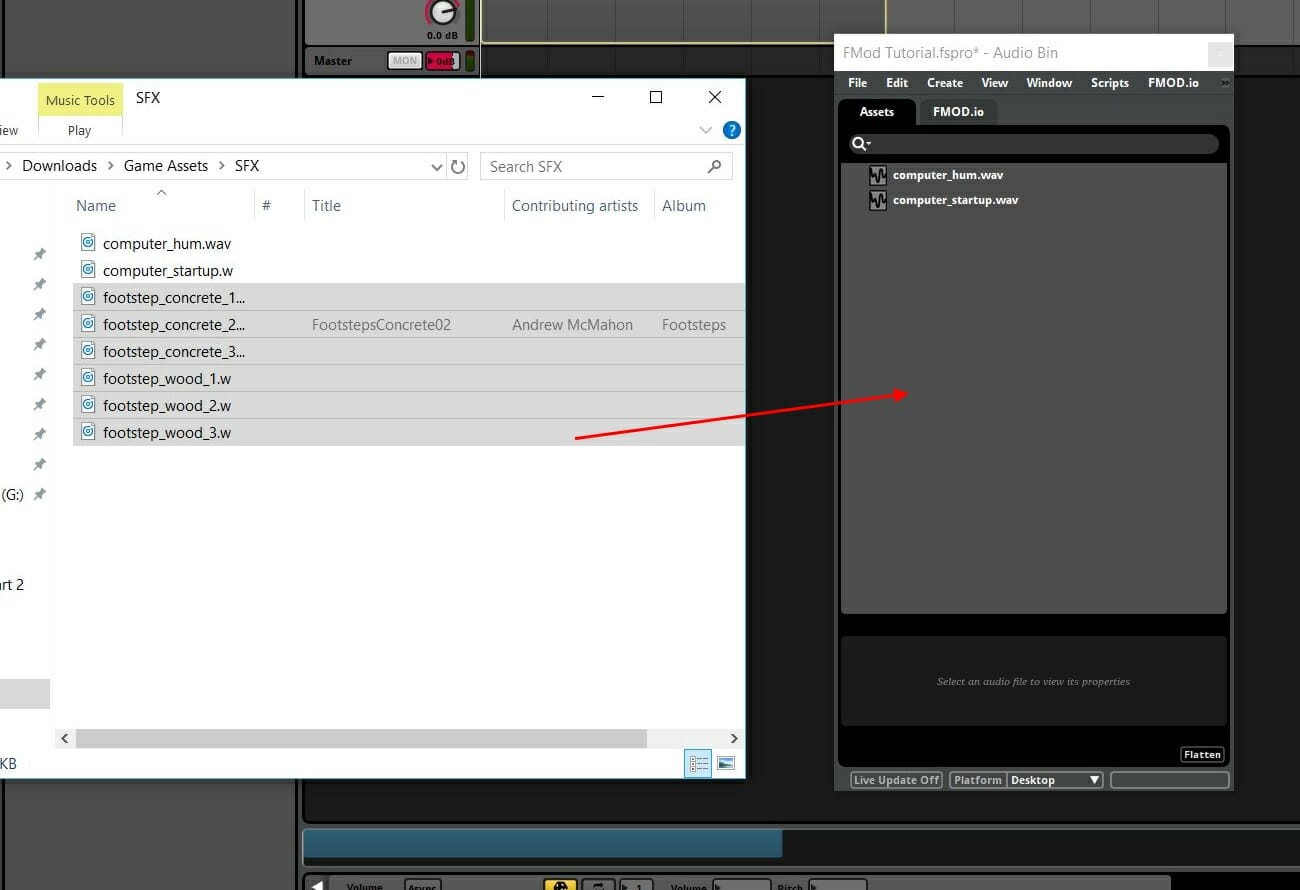
Let’s import all of the sound files we’ll be using into the FMOD Audio Bin. If, like me, you haven’t yet added the unused sound effects from Part 1 to your FMOD Audio Bin then let’s do that now. In FMOD Studio go to Window > Audio Bin (or press Ctrl + 3 on your keyboard). Now drag all the footstep sound files in Part 1 from your file explorer into the Audio Bin window.
Next do the same for the extra computer and printer sounds from the Part 2 assets zip folder. Remember that this process creates duplicates of the files in your FMOD Studio project folder so you probably shouldn’t be importing files that are already in your Unity or FMOD project folders or you’ll be wasting a lot of disk space (high-quality sound files are quite hefty). If you already put sound files in the project folders just move them to the FMOD Project/Assets folder – this is the target folder for the Audio Bin.
FMOD Multi-Instrument Containers
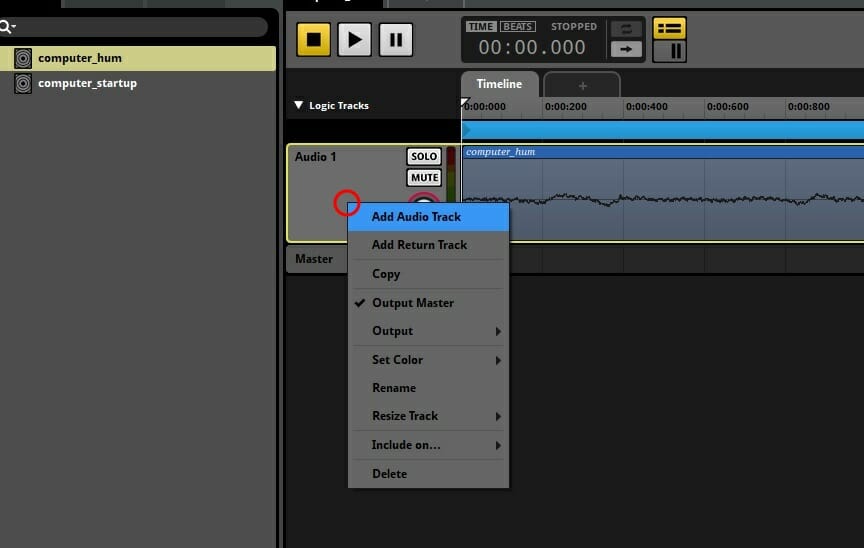
The first thing we’re going to do in FMOD Studio is add some extra sounds and random variation to the persistent computer_hum audio event. Instead of just humming, I want to add some random clicks and beeps that computers make using FMOD Multi Instruments (formerly known as Multi Sound in case of any confusion). This also serves as good practice because we’ll be using Multi instruments for the footsteps ahead. Let’s put the Multi Instrument on a second audio track in the computer_hum event. Right-click on the existing audio track header and click Add Audio Track.
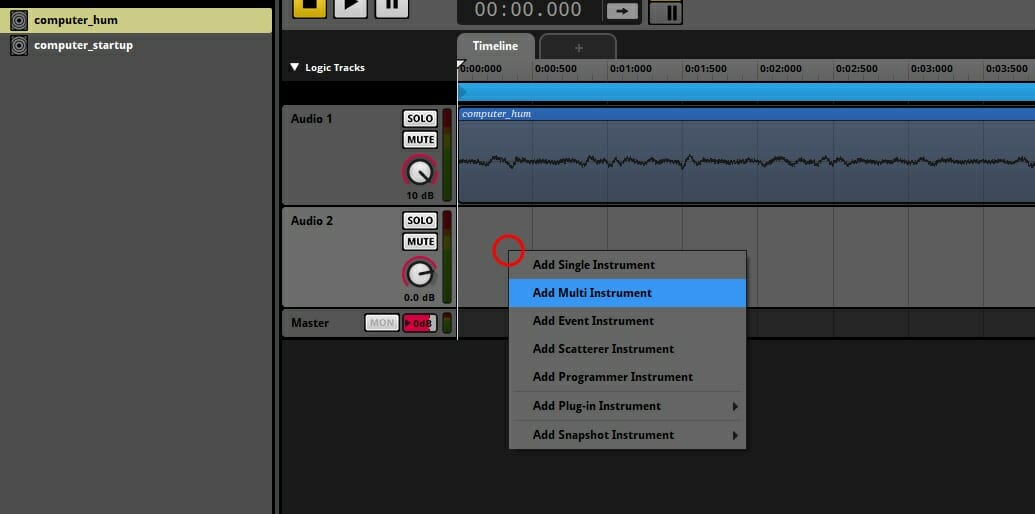
Then right-click on the body of the new audio track and click Add Multi Instrument.
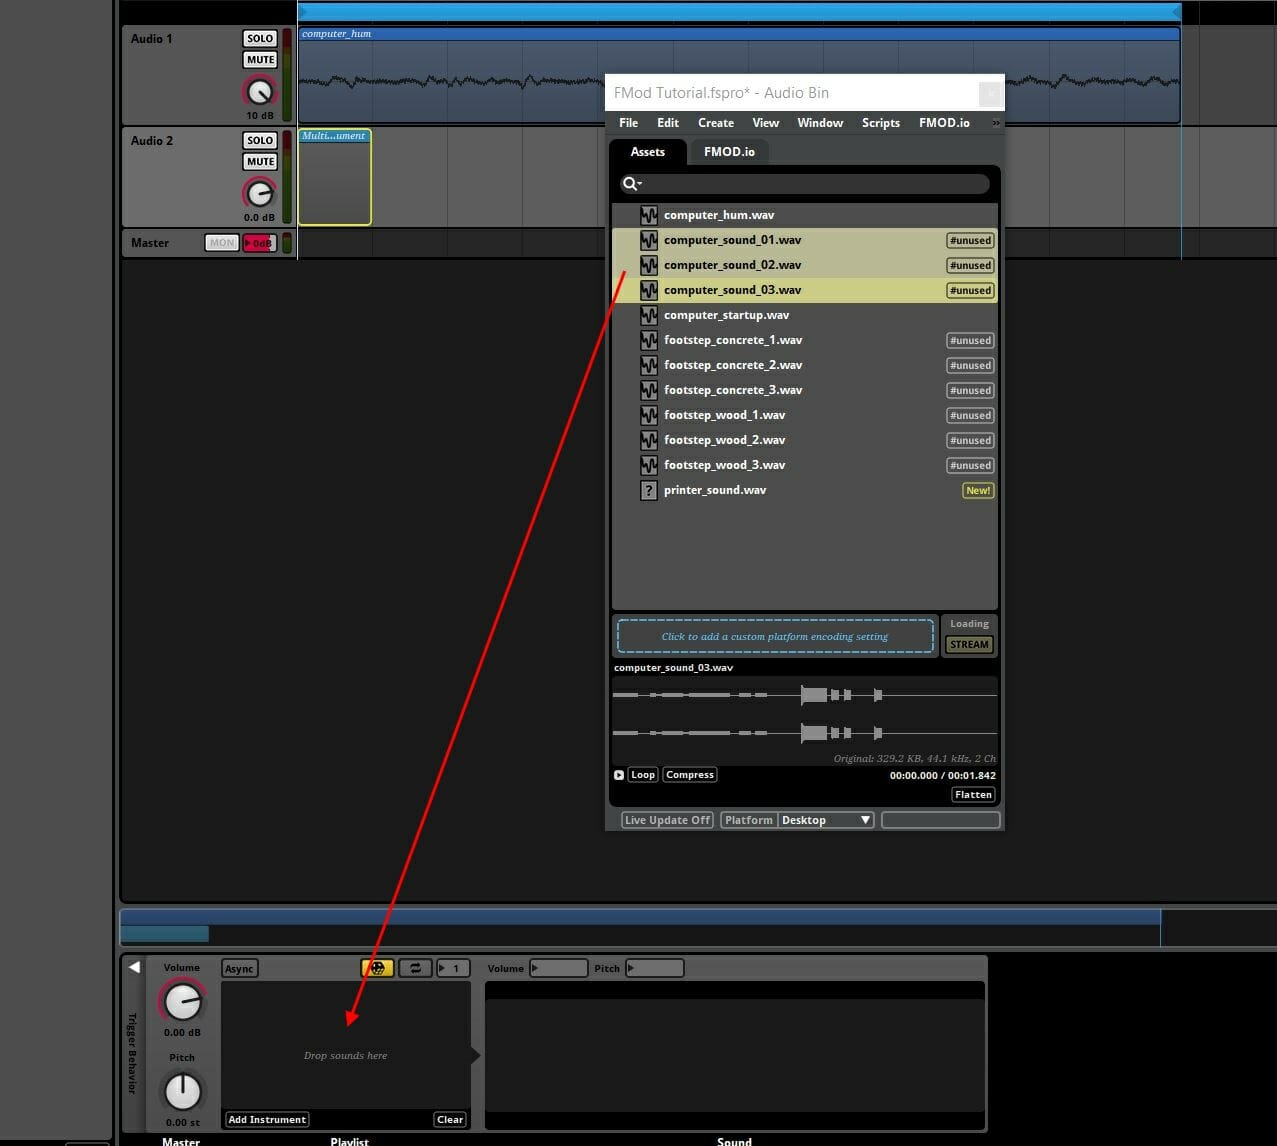
Now click on the Multi Instrument to select it. Notice that the dock at the bottom of the FMOD Studio window now contains a section called Playlist. There is also an icon of a dice highlighted in yellow by default above the playlist. This makes the Multi Instrument play one of the items in the playlist at random and that’s what we want, for variation’s sake, so let’s leave it like that. Now let’s open the Audio Bin and drag in the three computer sounds into the Multi Instrument playlist.
Adding Variation to the Multi Instrument Container
Now we’re going to add random variation using Modulation we learned about in Part 1. Expand the dock at the bottom of the FMOD Studio window by clicking the little white arrow above the text Trigger Behaviors. This lets us access the dials we need to modulate the behaviour of the Multi Instrument container when it is triggered. I’ve added Modulation to most of the settings here but it’s up to you if you want to use all of them. Hold Alt while you click and drag dials to add Modulation (Optn on Mac) shown by a thick red or green line.
I think Start Offset is the most important so that the audio doesn’t always play at the same time. Probability is the new one you might want to use here here, but I don’t think modulating it really does much considering it’s already based on chance. Either way, enable it by clicking the dice and lowering the dial below 100% for a chance that the Multi Instrument will NOT play when it is called. It’s ok though, because (if you’ve followed the previous tutorial) we have a loop region for this event, it means there might just be a bit of a gap in that specific audio track before the next loop. I’ve also brought the volume of the Multi Instrument down because I don’t want these random sounds to be overly-invasive, they’re not critical to the game after all. Remember, you should only modulate the volume and pitch a tiny bit otherwise it may sound like it’s moving (see the Doppler effect) and make it confusing for a sight-impaired player.
Play with the length of the Multi Instrument container by clicking and dragging on the right edge of the selection box (yellow outline). You don’t need to, but I suggest trying the loop setting on the playlist of the Multi Instrument itself. Turning that on and tweaking the length of the Multi Instrument container on it’s audio track allows you to play with the space between random noises. Lastly, you should rename the two audio tracks for this event to something more descriptive by right-clicking the header. Don’t forget to Save and then Build before trying out the new persistent computer sounds in Unity. It goes without saying that decent headphones will really improve the spatial audio experience.
Container – Footstep Changing Logic In FMOD
We’re going to be going through the above steps again using a Multi Instrument container on two different audio tracks for the footstep sounds. Right-click in the Events tab and add a New Event, call it footsteps or something similar. In this footsteps event, create and name separate audio tracks for each type of surface that your game has. My boring demo just has concrete and wood so I only have two audio tracks but I recommend you take the time right now to collect some more for your game – when it comes to ambiance in video games, more is more after all! I also think you should have at least three different footstep files for every surface your character can walk on in your game. Just two different footsteps played at random can become very monotonous.
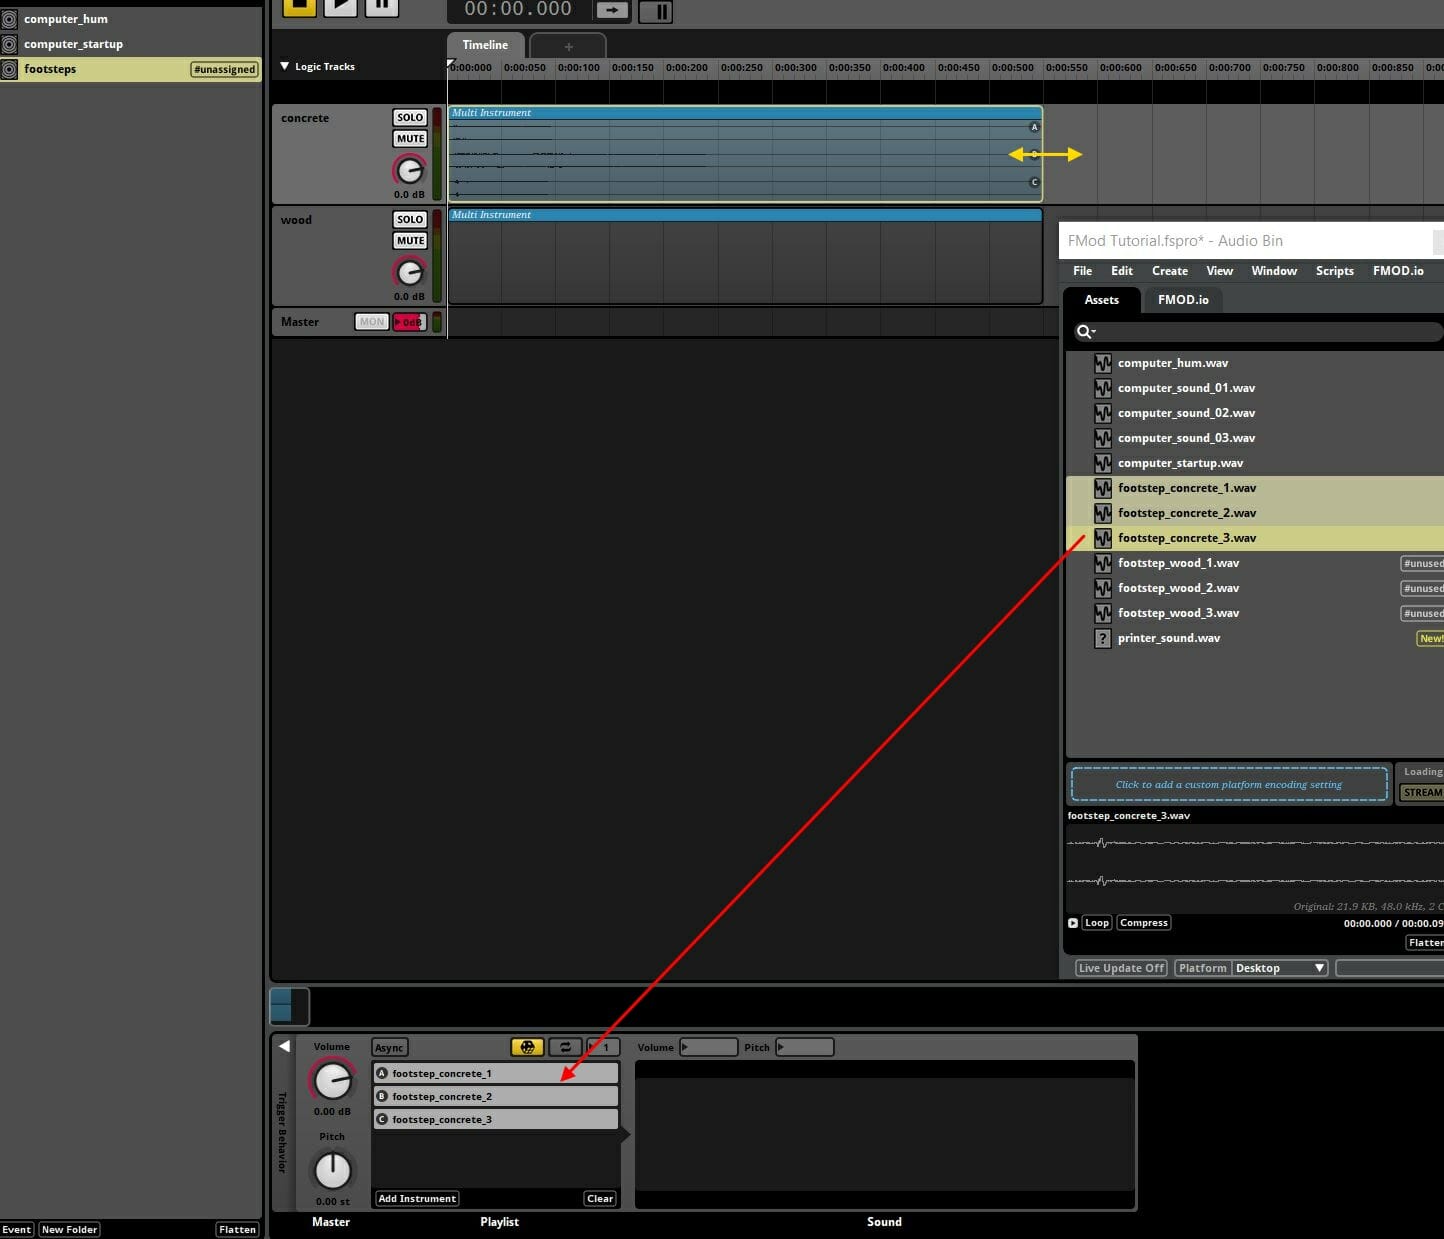
Now add a Multi Instrument container to each audio track and drag the appropriate list of sound files you’ve collected from the Audio Bin into the playlist for each. Don’t forget to resize each Multi Instrument container to be able to play all of the longest sound in each playlist! It should help to use the square bracket keys to zoom in and out of the audio track ([,]). As for Modulation, we want plenty of pitch variation but not so much volume. We certainly don’t want any random Start Offset or Probability but we do want the playlist to be random which it is by default anyway. Come back to tweak the specific Multi Instrument settings after we’ve set it up in Unity later.
Volume Automation
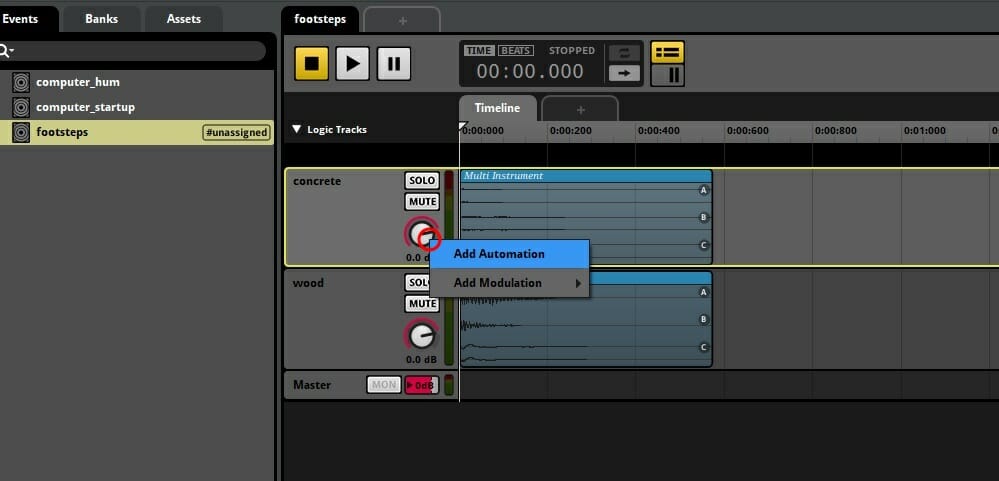
Next is the clever part. We will be using parameters to adjust the volume of each audio track independently. To allow this we first have to add Automation for the volume of each audio track. Do this by right-clicking the volume dial of one of the audio tracks and clicking Add Automation.
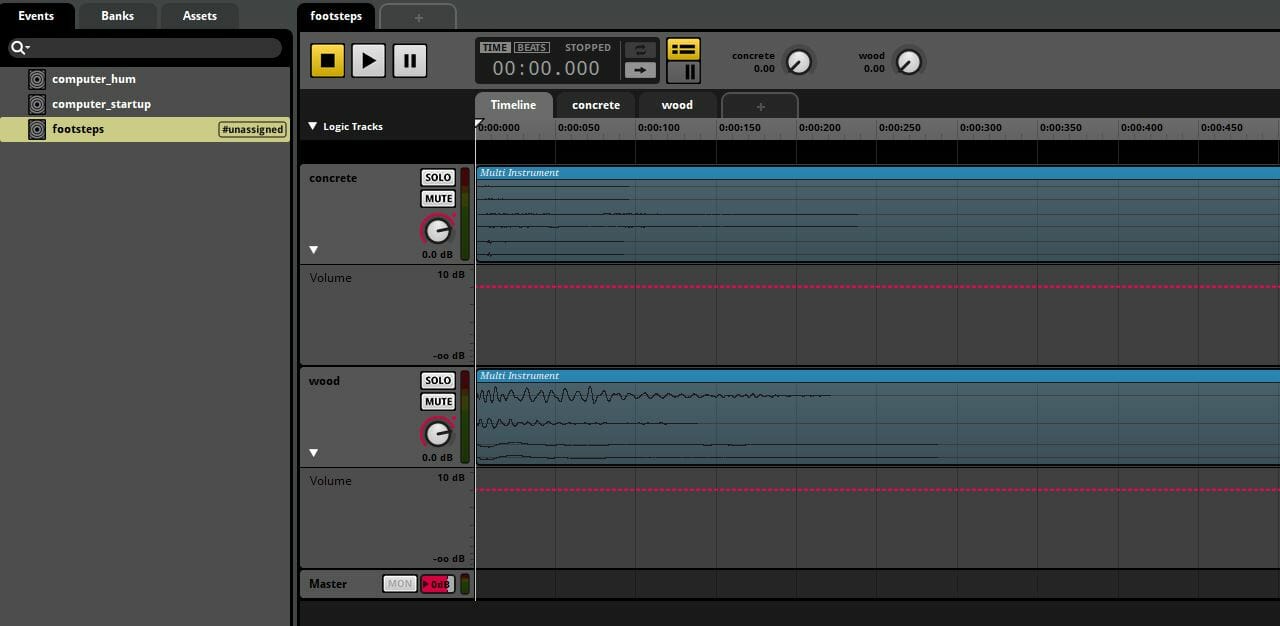
The volume automation displays like another audio track in the event Timeline tab. Now we must associate volume levels with a particular value for a new parameter for each type of footstep. Make a new parameter by clicking the little “+” next to the Timeline tab header then clicking New Parameter. Name the parameters the same as the audio tracks that they will affect and keep the values from 0 to 1. Notice how new dials have appeared at the top of the footsteps event window and there is a new tab for each parameter next to the Timeline tab.
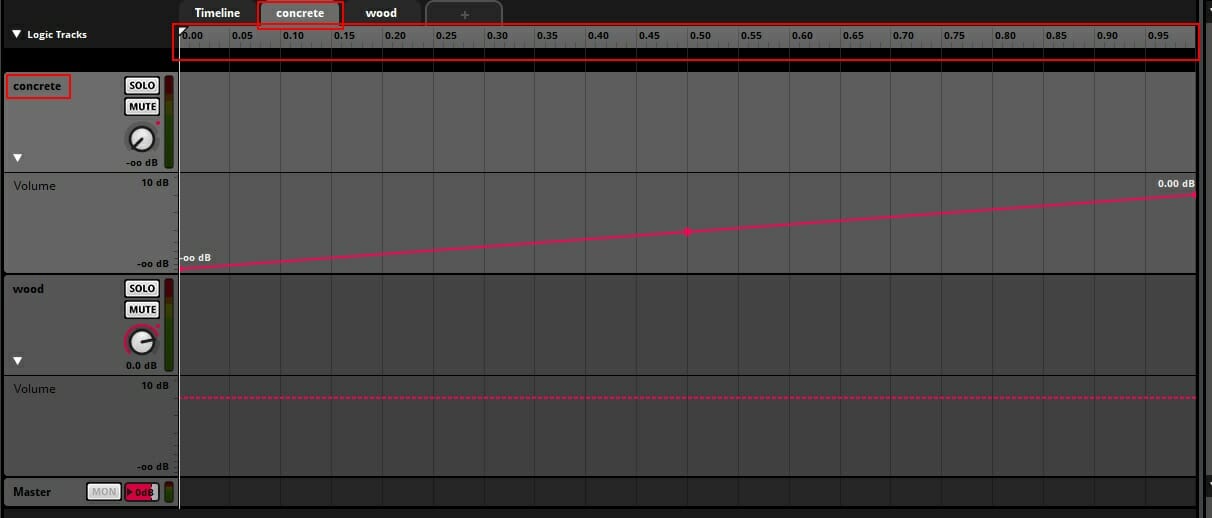
Next we link those parameter values to the volume of the different audio tracks. Let’s go to the first parameter tab we created (mine is concrete) and adjust the volume level to -oo dB when the parameter equals zero. Click and drag on the red dotted line under the audio track with the matching name to add a key and move it – down to the far bottom-left of the volume “track”. Then do the same for the far right, moving the volume to 0.00dB when the parameter equals one. It should look like the below image. Take note that I have zoomed out with the open square brackets ([) key so that I can see the whole of the parameter value range. Unlike the Timeline, this value at the top of the parameter tab is range, not time. So it should go from 0 to 1 (the range we set earlier) and that’s why you can’t zoom out any more than that.
Link the track volume to the matching parameter range in the same way for all the different footstep surface types – be sure to pay careful attention to which parameter tab you are in! When you’re done, play the event and fiddle with the parameter dials above the timeline. Notice how you can adjust the parameter dials to fuse the different surface sounds together? You can move these parameters into any value for high-fidelity, high-control ambiance. Perhaps wet dirt could be a combination of your dirt and the mud footstep sounds?
Seek Speed
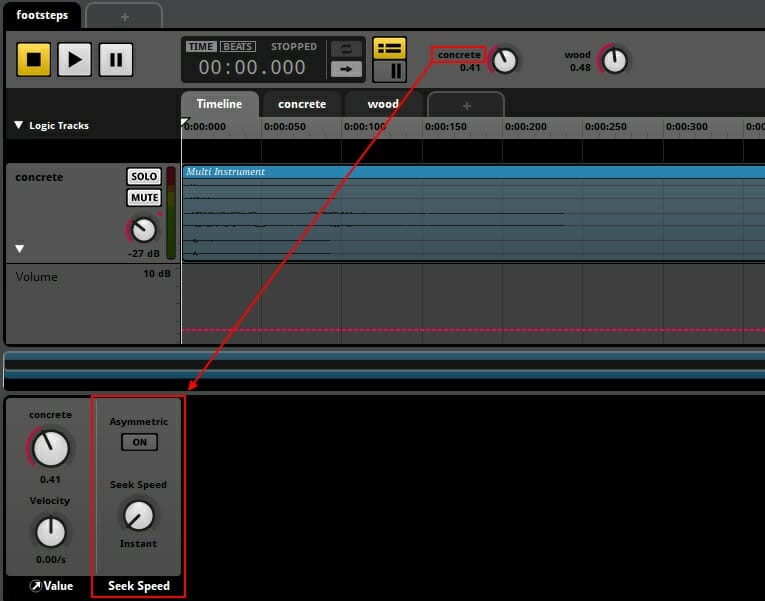
There’s actually a simple setting that makes it easy for us to smoothly transition between different types of surface sounds using multiple audio tracks like this – it’s called Seek Speed. This is the rate at which a certain parameter will move towards a new target value such as one sent from Unity. This lets us just send a value of zero or one from Unity that adjusts smoothly with a value we can tweak in-editor per surface type! You can find Seek Speed by simply clicking on the name of the parameter next to it’s dial at the top of the event window.
Seek Speed is instant by default but if you want it to be gradual, you need to click and drag on the dial. The Asymmetric option just allows you to have a different rate for fading in and out, or, ascending and descending. Adding a loop region temporarily to this event will make it much easier to determine what rate you want. Playing with the parameter dials while the event is looping will allow you to audibly-and-visibly gauge the appropriate Seek Speed. Don’t forget, you will need to set Seek Speed per each parameter.
Stereo Footsteps Fix
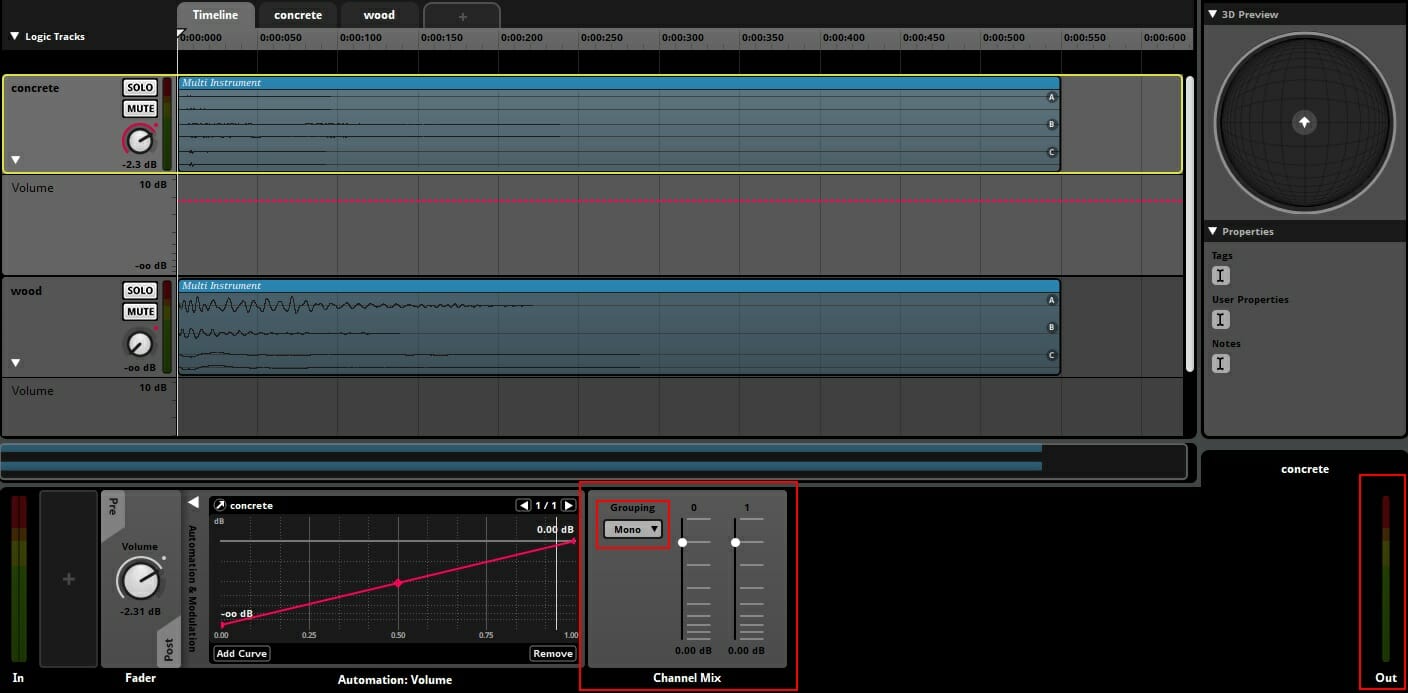
We have used a 3D event for our footsteps in case we want this same event to be used for other characters in the 3D world. But we could have a bit of a problem if we’re using stereo sounds – it’s very odd to hear footsteps pan because, as humans, we hear our footsteps from directly below. You can fix this two ways; convert the file to mono in Audacity or a similar application, or just add a Channel Mix effect in FMOD Studio – Select the audio track you want to add an effect to, right-click the black area in the dock at the bottom of the window, click Add Effect > Channel Mix. Then change it’s grouping to mono.
Multi Instrument & Volume Automation Final Thoughts
Perhaps we could add another Multi Instrument container to another audio track for wood creaks (volume-controlled by the wood parameter) that has a low Probability to play when the event is called? I imagine that would be awesome for horror games! When you’ve finished wondering about the many varieties of ambient sound combinations that Multi Instrument containers and volume automation provide, let’s set up accessing custom parameters in Unity.
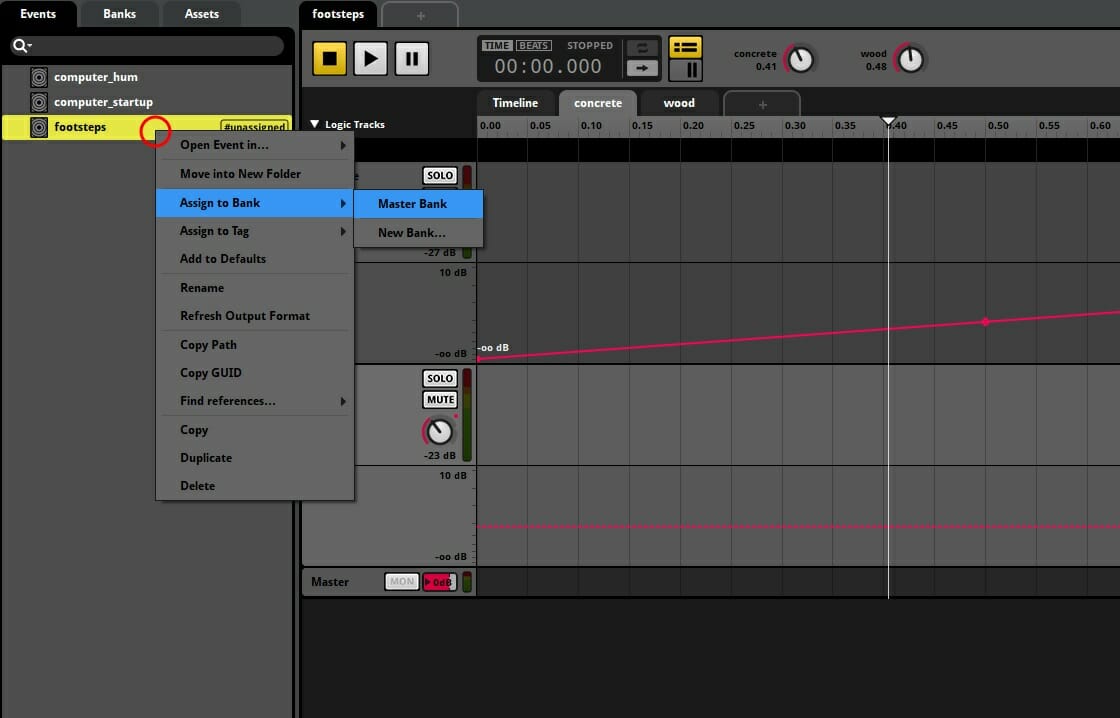
Before you leave FMOD Studio though, don’t forget to assign the footsteps event to the master bank by right-clicking it in the Events tab. Then Save and Build your FMOD Studio project and open your Unity project.
FMOD Footsteps in Unity
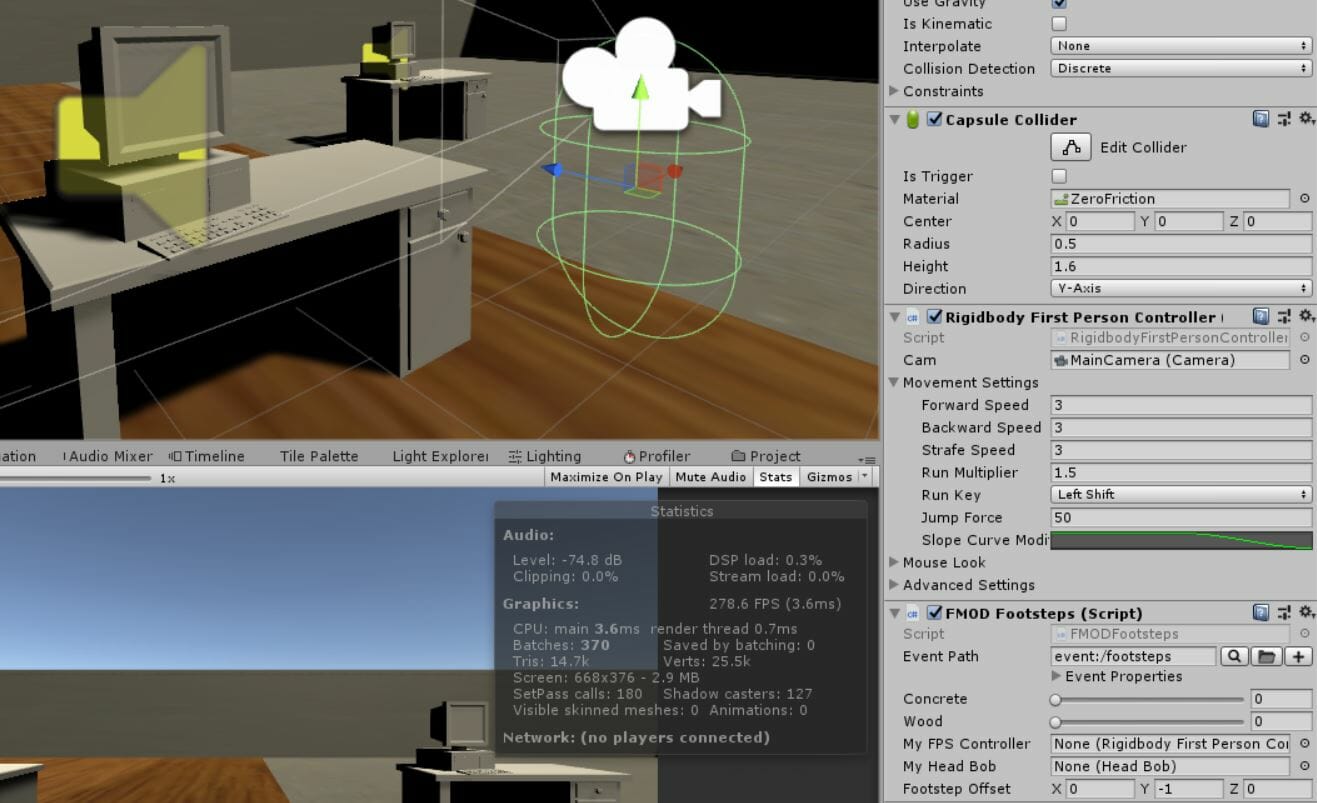
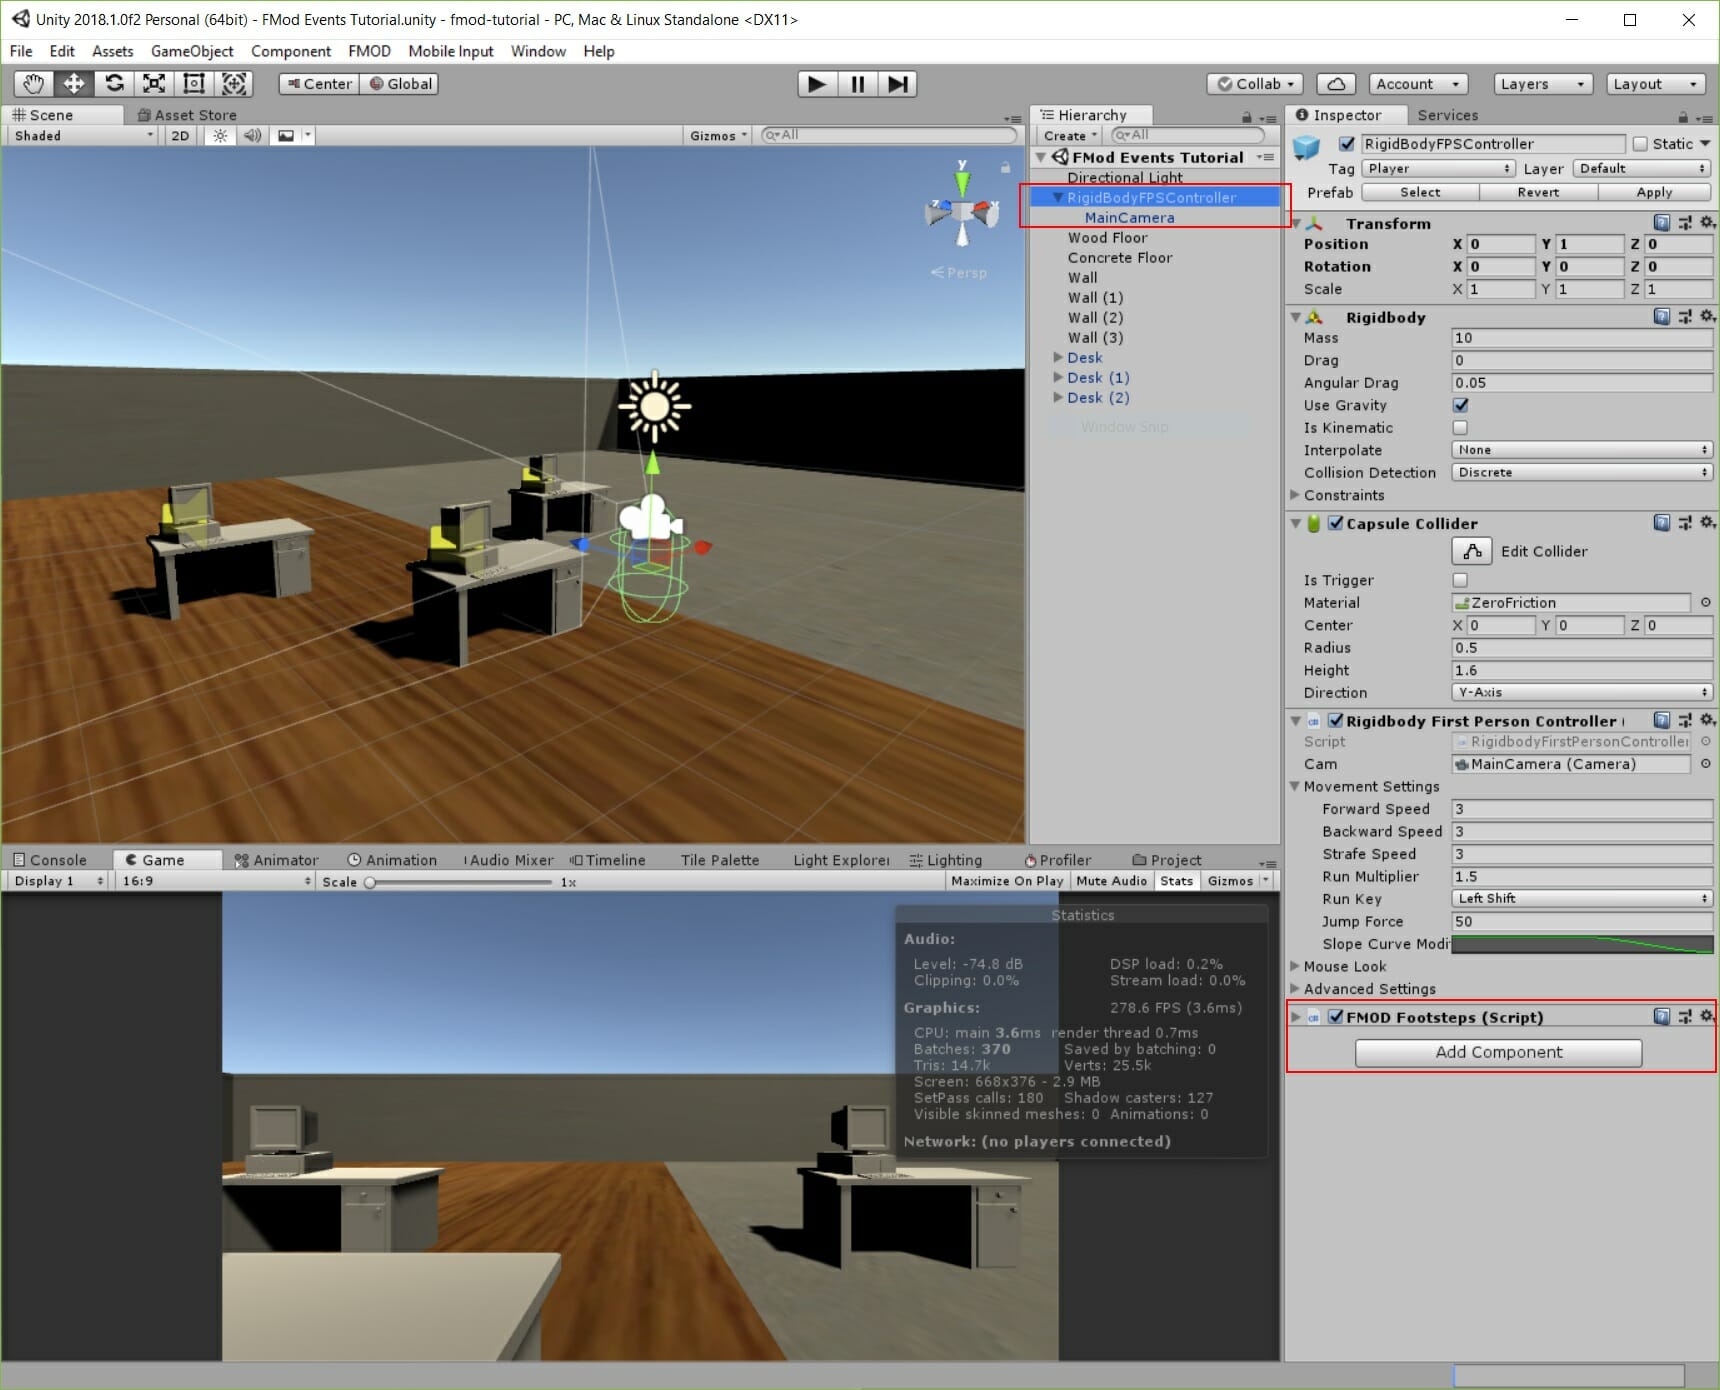
To fire the footstep event we have made in FMOD Studio we will be using a custom C# script that I just wrote. This script needs to be attached to our Rigid Body FPS Controller game object because it needs to access components of both the RigidbodyFirstPersonController and the HeadBob scripts. We do not need need to add a StudioEventEmitter script like last time because we will be accessing our footsteps event in our script.
With the RigidBodyFPSController game object selected, click Add Component > New Script and name it FMODFootsteps.
I’ll paste the entire script below, take your time now to read through my comments to better understand what’s going on. You can use this script however you want but don’t run away just yet! – there’s a bit to explain here and I have plenty of future recommendations for your own tweaks ahead!
using System.Collections;
using System.Collections.Generic;
using UnityEngine;
using UnityStandardAssets.CrossPlatformInput; // Use to access input for all platforms
using UnityStandardAssets.Characters.FirstPerson; // Access FPS classes

[RequireComponent(typeof(CapsuleCollider))] // A collider is required to check surface types
// Attach this to your rigidbody <a class="wpil_keyword_link" href="https://gamedevacademy.org/best-fps-tutorials/" target="_blank" rel="noopener" title="FPS" data-wpil-keyword-link="linked">FPS</a> controller game object
public class FMODFootsteps : MonoBehaviour
{
    [FMODUnity.EventRef] // This allows us to use the search function to fill in the path string below
    public string eventPath;

    [Range(0, 1)]
    public float concrete, wood; // Only make public for debugging purposes

    public RigidbodyFirstPersonController myFPSController; // Access FPS controller for player state information
    public HeadBob myHeadBob; // Access head bob component for stride length
    public Vector3 footstepOffset; // An optional transform offset for the footstep audio event instances

    float stepCycle, nextStep = 0.1f; // Keep track of when we want to play the footstep event
    float inputX, inputY; // Just shorthand variables for player input checks
    Rigidbody myRigidbody; // Use to check if player is moving

    // Use Start to setup references
    void Start()
    {
        // If no FPS controller has been setup, look for one attached to this game object
        if (myFPSController == null)
            myFPSController = GetComponent<RigidbodyFirstPersonController>();

        myRigidbody = GetComponent<Rigidbody>();

        // Access attached head bob component in children if none has been supplied in editor
        if (myHeadBob == null)
            myHeadBob = GetComponentInChildren<HeadBob>();
    }

    // Update is called once per frame, use it to check for inputs
    void Update()
    {
        // Update axis inputs so we know the player wants to move
        inputX = CrossPlatformInputManager.GetAxis("Horizontal");
        inputY = CrossPlatformInputManager.GetAxis("Vertical");

        // If you hit jump and player is not already jumping then play a footstep sound
        if (CrossPlatformInputManager.GetButtonDown("Jump") && !myFPSController.Jumping)
        {
            PlayFootStepEvent();
        }

    }

    // Fixed Update is called once per physics step
    private void FixedUpdate()
    {
        // Set all parameters to 0 as soon as the player is not grounded as a failsafe
        if (!myFPSController.Grounded)
        {
            concrete = 0f;
            wood = 0f;
        }

        UpdateStepCycle();
    }

    // Check if ready for next step and play event if so
    void UpdateStepCycle()
    {
        // If the FPS controller is moving and the player wants to move update step cycle while considering if player is running
        if (myRigidbody.velocity.sqrMagnitude > 0 && (inputX != 0 || inputY != 0))
        {
            stepCycle +=
                (myRigidbody.velocity.magnitude * (myFPSController.Running ? myHeadBob.RunningStrideLengthen : 1f)) * Time.fixedDeltaTime;
        }

        // If step cycle has passed distance for next step update next step and play footstep
        if (stepCycle > nextStep)
        {
            nextStep = stepCycle + myHeadBob.StrideInterval / 2;

            PlayFootStepEvent();
        }
    }

    // Handles playing footstep event instance based on path
    private void PlayFootStepEvent()
    {
        // If FPS controller is grounded update parameters and play footstep event
        if (myFPSController.Grounded && eventPath != null)
        {
            FMOD.Studio.EventInstance footstepEvent = FMODUnity.RuntimeManager.CreateInstance(eventPath);

            // Set position of event with optional offset
            footstepEvent.set3DAttributes(FMODUnity.RuntimeUtils.To3DAttributes(transform.position + footstepOffset));

            // Optionally you could set parameters here instead of using the supplied FMOD parameter script
            // See the helper function below named "SetParameter" by Liam de Koster-Kjaer
            SetParameter(footstepEvent, "concrete", concrete);
            SetParameter(footstepEvent, "wood", wood);

            // Play and release one-shot instance
            footstepEvent.start();
            footstepEvent.release();
        }
    }

    // Set an FMOD parameter
    void SetParameter(FMOD.Studio.EventInstance e, string name, float value)
    {
        FMOD.Studio.ParameterInstance parameter;

        e.getParameter(name, out parameter);
        parameter.setValue(value);
    }

    // Set surface variables while touching
    void OnCollisionStay(Collision surface)
    {
        switch (surface.gameObject.tag)
        {
            case "Concrete":
                concrete = 1f;
                break;
            case "Wood":
                wood = 1f;
                break;
        }
    }

    // Zero out surface variables when no longer touching
    void OnCollisionExit(Collision surface)
    {
        switch (surface.gameObject.tag)
        {
            case "Concrete":
                concrete = 0f;
                break;
            case "Wood":
                wood = 0f;
                break;
        }
    }
}
Because my game only has a simple capsule-collider-based player, it makes sense to have the footsteps based on additions of the player’s movement (velocity.magnitude) over time as seen in the UpdateStepCycle() function. But if you have a third-person game, or if your player can see other character models walking around, you definitely want to set up PlayFootStepEvent() to fire on animation keyframes! To be precise, put your Event keyframe on your animation timeline at the same time that the character’s foot touches the ground.
I have used a switch statement to set the parameters based on the tag of the collider the player is touching, but this is probably not entirely bug-proof if you have a dynamic environment where you are disabling colliders.
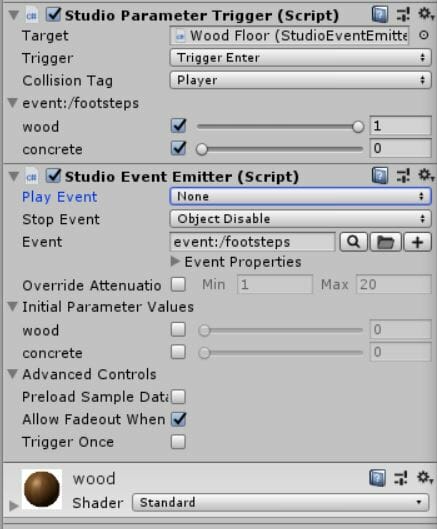
There are so many ways for you to set up the surface parameter logic for footsteps, you could: check the material name of the colliding object, the pixel colour of the texture; or, for super-high accuracy, use raycasts for each foot! But I find the simplest method to setup and fine-tune footstep surfaces is in using trigger volumes with the FMOD-supplied FMODStudioParameterTrigger script.
The ParameterTrigger script lets you tweak every parameter of a specific StudioEventEmitter with a few clicks in the Unity inspector and it uses all the same default events as a StudioEmitter script. But because it needs to point at an existing StudioEventEmitter in the scene, you’ll have to scrap the instance setup in my footsteps script – instead reference the existing Emitter and use the play function. You’ll have more game objects in your scene with this method but a lot less code logic to worry about.
That’s it for now, I hope this tutorial has helped you to think up some other cool ways to use FMOD Multi Instruments and Parameters!
