You can access the full course here: CREATE A 2D PLATFORMER WITH GODOT 4
Table of contents
Player
In this lesson, we are going to be setting up our player controller. It will allow us to give it a velocity input that will automatically move our player throughout the world. It will also take into account grounding the player, making sure they won’t fall for any obstacles.
Creating a Node
To begin, we are going to be creating a CharacterBody2D node by clicking the plus button in the Scene tab.

This can then be named Player.

We need to give our player a Sprite. We can do this by selecting one of our character Sprites and dragging it into the scene to create a Sprite node.

We then need to make this sprite a child of the Player node (by dragging and dropping the node on top of Player in the Scene view) and rename it to Sprite.

Then to center the sprite, set the sprite’s Position value to (0, 0) in the Inspector tab.

We then need to add in a collider. To do this, right-click on the Player node in the Scene tab and select Add Child Node.

We will then add a CollisionShape2D node.

We can then go to the Shape value in the Inspector and create a capsule.

Then use the orange circles on the new blue capsule in the scene view, to scale the capsule to the size of the Sprite.

Setting up our first script
We then need to create a script that is going to give our player the ability to move around and jump. To do this, in the Inspector tab, choose Create Script under the Script property.

The default values should be fine, just ensure the script is called Player.gd and that it inherits from CharacterBody2D. Then press the Create button.

There may be some default code in the editor, but for this lesson, we will select all of it (apart from the first line) and delete it. This should leave you with the following code:
This line will give us the ability to communicate with our CharacterBody2D node. Firstly, we will need to create some variables. The first will be our move_speed variable with the line:
We gave the script a value of 100.0 which means our character will move at 100 pixels per second.
For the next line, we will also add a variable called jump_force, which will also be of type float, using the line:
This value will be the upwards velocity we add when the user presses the jump button.
We will also create another variable called gravity, with the type of float, using the line:
This value will be the downward force we use as our gravity, to combat the jump_force value.
Physics Process Function
We are going to create a function called _physics_process. The physics process function is generally where you want to run the physics code that you want to check every frame. This function gets run at a consistent rate per second. To do this we will add the function to our code:
In this function, we are going to be applying gravity. To do that, we first want to check to see if the Player is not standing on the floor by using the is_on_floor function. Then, if we are not standing on the floor, we want to modify our vertical velocity by our gravity value.
Multiplying by the delta value above will convert a per-frame action, into a per-section action.
We then want to have the ability to move left and right. We will being by setting our X velocity to zero, and if we are pressing the left key, we want to set our velocity to be negative move speed. If we are pressing the right key, we then want to set our velocity to be positive move speed. This can be done using the following code:
Finally, we need to apply the velocity to the CharacterBody2D node so that Godot can process our movement. This will be done using the move_and_slide function that will move our player based on the velocity and slide across objects like ramps.
Testing the Movement
We can then save this script (CTRL + S) and return back to our 2D scene view.

If you test the game you will notice we can’t see anything, this is due to our camera isn’t showing what we want to render. To fix this, we are going to add a new node of Camera2D.

We can then zoom in a bit by changing the zoom property to (3, 3).

Now, we can press the Play button, and we should be able to see our character. If you get a pop-up when pressing play, choose the Select Current option.

When you test the game you will notice our player falls through the ground. Don’t worry, this is an easy fix.
Adding Ground Collisions.
Firstly, we want to select our TileMap node in the Scene tab.

We then want to open the Physics Layers tab in the Inspector and press Add Element.

We then need to add this physics layer to our tiles. In the Tiles tab, select the Paint option.

Then choose the Physics Layer 0 option in the Select a property editor option.

Then we can go through and “paint” all of the tiles that we want to have collisions with, using the left mouse button.

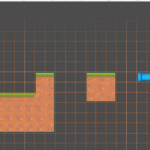
Testing the Game
Now when you press Play you should be able to move left and right using the keys we set up earlier, and gravity will affect the Player if it falls off the edge of the terrain we made.

Adding Jumping to our Player Script
As well as moving and falling, another important section of a platformer game is jumping. To do this, we will reopen our Player script and add the following lines above the move_and_slide function call.
This will add our jump force to the player (negative to say going upward) if the player presses the space bar and is on the ground. We also want our Camera to follow the Player, to do this, just drag and drop the Camera node as a child of the Player node.

You can also position the Camera to be just above the Player Sprite using the arrow tools in the editor window.

Now, you can press space to jump around your level, use the arrow keys to move left and right, and you will fall due to gravity, all from this one simple Player script.
In the next lesson, we will set up the ability to have enemies and falling set off our game over screen.
Did you come across any errors in this tutorial? Please let us know by completing this form and we’ll look into it!

FINAL DAYS: Unlock coding courses in Unity, Godot, Unreal, Python and more.
Transcript
Welcome back everyone. In this lesson we are going to be setting up our player controller. So to begin, what we’re going to do is we are going to be creating a new node.
So we’ll click on the plus and we are going to be looking for a character body 2d. Now, a character body 2d, this node basically allows us to just give it a velocity input and it will automatically move our player throughout the world. Okay?
And we’ll also take into account grounding the player, making sure they won’t fall for any obstacles. So this is a great base for if you want to create a player controller, let’s rename it to be player.
We need to give our player uh, a Sprite. So what I’m gonna do is go into our character’s folder here. I’m just gonna go through here, search for a character Sprite, that we might want to use something like this.
We can drag that into our scene. Uh, we can then select our character Sprite, make that a child of player. Let’s rename it to be Sprite just so we know exactly what it is and set the position to be zero on the x and zero on the Y. Okay?
And we then need to add in a collider. So on our player uh, node right here, I’m gonna right click and go add child node. And we are gonna look for a collision shape 2d.
We can then go shape, create a new one, and we are gonna be creating a capsule and then just go through ahead and basically fit it to the form of your character. Like so.
So we got our Sprite, we got our collision shape. Now what we need to do is create a script that is going to basically give our player the ability to move around and jump.
So for this I’m gonna go select our player. Then inside of the inspector at the bottom we have a script property. Here we are going to create a new script and call it player and make sure that it inherits from character body 2d.
If you are, make sure, so make sure you do have the player node selected and it should inherit from character body 2D right here, click create.
Now it does include some default code here, but what I’m gonna do is select all of it except for the first line and delete it. Okay? So we just want extends character body 2D because that gives us the ability to uh, communicate with our character body node.
We are gonna be creating some variables. The first one is going to be our move speed. So I’m gonna create a variable called move speed. It’s gonna be of type float and it’s gonna be equal to let’s just say 100.
So this basically means we are gonna be moving at 100 pixels per second. Then we’re gonna have our jump force, so variable called jump, force of type float. And I’m gonna make this equal to 200.
Now jump force is basically the amount of upwards velocity we are going to add to our player when we want to jump. Then we’re gonna have another variable called gravity of type float once again.
And it’s. Gonna be equal to 500. Basically this is the amount of downwards force we are going to be applying to our player. So create a function, call it underscore physics process.
And you should see uh, the autocorrect does pop up right here. So we can just hit enter and that’s gonna create an automatically for us.
Now the physics process function is generally where you want to run your physics code, that you want to check every frame. And basically physics process gets run at a consistent rate per second.
Just because when it comes to physics and computing, um, it really prefers it if it is running at a consistent rate, which is what this function does. So first of all, what we are going to be doing is applying gravity.
So the way we’re gonna be doing that is by checking to see if the player is not standing on the floor. Now to do that we can go if not, and then is on floor, okay?
The is on floor function is built into our character body 2d, and that returns true or false for whether or not our player is standing on the floor. So if we are not standing on the floor, then we want to modify our vertical velocity.
And to do that we can go velocity dot y plus equals gravity multiplied by delta. Now the delta is basically, um, what converts a per frame action into a per second action. Okay?
And this is just how we have, um, our gravity increase over time at a consistent rate. The next thing we want to do is have the ability to move left and right.
Now before we start detecting our key presses, we first of all want to go velocity dot x equals zero. Okay? We want to set our velocity to zero and then if we are pressing the left key, we want to set our velocity to be um, negative move speed.
Otherwise, if we are pressing the right key, then we want to set our velocity to be positive. Move speed. So down here on a new line, what I’m gonna do is I’m just gonna go if input.is key pressed, okay?
So if, if is key pressed, then we want to give it a key, this is gonna be key underscore left and this correlates to our left arrow key. So if our left arrow key is currently being pressed, then we want to go velocity dot x minus equals move speed. Okay?
So here we are setting our X velocity to be zero. And here we are setting our X velocity to basically be negative. Move speed. Now if we are pressing our right arrow key, we want to do the opposite.
So if input.is key pressed, this is getting gonna be key underscore, right? So if our right here has been pressed, oops, we want to go velocity e uh, velocity or x plus equals move speed. Okay?
And that should make it so that our player can move left and move Right now let’s. Save this script return back into our 2D scene here and let’s test it out to see if the movement works.
So I’m gonna press play, we go select current and it’s gonna launch and we can’t really see anything. And the reason why is because uh, our camera isn’t rendering what we want to render.
So to fix this, what I’m gonna do is I am going to, in our scene here, add in a new node of camera 2d. Now this camera 2d, if we zoom out, we can see this purple uh, rectangle right here is the bounds of our camera.
Now we want to zoom in a bit. So let’s go to the inspector and where we have the zoom, I’m gonna change this from one to three. So there we go.
We got the camera zoomed in a bit more Now we should then be able to press play. We have our environment and with the left arrow key, I can move left, which is not actually working.
And the reason why is because even though in our script here we are modifying our velocity, we aren’t actually applying it to our character body.
Now to apply it to our character body, we need to call the function move and slide. And it pretty much does exactly what it sounds.
It moves our player based on the velocity and if we are, you know, up against a ramp, it will slide us across that as well.
So we can save this press play and as you can see, our character falls through the ground. Now the reason why that happens is because we have set up our tile map here, but we haven’t actually given it any collision.
So what we want to do is click on our tile map right here. We then want to go over to the inspector, go down to where we have our physics layers and click add element. And this is gonna basically add collision to our tile map.
So now when we press play, we should see that our player still falls through and that is because we haven’t applied this tile, uh, this physics layer to our tiles.
So down at the bottom click on tile set, open up the tile set window, we can then click on the paint button right here, select a property physics layer zero right here.
And then we just wanna go through and basically just paint in or select um, holding down left mouse all of the uh, sprites that we want to basically have this uh, change applied to. Okay? And you can just select every Sprite here if you wish, but I’m just gonna select these ones for now.
We can then go back into our main scene here, click play and we should see that our player lands on the ground and we can move left and right and if we fall off the edge here, our player will fall off. Okay?
So we have the ability to uh, move left and right as well as have gravity affect us. Uh, but how about jumping? Well, for jumping we’re gonna go to our script and just before we call move and slide, we’re gonna check if input.is key pressed and this is going to be the key underscore space for the space bar and is. On floor. Okay?
Because we only want to jump if we are standing on the floor, then we are going to go velocity dot y equals minus jump force now.
But doing minus here because the way it works is if we do positive is just going to try and um, thrust down into the ground so we can save that press play and now we can move left to right and if I press space, you can see I can jump and we can jump on these obstacles here as well.
Now we probably want the camera to follow the player as well, so for that we can just go ahead and make the camera a child of player and we can then move the camera up a tiny bit as well.
There we go, press play. And now there we go. So we’ve got this all set up now and in the next lesson we are going to be looking at setting up the ability to have enemies and our game overstate for when we fall down below our level.
So thanks watching and I’ll see you all then.
Interested in continuing? Check out our all-access plan which includes 250+ courses, guided curriculums, new courses monthly, access to expert course mentors, and more!