Hi everyone! I’m in the mood of writing tutorials now so why don’t we continue our able game development series! This is the second part after at the first tutorial I talked about adding another control configurations for your game to accommodate people with disabilities. This time I’m writing about remappable keys! If in the last tutorial we added another key to move around with WASD, now we’re going to do a similar thing, but the player will be able to decide the alternate keys. (this tutorial was first written in my blog, in Indonesian)
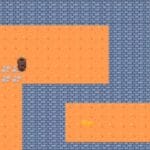
How to do it in Construct 2? First make a new layout and make something like a platformer level, we’re going to base this tutorial on a simple platformer.

The blue sprite is the actor with a platformer behaviour, the green sprite is our platform with a jump-thru behaviour, and the grey one is a ground with a solid behaviour. By default this game is a simple platformer, now we’re going to add the remapping feature. First, add a remap button (here, on top left corner but you can add it anywhere you want)

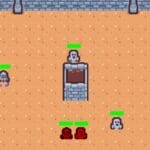
then add a new layout, this is where we’ll remap our keys.

those three sprites are for changing / remapping our keys. To know how to do that we’re switching to code view now.

first declare all the needed variables. Some of these variables are for storing the keycode value of the new keys, others are for the remapping functionality.

the next block of codes are the remapping function. We will first add a text “Add a key to remap” then the game will remember the keycode of the next keyboard button the player presses. The question is: How does the game know which control to remap to the next press of a button? This is why I use the isRemapJump, isRemapLeft, and isRemapRight variable. The game will remap movement for the variable which value is 1 (or True). There’s one more variable I want to explain: isRemapping. It is used to prevent players from clicking two buttons first before pressing a keyboard key, which can make it confusing to decide which control to remap.
Lastly, we’re going to use the Keyboard object to remember the keycode that is pressed.

And now we’re almost done! We just need to go back to layout one to use the keycode the game just remembered.

there, done! We added new instant variables to actor object and use them to move it around. If you feel like familiar with the code, that’s because this code is based on the one we used in the previous tutorial. We just develop it a bit further to make the players able to define their own configurations.
I think that’s enough for this tutorial, if you want to grab the project file it is here in my dropbox. Until next time!