In this tutorial, we are going to create a Train of Followers game by utilizing Unreal Engine 4. In our game, the player collects followers and each follower follows the one in front of it, creating a train-like effect. We will be covering topics such as creating the followers, setting up their movement, detecting collision, and working with arrays to collect multiple followers.
In order to follow this tutorial, you are expected to be familiar with the following concepts:
- Unreal Engine 4
- Blueprints
Table of contents
Project Files
While you’ll need to set up your own Unreal Engine 4 project, we have included a full copy of the code and screenshots for each step of creating this tutorial.
Download Project Files Here
Creating the Follower – Part 1
Progressor Parent
For this game, we’re going to have a number of things that move when the player does. These are going to be the followers and enemies. Let’s now create a new blueprint of type Actor called Progressor. This will be a parent blueprint that all others who want to move when the player does will derive from.
Inside the blueprint, we’re going to create a new function called OnProgress, but we’re not going to do anything with it since the follower and enemy blueprints will do all the work.
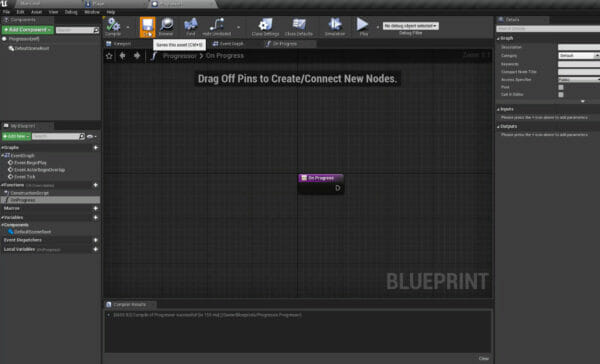
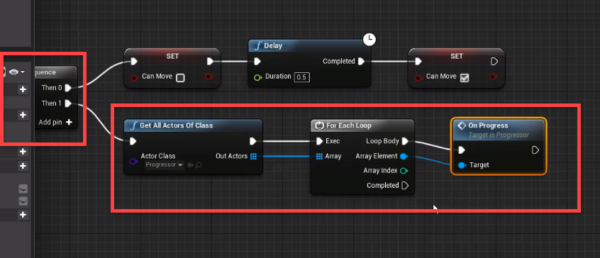
Save, compile and return to the player blueprint. Here, each time we move, we want to find every progressor object and call this function.
Instead of having the 4 nodes connect to the set can move one, plug them into a sequence node and make it look like the image below:
Creating the Follower
Back in the level editor, we can now create our follower blueprint. Create a new blueprint with a parent class of Progressor and call it Follower.
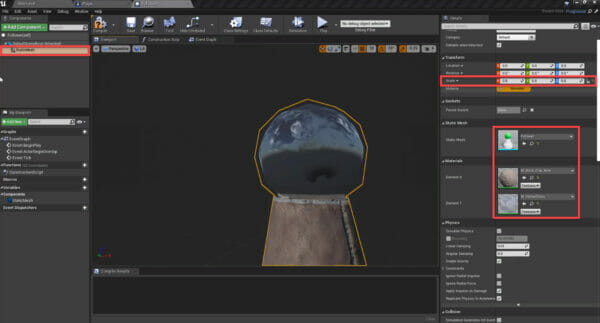
Inside, create a new static mesh component.
- Set the Scale to 0.8, 0.8, 0.8
- Set the Static Mesh to Follower
- Set the Materials to M_Brick_Clay_New and M_StatueGlass
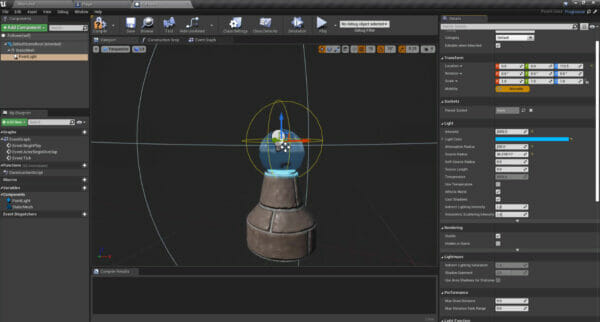
Next, create a Point Light.
- Set the Location to 0, 0, 112.5
- Set the Intensity to 3000
- Set the Light Color to blue
- Set the Attenuation Radius to 200
- Set the Source Radius to 36
Over in the event graph, we can begin to setup the logic for when the On Progress function is called.
Right click and create the Event On Progress node. Right click it and select Add call to parent function.
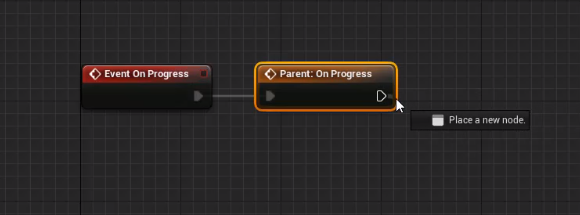
In the next lesson, we’ll continue with the event graph.
Creating the Follower – Part 2
Follower Variables
Let’s begin by creating some variables inside of the follower blueprint.
- CanMove (boolean)
- TargetPosition (vector)
- Target (Actor)
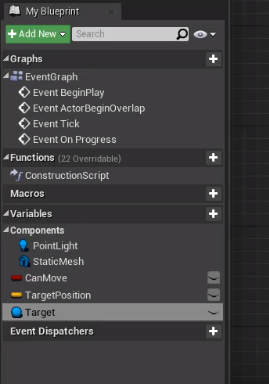
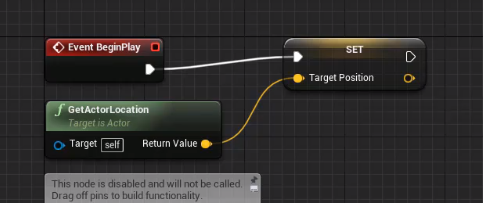
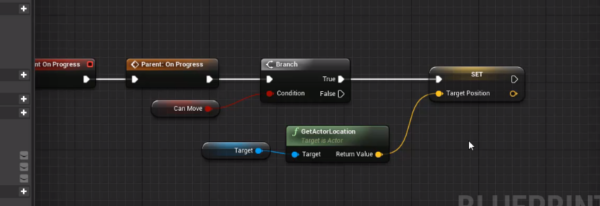
When we start the game, we want the target position to be its current one.
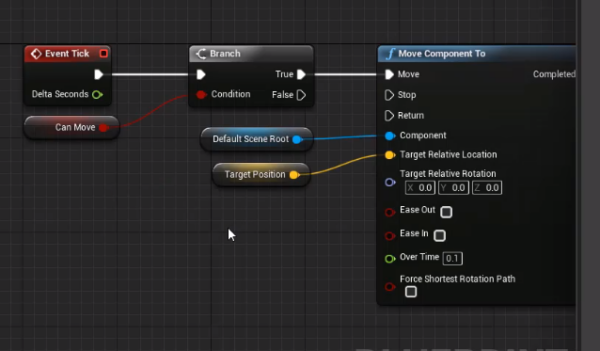
Every frame, we want to move towards the target position.
Down with the On Progress event, we want to set our target position to be the target location.
Create a new function called SetTarget with an input of type Actor called TargetToSet.
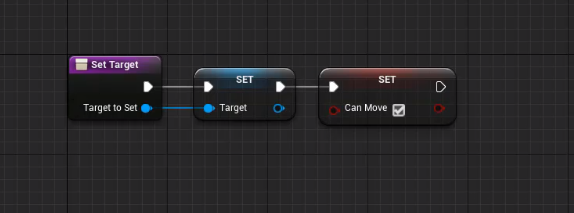
That’s all for the event graph.
Select the StaticMesh component and set the Collision Presets to OverlapAllDynamic.
Detecting Followers
In the Player blueprint, let’s detect followers. Create a new variable of type Follower called Followers.
Click on the icon next to the variable type and make it an array. So we can store multiple followers.
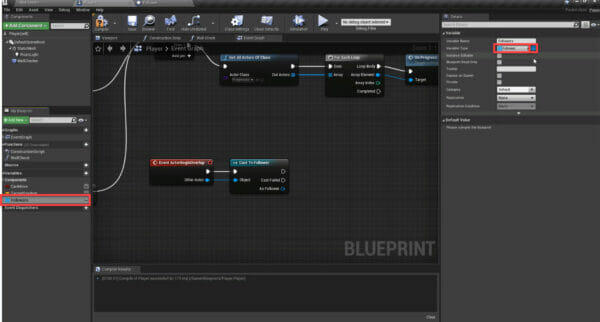
We can then detect followers and add them to the array.

Back in the level editor, we can place down a follower, press play and test it out!
Did you come across any errors in this tutorial? Please let us know by completing this form and we’ll look into it!

FINAL DAYS: Unlock coding courses in Unity, Godot, Unreal, Python and more.
Collecting Multiple Followers
Multiple Followers
When we collect followers, they all follow the player. What we want is for them to follow each other so we can have a train. Let’s go over to the Player blueprint.
Create a new variable of type integer called FollowersToCollect.
- Set the Default Value to 5
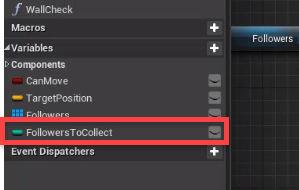
Delete the collision detection nodes as we’ll be re-creating them differently. First, we want to check if the followers array contains the collided follower.

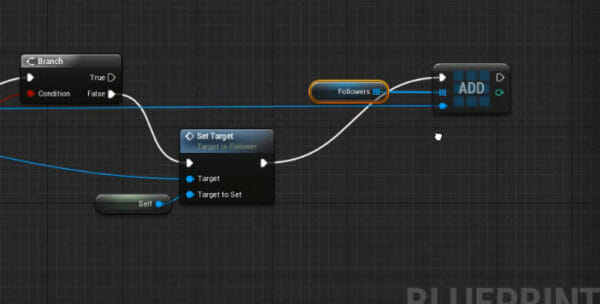
If not, then we want to see if we’ve got more than one enemy. If not, set their target to us.
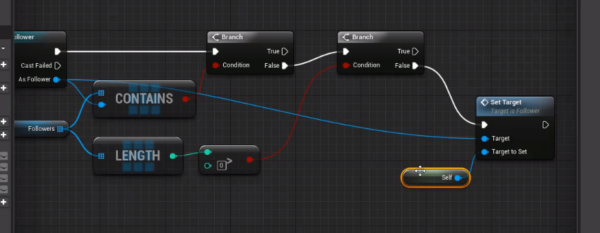
We then want to add them to the followers array.
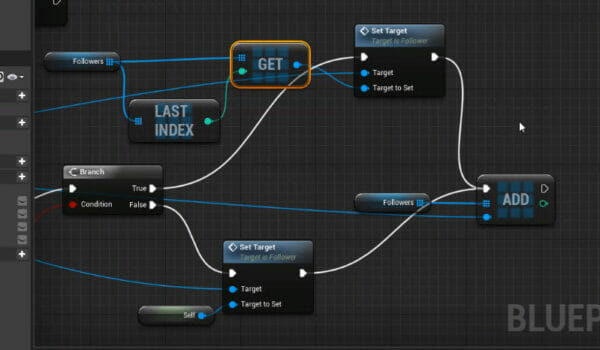
If we have followers already, then we’re going to set their target to the last follower.
Back in the level editor, place down multiple followers and test it out!
Conclusion
By the end of this tutorial, you will have learned how to create a Train of Followers game in Unreal Engine 4, including the logic for detecting multiple followers and setting their movement. With your newfound knowledge, you can adjust and expand this project, or use the concepts to apply them to other projects of your choice. Furthermore, you can explore more advanced topics in Unreal Engine 4 through additional tutorials and online courses offered by Zenva.
We hope you’ve had a great learning experience, and we’re looking forward to seeing your future game projects!
Want to learn more? Try our complete MAKE A PUZZLE GAME IN UNREAL ENGINE course.


