You can access the full course here: Battle Royale – Multiplayer Projects
Table of contents
Part 1
Folder Structure
Let’s start by setting up out folder structure and 2 scenes.
- Materials
- Models
- Photon
- Prefabs
- Resources
- Scenes
- Game scene
- Menu scene
- Scripts
- Textures
Menu Scene
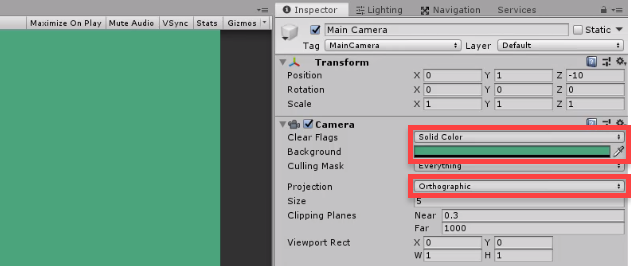
In our menu scene, let’s setup the camera for when we do the menu UI in a later lesson.
- Set the Clear Flags to Solid Color
- Set the Background to a green-blue color
- Set the Projection to Orthographic
Game Scene
In our game scene, let’s setup our map. First, we’ll drag in the Terrain model.
- Create an empty game object called _Map and drag the terrain in as a child of that
- Set the Position to 0
- Set the Scale to 10
- Create a new material called Terrain and apply it to the terrain model
- Add a Mesh Collider component to the terrain
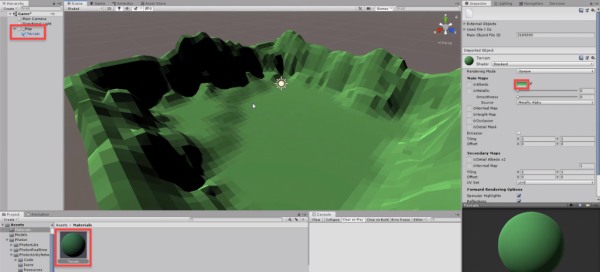
You might notice that the shadows are quite dark. To fix this we can go to the Lighting screen (Window > Rendering > Lighting) and click on the Generate Lighting button at the bottom.

Building our Map
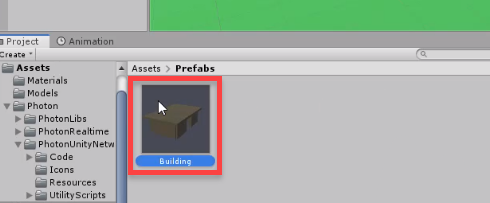
Now we’re going to create the various structures and put them around our map. Let’s start by dragging in the Building model. Like with the terrain, we can create a new material and apply it to the model.
Right now we’d be able to walk through the walls. So what we need to do, is add a Mesh Collider component. This will make a custom collider to match the dimensions of the mesh.

Finally, we can save it in our Prefabs folder to both use later, and make sure all changes are applied to all instances.
Do the same for the Barrier and Platform models.
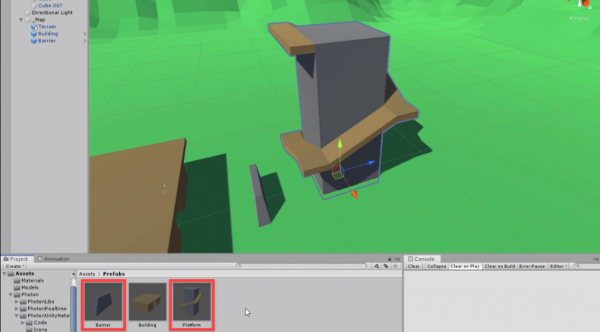
Finally, we can go around and populate the map with our structures.
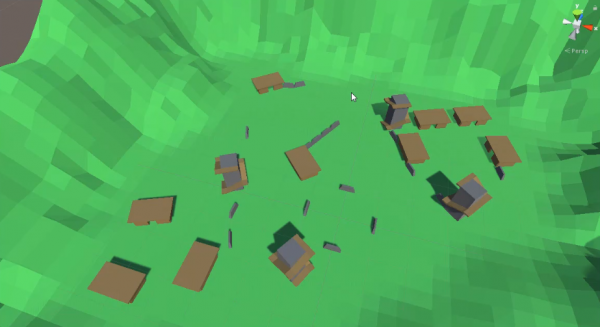
In the next lesson, we’ll start to create our network manager.
Part 2
CameraController Script
Create a new C# script called CameraController and attach it to the main camera. In this lesson, we’ll just be setting up the spectator camera functionality. When we create our player controller, we’ll do the rest. First up is our variables.
[Header("Look Sensitivity")]
public float sensX;
public float sensY;

[Header("Clamping")]
public float minY;
public float maxY;

[Header("Spectator")]
public float spectatorMoveSpeed;

private float rotX;
private float rotY;

private bool isSpectator;
The first thing we want to do is lock and hide the mouse cursor in the Start function.
void Start ()
{
    // lock the cursor to the middle of the screen
    Cursor.lockState = CursorLockMode.Locked;
}
For actually checking the input and applying it to our rotation, we’ll be doing that inside of the LateUpdate function. The reason for this, is that doing it in the Update function, can cause jittering.
void LateUpdate ()
{

}
First up, let’s get our mouse inputs.
// get the mouse movement inputs
rotX += Input.GetAxis("Mouse X") * sensX;
rotY += Input.GetAxis("Mouse Y") * sensY;
Then we can clamp the vertical rotation.
// clamp the vertical rotation
rotY = Mathf.Clamp(rotY, minY, maxY);
For the spectator camera, we’re going to be able to look around as well as moving with the keyboard.
// are we spectating?
if(isSpectator)
{
    // rotate the cam vertically
    transform.rotation = Quaternion.Euler(-rotY, rotX, 0);

    // movement
    float x = Input.GetAxis("Horizontal");
    float z = Input.GetAxis("Vertical");
    float y = 0;

    if(Input.GetKey(KeyCode.E))
        y = 1;
    else if(Input.GetKey(KeyCode.Q))
        y = -1;

    Vector3 dir = transform.right * x + transform.up * y + transform.forward * z;
    transform.position += dir * spectatorMoveSpeed * Time.deltaTime;
}
else
{

}
Back in the editor, we can fill in the values.
- SensX = 10
- SensY = 10
- MinY = -90
- MaxY = 90
- SpectatorMove peed = 10
Transcript 1
Hey everybody and welcome to the course. My name’s Daniel Buckley and I’ll be instructor. Let’s have a look at what we’ll be making.
We are going to be creating a multiplayer, 3D, battle royale game. Here’s an example of two players who are playing the game. The player on the right, you can see, can kill the player on the left, and once he does that, he is the last player alive and wins the game. This can feature as many players as you want. We are just going to be testing it out with around two or three, but as you can see, we have a level here and we also have a force field in the background that closes in.
For this project, we will be using Photon Unity Networking. This is a free networking framework that is very useful and very popular within Unity. It’ll allow us to connect servers, create rooms, have lobby browsers, and send each other messages to create a fully working multiplayer game.
So one of the first things we’ll create is the player controller. This is what you will control. You’ll be able to move, jump, shoot, heal when you pick up a health pack, and add ammo when you pick up an ammo pack. When a player gets hit by a bullet, they take on damage; and when their health reaches zero, they will die and the camera will actually become a spectator camera so you’ll then be able to fly around the map and look at the remaining players while they play the game.
We’ll also have pickups, health and ammo packs, that the player can find around the map, and just like any battle royale game, we have a force field that will encapsulate the players and force them into smaller and smaller areas on the map. This will damage the player every second or so while they’re outside the force field, and it will shrink every so meters every so and so seconds. This is a very customizable force field that we’ll be creating.
One of the things we’ll also create is a lobby and menu system. Players can join a game and wait in a lobby before starting. On the left is our lobby browser. When a player creates a game, the players will be able to find it in the lobby browser. As you can see, it has the room name, as well as how many players are currently in it, and then on the right we have the actual lobby. This will display all the list of players who are in the room, as well as the name of the room, and it’ll allow the host to begin the game whenever they want.
To do this, we’ll be using Unity’s UI system. On the left is what the game UI will look like. We’ll use sliders for the health bar, text for all the stats and even an image for crosshair. On the right we have the same thing. We have, this time, also a scroll bar. We’ll be learning how to use the scroll racks and setting all that up to create a dynamic server browser as well so that you can update constantly when you click the refresh button.
So, ZENVA is an online learning academy with over 400,000 students. We feature a wide range of courses for people who are just starting out or for people who just want to learn something new. Our courses are also very versatile. You can view them wherever you are and whenever you want. There’s also lesson summaries so you can choose to follow along and watch the videos or even read the courses and we’ve included project files. You can create the project however you want. Now with all that said, let’s get started on our project.
Transcript 2
Welcome back, everyone! In this lesson, we’re gonna be setting up our project, and first of all, our project file structure. Then we’re gonna move on and set up each of our scenes.
So, to begin, let’s create our folders. We’ve already got our Photon and Scenes folder right here. So let’s create another folder, and this one is gonna be called Prefabs. Now, this is where we’re gonna be storing all of our different Prefabs that we’re gonna be using. Let’s also make a folder called Materials, to store our materials in, and then another folder for our models.
This project also comes with some included files and some of those are models that we’re gonna be using. So, these models are the AmmoBox, Barrier, Building, Force Field, Health Pack, Platform and Terrain. So, I’m just gonna drag those in right here.
Apart from that, we also then want to create another folder here. This folder is gonna be called our Scripts and this is where we’re gonna be storing all of our different scripts we’re gonna be creating and then another folder for the resources. And in the Resource folder, I’ll get into more detail about this later, but, this is where we need to put Prefabs that we want to instantiate over the network with Photon. I’ll go into this in more detail later on, when we actually start instantiating those, but for now, let’s create our next folder, and this folder is going to be called Textures.
Now, the only texture we’re really gonna be having is going to be our CrossHair, which is another included asset in the project files, so you can just drag that in. And by default, let’s actually just set this up right now, let’s click on this crosshair right here, and we have to change the texture type from default to Sprite, 2D and UI. And just click on apply, like so. And that’s all we have to do. And that’s it for the folders.
Now, let’s go into our scenes folder, and we want to create two new scenes. The first scene we want to create is going to be our menu scene, which is going to be where we can create lobbies, join rooms, and then start the game. And then we want our next scene to be the actual game. And this is where all the action is going to be taking place.
And let’s actually open up the menu scene right now and inside of here, we can go into the game view, have a look. Let’s actually set up the camera as well right now. So let’s click on the main camera, and we want to change its projection from Perspective to Orthographic. The reason for that is because since we’re working with UI and 2D aspects in this scene, we don’t really need depth, because we’re not trying capture distance of 3D objects. So we can set it to Orthographic to make it much easier, and we’ll actually change the background, because we don’t really want this skybox background for a menu. So what we can do is click on Clear Flags up here and change that from SkyBox to Solid Color. And this color can then be changed here, and let’s change this to a sort-of greeny-blue color. Something like this.
All right, and with that done, let’s now save that and go into a game scene where we are gonna create our level. So, first thing, let’s go our models folder, and we want to drag in the terrain model right here into the scene. Now, it doesn’t have texture on it just yet, but before we do that, let’s actually set-up the hierarchy here a bit.
Let’s right-click and go Create Empty and we’re gonna call this one, let’s zero this out, we’re gonna call this one _Map. Now, this is just gonna be an empty game object that’s gonna be holding all of our, all of the objects that are related to the map. All of the structures and stuff like that. Just so it’s a lot neater here in the hierarchy and we can look through it and understand what object is for what thing.
So, let’s drag our terrain into the map object right here and let’s actually make a texture for this terrain. So, let’s go to our materials folder that we just created we’ll right-click here, go Create, Material and let’s call this Terrain. To apply a material, we can simply drag this on like so and let’s change this material over here, let’s set the smoothness all the way down and let’s change the albedo color to a green. So, we’ll go green here. Yeah, something like that.
You may notice though that the shadows look quite dark and not really that good. This is just how it is by default, but what we can do to easily fix this is go over to the Lighting Panel. If you don’t have the Lighting Panel, you can go up to Window here, go Rendering, and then Lighting Settings. And once we’re on here, all we need to do is just click on the Generate Lighting button down here at the bottom right. Just click that, it should take barely any time and there we go, it’s done. We have our shadows and everything and it looks so good now. Since we’re using real-time lighting, we don’t really have to do that again, unless you want optimize it. But, for us, we’re fine just like this.
So, with our terrain, we can now, and it might look a bit too bright, that green. So, let’s change this to something a bit more green like that, I reckon. That green looks good. So we’ll keep it like that. Now, the thing with our terrain right now is that it looks pretty good, it looks pretty much the size, but the problem is, we want to be using Unity units. We want to be scaling everything within the units inside of Unity. And that just makes it a lot easier for the physics to work as we want and just makes things, everything to scale.
So, what we can do now is just right-click here, just do for reference, go to 3D object, Cube and this cube here, if we zero this out, is one by one meter. Now, if we compare that to the rest of the terrain, it makes the terrain look quite small in comparison to that one meter cube. So, let’s get our terrain here, and let’s scale it up a bit. Let’s set the scale here to maybe 10 by 10 by 10. With that done, we can actually delete that cube, and let’s start on actually adding in our buildings and all about that.
So, let’s go to our models folder again, and we actually drag in the building asset right here. Just like that. Let’s create a texture for it, by going back to our materials folder. We’ll create a new material and we’ll call this one Building. Let’s apply it to the building here, and we’ll set the smoothness back down to zero again. And for the albedo, let’s set this to maybe a sort of dark brown sort of color like that. Yeah, something like that, there we go.
At the moment though, if we click on a building, we’ll see that we can actually, we actually don’t have a collider on it. So, people can walk through the walls, they can shoot through the walls, but we don’t want that. So, we’re gonna be adding a component here, and the component we want to add is going to be a mesh collider. And what this does is this makes it so that basically the mesh is a collider. It’s not necessarily a box collider or sphere collider; it just has it so you can’t walk into the actual object itself. So, the collider covers the entire object. There we go.
For this building, let’s actually go to our Assets window, into our Prefabs and let’s actually save this as a Prefab, so we can easily use it later on. We’ll just keep it, call it Building, and let’s drag it into here. We’ll go original Prefab and there we go, with our building asset. Our building Prefab saved, so let’s actually drag this into our map object, as that’s where it belongs.
Let’s add in our next environment model, which is gonna be the barrier. And this is just gonna be a sort-of shield of protection that the players can hide behind. Let’s again add a mesh collider to cover that. And let’s actually change this default white material to something else. So, we’ll create a new material in our materials folder and we’ll call this one Barrier. We’ll apply that, set the smoothness down to zero, and for the albedo, let’s make this say, sort of dark, dark gray like that. Yeah, something like that. Okay, that barrier is done, so let’s drag that into our Prefabs folder as well. We’ll make a Prefab of that, original Prefab.
And, the last thing we need to make is going to be our platform. This is just gonna be another structure that the players can climb up on top, look out from the top of, and shoot other players from. So, let’s actually re-use some of our materials, because what we can do is, for this platform here, we can set this as the building material there, and for the centerpiece, we can just do that as the barrier. So, there we go, we can reuse material like that, we can create new materials, if you want, for this, but I reckon we’ll just keep it with this sort of theme like that. It just looks pretty nice.
So, yeah, with these three things here, let’s actually first of all, go to Prefabs and save this platform as a Prefab, like so. And actually, we need to add in our colliders for this as well, so inside of here, we can select the cube and the other cube here, for both the different models, go Add Component, Mesh Collider. Click on the platform here, we can drag that back into the Prefabs folder, save it as a Prefab and there we go.
Now, what I’m gonna do is, I’m just gonna go around, I’m going to design the map. You can choose where you want to place them how many different objects you want, but just customize your map. Put things where you want and yeah, so I’ll be back once my map is finished.
So, there we go. I’ve got my map complete. I just put the houses, I’ve put the buildings around the different areas here up on this little hill here in different little areas and mixed around that with the towers, as well as the barriers. Something we also have to do, that I just remembered, is actually add a collider to our terrain, because otherwise, we’ll just fall right through the floor. So selecting the terrain, let’s just add a component, and add a mesh component, just, add a mesh collider, just like all the other ones. And that’s all we needed to do.
In the next lesson, we’re gonna be starting on our network manager, which is gonna be actually connecting us to the Photon Servers and allowing us to create rooms, join rooms, and all the rest. So, I’ll see you all then.
Transcript 3
All right, welcome back everyone. In this lesson, we’re gonna be starting to create our camera controller script.
At the moment, I’m in the game scene right now, and let’s actually create a new script here in our scripts folder. And we’re gonna be calling this one CameraController. Now with our camera controller script, let’s actually attach this to our camera by just dragging that on like so and opening it up in Visual Studio.
Now there are gonna be two different modes for this camera. There’s gonna be the first one where it’s actually attached to the player, and they’ll be able to look around, they’ll be able to look horizontally and look vertically. And then when the player dies the player will go into spectator mode, which will allow them to fly around the map using WASD or the arrow keys, and they will still be able to look around. So it’ll allow them to view the battle even after death.
So let’s remove the Start and Update functions here, as we won’t be needing them, and begin with our variables. Now we’ll be needing a few variables to keep track of the different sensitivities and positions and rotations. So I’m gonna separate these by headers, which is an attribute like so. And this just has a bold text in the inspector, so we can easily differentiate these.
And the first one we’re gonna do is going to be Look Sensitivity. And for this we’re gonna have a public float senseX for our X-axis sensitivity. And another one for a float for our senseY for our Y-axis sensitivity when we move the mouse. Then we also want to clamp our rotation, so got clamping and this is going to be our public float, minY, so what’s the lowest Y rotation we can look at. And then for the max, which is going to be maxY and what is the most vertical we can look – so how high up can we look before it clamps.
And then after that we then want to know for spectator, so we’ll go Header Spectator but then want to know how fast the spectator can move. So spectator or just go spectatormovespeed here. And after that we’re gonna go into our private variables. And first of all we then want to know our private float rotX, so what’s our current X rotation and the same for the Y, so what’s our current Y rotation. And that’s it for all the variables.
Now what we want to do first of all is – in many games you may notice that once you hop in it you can no longer see the mouse and the mouse actually doesn’t go off the screen. And that is because the mouse cursor is locked, and to do that inside of UNC we will do this in the Start function here. We will lock the cursor, so we can actually access the curse by going cursor and then lockstate and this is equal to CursorLockMode.Locked. So the cursor will be stuck in the middle of the screen, and it will be invisible. So it’ll feel just like all those other FPS’es.
Now let’s get on to working on in the main part of this script which is gonna be actually rotating and moving the camera. And to do this we’re gonna not do it in the update function, but we’re gonna be doing it in the Late Update function. Now what the Late Update function is, is this is basically just like the Update function, but this runs at the end of the frame. So this runs after everything in the other update functions has already run.
And the reason for doing this, is because when the camera is attached to the player and we’re doing the rotations and all that, there can be some interference with how the player rotates compared to how the camera then rotates. So it can have some sort of jittering if we have this in the Update function. But having it in a Late Update function solves those issues.
So first thing we’re gonna do is we wanna get the mouse movement inputs. And to do that we can go rotX, so we’re gonna add to our X rotation, that is going to be done by plus equals input.GetAxis. And the axis we want to get is going to be Mouse X like so. And then, of course, we want to multiply that by our X sensitivity. And again for the Y we can go rotY plus equals input.GetAxis mouse Y and multiply that by our senseY just like that.
Okay, now what you want to do is you want to clamp the vertical rotation so that we can’t look all the way up, and then wrap back around as that can cause some issues with the rotation and cause the controls to actually flip. So we’re gonna be clamping the rotation so that it doesn’t do that, and we can only look so far vertically and so far down. So to do that we can go to rotY as Y is gonna be the up-and-down rotation and that is gonna be equal to the mathf.clamp. And we wanna send in the value where we want to clamp – that is rotY. The min, which is going to be minY, and Max, which is going to be the maxY, like so. Great,
With that done we can then check are we spectating or are we not spectating – or so are we alive or are we dead. So are we spectating? And for that we can just go if isSpectating, if isSpectator then we’ll do whatever’s in here. Otherwise, if we attach the player will do this, and the reason for this is because as well as having the movement when we’re a spectator, when we attach the player to our X rotate, we don’t actually rotate the camera horizontally. So we won’t be looking left and right, instead we’ll be rotating the player left and right. And the reason for that is so that we can easily have the player point in the forward direction that we’re looking (so we don’t have to do some other calculations later on in the player controller).
So let’s work here in the isSpectator first, as that’s what we’ll be setting up this lesson. So first of all we want to rotate the camera vertically, and to do that we’ll just go transform.rotation equals Quaternion.Euler. And we just wanna pass in our negative rotY and our rotX. We’re doing negative rotY because it is flips, if you do wish to have inverted Y controls, then you can just have that as rotY. Okay, and then for the Z rotation, we just want zero as we don’t want the camera tilting left and right.
And now for the movement, we can go here, and we can just go for our X input. We can go input.GetAxis horizontal, so this is going to be our horizontal input, and then we can go for our forward input. So when we’re in forward and backwards they can go equal to input.GetAxis vertical, so the up and down keys compared to the horizontal which is the left and right keys. And for the Y this can be equal to zero for now as we’re gonna be changing it down here.
Now for the Y we’re also gonna make it so that the player can move up and down and that’s gonna be done with the E and Q keys. So if input.GetKey, KeyCode.E then Y is gonna be equal to one else if input.GetKey, KeyCode.Q then we’re gonna be setting y to equal to negative one so they’ll move down. N
ow to apply that, we need to do a calculation right now to make it so that when we move, we’re moving in the direction that we’re looking. Because if we just applied these X, Z and Y directions to our transform at the moment, that would move us based on the global positions and rotations. So if we’re looking to the left we might instead move forward if we try and move left for example. So what we’re trying to do is we wanna make it so that no matter where we’re looking we will move forward, left, right and backwards relative to our rotation.
And for that we’ll create a Vector3, call that dir for direction and that will be equal to transform.right, so our right transform direction. So the direction that is to our right, multiply that by X plus transform.up, multiply by Y plus transform.forward, multiply it by Z. And with that, we can then apply that to our local position we’re going. Transform.position plus equals dir at the direction we want to travel times SpectatorMoveSpeed times Time.deltaTime (so it is independent of framerate), and we move at the exact same time no matter what framerate we have.
And that’s that, let’s actually hop now back into the editor here and test it out. Let’s actually go back in here and just set isSpectator to true for now manually, so that we can test it out. And for our X sensitivity, I will zoom in here. For our X sensitivity, we can set this to – and I’ll say 10 for now, Y is 10, min Y will set this to negative 90, Max Y 90. Spectator Move Speed will go 10. Okay and let’s press play and see if this works. See if we can look around. As you can see I can look around with the mouse, and with the arrow keys I can move like so. I can press E to go up, Q to go down.
In the next lesson, we’re gonna be starting on our player controller. Connecting up the rest of the camera to the player and finishing off the camera script when it’s actually attached to the player so that we rotate not only the camera, but the player as well to face the direction. Also when you’re in this mode you can’t really press the play button. So what you can do is you can either go press Escape to get the mouse like so and click it or you can just go control + P to toggle the plane like so. So yeah I’ll see you all in the next lesson.
Interested in continuing? Check out the full Battle Royale – Multiplayer Projects course, which is part of our Multiplayer Game Development Mini-Degree.
