Requirements
Basic knowledge of HTML5, CSS3, and HTML tables.
Some exposure to JavaScript and jQuery is recommended.
You can download the tutorial source code files here.
Did you come across any errors in this tutorial? Please let us know by completing this form and we’ll look into it!

FINAL DAYS: Unlock coding courses in Unity, Godot, Unreal, Python and more.
Introduction
In this tutorial, we will build a table with HTML5 and CSS3. Then we’ll use the jQuery library to hide the table’s data rows when the page loads and allow the user to expand and hide select rows.
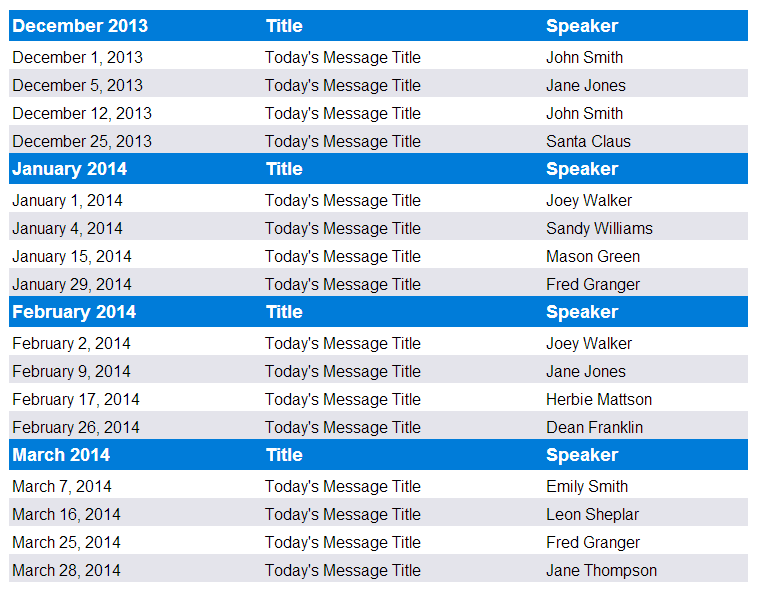
Here is a screenshot of the table we will create:
What you will need to complete this tutorial
To complete this tutorial, you will need a text editor. For beginning web developers I highly recommend Notepad++, which you can download for free from http://notepad-plus-plus.org/download/v6.5.5.html.
For simplicity’s sake I recommend creating a simple folder structure for the project. You do not have to follow this structure precisely but it does make things a little easier. Here is the recommended folder structure for the project and the one I’ll be using throughout this tutorial:
- Create a new folder on your desktop called Table Project.
- Inside the Table Project folder, create a new folder called css. This is where the Cascading Style Sheet for the project will go.
- Inside the Table Project folder, create another new folder called scripts. Our jQuery code will go here.
Getting Started
Let’s create the basic HTML5 document structure and the css file for the project.
- Open Notepad++. A new blank file is automatically created for you when the program loads. Save this file in the Table Project folder as table_project.html.
- Create another new file by clicking on the New icon in the upper left corner of the Notepad++ window(it looks like a white sheet of paper next to a green circle with a white + symbol inside the circle). This will create a new blank file and will appear as a new tab at the top of the Notepad++ window directly above the editor window. The name of the tab should appear as new 2.
- Save this file in the css folder which is inside of the Table Project folder and name this new file styles.css.
- Click the tab labeled table_project.html at the top of the Notepad++ window.
Now we’re ready to start writing our HTML5 page. Type the following code into Notepad++:
Table Project
This code defines the basic HTML5 document structure for our project and links the HTML page to our .css file by using the link tag.
Now we’ll create our table. Add the following code between the opening and closing body tags:
| December 2013 | Title | Speaker |
|---|
December 1, 2013
Today's Message Title
John Smith
December 5, 2013
Today's Message Title
Jane Jones
December 12, 2013
Today's Message Title
John Smith
December 25, 2013
Today's Message Title
Santa Claus
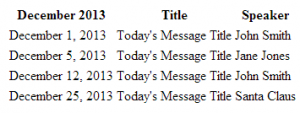
We now have a table with a heading, four rows, and three columns. Viewed in a browser, your table should look like the following screenshot: (Don’t worry about the class names in this code yet. I will explain these when we begin writing the code for our style sheet).
The table doesn’t look very pretty now but it will after we style it with css which we’ll be doing soon.
Let’s finish up the table by adding the remaining table headers and rows. Add the following code directly below the code you just wrote:
January 2014
Title
Speaker
January 1, 2014
Today's Message Title
Joey Walker
January 4, 2014
Today's Message Title
Sandy Williams
January 15, 2014
Today's Message Title
Mason Green
January 29, 2014
Today's Message Title
Fred Granger
February 2014
Title
Speaker
February 2, 2014
Today's Message Title
Joey Walker
February 9, 2014
Today's Message Title
Jane Jones
February 17, 2014
Today's Message Title
Herbie Mattson
February 26, 2014
Today's Message Title
Dean Franklin
March 2014
Title
Speaker
March 7, 2014
Today's Message Title
Emily Smith
March 16, 2014
Today's Message Title
Leon Sheplar
March 25, 2014
Today's Message Title
Fred Granger
March 28, 2014
Today's Message Title
Jane Thompson
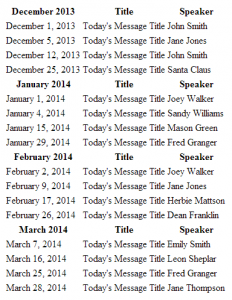
Here is our completed, un-styled table:
Now we’ll spruce this up with a little css.
Save the table_project.html file and open the styles.css file that you created earlier. Type the following into the Notepad++ code editor:
.table {
    font-family: Arial, sans-serif;
    width: 55%;
    border-collapse: collapse;
    margin-top: 55px;
    margin-left: 300px;
}

.table td, th {
    font-size: 1em;
    padding: 7px 7px 2px 3px;
}

.table th {
    font-size: 1.1em;
    text-align: left;
    padding-top: 5px;
    padding-bottom: 4px;
    background-color: #007cd9;
    color: #ffffff;
}

.table tr.alt td {
    background-color: #e4e4eb;
    color: #000000;
}
With this css code, we’ve changed the font style and size, added some basic margin and padding, and also added a little color to the table headers. One thing I do want you to notice is that we added the grayish background color to every other row of the table with the last style in the css file. Adding a light background color to table rows in this manner is a common practice to make the information a little easier to read.
At this point, our table looks like this:
Now we’re going to use jQuery to perform our row hiding. jQuery is a JavaScript library that makes adding useful functionality to web pages much easier versus creating the same or similar functionality in JavaScript itself. This is an over-simplified definition of jQuery and it would be well worth your time to study jQuery outside of this tutorial.
Before we can begin using jQuery, we need to download it. Go to http://jquery.com/ and click the Download jQuery button on the homepage. As of this writing, the current version of jQuery is 1.11.0. For our purposes, we’ll download the compressed, production version.
Click on the download link labeled Download the compressed, production jQuery 1.11.0. A page will open in your browser with the jQuery source code.
Select all of the source code in the browser window (for Microsoft Windows users, the keyboard shortcut for this is CTRL-A).
Once all of the source code has been selected, right-click and choose copy.
Go back into Notepad++ (which should still be open) and create a new file and paste the jQuery code into this new file.
Save the file in the scripts folder that is within the Table Project folder and name the file jquery.js. You can name the jQuery file anything you want just as long at it has the .js extension after the filename.
Since we won’t be editing this file go ahead and close the jquery.js tab in Notepad++ by clicking on the small x on the right side of the tab.
Now we need to add a reference to jquery.js in our HTML page.
Open the table_project.html in Notepad++. Directly below the link to the stylesheet, add the following code:
Add one more reference directly below the one you just wrote:
This is a reference to a file we will be writing soon.
Now that our references have been set up, we can start writing some code. In Notepad++, create a new file, name it rowtoggle.js and save it in the scripts folder.
Type the following code into the file rowtoggle.js:
$(document).ready(function() {
    $('.toggle, .toggle2, .toggle3, .toggle4').hide();
});
If you save the file and view the webpage in your browser, you’ll notice that all of the table’s data rows have been hidden and only the headers remain.
Let’s examine the code that accomplished this.
$(document).ready(function() {
    $('.toggle, .toggle2, .toggle3, .toggle4').hide();
});
The first line of code is the start of jQuery’s document.ready function. This function waits for the entire HTML page to load before running the code inside it. Waiting for the page to load completely ensures our script(s) run the way that we expect them to.
The heart of this function hides the table’s data rows when the page loads.
$('.toggle, .toggle2, .toggle3, .toggle4').hide();This code hides all of the table elements with the class names toggle, toggle2, toggle3, and toggle4 when the page loads. While this is nice, it’s not very functional because we have no way of expanding the rows that we have hidden. We’ll fix that now.
Look back at the HTML we wrote to create the table. Each of the table headers that represent the month and year (December 2013, January 2014, February 2014, March 2014) are attached to classes like so:
December 2013
January 2014
February 2014
March 2014
Using jQuery, we are going to attach these headers to a click event and toggle (show and hide) each row that is associated with a specific header by allowing the user to click on the text of the month and year.
Below the code we previously wrote:
$(document).ready(function() {
    $('.toggle, .toggle2, .toggle3, .toggle4').hide();
});
Add the following code after the semi-colon:
$(document).ready(function() {
    $('.clickable1').click(function() {
        $('.toggle').toggle(250);
    });
});
$(document).ready(function() {
$('.clickable2').click(function() {
$('.toggl2').toggle(250);
});
});$(document).ready(function() {
$('.clickable3').click(function() {
$('.toggle3').toggle(250);
});
});$(document).ready(function() {
$('.clickable4').click(function() {
$('.toggle4').toggle(250);
});
});Here is what we have done:
We have created four document.ready functions that will not run until our HTML page has completely loaded.
Inside of these functions, we have created another function that attaches a click event to our table headers that have the class names clickable, clickable2, clickable3, and clickable4 attached to them.
Inside of each .click function (or click event), we are using jQuery’s toggle method to show or hide the table rows based on which header the user clicks on. In this example, we are passing the .toggle method a parameter of 250 between the parentheses. This parameter controls how fast the toggle effect is, which in this case is 250 milliseconds. You can alter the speed by changing the parameter. If we were to change the number to 500 milliseconds, the toggle effect would be slightly slower.
Now if you save the HTML file and view it in your browser, you can click on a month or year and expand or show the table rows below them. Clicking on the month or the year again hides the rows. But we’re not done yet. You and I know that we can achieve this functionality by clicking on the month or the year but a user would have no way of knowing this. We need to let the user know that the month and year are clickable. You may be thinking that we could just turn the headings into links and we are essentially going to do that but we’re going to go about it a little differently.
If we turn the headings into traditional links, we really aren’t linking to anything in the traditional sense (a separate HTML page or even a portion of our page itself). We could turn the headings into links with additional HTML but I have an easier way.
Go back to Notepad++ and open the styles.css file.
Add the following code to the bottom of the file:
 .clickable1, .clickable2, .clickable3, .clickable4 {
    cursor: pointer;
    text-decoration: underline;
}
Save the css file and view the updated HTML file in your browser. Our month and year heading text is now underlined and the cursor changes when we hover over the underlined text, just like a traditional link.
You can customize this table in an infinite number of ways but I hope the techniques presented here will get you started. What I really wanted to convey in this tutorial is that we can achieve some very nice effects with only a few lines of jQuery code, which is especially encourage to beginning developers. The techniques I’ve discussed here are by no means the best and only way to achieve the functionality presented but I hope that this tutorial will give you a good start.
Tutorial source code
You can download the tutorial source code files here.


