Welcome to this Godot UI tutorial where we’ll be setting up a scorekeeping system for a game using Godot and its UI system.
A crucial part of most video and computer games is providing players with information through the user interface. UIs include everything from mini-maps that let players know where they are to scoring which provides a quantification for players to compare and compete with their previous performances.
In this Godot UI tutorial, we’ll create a score text in our game, learn how to position it on the screen and update the player’s score as they collect coins.
This Godot UI tutorial assumes you have basic knowledge of Godot and its scripting language, GDScript. But don’t worry, if you’d like to learn more about Godot and GDScript, you can also review our full course, Create a 2D Platformer with Godot 4 which covers these concepts more in-depth.
Table of contents
Project Files
The project files include code snippets used in this Godot UI tutorial to set up the needs system. Understanding this codebase will prove beneficial in realizing the functionality of your Godot survival game.
Download Project Files Here

Score Text
As mentioned, in this Godot UI tutorial, we will be setting up our score text for our game to learn the basics of the UI system. This will allow us to see our score as we progress through the game.
Creating the Score Text
First, we need to create a Canvas Layer as a child node of the Player node, this is a node that renders UI elements on our screen. We will also add a Label node as a child to the Canvas Layer.

We can then rename the label to ScoreText.

Next, select the ScoreText node and press the F key to focus on it. In the inspector, add the text Score: 0. This will be the text that is displayed on the screen.

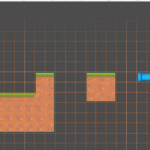
We can position the Score Text wherever we want relative to the screen. To do this, scroll out and you will see a faint blue rectangle. This represents the screen resolution. We can then use the move tool arrows to position it in the space.
We can also customize the Score Text by changing the font size, outline, and shadow. To do this, in this Inspector choose New LabelSettings in the Label Settings property.

We will increase the font size to 40 pixels and add a black outline that is 5 pixels wide. You can change any of the values you like to your own taste of course.

This will make the Score Text display on our screen, however, we still haven’t added any functionality to it.

Adding the Score Text to the Script
Now, we need to add the score text to our Player.gd script and hook it up to the function we created previously.

Underneath the score variable, we will add a new variable to keep track of our Score Text. We will use the @onready tag and the get_node function to set it to our Score Text node when the script is loaded.
@onready var score_text : Label = get_node("CanvasLayer/ScoreText")Finally, in the add_score function, we want to update our score_text. We will use the str function to combine our integer score variable with a string.
func add_score(amount):
    score += amount
    score_text.text = str("Score: ", score)
Now you can press Play and collect the coins in your level and you will see the score increase. Feel free to duplicate the coin (or drag the Coin.tscn scene into the level from the FileSystem) to create more coins across your level. Due to the way we handle the game_over state of the game, when we restart the score will also be reset as intended.
And that’s it for this Godot UI tutorial in a nutshell!
Godot UI Tutorial Wrap-up
With that, we come to the end of this Godot UI tutorial. You have successfully created a score-keeping system in your game, displaying the score on the screen, and updating it as the player collects coins – all crucial elements for the UI experience. Experiment with your game; add more UI elements, position them differently, and so forth. Either way, you have the foundations now to explore UI development and adapt what you need to a variety of games.
Keep exploring Godot Engine and improve your game development skills. You can find more tutorials on a variety of genres, including RPGs, FPS games, and much more, right here at Zenva. Enjoy developing!
We hope this tutorial has been instructionally beneficial for you, and we can’t wait to see what you’ll create next!
Want to learn more? Try our complete CREATE A 2D PLATFORMER WITH GODOT 4 course.
Did you come across any errors in this tutorial? Please let us know by completing this form and we’ll look into it!

FINAL DAYS: Unlock coding courses in Unity, Godot, Unreal, Python and more.