Scoring systems are a crucial part of almost every game, including Godot 3D platformers. They add an element of competition, which keeps the players engaged and motivated to perform better.
In this tutorial, we are going to create a scoring system for a gaming application in Godot, an open-source 2D and 3D game engine. Specifically, we will design a coin collection system in which the player’s score will increment upon collecting a coin. Furthermore, we will set up the foundation for this system by writing scripts for the player’s avatar. Once the scoring system is up and running, we will enhance the gaming environment to make it visually appealing. We recommend you come with a basic understanding of Godot and scripting languages.
Table of contents
Project Files
You need to set up a Godot project to follow along with this tutorial. We have included all the script files and assets used in this tutorial that can serve as a reference while building your application.
Download Project Files Here

Coin – Part 1
In this tutorial, we are going to start working on the scoring system for our game. This system will track the player’s score and display it on the screen using a user interface. The score tally will increase each time a player collects a coin. But before we dive into creating the scoring system, we should first set up the foundation of the system by setting up the player’s script.
Setting up the Player’s Script
We begin by creating a new variable in the player’s script. This variable, called ‘score,’ will be of the ‘int’ (integer) type. Then, at the bottom of the script, we’ll create a new function called ‘add score’ which will take an ‘amount’ as an argument. The idea behind sending an amount is that you might have different collectibles that you want to increase the score in different ways. The function will simply increment our current score by the provided amount.
var score : int;
func add_score (amount)
{
    score += amount
}
Once the basic structure of the scoring system is in place, we can then focus on creating our coin.
Creating the Coin
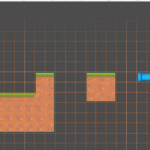
The process begins by creating a new area3D node, which we’ll call ‘coin.’

We will then drag the ‘coin gold’ model from our models folder and make it a child of the coin.

The coin model needs to be appropriately sized, so we’ll set the scale to 1.5 in the settings. Make sure as well to put the coin at 0, 0, 0 in terms of position.

We also need to add a CollisionShape3D to the coin area3D.

The functions of the coin are twofold: it’s going to be collected by the player, and it’s also going to bob up and down while rotating around its Y axis. To make this happen, we’ll create a script for the coin.
Coin Variables
Our coin script is going to need to handle a few systems:
- Allow the Coin to be collected by the player.
- Move the Coin up and down to create a ‘bobbing’ effect.
- Rotate the Coin around its y-axis.
We can remove the _ready function as our script won’t need to use it. Like with our other scripts, we can start by setting up our variables. First of all, we will need a float called “spin_speed”, which will have a default value of 2.0. This will determine the number of revolutions per second the coin makes.
var spin_speed : float = 2.0
The second variable will be called “bob_height”, be of type float, and have a default value of 0.2. The bob height will determine the maximum height that the coin reaches when bobbing up and down.
var bob_height : float = 0.2
We will add a “bob_speed” variable, also of type float, and with a default value of 5.0. This will determine how quickly the coin is bobbing up and down.
var bob_speed : float 5.0
All of these values can be tweaked depending on how you feel about the Coin’s animation. We will also need to create a variable called “start_y”, of type float. This will hold the beginning y-axis position of our coin for calculating the bob animation. Therefore, we will add an @onready tag and set the value to global_position.y.
@onready var start_y : float = global_position.y
Finally, we will create a variable called “t”, with a type of float and a default value of 0.0. This will act as a timer for our sine wave that will be creating the bob effect.
Rotating the Coin
The rotation function will rotate the coin around the Y-axis. Godot provides a built-in function to help us achieve this. The function takes two arguments: the axis and the angle of rotation. Here’s how it works:
func _process(delta): rotate(Vector3.UP, spin_speed * delta)
We can adjust the speed of rotation by changing the spinSpeed.
Bobbing the Coin
We can now make it so that our Coin can bob up and down. As mentioned before, we will do this using a sine wave, which is a smooth curve that moves up and down between -1 and 1. We will be moving along that, using our t value, to give a smooth bobbing animation. To implement this, we first need to increase t by delta to allow our t value to track how many seconds have passed.
func _process(delta):
    ...
    t += delta
We can then use this to sample a point on our sine wave, we will call this sample “d”.
func _process(delta):
    ...
    var d = sin(t * bob_speed)
However, a sine wave goes between -1 and 1, which won’t work for our case as we don’t want the coin going below the start_y value. To fix this, we will increase the value by 1 and divide it by 2, to convert between -1 and 1 to 0 and 1.
func _process(delta):
    ...
    var d = (sin(t * bob_speed) + 1) / 2
Finally, we can update the y-axis position.
func _process(delta):
    ...
    global_position.y = start_y + (d * bob_height)
When you press play you will now see our Coin bobs up and down as expected.
Coin – Part 2
In this section, we will learn how to add a scoring feature to our player and how to improve our environment within the Godot game engine. We will go through each step starting from selecting our coin node in the scene.
Connecting Coin to the Player
To start with, we need to select our coin node in the scene. We then orient to the node panel and look for the ‘body entered signal’. Double clicking on this signal will allow us to find our coin and connect it to our player’s avatar. Here is a brief summary of the steps:
- Select coin node in the scene
- Go to the node panel
- Find the ‘body entered signal’
- Double-click on it, find the main code scene, and connect it.

Checking for Collision and Updating Score
In order to check if our player is colliding with the coin, and subsequently update our score, we need to use a few lines of code. First, we check if body (our player) is in the group of players. In the case of a positive result, we want to increase our score.
We will use the is_in_group method to check if the body property is the player.
func _on_body_entered(body):
    if body.is_in_group("Player"):
        body.add_score(1)
Then, we call the add_score method on the player, with a value of 1, to increase this score by 1.
func _on_body_entered(body):
    if body.is_in_group("Player"):
        ...
        queue_free()
We will also use the queue_free function to remove the Coin node from the scene.
Improving the Environment
Improving the environment will make the gaming experience more aesthetically pleasing. We’ll start by creating a new node called ‘World Environment’.

This node lets us alter many different settings related to our environment. Consequently, we can create a custom environment with personalized skies, glow, fog, background color, etc.
Modifying Background Color
To enhance the background, we can adjust its color to better suit our game’s theme. By changing the mode from ‘clear color’ to ‘custom color’, we can select a preferable color for our skies. This can be found by:
- Selecting the Environment node
- Accessing the settings in the Inspector
- Locating the Background option for the dropdowns

In summary, we learned how to add score functionality for our player in Godot, and enhance our game environment. We’ve omitted sections about setting up score text and other environment settings but it’s advisable to try those out as exercises or refer to other lessons directly related to them.
Conclusion
In this tutorial, we have learned how to set up a score system in a game and how to improve the environment. We have used a coin node and connected it up to a body enter signal. We have also created a new World Environment node and experimented with different settings.
Godot 3D Platformer Coin Summary
And that concludes our tutorial on creating a scoring system and improvising the game environment in Godot. Having applied what we learned, you can now add a scoring feature to any character in your game application. Our focus was primarily on setting up a coin collection system to increment the player’s score and enhancing the gaming environment. However, the scoring system and the environment setup methods can be applied to various game types and designs. Next, you might want to try playing around with different elements in the game, use different assets, or even experiment with designing your own scoring systems. Remember, creativity is key when it comes to creating immersive gaming experiences.
Zenva offers a variety of courses from game development to virtual reality, which can help expand your knowledge and skills in this field. We look forward to seeing your incredible gaming projects!
Want to learn more? Try our complete DEVELOP A 3D PLATFORMER WITH GODOT 4 course.
Did you come across any errors in this tutorial? Please let us know by completing this form and we’ll look into it!

FINAL DAYS: Unlock coding courses in Unity, Godot, Unreal, Python and more.