Godot is on the rise, and after experimenting with the engine, you’re probably ready to build your first Godot game. But what?
In this tutorial, we will be diving into the development of a simple 2D Coin Collector game using Godot. Throughout this tutorial, you will learn how to create a game scene, build a player character with movement functionality, implement collision detection, and create a collectible coin system. You will also gain an understanding of Godot’s scripting language, GDScript, to create and control game behaviors.
By the end of this tutorial, you should have a basic grasp of 2D game development in Godot, and if you are interested, you can also review our full course, Intro to Godot 4 Game Development which covers Godot 4 concepts and features more in-depth in game development.
Table of contents
Project Files
Whatever level of game development experience you have, be sure to download the assets used in this first Godot game tutorial to use as you follow along:
Download Project Files Here

Coin Collector Game – Part 1
In this first section of our first Godot game tutorial, we are going to get started on our Coin Collector game by building our player.
Creating the Scene
The first step will be to create a new 2D scene. To do this we will select 2D Scene button.

We can then, save the scene as CoinCollectorLevel.tscn.

Creating the Player
With our level created, we now want to set up our Player. To do this, we will use a node called CharacterBody2D. This node comes with a lot of functionality built in, such as physics and the ability to detect collisions.

Next, we will add a Sprite node as a child of the CharacterBody2D. Make sure to rename it to Sprite to help keep track of the nodes in the scene.

We can then set the Texture property to the Player.png sprite we downloaded at the beginning of the course.

Make sure, the Sprite is centered on the CharcterBody2D by setting the Position property to (0,0).

We can also rename the CharacterBody2D to Player to make the node obvious in the Scene tab.

As a child of Player, create a new node of type CollisionShape2D which will give a collision shape to our CharacterBody2D node.

We can then select a New RectangleShape2D for the Shape property, and resize it to fit the bounds of the Player sprite.

Writing the Script
Now we need a script to control the player – our first one for our first Godot game tutorial. With the Player node selected, create a New Script. Make sure to name the script Player.gd and that it inherits from CharacterBody2D.

By default, Godot creates some default code to move a player for scripts that inherit from CharacterBody2D. For this lesson, we are going to delete everything except for the very first line, which should leave your script looks like this:
extends CharacterBody2D
Inside the script, we will create a function called _physics_process. This function gets called at a consistent rate per second, which is good for physics and means we don’t need to use the delta time value for moving the player.
func _physics_process(delta):
Inside the function, we will detect keyboard inputs and modify our velocity based on that. To do this, we will start by setting the velocity to zero on both axes.
func _physics_process(delta):
    velocity.x = 0
    velocity.y = 0
We can now check if a key is pressed, and if so, modify the velocity accordingly. For example, if the left arrow key is pressed, we will subtract one from the X velocity. We will do this using the Input.is_key_pressed method.
func _physics_process(delta):
    ...

    if Input.is_key_pressed(KEY_LEFT):
        velocity.x -= 1
We will do the same for up, down, and right.
func _physics_process(delta):
     ...

    if Input.is_key_pressed(KEY_LEFT):
        velocity.x -= 1

    if Input.is_key_pressed(KEY_RIGHT):
        velocity.x += 1

    if Input.is_key_pressed(KEY_UP):
        velocity.y -= 1

    if Input.is_key_pressed(KEY_DOWN):
        velocity.y += 1
Finally, we will call the move_and_slide function, which will do all the physics processing behind the scenes.
func _physics_process(delta):
    ...

    move_and_slide()
Make sure to save the script, and then when we run the scene, we should be able to move the player with the arrow keys. If you get a popup, make sure to Select Current Scene to make sure the engine runs the correct scene.

Alternatively, you can use the Player Current Scene button.

However, the player will move very slowly. To fix this, we can multiply the velocity by 50 before calling the move and slide function. This will make the player move much faster. This will make our player move at 50 pixels per second.
func _phyiscs_process(delta):
    ...

    velocity *= 50

    move_and_slide()
In the next part of our first Godot game tutorial, we will be looking at customizing the camera node so we can zoom in and out.
Coin Collector Game – Part 2
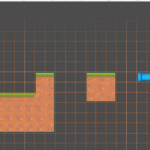
In this section of our Godot game tutorial, we are going to be setting up a camera node in order to make our game more dynamic. We will be able to zoom in and out, move the camera around, and customize it however we wish.
Creating the Camera Node
The first step is to create a new node. To do this, click on the plus button and search for Camera2D.

Once the node is created, it will be represented by a purple outline. You can then use the move tool to move it around.

You can now test this by pressing Play, and you will now see the Player node is centered on the screen, instead of starting in the top left. You can also adjust the zoom level by changing the Zoom property in the Inspector window. For example, setting the zoom to 1.5 will zoom in the camera.

Moving the Camera with the Player
If you want the camera to follow the player, you can make it a child of the player. To do this, select the camera node and drag it in as a child of the player.

Now wherever the player moves, the camera will follow. If you press Play you will notice the Player stays in the center of the screen when you move, as the Camera is now attached to the Player and will move with it as such.
For the next part of our first Godot game guide, we will be setting up coins for the player to collect. This will allow us to see the camera moving around our environment and add some gameplay to the game.
Coin Collector Game – Part 3
In this section, we are going to be looking at creating our Coin scene, which will allow our Player to collide with the nodes. This will be the final section of our first Godot game tutorial – and by the end you’ll have a functional little game.
Creating the Coin Node
The first step to the coin node is creating a new Area2D node. This is a node that can detect collisions when a collider like our Player node walks over it.

We will then add a Coin.png sprite as a child of the Area2D node.

Rename the node to Sprite and make sure to center it by setting the Position property to (0,0).

We can also rename the Area2D node to Coin so that it is easily identifiable.

Then, add a CollisionShape2D node as a child of Coin. We will use this to add a collision shape to our Area2D so it knows what area to detect.

We will be using a CirlceShape2D for the Shape property, and make sure to scale it to the size of the coin sprite.

Creating the Coin Script
We now need to create a script for our Coin node so that we can add functionality to it.

The script will already have the default _ready and _process functions, however, we won’t be using them for this script, so we can remove them, and leave the top line:
extends Area2D
To detect when an object has collided with the Area2D node, we will use signals. To set this up, make sure the Coin node is selected, and move to the Node window in the Editor.

In Godot, Signals are events that are triggered when something happens in our game. We will be using the body_entered signal for our script.

If you select this, you will see a window popup. Make sure to select the Coin node and then press Connect.

This will generate an _on_body_entered function in the script, and automatically connect it to the Area2D signal. We are now ready to write the code for our script, so the first step will be to increase the scale of the body that has entered the area. We will do this using the body parameter that comes with the function, as this will represent our Player node.
func _on_body_entered(body):
    body.scale.x += 0.2
    body.scale.y += 0.2
We then want to destroy the coin so that it can’t be picked up a second time. We will do this using the queue_free function.
func _on_body_entered(body):
    ...

    queue_free()
We can now test this by saving the script and pressing Play. If you now make contact with the Coin you will see the Player increase in size and the Coin is deleted.
Changing the Player’s Speed
You may notice when testing the game that the Player is a bit slow. To fix this we could change the velocity multiplier, however, a better solution would be to create a speed variable at the top of the script to make it easy to edit the Player’s speed when testing it. In the Player.gd script, you can add these lines to change the speed:
var move_speed : float = 200.0
Then, replace the current velocity multiplier with our move_speed variable instead.
func _process(delta):
    ...

    velocity *= move_speed

    ...
Now if you Play the game you will notice the player is much quicker, and you can always modify the move_speed variable at the top of the script.
Creating a Coin Scene
To have multiple coins in our first Godot game, we could copy and paste them across the level. However, this means that we would have to individually edit each instance of the Coin. Instead, we will turn this into a scene, by dragging the Coin node into the FileSystem.

We can then save this as Coin.tscn and the scene will appear in the FileSystem.

Now we can drag the scene into the level to create multiple instances of this scene for the Player to collect.

We can then move these Coins around the level for the Player to collect.

Now if you press Play you can collect all of the coins and watch your Player node increase in size with every coin they collect.
Your First Godot Game Wrap-Up
Congratulations, you have now built your first Godot game!
You’ve learned how to create a game scene, set up a controllable player character, handle collision detection, and develop a coin collection system. You’ve seen how to harness GDScript creatively and set up different elements on your game scene, which are abilities applicable to a wide variety of other game types.
Go ahead and experiment with the knowledge you’ve gained; try adding more levels, enemies, or new types of collectibles to your game. You can even explore the fundamentals of saving in games so scores are saved. Stay enthusiastic and continue learning – the game development journey is filled with endless possibilities.
Want to learn more? Try our complete INTRO TO GODOT 4 GAME DEVELOPMENT course.
Did you come across any errors in this tutorial? Please let us know by completing this form and we’ll look into it!

FINAL DAYS: Unlock coding courses in Unity, Godot, Unreal, Python and more.