You can access the full course here: BUILD A MICRO TURN-BASED RPG WITH GODOT 4
Welcome to this Godot 2D tutorial where you will learn how to create 2D games in Godot. The Godot game engine is perfect for creating games across varying complexities as it allows great flexibility in designing characters, assigning functionalities, and building physics. It is one of the few engines that has a dedicated 2D physics engine, providing more performant outcomes compared to other engines like Unity.
Through this Godot 2D tutorial, we’ll focus on some basic elements in getting our character going – with a focus that is relevant to a turn-based RPG system. These foundations will help you get a jump start in Godot 2D development, so let’s jump in.
If you have a background in any sort of programming, you’ll fit right in! However, if you’d like to learn more about Godot and GDScript, you can also review our full course, Build a Micro Turn-Based RPG with Godot 4 which covers these concepts more in-depth.
Table of contents
Project Files
Regardless of your experience level, it is recommended that you download the project files used in this Godot 2D tutorial. This would serve as a guide to help you understand better.
Download Project Files Here
Character Scene
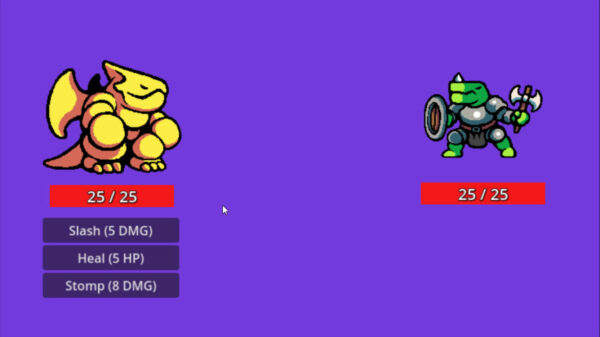
In this first part of our Godot 2D tutorial, we are ready to begin creating our character. Unlike with other games, our characters won’t need to move and interact with the physics systems, so we won’t be using a CharacterBody2D node, as you may have previously. Instead, we will use a new Node2D as the root node of our character.

We can rename this to “Character”.

We can then add a visual element to our character by using one of the assets we added in the previous lesson. For this character, we will be using the Dragon.png asset.

Make sure this node is a child of our Character root node, and rename it to “Sprite” so that we can identify it.

We also need to set the Position of the Sprite to (0, 0) to make sure it’s centered on the Sprite node.

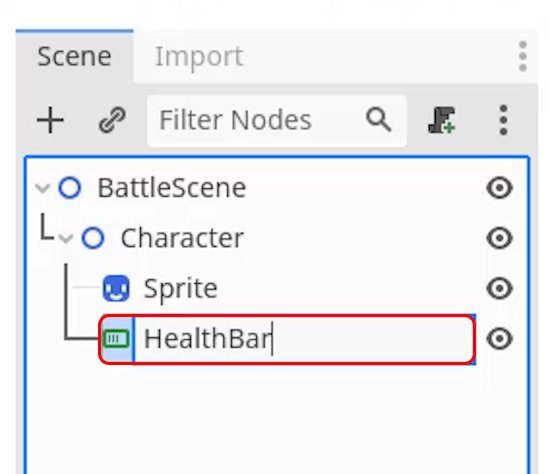
Alongside this sprite node, we also want our character to have a health bar that can adapt to the character’s current health. To do this, we will add a ProgressBar as a child node of our Character.

This can then be renamed to “Health Bar”.
Use the orange circles to resize the element, as we will place it just beneath the Sprite element.
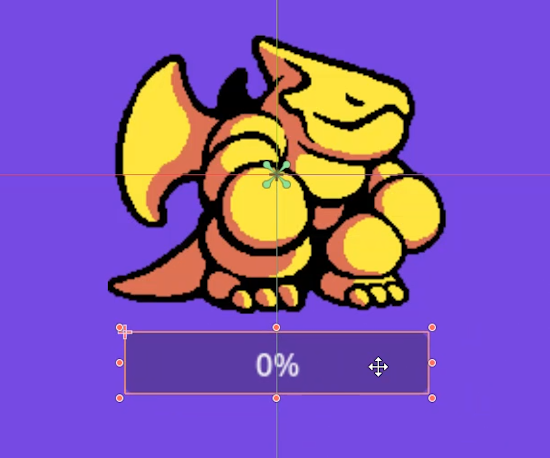
Changing the Health Bar
Let’s focus a bit more on the UI aspect in our Godot 2D tutorial.
By default, a ProgressBar node doesn’t look quite like a health bar, but there are lots of values we can customize to make it exactly how we like. To help us see the changes, we can change the Value property of the Healthbar node to 50.
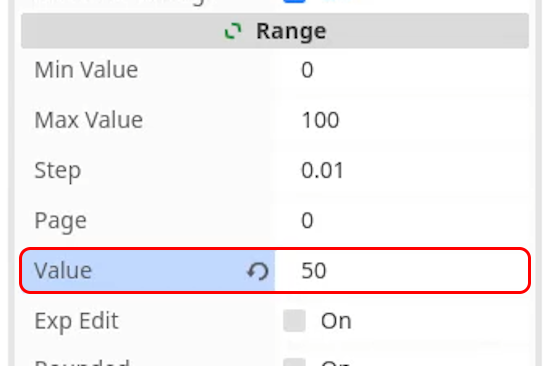
This will show the bar at half full in the scene view to see how any customizations affect it.

Our first change will be to disable the Show Percentage property, which will remove the text from the HealthBar, as we will be adding our own later.
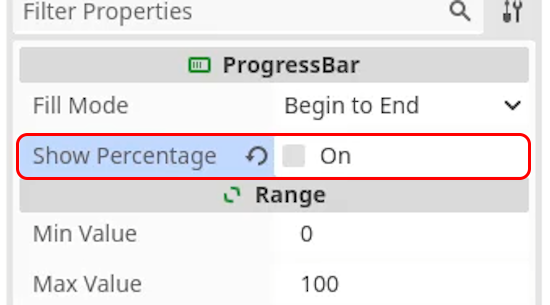
We can then begin changing the colors of our HealthBar. To do this, we will add new Styles in the Theme Overrides section. To change the Background color, select New StyleBoxFlat from the dropdown next to the property.
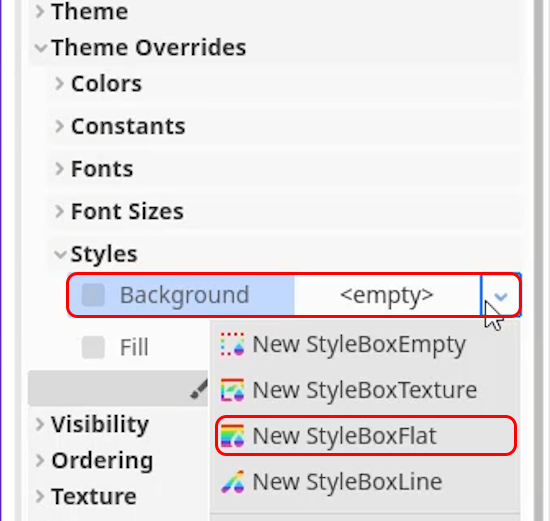
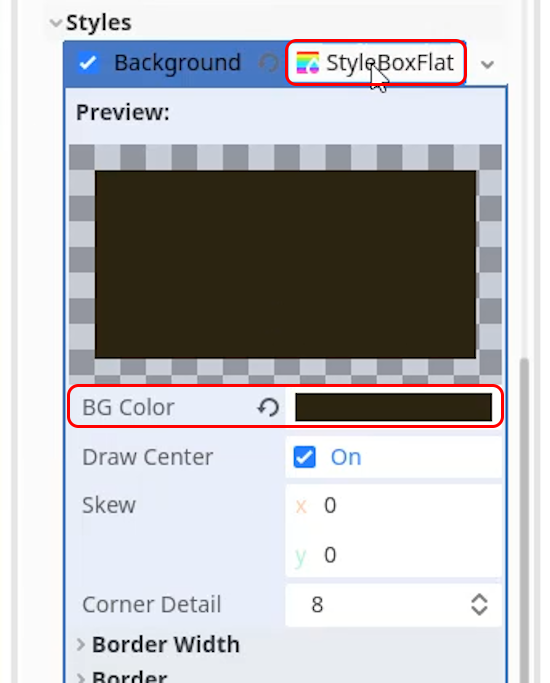
You can then press the new StyleBoxFlat value and change the BG Color property to a dark grey, to match the background color that we want.
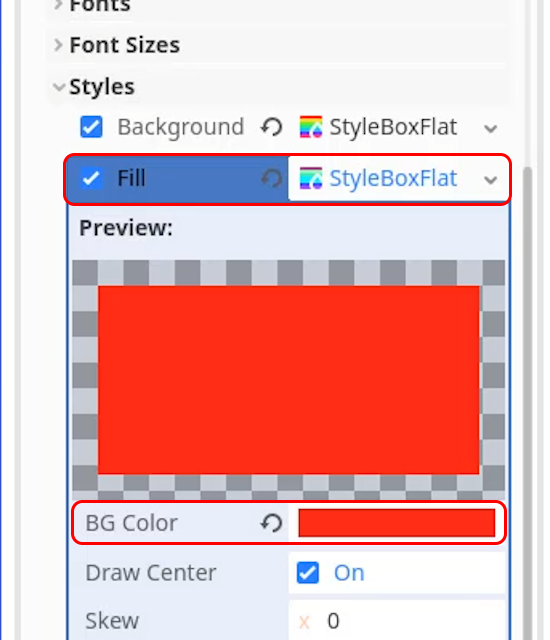
We can then do the same thing for the Fill property, except this time give the BG Color a red value.
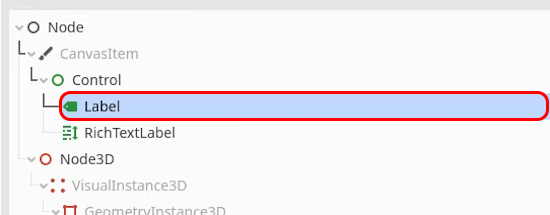
We also want to add text to our health bar, however, instead of a percentage, we want to represent our character’s health as a fraction. We will do this using a new Label node, as a child node of our HealthBar.
So that we can get the looks right, we will give the Label a default Text value of “25 / 25”.
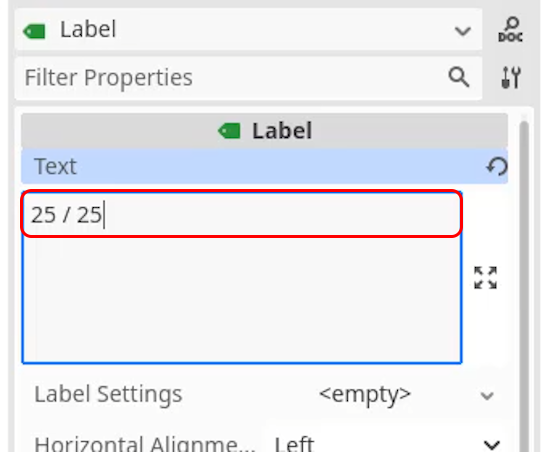
Next, we will resize the text box to fit the bounds of the HealthBar element.

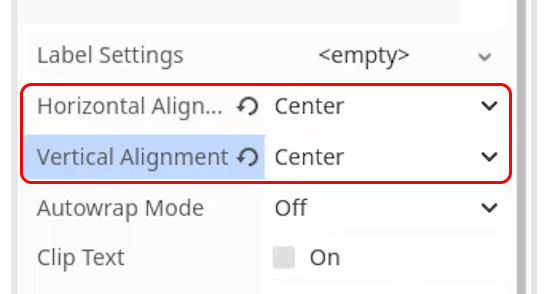
We can then change the Horizontal Alignment and Vertical Alignment to Center so that our text is centered within the HealthBar area.
We can also update the visuals of our Label element, by adding a New LabelSettings object to the node.
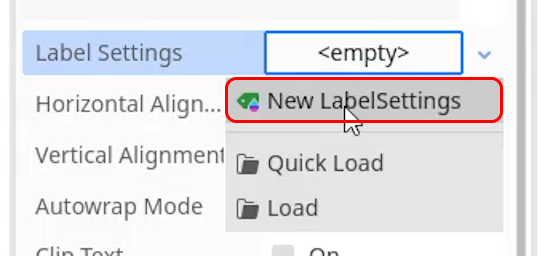
With this open, we can modify lots of values to change how the text is displayed. For this label, we will want to increase the Font Size value slightly. You may need to re-center the Label within the HealthBar after this.

We can also add an Outline to the text to make it visible when the HealthBar is full. We will be using 3 pixels for the Size value and black for the Color value, but feel free to try experimenting with this yourself.
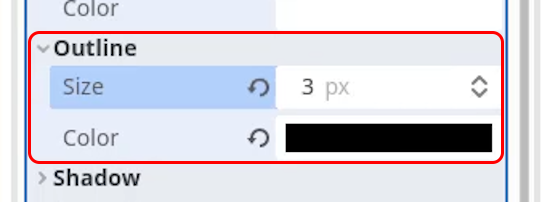
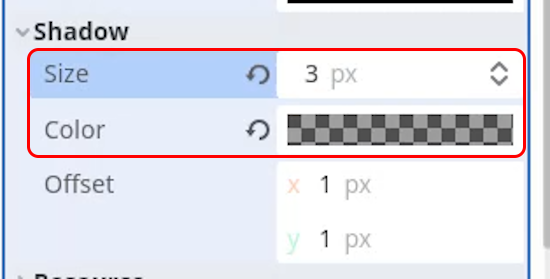
Finally, we can also change the Shadow property with some different values to make the text pop.
Finally, we will rename the Label to “HealthText” to make it more identifiable.

To complete our Character in our Godot 2D tutorial, we will drag the root node into the FileSystem to turn it into its own scene for use later in the project.

Adding a Camera
With these nodes in place, our character is ready to begin adding functionality to in our Godot 2D tutorial. However, if you press play at the moment, the character is stuck in the top-left corner of the screen. To fix this, we can add a Camera2D node to our scene tree.
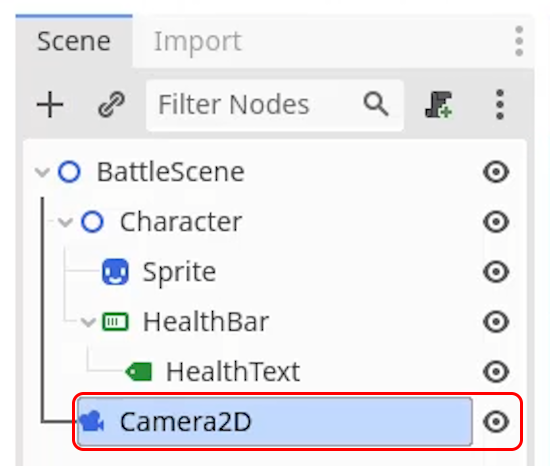
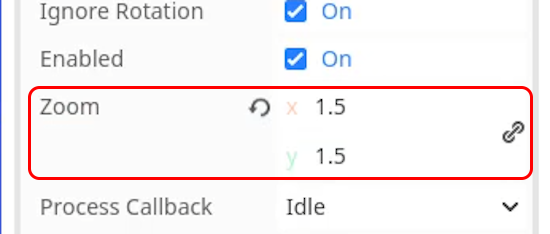
By default, the Camera2D node is a little large for our use case, so we can change the Zoom value to 1.5 on both axes to zoom the camera in on our sprite.
In the next section of our Godot 2D tutorial, we will continue working on our character and adding further functionality to the nodes we have set up.
Character Script
In this second part of our Godot 2D tutorial, we will be setting up our character script. This will likely be the largest script in our game as it contains crucial functionality such as controlling the character’s health and handling combat actions. We will be implementing combat actions later in this course, so for this lesson, we will focus on setting up the script and implementing the character’s health systems.
Setting up the Character Script
To begin with, make sure you have the Character scene that we created in the previous section of our Godot 2D tutorial, as we want to edit our character here to apply the changes across the project.

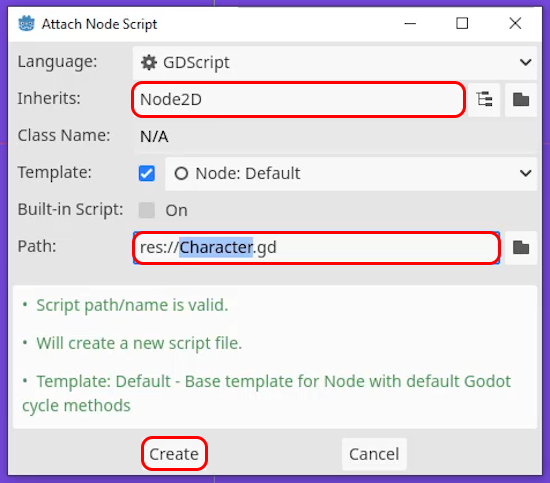
We can then add a new script to the node in the Inspector window. We will name this Character.gd and ensure that it inherits from Node2D. Finally hit Create to generate the script.
The first thing we need to do is define our class directly under the extends Node2D line.
class_name Character
This line defines our script as a class called Character, which will allow us to store this script as a variable in other scripts. Additionally, we will now be able to make use of our Character script as a base to extend other scripts from and add extra functionality to.
Creating the Variables
As with most scripts, we will need a few variables to use with our Character in our Godot 2D tutorial. The first variable will track whether the current character instance is the player, we will call this is_player, make it of type bool, and definite this with an export tag to make it visible for editing in the Godot Inspector window.
@export var is_player : bool
The next variable will track the character’s current health, we will call this cur_hp, and give it a type of int with a default value of 25. This will also be exported as it will change based on the character.
@export var cur_hp : int = 25
We can copy and paste this line for the maximum health variable, although we will change the name to max_hp.
@export var max_hp : int = 25
We will also need a variable that can keep track of our combat actions. We won’t be implementing this yet, but we will create the variable for use later in the course. This variable will be called combat_action, be of type Array, and also have an export tag to make it visible in the Inspector.
@export var combat_action : Array
Additionally, we will make use of a variable to track our opponent, which will be of type node and also be exported.
@export var opponent : Node
Finally, we will need to access the HealthBar and HealthText nodes inside our script. We won’t be exporting these, instead, we will use the onready tag along with the get_node function to assign the variables when the script starts. These variables will be called health_bar and health_text and be of type ProgressBar and Label respectively.
@onready var health_bar : ProgressBar = get_node("HealthBar")
@onready var health_text : Label = get_node("HealthBar/HealthText")
Implementing the Functions
With our variables in place, we are ready to begin implementing some of the functions that we will want to use (though we won’t call them in this Godot 2D tutorial). One function we will use quite a lot will update the HealthBar and HealthText values. We will call this function _update_health_bar.
func _update_health_bar():
    health_bar.value = cur_hp
This code will update the current Value for our HealthBar however we also need to set the Max Value of our HealthBar node so that it has something to work from. To do this, we will add some code to our _ready function.
func _ready():
    health_bar.max_value = max_hp
This will update the HealthBar to the correct maximum based on our max_hp variable. With this set up, we finally need to update our HealthText node to contain the right information. We can add this code to our _update_health_bar function as well.
func _update_health_bar():
    ...
    health_text.text = str(cur_hp, " / ", max_hp)
Here we use the str function to combine our cur_hp and max_hp values into a string that shows them as a fraction. We can also add a new function called take_damage with a parameter of damage.
func take_damage (damage):
    cur_hp -= damage
    _update_health_bar()
Here we decrease the current health value, cur_hp, by the damage passed through in the parameter. We also need to call the update_health_bar function to make this visible to the player. In this function, we can also check to see if the cur_hp variable is less than or equal to zero, and if so, handle the character dying.
func take_damage (damage):
    ...

    if cur_hp <= 0:
        queue_free()
To “kill” the character, we use the queue_free function, which will destroy the Character node in the scene. Later in the course, we will implement a bit more functionality here, but for now, this will work perfectly. Finally, we can also create the heal function, which will be the opposite of the take_damage function.
func heal (amount):
    cur_hp += amount

    if cur_hp > max_hp:
        cur_hp = max_hp

    _update_health_bar()
You will notice that, unlike our take_damage function, we also add an additional if statement here. This limits the cur_hp value to the maximum hp set by the max_hp variable. And that’s it for our character, and for this Godot 2D tutorial as well.
Godot 2D Tutorial Wrap-Up
And through these simple steps, we come to the end of this Godot 2D tutorial. We’ve made quite the journey to get started with a Godot 2D development, but there’s much more to learn. Setting up 2D levels and implementing various other game mechanics are just a few things you can learn next. However, these 2D game development principles should provide you the basis through which you can more easily explore these topics.
However, from here, the sky is the limit. You can learn to make RPGs, platformers, roguelikes, and more. Godot 4 is the perfect solution, so we hope you’ve enjoyed this starter Godot 2D tutorial.
Good luck, and we can’t wait to see what games you make in the future.
Did you come across any errors in this tutorial? Please let us know by completing this form and we’ll look into it! FINAL DAYS: Unlock coding courses in Unity, Godot, Unreal, Python and more.
Transcript – Character Scene
Welcome back everyone. In this Godot 2D tutorial, we are going to be setting up our character. So to begin, what we’re going to do is of course, create ourselves a brand new node, which is gonna act as the base of our character. Now, unlike some other games where we might want to have a character controller that we can use the mouse and keyboard with to jump around and interact with the physics system, we aren’t going to be using a character body 2D.
Instead, we are going to be using just a base node because our characters, they don’t need to be moving around with the keyboard, they’re not gonna be interacting with physics or anything like that. So I’m just gonna click on the plus here. And we are just going to create a nice basic node 2D, okay? Create that. Like so let’s rename this to be character.
And with this character node, what we’re going to do is we then need to give it of course a visual. So I’m gonna go to our sprites folder and I’m just gonna drag in the dragon, okay? Like, so we can then make this dragon Sprite, a child of character. Let’s rename that to be Sprite. So we can actually, add a glance, see what it actually is. And then what we need to do is we need to set the position of our Sprite to be zero on the X and zero on the Y.
So it is nice and centered on our character right here. Now, along with a Sprite, we also need to give our character a health bar to display what their current health is.
So to do this, we are going to right click on character, go add child node, and we are going to be looking for a progress bar. Now, a progress bar is a very handy UI element inside of Gau. It basically allows us to have something like a health bar for example. So click and drag on these orange circles to resize it, and I’m gonna position it just underneath our player right here. Okay? You can of course, determine how big you want it to be. Now with our health bar here, let’s first of all rename it to be health bar at first.
Um, we might need to change the visuals around a bit because let’s just actually go over to the inspector first and change the value right here to be, uh, we’ll change the value here to be 50, okay? Just so we can have a look at what it looks like. So you can see right now, the value is basically how full this bar is. So we can of course change that inside of a script. Um, but we want to change the visuals, okay? We want it to have to be red and we don’t want this percentage here. Instead, we want our current health slash our max health. Okay?
So to do those things, we’re gonna first of all disable show percentage to get rid of that, right there we are then going to go down to theme overrides, go down to styles, and then you see we have background and fill. So I’m gonna click on the little empty dropdown next to background Go new style box flat. And this, if we then click on it, we’ll open up this little window here. We can then change. The BG color to be probably a dark gray, like so. All right.
And then we can go over to the fill, do the exact same thing, style box flat. Let’s open that up. Change the BG color to then be, let’s just say a nice red, okay, something like that. And there we go. So that is our health bar. And of course we can then change the value. So we can click and drag on that to basically see what it looks like. Uh, but we also need our text.
So what I’m gonna do is I’m gonna right click on health bar, go add child node, and we are gonna look for a label, okay? And a label of course is where we can have text display. So in the inspector, I’m just gonna give it some default text of 25 space slash space 25 as this is generally what it’s gonna look like. Let’s resize this box to basically fit the bounds of our health bar here.
And then what we’re going to do is we are gonna change the horizontal alignment to be center, so it’s in the middle and the vertical alignment to be centerized. Well, so our text is now centered right here. Now, we also probably want to change the size of the text and maybe give it a bit of a backdrop so it doesn’t blend in so much with our health bar.
So to do this, we can go over to our label settings, click on where it says empty and go new label settings. We can then select that again to open it up and on font we can select that and change the size. So let’s just increase the size a bit here. Something like that, I reckon. Oops, we’ll bring it down tiny bit. Yep. Something like that. We can then position it where we’d like. There we go. Um, now let’s also give out our text and outline so we can open up the outline here.
Let’s give an outline of, uh, we’ll say three pixels. Change that color to be a dark color, like so. And there we go. We can even give it a shadow as well if we wish. So we might want to, up the alpha value on this shadow a tiny bit here and give it a size like that.
So there we go, and we can then rename this label to be our health text, okay? Just so that we know exactly what these nodes do when it comes to, implementing them in our script. So there we go. That is pretty much the structure of our character. We have a node 2D, just a basic node 2D for the base node as a child of that we have a Sprite for the visual. We have a health bar for the, um, basically showing the visual representation of the player’s health and then health text to show the exact numbers.
Now, if you press play, you’ll see that our characters in the top left corner. And the reason why is because we don’t actually have a camera in our game to actually move around and size the way we wish. So for this, what we’re going to do is we’re gonna click on the plus we’re going to create a camera 2D. Now, if we zoom out, you can see it’s kind of hard to see on the purple background here, but the camera is pretty big.
So what I’m going to do is I’m actually going to bring the camera zoom and set that to be 1.5 on the X and the Y. Okay? Now, if you press play, we should see our character in the middle of the screen, like so.
Okay, so we’ve got our character, we got all of their nodes set up. Okay? And one final thing is we should then make our character a scene as we will be using it multiple times for both the player and the enemy. So let’s click and drag on our character down into the file system and save it as character like. So, okay?
And now if we ever want to edit our character again, we can just go down to our file system, double click on character, and that will open it up in its own individual tab here where we can modify its, notes. So thanks for watching. And in the next part of our Godot 2D tutorial, we are gonna be working on our character’s script. So I’ll see all then.
Transcript – Character Script
Welcome back everyone. In this Godot 2D tutorial, we are going to be setting up our character script. Now, this is gonna be probably the biggest script in our game because it is gonna contain a lot of information such as the player’s stat, such as their health, and also the ability for them to take damage, heal as well as cast combat actions which will be implementing later down the road. So first things first, let’s go ahead and set up our character’s script.
So here I am inside of our character scene of our Godot 2D tutorial. I’m gonna select our character. I’m gonna go over to the script property here, make sure this is on the character’s root node. We’re going to create a new script called character, okay? And make sure it does inherit from node 2d, but that doesn’t really matter since, since we’re not really going to be affecting our inherited class at all. So click create and here we are inside of our script.
So the first thing we need to do is add a little line down here underneath Extends and this is gonna be called class underscore name. And we are gonna call this one character. Now what is this doing? Well, basically what we’re doing here is we are giving this script which is technically known as a class, its own specific name. And this is because we are gonna be storing this, as a variable in some other scripts as well as extending from this script itself as we will be sort of referencing this script or this class, um, later on down the road. Okay? So we’re just gonna do that for now.
Now next up we need to create our variables. Now for our variables, we are going to have a variable for is Player, so is underscore player of type bull. And this is just gonna be true or false for whether or not this instance of the character is the player, okay?
Because we need to know, if this is the player then we don’t want them to automatically decide a combat action and we are going to export this as well. So at export at the start, basically if we save this script and select our character, you’ll see that this property is player appears here in the inspector, okay? And that’s what this little export tag does. Basically, it just exports it to the editors so we can modify its value there.
Now another variable which is also going to be exported is gonna be our current hp. So underscore HP of type int. Let’s set that to a default of 25 and the same thing for our max hp. Okay, so we got our current and our max HP values right there.
Now something else we also want to do is have a variable to keep track of our combat actions. So, I’m gonna add this but we’re not gonna be filling it in or really looking at it just yet. So I’m gonna export a variable and this is gonna be called combat actions of type array. So we’re gonna get into this bit later. So we’re just going to ignore that for now.
We also need a variable to keep track of our opponent. So I’m going to create an opponent variable here of type node. And then finally we need our health bar and our health text. Now we aren’t gonna export these, rather we are going to use the on Ready. And what this does if we create our health bar variable of type progress bar, what we can do here is go equals get underscore node and this function right here we can find our health bar.
So basically what this already does is it means that at the start of the game when this node or this scene is initialized, it is going to get the health bar node and assign it to this variable. So instead of going down to the ready function and going health bar equals get node health bar, we can do that in the variable declaration right here with the on ready, okay? And we can do the exact same thing for our health text.
So those are the variables that we are going to be using for our character script right here. Now let’s just implement some of the functions that we are going to be using.
So one of the most common functions is actually going to be a function. If we go down to a new line here, we’re gonna create one called function and this is gonna be called underscore update underscore health bar. And update health bar. Basically what this function is gonna do is it is just going to update the health bar percentage and the health bar text, okay? And this is gonna be called when we take Damage or when we Heal.
So the way we can do that is by using the Q free function, so q underscore free and that basically destroys this node. Now we’re also going to be doing some other stuff where we basically sending a message to our turn manager whenever a character dies just so we can see, you know, determine who the winner is, but we’re not gonna implement that just yet. So we are just going to keep it as destroying the character for now.
Now in the next Godot 2D tutorial, we are going to be looking at setting up our turn manager as that is going to basically be what controls the game, you know, what determines whose turn it is and switching between the players. So I’ll see you all then in the next Godot 2D tutorial.
Interested in continuing? Check out our all-access plan which includes 250+ courses, guided curriculums, new courses monthly, access to expert course mentors, and more!
