You can access the full course here: Real-time Strategy Project – Resource Gathering
Table of contents
Camera Setup
The camera controller will allow us to move the camera around with the keyboard and zoom in/out. This is similar to many other RTS games and their camera systems.
Before we start scripting, let’s change the camera transform a bit.
- Set the Position to 0, 20, -17
- Set the Rotation to 50, 0, 0

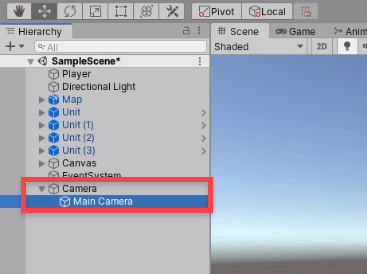
Now with this Main Camera object, we need to make it a child of another object. This will make it easier to move the camera around. First, create a new empty GameObject called Camera.
- Set the Position to 0, 0, 0
Next, drag the Main Camera in as a child of the Camera object.

CameraController Script
Create a new C# script called CameraController and attach it to the Camera parent object. Open it up in Visual Studio.
To begin, let’s add in some variables.
public float moveSpeed;
public float zoomSpeed;

public float minZoomDist;
public float maxZoomDist;

private Camera cam;
In the Awake function, we can get the camera and set it to the cam variable.
void Awake ()
{
    cam = Camera.main;
}
Next, we’ll create the Move and Zoom functions, calling them every frame in the Update function.
void Update ()
{
    Move();
    Zoom();
}

void Move ()
{

}

void Zoom ()
{

}
In the Move function, we’ll first get the keyboard inputs.
float xInput = Input.GetAxis("Horizontal");
float zInput = Input.GetAxis("Vertical");
Next, we want to get the vector direction to move in and apply it to our position.
Vector3 dir = transform.forward * zInput + transform.right * xInput;

transform.position += dir * moveSpeed * Time.deltaTime;
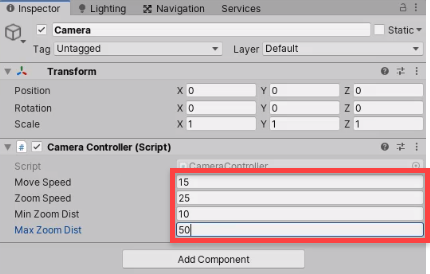
Let’s quickly go back to the editor and fill in the properties.

Back in the script, let’s fill in the Zoom function.
float scrollInput = Input.GetAxis("Mouse ScrollWheel");
float dist = Vector3.Distance(transform.position, cam.transform.position);

if(dist < minZoomDist && scrollInput > 0.0f)
    return;
else if(dist > maxZoomDist && scrollInput < 0.0f)
    return;

cam.transform.position += cam.transform.forward * scrollInput * zoomSpeed;
Finally, we’re going to create another function which we’ll be implementing later on. The FocusOnPosition function will move the camera to a certain position.
public void FocusOnPosition (Vector3 pos)
{
    transform.position = pos;
}
Back in the editor, we can press play and test it out.
- WASD or Arrow Keys = move camera
- Scroll Wheel = zoom
In the next lesson, we’ll start to create the resource objects.
Transcript
Welcome back everyone. In this lesson we are gonna be working on our camera controller script, which is going to allow us to both move the camera left to right, forward and back as well as zooming in and out. So we can get a good view of our game scene and be able to navigate around. The camera is also gonna have the ability to focus on a certain position, so at the start of the game we’re gonna be focusing on our unit spawn area so that the camera can easily show the player where our units are spawning, and later on, if you wanna implement stuff such as pressing a button to move to an idle unit, then this is also going to allow that.
So first of all, we need to change our setup of our main camera right now. If we go on the scene view here you’ll see that the main camera, it is just by itself, but what we need to do is we need to put this main camera inside of a container. And that is going to allow us to easily move around and figure out the center point down here, to figure out what is at the center of the camera, because if we don’t, trying to center this camera on a certain point, we’ll have to do some trigonometry, and yeah, it can get a bit confusing so we’ll just keep it like this.
So what we need to do is first of all, get our camera here, and we need to place it inside of an empty object. So I’m gonna create a new empty game object here, I’m gonna call it our camera, I’m gonna set it to zero, zero, zero, and now we just need to set the camera here, oh, drag this in as a child, and we need to set the main camera here to a position where we want the center of the map to be in the center of the screen.
So I’m gonna set the y position here to 20, z to -17, and the rotation on the x-axis to 50. So there we go, it looks like we’re pretty much aiming in the center there, which is good. Field of view at 40, which is also good. And now what we can do is on our main camera object right here, let’s create a new script inside of the scripts folder, and I’m gonna be calling this one our camera controller. We can then select our camera object that we just created here, and I’m gonna drag on the camera controller script, and now let’s open it up inside of Visual Studio to begin scripting.
Okay, here we are. First up, I’m just going to remove the start and update function just to get it a bit clean here when we enter in our variables, and first up for our variables, we need to know the move speed, this is going to be how fast are we gonna be moving the camera around with our arrow keys, then we also need to know a zoom speed, so how fast are we gonna be zooming in and out, so zoom speed here. And then, we also need to know what is the minimum distance we can zoom in, and the max distance we can zoom out, because we don’t wanna be zooming through the terrain or really far out, so I’ll go public float minZoomDist and another public float for the maxZoomDist.
What else we need is going to be the camera, because when we are zooming the camera, we’re gonna be moving it based on its forward direction yet when we’re moving the camera, we’re gonna be moving this parent object around. So here, I’ll just go private camera cam, and there we go.
Now what we can do is inside of the Awake function I’m going to just go cam = camera.main to get the camera easily like that, and now what we can do is create our two functions, the move function and the zoom function. And these are gonna be called every frame inside of update, so I’m just gonna go void move and then void zoom, and then inside of the update function up here we are going to be calling the move and the zoom functions every frame.
Okay, so let’s begin with the move function. This is gonna take in two inputs, it’s gonna take in the keyboard horizontal and vertical axes, which are bound to your arrow keys and your WASD keys. Horizontal is A and D, or left arrow and right arrow, and vertical is W and S, or up arrow and down arrow. And this is a range between negative one and one, with zero being the default, which means nothing has been pressed.
So let’s get our xInput first, so float_xInput = Input.GetAxis, horizontal and then for the zInput, which is gonna be our forward and back, we’re gonna get our Input.GetAxis, vertical. Okay, so we’ve got our input. Now what we need to do is basically move the camera based on these. And the way we’re gonna do that is by just moving this parent camera object in the forward, and left and right direction.
So what we can do with that is create a Vector3 called dir, and this here is gonna be equal to our transform.forward multiplied by zInput, plus our transform.right multiplied by the xInput. So this is gonna get a direction to move that. If we’re not pressing anything then this is just gonna be a empty vector. So then what we can do is add this on top of our transform position, so transform.position += direction, multiplied by our move speed, and then we need to multiply it by Time.deltaTime, because we don’t wanna move our move speed every single frame, we wanna move it every single second. So Time.deltaTime will convert this down to a second range, and make it so that it is frame rate independent, it doesn’t depend on a certain frame rate.
Okay, so let’s actually go test this out right now. I’m gonna go into Unity. For our camera controller right here I’m gonna set the move speed to 15, zoom speed to 25, min zoom dist to 10, and max zoom dist to 50. These are just the values that I found that were pretty good, press play, and as you can see here, we can use WASD to move our camera around like so, and then we’re gonna be working on the scroll wheel. The scroll wheel is gonna be zooming us in and out, so let’s go do that now.
So what we can do down in zoom here is, we need to first of all get the scroll input from the scroll wheel. And to get that we can just go float scrollInput = Input.getAxis and we wanna get the mouse scroll wheel, so Mouse Scrollwheel. And like with the other inputs, this is gonna be a range between negative one for scrolling down, and one for scrolling up. And with this, then, we also need to calculate a distance between the camera and the center point, between the parent object, because the camera is going to be calculating pretty much how far it can zoom in and out based on that distance.
So float dist = Vector3.Distance between us, so transform.position, this parent object that is currently in the center of the screen at zero, zero, zero, and the cam.transform.position, which is up in the air. Then what we need to do is check, okay, if this distance is less than the minimum distance, and we are trying to scroll up, then we cannot zoom in any more. So return. So if dist is less than minZoomDist and the scroll input is greater than zero, then return, because we can no longer zoom in, because we’ve already hit the max, so don’t bother trying to affect the zoom any more.
Otherwise, so else if out dist is greater than the max zoom distance, and we have our scroll input trying to scroll down, so we’re trying to scroll out, then we also want to return, because we don’t wanna be able to zoom out when we’re at this distance, either. So finally, if we’re within the range of the min and max zoom, then we can affect the camera position by just going cam.transform.position += cam.transform.forward, multiplied by the scrollInput, multiplied by zoomSpeed. There we go.
Okay, so we got that all set up now, Let’s also add in the function to focus on a position, which is only one line of code. So we’ll go public void FocusOnPosition. It will require a Vector3 for the pos, and all we’re doing here is just gonna go transform.position = pos.
Okay, so let’s test out our zoom function right now. We’re pretty much moving along the camera’s forward direction, which is the blue axis the z axis, local to the camera, whichever is pointing in the direction that the object is looking at, so we’re gonna be moving along that axis based on our scrollInput, and then multiplied by our zoomSpeed, so we can affect how fast the zoom is.
So back in our Unity right now, let’s press play and test it out. So we can move around like before, we can then zoom out with scrolling, as you can see. I’m at the max zoom distance, I can’t scroll out any more. Then, we can zoom in and I’m at the max zoom in distance, the min distance, so I can’t scroll in any more.
And yeah, that’s basically the camera control set up and ready to go, when we do have units spawning set up, whenever we click on spawn unit, we’ll have the camera focus on that position, and it will also focus on that at the start, so we don’t have to manually move the camera around when testing in the game. That is the camera controller script set up and ready to go.
In the next lesson we’re gonna be working on setting up our player, give them the ability to gather resources and use those resources, so I’ll see you all then.
Interested in continuing? Check out the full Real-time Strategy Project – Resource Gathering course, which is part of our Strategy Game Development Academy.


