You can access the full course here: VR Projects – Build an RPG
Creating the Level
If you go to the Models folder, you’ll see all of our modular pieces to create our level. Drag in the grass model and then drag in the grass PNG file to attach the texture.
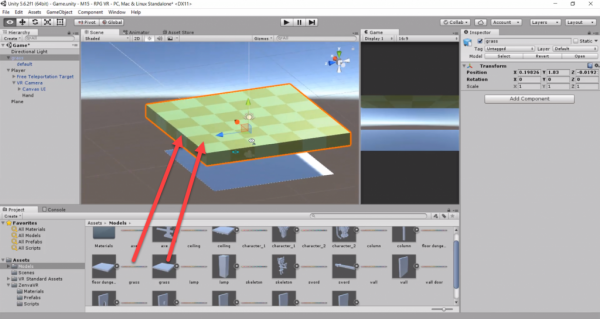
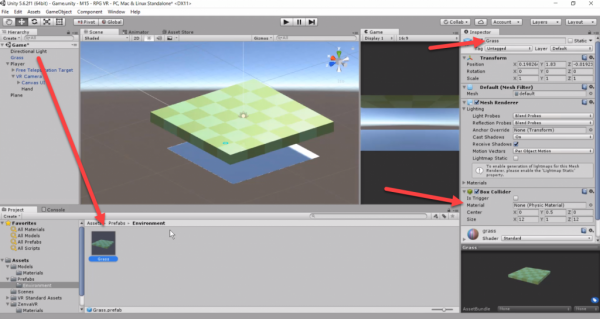
Rename the object to Grass, and then attach a BoxCollider component. After that, create a new folder called Environment and drag the model into there. This will hold all of our modular level objects.
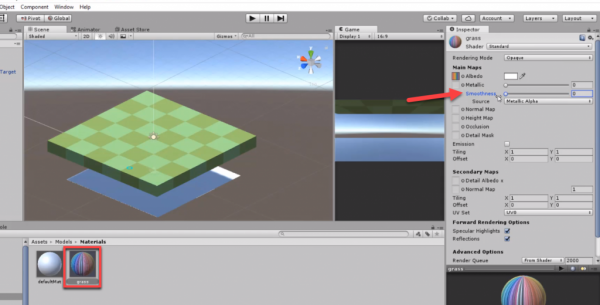
If you go to the Materials folder, you should see a grass material. Selecting it, you can change the material’s properties. To remove the shine, drags the Smoothness slider down to 0.
Like with the plane we made last lesson, let’s do the same but as a child of the grass. Create a new plane and set it’s parent to the Grass object.
- Set the scale to 1.2, 1, 1.2
- Set the position to 0, 1.01, 0
- Add a Free Teleportation Zone script
- Remove the Mesh Filter component to make it invisible
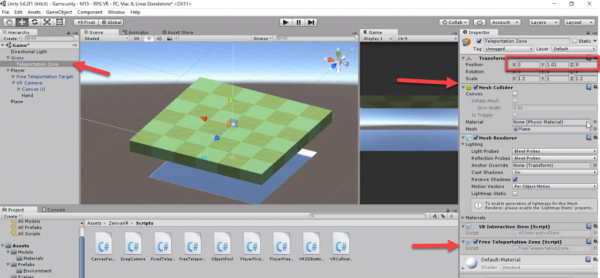
Now just select the Grass object and hit Apply to update the prefab.

Let’s do what we just done again – create a new piece for the dungeon floor.
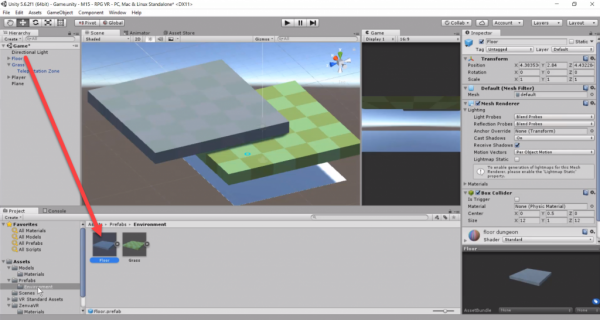
Then duplicate/attach multiple pieces so they’re next to each other like so:
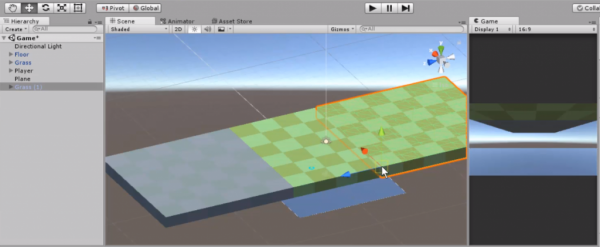
Selecting all the tiles, set their Y position to -1. This will make the surface of the tiles be at Y = 0.

Now select the VR Camera object and set the Y position to 1.8. This is to simulate the player standing. You can change this position to whatever height you want – even yours!
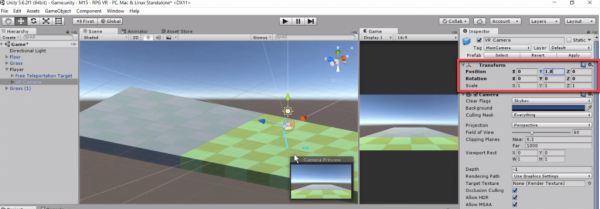
For the walls, let’s drag in the wall model, texture and attach a BoxCollider component to it. Then drag this down into the Prefabs > Environments folder to save it as a prefab.
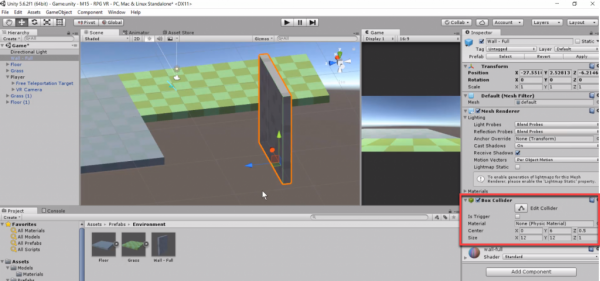
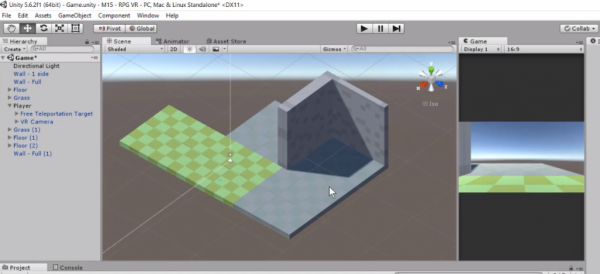
Now duplicate and place the walls again to create a level that looks something to the one below (we’ll continue on with it next lesson), or create your own!
Transcript
In this lesson, we are going to talk about a very important game design technique called modular level design. Now, what is modular level design? As the name very well suggests, it is when you create elements of your level as small components, small modules. So that you can build your level out of many small elements that you can reuse in different parts or in different levels as well.
So what we will have in this case will be a dungeon, where we will have different rooms. And there will be elements like walls, doors, areas that are outdoors. And the approach that we’ll take here is to have our dungeon divided in an imaginary grid. So imagine that you have a grid and you can create your level assets, for example, the floor elements, considering this basic unit. Our basic unit is going to be 12 Unity units or 12 meters by 12. That is just the size that I have chosen in this case, but you can choose whichever unit suits your own needs when you are using this approach.
So, how are we going to represent the floor? We are going to have a block for the floor. And that block will have those dimensions that I mentioned. So it’ll be 12 by 12. Then, what if you have a wall? The walls are also going to be 12 thick always, or if you have a wall that has a door for example, that will also have that same width. Now, the height is also something that we can set, and then they can all have the same height or you can have different sets of heights.
So, in this manner, if you’re going to create a very large room you can just put many of these elements together, one next to the other. For example, you can have a room that is very big. So you could use four of these floor elements and then you have a much bigger room. But you’re always using this unit of measurement, which can also be a small number. So, you could also have a very small unit there and then you would just have to use more pieces, more puzzle pieces.
The idea here is to think of this as a Lego, where we have all these different elements like a wall with a door. A wall that is meant to be put next to another wall for a corner. Or a wall that will have a torch on it. So you could have all these different elements. You could have like different ceiling elements, different floor elements and then you can go and put together a level that is really as big as you want.
So let’s go and take a look at these assets. How they were created and how we can export them and bring them into Unity. This program is called MagicaVoxel, it’s a free tool that can be downloaded for all platforms. So, I can go here, I can create any kind of shape that I want. It’s extremely easy to use. But we’re not going to cover how to use it here. So, what I want to show you is the elements that I have.
So we have this, which is going to be the floor. And in here this is 12 by 12, so this will translate when imported into Unity in 12 Unity units. That’s great, it means that we don’t have to do any scaling or whatsoever. It will just work out of the box. So that is one of the elements that we will have. Then, we are also going to have, I mentioned before, a ceiling element, so the ceiling will be something like that. We’ll have that kind of pattern. We’re going to have a different type of floor as well, like grass tile, so we can create extends, outdoor areas, using this approach. And then we’re going to have different types of walls.
So, I’m going to start by showing you the full wall. The full wall goes all the way from 12, it is 12 Unity units. But imagine you want to have a corner, if you used this wall for a corner, you would have the same wall in two areas, and you would have an overlapping area. Basically, the corner would be overlapping with the two meshes. And having overlapping meshes in that way is not a good idea.
There are reasons why you would not want that. One of them is that sometimes when two meshes occupy the same space, the faces will kind of overlap each other and it’s going to look weird. Another reason is that you are rendering something that’s not visible, so that’s extra work for your game. So, to address that we have different types of walls. We have a wall that has one of the sides empty so that you can position another wall as a corner.
We’re also going to have a wall that has both sides empty, if you want to have walls on both areas. And also to make this very flexible, in case you want to have different tool, one walls for example, I also created a column that could be used potentially to fill in any gaps or to give a wall an extra texture. Like a bit of a decoration thing. So we’ve got a column as well that we can use. Now, what else do we have here? We have a wall that has a door and we have a wall that has a lamp and we’ll be putting lights here and those lights will be baked on the scene. So it’s going to look really cool.
What else do we have here? Let me show you everything that we’ve got. We’ve got the weapons, so we’ve got an ax and we’ve got a sword. The weapons will need to be scaled, because as you can see they are a few units. So, this one for example is 12 units long. If you import it like that into Unity, it will be 12 Unity units, clearly not what we want. Then we have the skeleton, and I think that is all that we have in this particular folder. We also have the lamp on its own if we want to place it in a different location. And that’s it, so let me now bring this in to Unity.
But first, how do we export this? How do we export this file? Well, it’s pretty simple. There’s an option down here that says export, and what you do is you go there and you select obj and then you select the destination folder. And that will create an obj file and also a png file, texture file. And both of them need to be brought in to Unity. So I’ll show you what the files look like, that we’ve got all these files here.
The ones that matter are the objs and the pngs. So, if I go now to Unity, I’m going to create here a folder named models and I’m going to select all of these models that I have. ‘Kay, we have some more characters there as well, some more elements. So I’m going to select all of these and drag it all to here. So after a couple of seconds that’s all imported and now we can easily just bring any of these elements here really. So, for example, if I want to have grass, I can just bring the grass in here. This grass is 12 units long and it is one unit high. So, that’s perfect. And if I want to give it the texture, I can just simply drag the image here to the grass itself and that will make it show like so. The materials are going to be placed here, once you do this operation.
So, now let’s go and explore what this object here that was created looks like. You can see a grass object and also a child object there. And I find this quite interesting, because this current object here doesn’t seem to be serving any purpose because our transfer doesn’t have any default values here. So, what I’m going to do with all the environment elements, basically the walls and the floor and the ceiling, those and the column, with all those things what I’m gonna be doing is just drag the inner object to the outside and it will warn you that it will break a prefab instance. I’m going to say continue, I don’t care. And then I’m going to delete the grass, and I’m going to rename this one here to grass. And then what I want to do is give the grass a Box Collider.
So select here at component, Box Collider. Inside of assets, you can go and create a folder called Prefabs and inside of Prefabs we can create a subfolder here called Environment. And in here we can bring this grass. Now, I won’t be doing this for every element. They will be all done for the next video. So I will leave that part up to you.
Also the materials themselves that you can go here, select the material and you can change the properties if you want. If you don’t like the way that they’re reflecting light for example, you can go and change their properties. Their smoothness or their metallic type of value. And for the ones that are the floor, which are basically two, one of them is the grass and the other one is the one called floor or ground, it is called, here it is floor dungeon.
So for those two, we need to be able to teleport in this region here, we need to be able to move in this area. So, what I’ll do is create a child object to this element, which is going to be a plane. And I’m going to move this plane up. It will be in position, we can place it in position one. Or it can be something like 1.01, so that we’re actually on top of the other one. And then we need to increase its size a little bit so that it reaches the edges of this area here.
So I’m going to need to scale this. I think maybe 1.1 or 1.2. 1.2 seems to be the right number here. We might need to adjust this so let me make sure that, I should be doing the math to get the right amount here, but it seems that 1.2 should do it. Yeah, 1.2 will do. So, I’m scaling it like so and this is going to be a teleportation area so I’m going to go to here, ZenvaVR, Scripts and find FreeTeleportationZone. Give this FreeTeleportationZone script to our plane.
So we can find that now here. And also, maybe we should rename this to Teleportation Zone. And we don’t want this to be visible really. So what we can do is just remove the plane mesh so that it doesn’t have any visible element. It is just like an invisible collider in this manner. Also, I’m going to make the, well it’s called this mesh. Let’s take a look. So you’ve got that mesh collider on the planes and I’m not sure why it is, well we’re going to leave this as it is. And we are going to apply these changes. So select the parent object, the grass. We’re going to apply these changes. So that’s for the grass. I will do the floor as well real quick.
So I’m going to do the same process basically. Bring the dungeon floor here and bring in its material and I’m going to change the material’s smoothness here. Set that to the minimum. We are going to expand in the editor and bring the parent up one level, delete the original element. Now, rename this to floor. And add here a Box Collider, and I’m going to add, actually we don’t need to have the collider if we are giving already a collider for the Transportation Zone, but I think we will add it just in case and we might have to deal with that later if there is any issue. Because maybe the plane will need to be made a trigger, but we’ll fix that if we run in to any problems.
So, for now let’s just, we can actually duplicate a Teleportation Zone from the other element. And drag that to floor just to make sure that the position is being reset. And in Y we’ve got 1.01, like so. And also the position here and that should be zero. And now I’m going to select this and delete that one number there. It’s got the right controller. And now I’m going to drag this floor to our prefabs, the Environment folder.
So we’ve got already two Lego pieces. And with those two Lego pieces, we can already start doing other stuff. So we can go and for instance press V, so that we do vertex select and vertex snap. And see how we can easily, by pressing V on your keyboard you can easily start to build your level in a very quick way. So you can go for instance and duplicate that and just move it a bit further and then press V. Make sure to select the corner and then you can place it next to the other one. So, in this manner you’re able to create levels very quickly.
Now, what should be the height of all these elements? Well, as we can see the pivot point is on the bottom, and I would actually like to have the Y zero on the top of this, so that then we could place our player or anything we want assuming that zero is ground level. So I’m going to select all of these environmental elements and place them on position Y equals minus one. So that position zero equals to the top of the floor. So we’ve got that and I’m also going to delete the original plane that I created. And the player now I’m going to position it on zero, but the camera itself, I’m gonna give this a height of 1.7 or 1.8.
Now, remember that, or it’s important to know, in case you weren’t aware that some head mounted displays will set this value by themselves in the camera, whereas other elements will expect you to set that, some other platforms.
So the OpenVR platform will set this according to the height that you define when you are setting up your headset in your device. The person that you go through when you are playing games. You have to enter the height. So that number will be set by the camera, whereas with the Oculus or Gear VR or Cardboard, that is what you set here. And the problem in OpenVR is that is added to whatever number you entered here. So in OpenVR you should set zero, but in the other platforms a number. Or in your code you might have to check what platform you’re in and change the number accordingly.
So, that is where the grass to the floor, so I’m assuming now it will be easy for you to take floor, Control + D to duplicate, then move it a little bit. Press V to get the vertices and boom there you go. So you can create all sorts of rooms. Now, what about the walls? Let’s do a couple of the walls. The rest will remain for you as a challenge.
So, in models here, let’s bring in the very first wall. I’m going to start with the wall full. And actually the one that’s just called wall, I believe that that is not used, so I’m going to delete that. I think that is redundant there, so I’m going to delete it. Alright, so the wall, I meant to bring in the wall full, and give it its material. Let’s go and change the materials properties. And now I can expand here, take in the inner child object. Yes, break the prefab.
Then delete the original parent object, and go here, rename this to wall full. And give this a Box Collider and make this in to Environment prefabs. In here we don’t need to add anything teleportation related, so this is actually much simpler.
And how do you move this around? We can press V and take the bottom corner and oops, and then we just find where we wanna place it. And as you can see, everything just fits right in. But what I’ve thought is that you actually have to place the walls on top of the ground, so that it is thought that way. You have to place always the walls on top of the ground. So we’re not going to have floating walls. And if you have a wall between two areas, you can just duplicate the wall and have it on each one. Or you can just leave it on one of them.
So for example, if you duplicate this and move it here, you could just keep it like so. Now, keep in mind that very thin walls actually might be an issue because if the head mounted display has position tracking, the player might be able to go through your wall, if it’s too thin. So you might also need to create thicker walls, depending on platform. Or you can also, what might help is just to have a double wall. And so if we position here again. So as you can see this is extremely easy. That’s with the full wall.
Now, what about the one side wall? Someone explained that one, how you can use that one. So I’m going to bring that one in and give it its material, go and expand and change the smoothness of the material. You can change other properties too if you want. And here, I’m going to move the inner object to the outside, delete the original one, rename this to wall one side and give it a Box Collider. And also drag this to the prefabs Environment folder.
Alright, now I’ve got the wall and now if you want to place wall, well you might need to rotate it about Y. For example, 90 degrees, and we can now select V. Press V on our keyboard and whoops, and just pick the corner there and put that corner there. And there you go. If you run in to a, you should just press F and it will give you the right focus. So, see how this wall has that side empty and it fits perfectly here. And if you already had a wall here, you could use the two side, which has empty on both, two sides. So, then we’ve got, well the rest it’s really all the same.
So what I’ll do is stop here and leave the rest as an open challenge. The rest is you just have to do the same process that I just did, so there’s no point in making the video much longer. So I will do that and on the next video you’ll have all the elements loaded.
And as an open challenge for you, I would like you to do that yourself and to create a level here. Don’t make it too huge but create a few rooms. Connect them with the doors, get comfortable with using this approach, vertex snapping. It is extremely easy to create very large levels with this system. So, I will see you in the next video and I hope you enjoy the process of building your very first combat RPG level.
Interested in continuing? Check out the full VR Projects – Build an RPG course, which is part of our Virtual Reality Mini-Degree.

