In this tutorial series you will make a turn-based RPG similar to the early Final Fantasy games, all while learning to use many of the cool, new features incorporated into the current version of the Phaser 3 game engine. For the first part of this tutorial we will focus our attention on creating the world, adding the player and moving on the map. Then we will add some invisible zones where the player will meet the bad guys.
Part Two of this series will help you learn how to create the battle system and the user interface. We will make our units fight the enemies!
Table of contents
Learning goals
Scenes, scene management and interaction, events
In this tutorial we will learn how to create and use multiple scenes and how to switch between them. We will have one scene for the world map and another for the battle. Actually, we will have two scenes running at the same time during a fight – the Battle scene and the User Interface scene, where you will see heroes stats, damage information and enemy moves.
Sprites and animations
We will have our hero sprite on the world map and it will use several animations for moving in different directions.
Use map
You will learn how to use a Tiled map in Phaser 3 game engine. For this tutorial you can create your own Tiled map or use the one that comes with the sources. You will learn how to create map layers and make the player collide with map layer elements.
Arcade Physics
We will use arcade physics to move the player character on the world map and to handle some collisions. You will learn how to use Arcade Physics groups, Colliders and Phaser 3 zones.
Effects and camera
You will learn how to use some cool effects like shake and fade when the character meets enemies and before a battle is initiated.
Tutorial requirements
- Intermediate level of JavaScript
- Code editor
- Web browser
- Local web server
- Assets – map in JSON format and images (you can use the ones coming with this tutorial files)
Assets copyright
All assets used in this tutorial are CC0 licensed. The tiles are created by Kenney Vleugels and can be found at www.kenney.nl
The player sprites can be found here – https://opengameart.org/content/rpg-character-sprites
Source code
You can download the tutorial source code here.
Did you come across any errors in this tutorial? Please let us know by completing this form and we’ll look into it! FINAL DAYS: Unlock coding courses in Unity, Godot, Unreal, Python and more.
Create the game
We will start with creating a simple Phaser 3 game with the help of the config object. For now, in our game we will start with two scenes – Boot Scene and World Scene. Scenes in Phaser 3 are managed by the Scene Manager and as we will see in the next part of this tutorial you can have more than one active scene at a time.
Now we will start with something easier – creating the game and loading the resources.
Here is how your empty project and config object should look:
var BootScene = new Phaser.Class({

    Extends: Phaser.Scene,

    initialize:

    function BootScene ()
    {
        Phaser.Scene.call(this, { key: 'BootScene' });
    },

    preload: function ()
    {
        // load the resources here
    },

    create: function ()
    {
        this.scene.start('WorldScene');
    }
});

var WorldScene = new Phaser.Class({

    Extends: Phaser.Scene,

    initialize:

    function WorldScene ()
    {
        Phaser.Scene.call(this, { key: 'WorldScene' });
    },
    preload: function ()
    {

    },
    create: function ()
    {
        // create your world here
    }
});

var config = {
    type: Phaser.AUTO,
    parent: 'content',
    width: 320,
    height: 240,
    zoom: 2,
    pixelArt: true,
    physics: {
        default: 'arcade',
        arcade: {
            gravity: { y: 0 }
        }
    },
    scene: [
        BootScene,
        WorldScene
    ]
};
var game = new Phaser.Game(config);
You can pay special attention to the pixelArt: true option; when set to true it will prevent the blur of the textures when scaled. We will use it together with the zoom option to make the game scale. In the config object we will ask Phaser to include the arcade physics by default. It will help us move our character.
At the end of it we have scene option with all scenes listed. At the current moment both scenes look almost the same. The only deference is in the create method of the BootScene, where we start the WorldScene with this row:
this.scene.start('WorldScene');Load the assets
Loading assets in Phaser 3 is very easy, you just need to add whatever assets you need to the loader. Add this code to the preload function of the BootScene:
       // map tiles
        this.load.image('tiles', 'assets/map/spritesheet.png');

        // map in json format
        this.load.tilemapTiledJSON('map', 'assets/map/map.json');

        // our two characters
        this.load.spritesheet('player', 'assets/RPG_assets.png', { frameWidth: 16, frameHeight: 16 });
Now we will create our world scene with the map we have loaded. This will happen in the create method of the WorldScene:
var map = this.make.tilemap({ key: 'map' });The key parameter is the name, we gave to our map when we used the this.load.tilemapTiledJSON to load it.
Now when you refresh the game it is still black. To have the map in game, we need to load the layers of the map.
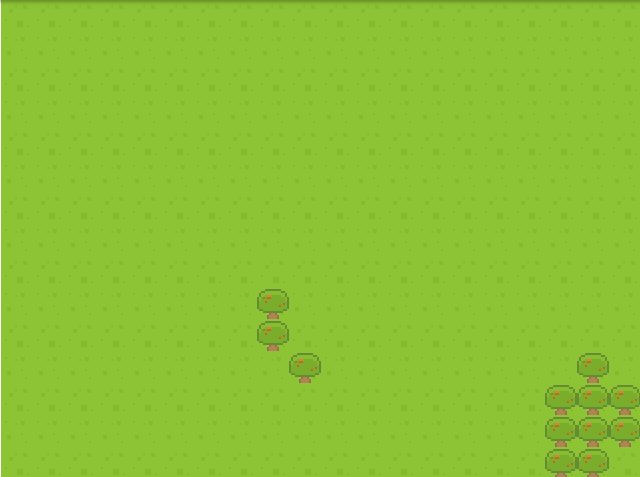
The map for this example is created with Tiled Editor. To follow the tutorial you can use the map that comes with the source files or create your own map. I have prepared simple map with only two layers – the first one is called ‘Grass’ and contains only grass tiles, the second is ‘Obstacles’ and there are some trees on it. Here is how you add them in game.
Add this code at the end of WorldScene create:
	var tiles = map.addTilesetImage('spritesheet', 'tiles');

	var grass = map.createStaticLayer('Grass', tiles, 0, 0);
        var obstacles = map.createStaticLayer('Obstacles', tiles, 0, 0);
        obstacles.setCollisionByExclusion([-1]);
The first row creates a tileset image. The next two rows add the layers to the map. The last one is what is interesting. The method setCollisionByExclusion makes all tiles except the ones send, available for collision detection. Sending -1 in our case makes all tiles on this layer collidable.
When you open the game in your browser, you should have something like this:
Its time to add our player sprite. Add this code at the end of the WorldScene create method:
this.player = this.physics.add.sprite(50, 100, 'player', 6);
The first parameter is x coordinate, the second is y, the third is the image resource and the last is its frame.
For moving on our world map we will use Phaser 3 Arcade physics. In order for the player to collide with obstacles on the map we will create it through the physics system – this.physics.add.sprite.
Add three more rows:
        this.physics.world.bounds.width = map.widthInPixels;
        this.physics.world.bounds.height = map.heightInPixels;
        this.player.setCollideWorldBounds(true);
This will make the player stay within the borders of the map. First we set the world bounds, then we make the character’s property collideWorldBounds to true.
Move on the map
Its time to make the player sprite move on the map. We need to process the user input. For this game we will use the arrow keys.
Add this code at the end of the create method:
this.cursors = this.input.keyboard.createCursorKeys();
For moving the player we will use the physics engine. We will set the body velocity of the sprite according to the direction we want to move. Now we need to add an update method to the WorldScene. We will add the player’s movement logic there.
Here is how your update method should look:
update: function (time, delta)
{
	this.player.body.setVelocity(0);

        // Horizontal movement
        if (this.cursors.left.isDown)
        {
            this.player.body.setVelocityX(-80);
        }
        else if (this.cursors.right.isDown)
        {
            this.player.body.setVelocityX(80);
        }

        // Vertical movement
        if (this.cursors.up.isDown)
        {
            this.player.body.setVelocityY(-80);
        }
        else if (this.cursors.down.isDown)
        {
            this.player.body.setVelocityY(80);
        }
}
First we set the body velocity to 0. Then if an appropriate key is down, we set the velocity on x or on y. You can test the movement of the character in your browser.
Our player can move, but the camera don’t follow. To make the camera follow a sprite we need to call its startFollow method.
Add this code at the end of the WorldScene create method:
	this.cameras.main.setBounds(0, 0, map.widthInPixels, map.heightInPixels);
        this.cameras.main.startFollow(this.player);
        this.cameras.main.roundPixels = true;
The first row limits the camera to stay within the map boundaries. The second makes the camera follow the player.
The third row this.cameras.main.roundPixels = true; is a bit of a hack to prevent tiles bleeding – showing border lines on tiles.
Again, try the game in the browser. As you see, the movements of the player look very boring, as there is no walk animation. So we need to animate the character. Animations in Phaser3 are done trough the Animation Manager. Here is how we will add animations to our player character.
To define the animations add this code to the WorldScene’s create method:
        //  animation with key 'left', we don't need left and right as we will use one and flip the sprite
        this.anims.create({
            key: 'left',
            frames: this.anims.generateFrameNumbers('player', { frames: [1, 7, 1, 13]}),
            frameRate: 10,
            repeat: -1
        });

        // animation with key 'right'
        this.anims.create({
            key: 'right',
            frames: this.anims.generateFrameNumbers('player', { frames: [1, 7, 1, 13] }),
            frameRate: 10,
            repeat: -1
        });
        this.anims.create({
            key: 'up',
            frames: this.anims.generateFrameNumbers('player', { frames: [2, 8, 2, 14]}),
            frameRate: 10,
            repeat: -1
        });
        this.anims.create({
            key: 'down',
            frames: this.anims.generateFrameNumbers('player', { frames: [ 0, 6, 0, 12 ] }),
            frameRate: 10,
            repeat: -1
        });
The code above defines a bunch of animations, one for each direction. In our case we don’t need separate animations for left and right as we will just flip the sprite and use the same frames.
In the update method you need to switch into the correct animation. Add this code at the end of the update method to do so:
        if (this.cursors.left.isDown)
        {
            this.player.anims.play('left', true);
        }
        else if (this.cursors.right.isDown)
        {
            this.player.anims.play('right', true);
        }
        else if (this.cursors.up.isDown)
        {
            this.player.anims.play('up', true);
        }
        else if (this.cursors.down.isDown)
        {
            this.player.anims.play('down', true);
        }
        else
        {
            this.player.anims.stop();
        }
Now if everything is correct, you should have nice walking animation in each direction. But our player walks over trees and obstacles. We need to make it collide with the tiles on the Obstacles layer. To do so, add this row at the end of the WorldScene create method:
this.physics.add.collider(this.player, obstacles);
It creates physics collider object and it takes two parameters – in our case a sprite and a tilemap layer. If you remember we made all tiles from the obstacles layer collidable calling
obstacles.setCollisionByExclusion([-1]);
Now if you try the game you will see that the player can no longer move through obstacles and have to avoid them.
And its time to think how the player will meet the enemies. For the enemies locations I’ve decided to use a group of zone objects (Phaser.GameObjects.Zone). When the player overlaps with such zone, a battle will be initiated.
Phaser.GameObjects.Zone is an invisible object, to be able to see it during development you can set debug: true like this:
physics: {
        default: 'arcade',
        arcade: {
            gravity: { y: 0 },
            debug: true
        }
    },
We will create 30 zones in a physics group and we will use this group to test for collisions with the player.
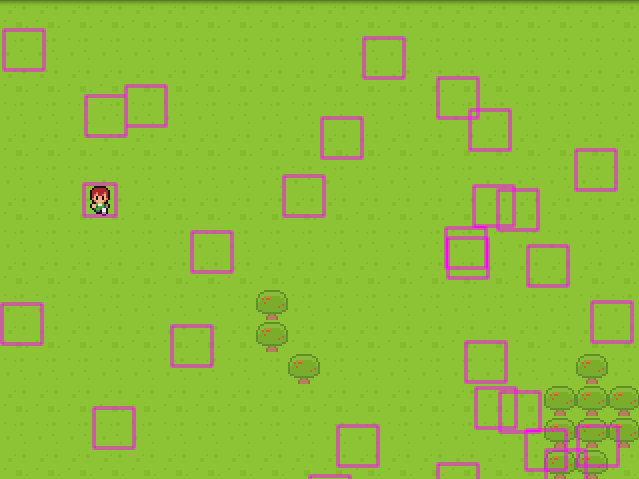
Add this code at the end of WorldScene create method:
        this.spawns = this.physics.add.group({ classType: Phaser.GameObjects.Zone });
        for(var i = 0; i < 30; i++) {
            var x = Phaser.Math.RND.between(0, this.physics.world.bounds.width);
            var y = Phaser.Math.RND.between(0, this.physics.world.bounds.height);
            // parameters are x, y, width, height
            this.spawns.create(x, y, 20, 20);
        }
        this.physics.add.overlap(this.player, this.spawns, this.onMeetEnemy, false, this);
With the last row we make the player and our zones interact. When the player overlaps with one of the zones, the onMeetEnemy method is called. Now we need to add this method to the WorldScene.
    onMeetEnemy: function(player, zone) {
	// start battle
    },
In the second part of this tutorial we will call the Battle Scene from here. For now our onMeetEnemy will be simpler. We will move the zone to another random location. For picking random coordinate I will use Phaser.Math.RND.between(min, max).
Change the onMeetEnemy code to this:
    onMeetEnemy: function(player, zone) {
        // we move the zone to some other location
        zone.x = Phaser.Math.RND.between(0, this.physics.world.bounds.width);
        zone.y = Phaser.Math.RND.between(0, this.physics.world.bounds.height);

        // start battle
    },
We won’t destroy the zone but we will move it to another random location. To make the battle start a bit more intimidating we will add something cool – a shake effect.
Shake effect in Phaser 3 can be added through the camera – camera.shake(duration).
    onMeetEnemy: function(player, zone) {
        // we move the zone to some other location
        zone.x = Phaser.Math.RND.between(0, this.physics.world.bounds.width);
        zone.y = Phaser.Math.RND.between(0, this.physics.world.bounds.height);

        // shake the world
        this.cameras.main.shake(300);

        // start battle
    },
You can play a bit with the value to change the duration of this effect. As an exercise you can try and change the effect to flash or fade.
camera.flash(duration);
camera.fade(duration);
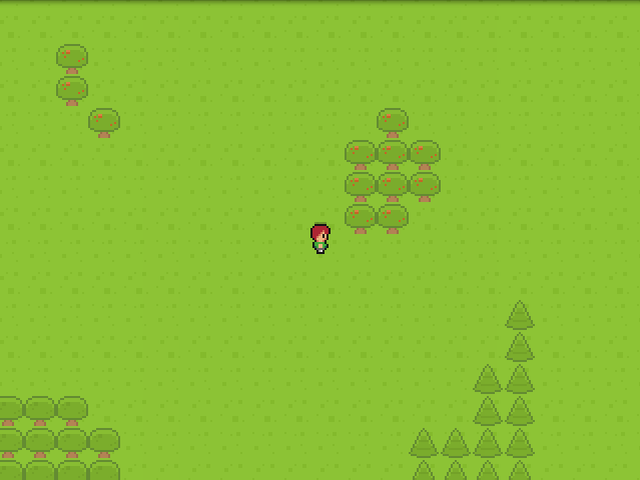
And with this, the first part of the tutorial is over. In Part Two we will create our Battle Scene and User Interface Scene, and we will switch to them when an enemy is met. When the battle is over we will switch back to our WorldScene.

