If you’re using a bone system with your 2D characters, did you know you can animate right within the Unity Engine?
In this tutorial, we’re going to show you how you can take a rigged, 2D character and animate them with idle and walk animations. As mentioned, we’ll also be doing everything inside Unity using the Animation window and Unity Timeline.
If you’re ready to become a true 2D puppet master, let’s start exploring 2D animation!
Table of contents
Introduction
At the very core of animation is an illusion. The “Illusion of Life” is what it is called. We think an animation looks the best when it produces a greater illusion of a living character. This makes sense, does it not? When we see an animation of a living character, it triggers a memory or recognition of a live being we have seen in real life. Therefore, the task of the animator is to closely follow the rules of movement that we see in the real world because that will greatly increase the illusion that what you are seeing is a real being, moving and functioning. And this is the goal of this tutorial. We are going to start creating this “Illusion of Life” for a 2D character.
This tutorial uses a character that was rigged in this tutorial: Rig a 2D Character in Unity. Please check this out if you would like to learn more about the sprite rigging process in Unity and if you want to be able to follow along in this tutorial. We will be animating a character to run, walk, idle, and jump. The end result is a sprite ready to be scripted into a 2D character for your game.
Did you come across any errors in this tutorial? Please let us know by completing this form and we’ll look into it! FINAL DAYS: Unlock coding courses in Unity, Godot, Unreal, Python and more.
Requirements and Assets
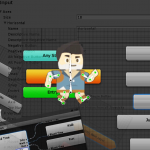
Basic knowledge of the Unity Editor (how to navigate and open tabs) is required along with how to work with the Unity Animation window (here is a tutorial that will tell you all you need to know about it: How to create animations from models and sprites). You will also need the character that was rigged in this tutorial. You will not be able to follow along without that character. This was rigged with the Sprite Skinning features in Unity and this contains the “2D Animation,” “2D IK,” and “2D PSD Importer” packages that are necessary to run this project. Also, this tutorial will focus on animating not the Unity Animator. If you are looking for information on the Unity Animator, check out this comprehensive guide to the Unity Animator: https://gamedevacademy.org/unity-animator-tutorial/
The source code for this project can otherwise be found here.
Animating!
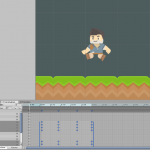
Select the Adventurer character and open up the Animation tab.

Dock this next to your project and console tab. Now, go to your project tab and open up the Adventurer folder. Create a new folder called “Animation.”

Now we go to the Animation tab and create a new animation called “Idle” that will be housed in our Animation folder. This will also create an Animator Controller in that same folder.

Now, let’s start animating this character!
The Idle Animation
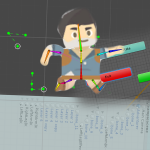
When it comes to the idle animation, the IKs really contribute a lot to the efficiency and speed of animating. We just need to animate a subtle movement, almost like just a breathing motion. Hit the red record button and move the character to this position:

Now go about fifty frames ahead and just barely move the top torso bone straight down. Move the arm IKs to the side so that there is a bit less bend in them and so that there is a sort of “swinging” motion. Here is the pose that I chose:

This is just a subtle tweak. If we make large movements, it makes the idle animation look strange. Next, select the first group of keyframes and hit Ctrl-C (Command-C on a Mac). Then paste these keyframes on frame number 1:50.

Now, we have a nice looping animation! It looks decent but I think we need to add some head motion to enhance the illusion. Just have the head rotate backward ever so slightly. As you can see, it makes a huge difference. Alright! Congratulations! We now have an idle animation!

Walk Animation
Create a new animation clip called “Walk.”

This animation is a bit more technical. Here, we need to know a few important things about the walk locomotion. The main feature of a walk animation is that the character is always touching the ground. We should never have a pose where our character is airborne. Also, I use the word “pose” intentionally. When we animate in 2D, an action is made up of a few key poses. In the case of the walk animation, we have one pose like this:

As you can see, here we have the right foot (relative to the character) touching the ground.
Then, about six frames ahead, we have what’s called a “passing pose.”

Here, there is a slight movement downwards. This adds a realistic bobbing motion. We also animate the character moving forward by moving the entire character game object. Don’t move the character by any other means except by dragging the entire character object.
And then another “dynamic pose” with the left foot touching the ground this time.

This occurs at frame twelve and we are still moving the character forward.
Now, we just need a final passing pose.

And then we recreate the same pose as the very first frame!

Simply copy the first keyframe and paste it at this frame. Reposition the character on the X-axis so that our forward motion matches. Now, just go through your animation and tweak any limbs that are bending the wrong direction.


We are done!

Run Animation
The Run animation is similar to the Walk animation except, this time, we need to have one pose where the character is airborne. The distance covered by one step is also greater than the walk animation. Other than that, the run animation has the same general structure (dynamic pose to passing pose to dynamic pose to passing pose etc) but we add one extra pose in order to enhance the illusion.
Create a new animation clip called “Run.”
Hit the record button and move the limbs to this pose:

The armature, I found, was very fiddly so be patient while trying to get it to this pose. This is, of course, our first dynamic pose which means that we need to have the entire character move slightly up on the y-axis. Then, after moving six frames forward, we drag the character forward and down while repositioning the limbs to create our first passing pose.

Scrub through these two keyframes to see if you have an animation that works. Reposition the feet so that there is no foot sliding.

Now, our second dynamic pose occurs six frames forward:

And then we have another passing pose at frame number 18:

And finally, we have our final dynamic pose where we try and make it look like the first pose. A good place to start is to copy the first frame and paste it at the end. Drag the character forward on the X axis into the correct place. Now move the limbs into roughly the same position as the first pose.

Now, we need to go back through the animation and do two things. First, we need to correct any limbs that are bent in an unnatural manner.


Second, we need to add a pose unique to this run cycle called a “Contact Pose” where we can visibly see the character make contact with the ground. This pose occurs a few frames after the dynamic pose and a few frames before the passing pose. It is simply the forward leg making early contact with the ground.

We need one of these before every passing pose. Also, while we’re here, let’s add a little bit more toe movement after a passing each passing pose to make it look like the character has pushed off from the ground.

The run animation is probably the most fiddly so be patient and try and get your animation to look as realistic as possible. Go through and try to correct any foot sliding as well.

The Jump Animations
A 2D character wouldn’t be complete without a jump mechanic. But, animating a jump is completely different than animating a run or walk cycle. In those cases, we needed only one animation clip. In the case of a jump animation, we actually need three. Each animation is just a single frame of a single pose. One animation clip is the “jump up” pose where the character has leaped off the ground. The second animation clip is the “mid-air” pose where the character stops moving upward and gravity begins to pull the character back to the ground. The final animation is the “landed” pose where the character has impacted the ground. The reason we do the jump mechanic this way is so that we can have more control over the power of the jump. If we animated a jump mechanic, it locks us into using that exact jump height. What if we wanted to have jump power-ups? We would have to animate a whole new action with an accentuated jump height. With this method, however, we can have the character jump up with a force of 50 or 500 and it makes no difference, all the animations play in their proper place. The Unity Animator does all the hard work for us in this case.
Create a new animation clip called “JumpUp.”

Hit record and simply drag the limbs into a pose that looks like this:

And that’s it for that pose! Just make sure it only exists on one single frame. There shouldn’t be more than one frame in this animation clip.

Next, create a new animation clip called “MidAir” and position the limbs like this:

The character has stopped accelerating upwards and is now falling back to the ground. This pose doesn’t look very natural but it really adds a realistic flair to your jump mechanic.
Finally, create a new animation called “Landed” and make it look something like this:

Here, the character has fully impacted the ground after the jump. We now have three animations which will constitute the core of our jump mechanic. All of these poses will be used by the Animator. In the Animator, we will create interactions which will transition and play these animations automatically. The topic of the Unity Animator will be treated in a separate tutorial.
A brief word on Root Motion
When we animated our character to move forward in the run and walk actions, you’ll notice that we built the forward motion into our animation. This is one of two methods of moving the character forward. One of the methods is to animate the character running or walking in place and then script the character’s forward motion. This method is good if you, as a developer, prefer to have your forward motion controlled by a few lines of code and if you just like having that kind of control when you are scripting your character. However, we have chosen the other method and that is to animate the character’s forward motion. The main difference, in this case, is that we, as animators, now have control over the forward motion. The result of this control is that we can make the animation much more realistic. We can add realistic bobbing motion to the character’s run and walk cycle which further enhances the illusion and we can prevent the foot sliding that often takes place if the forward motion were scripted and not animated.
This method has one main drawback, however, and that is that our forward motion is not additive. Whenever we hit play on our animation, the character runs forward and then jolts back to its first position. This is why we need a special Unity Animator function called “Root Motion.” This takes our forward motion and applies it to the character in an additive way. The forward motion will be applied relative to the character’s position. This allows us to create a realistic run and walk animation without having the constraints of a normal animation.
With Root Motion:

Without Root Motion:

Conclusion
This tutorial was mainly focused on animating a 2D character and it dove deeper into the actual structure of an animation. Knowing these things will not only allow you to animate 2D characters but also 3D characters as the principles are the same for each medium. Knowing how to create a convincing run or walk cycle is the first step to creating the illusion of life.