Want a Godot weapon system that lets your player and enemies share the same weapons? Drawing on Zenva’s experience teaching coding and game development through over 400 courses, this tutorial walks you through reusable item classes, a sword attack animation, and a controller for equipping, aiming, and attacking.
This tutorial assumes you know basic GDScript and have the project’s character setup and sword asset available.
Table of contents
Download Project Files
You can keep reading the free tutorial below, or follow the full guided project with the Intermediate Godot Mini-Degree, which includes the course, project files, and full project.
Build the Foundation of Your Godot Weapon System
Start with a modular design: a sword should belong to a generic Character, not specifically to a player or an enemy. That lets both character types use the same weapon behavior without separate weapon code.
The Weapon System’s Inheritance Hierarchy
Use inheritance to separate shared item behavior from specialized weapon behavior:
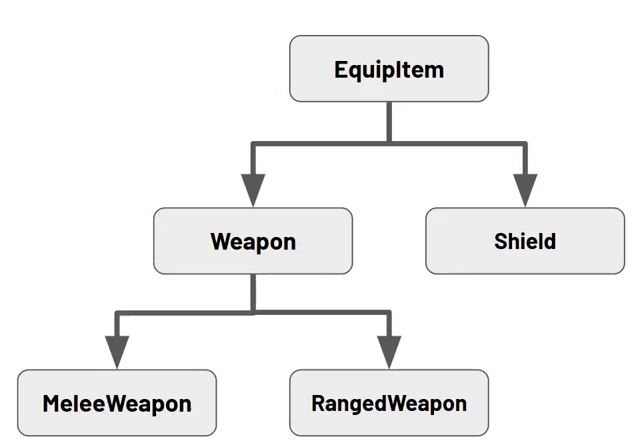
- EquipItem tracks the use rate, aim angle, owning character, and functions for equipping and using an item.
- Weapon inherits from
EquipItemand holds weapon-specific data such as attack range. - MeleeWeapon inherits from
Weaponand is intended for direct damage to overlapping characters. - RangedWeapon also inherits from
Weapon, with attacks that spawn projectiles. - Shield inherits directly from
EquipItemfor defensive behavior.
Here, you’ll build the shared item foundation and the sword’s equipping, aiming, and attack animation. Damage handling, ranged weapons, and shields are outside this tutorial.
Creating the EquipItem Script
In the FileSystem dock, create a Weapons folder inside Scripts. Create equip_item.gd in that folder.
Extend Node2D so the item can sit inside a character scene. Give it a global class_name so other scripts can reference its type:
class_name EquipItem
extends Node2D
Defining the Item Properties
Add the properties shared by every equippable item:
use_ratesets the interval between uses, in seconds.last_use_timestores the timestamp of the last successful use.aim_anglestores the target rotation in radians.owner_characterreferences theCharacterholding the item.can_uselets you enable or disable item use.
@export var use_rate : float = 0.5
var last_use_time : float
var aim_angle : float
var owner_character : Character
var can_use : bool = true
Laying Out the Core Functions
Next, lay out the functions that control the item’s behavior. You’ll fill in the shared logic first and leave item-specific actions for subclasses.
_process(delta)smoothly rotates the item every frame.set_aim_direction(aim_dir)receives an aiming direction from the owning character._equip()and_unequip()provide hooks for subclasses to customize equipping and unequipping._try_use()checks whether the item can be used and returns abool._use()performs the item’s action, such as an attack animation.
func _process (delta : float):
	pass

func set_aim_direction (aim_dir : Vector2):
	pass

func _equip ():
	pass

func _unequip ():
	pass

func _try_use () -> bool:
	pass

func _use ():
	pass
Implementing _try_use
The character calls _try_use() when it wants to use an item. This function checks the can_use flag and cooldown before allowing the action:
- Return
falseifcan_useis false. - Return
falseif the time since the last use is less thanuse_rate. - Otherwise, record the current Unix time, call
_use(), and returntrue.
func _try_use () -> bool:
	if not can_use:
		return false

	if Time.get_unix_time_from_system() - last_use_time < use_rate:
		return false

	last_use_time = Time.get_unix_time_from_system()
	_use()

	return true
Leave _equip(), _unequip(), and _use() empty in this base class. Subclasses override them with their own behavior, such as a sword playing an attack animation or a bow spawning a projectile.
Rotating Toward the Aim Angle in _process
Use lerp_angle in _process to turn smoothly toward aim_angle instead of snapping to it:
func _process (delta : float):
	global_rotation = lerp_angle(global_rotation, aim_angle, 40 * delta)
Converting the Aim Vector Into an Angle
The owning character supplies a direction: toward the mouse for the player, or toward the player for an enemy. Convert that Vector2 into an angle in radians with angle():
func set_aim_direction (aim_dir : Vector2):
	aim_angle = aim_dir.angle()
An Abstract Base Class
You won’t attach EquipItem directly to a specific object. Treat it as a base class that more specialized item classes inherit and extend. Next, you’ll add the weapon and melee-weapon layers.
Create the Sword Scene and Attack Animation
With the item foundation in place, you can create the weapon scripts, build the sword scene, and animate its attack.
Creating the Base Weapon Script
Create weapon.gd in the Weapons folder. This class inherits the properties and functions of EquipItem and adds shared weapon data rather than handling damage itself:
class_name Weapon
extends EquipItem

@export var range : float = 10.0
The range value is intended to help enemies decide how close to get before attacking. You won’t use it directly yet.
Creating the Melee Weapon Script
In the same folder, create melee_weapon.gd. This class extends Weapon with damage and hit-force values, plus placeholders for the animation player and hitbox references you’ll add later:
class_name MeleeWeapon
extends Weapon

@export var damage : int
@export var hit_force : float

# animation
# hitbox

func _use():
	pass

func detect_hits():
	pass
_use() will perform the attack, while detect_hits() is reserved for checking characters inside the hitbox. The hit_force value represents the force applied to a hit character: a light sword might push gently, while a heavier axe could apply more force.
Overriding Functions and the super Keyword
Declaring _use() in MeleeWeapon overrides the version inherited from EquipItem. Calling it on a MeleeWeapon instance runs the melee weapon’s version.
If you need the parent’s implementation too, call it with super. This example runs the parent function before the child-specific code:
func _use():
	super._use()
	# code specific to MeleeWeapon goes here
For now, keep _use() as pass. You’ll replace it with animation playback after connecting the player controller.
Building the Sword Scene
Now create the sword that your characters can use:
- Create a new scene with a
Node2Droot namedWeapon_Sword. - Attach
melee_weapon.gdto the root. - In the Inspector, set Damage to
1and Hit Force to150.
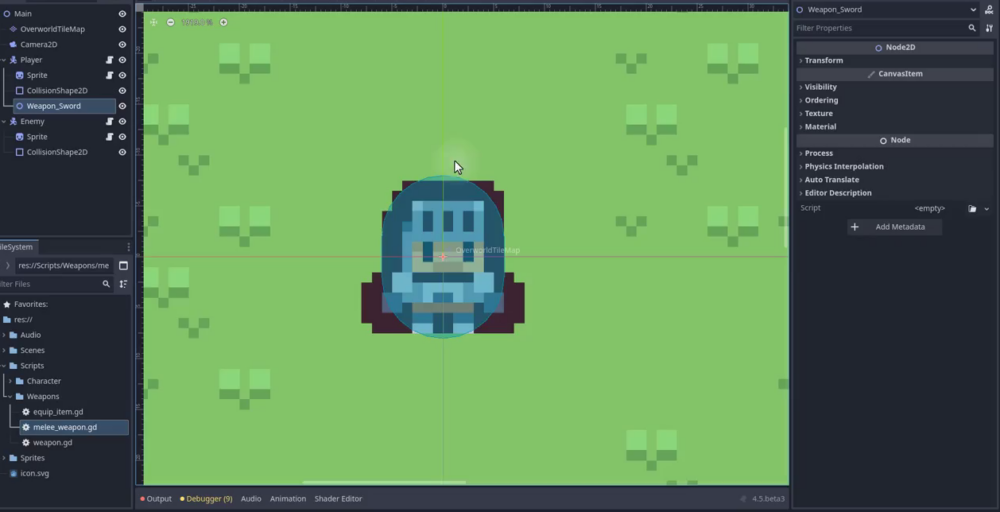
Adding the Sword Sprite
Add a Sprite2D child named Sprite. Drag the sword texture, such as Item_Sword from the items folder, into its Texture property.
The weapon’s forward direction is right. Rotate the sprite to point right, then set its Position X value to 11 as a starting offset so it doesn’t sit directly on top of the character.
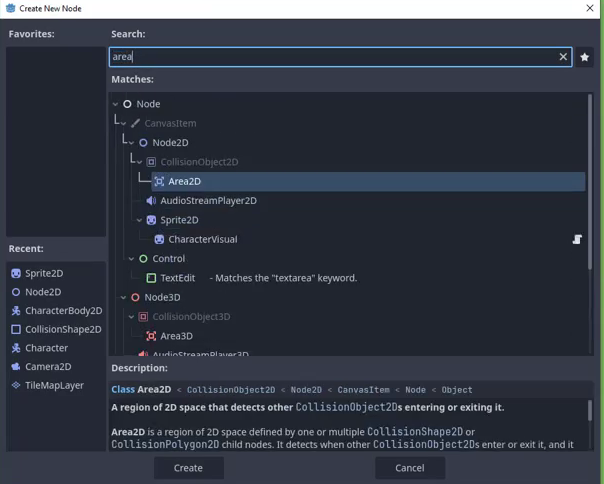
Adding the Hitbox
Use an Area2D to detect overlapping bodies and areas. Set up the sword’s hitbox as follows:
- Add an
Area2Dchild to the weapon root and name itHitBox. - Add a
CollisionShape2Dchild toHitBox. - Set its Shape to a new
RectangleShape2D. - Move and resize the rectangle around the sword’s tip, covering the area the blade will sweep through during its attack.
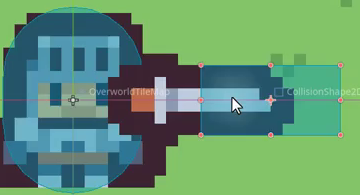
This rectangle defines the area for hit detection. You’ll prepare the hitbox here, but the damage logic is not part of this tutorial.
Animating the Attack
Add an AnimationPlayer child to the weapon root. With it selected, open the Animation panel, choose Animation > New, and name the animation attack. Set its duration to 0.5 seconds.
Select Sprite and click the key icon beside its Position property. When prompted, click Create without enabling the reset track. This creates the position track for the attack.
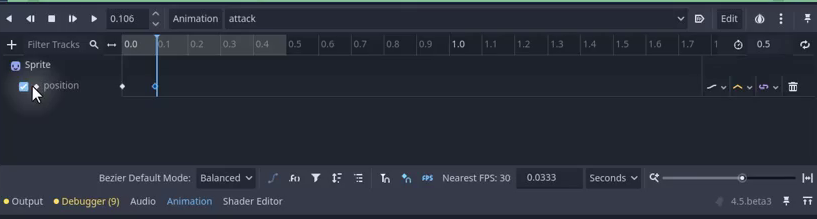
Build a short jab: pull back, hold briefly, thrust forward, then return to the starting pose.
- The starting-position keyframe is inserted automatically at
0.0. - Move the timeline cursor forward, for example to around
0.1seconds. Right-click the track, choose Insert Key, and set that keyframe’s X value to a small negative number. - Copy the pull-back keyframe and paste it slightly later to create a brief hold.
- Insert another keyframe further along with a larger positive X value, moving the sword beyond its starting position.
- Copy the original keyframe and paste it at the end so the sword returns to its idle pose.
Preview the animation in the editor. To make the forward motion faster, move the pull-back and thrust keyframes closer together.

Connect Weapon Equipping, Aiming, and Attacking
The sword now has a scene and an animation. Next, add a controller that equips it, aims it toward the mouse, and requests an attack when you click.
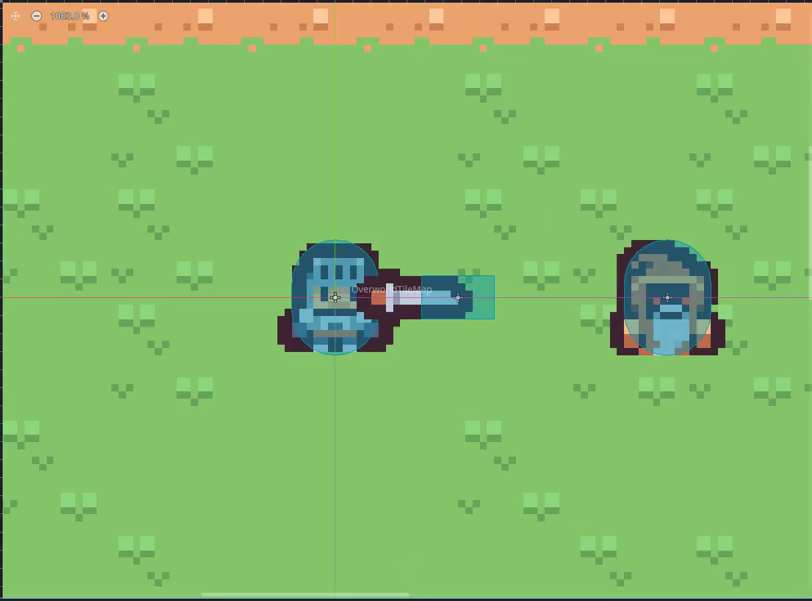
Saving the Weapon Sword as a Scene
The controller will instantiate the sword from code rather than keep it as a fixed child of the player. Create a weapons folder inside scenes and save the sword as the reusable WeaponSword.tscn scene.
If the sword is still inside the player scene, drag its node into scenes/weapons to save it as a separate scene, then remove that fixed sword node from the player.
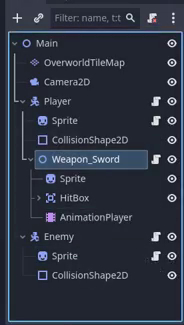
Adding the PlayerWeapons Node
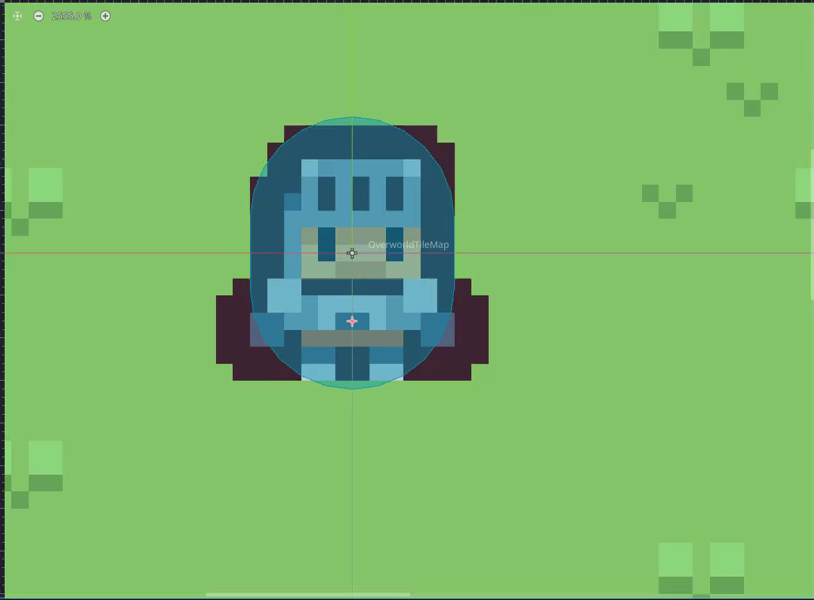
Add a Node2D child to Player and name it PlayerWeapons. This is the attachment point for equipped weapons. Move it down slightly to sit around the center of the player’s torso.
Planning the Script Structure
Use a shared CharacterWeapons base class for equipping and unequipping, with specialized PlayerWeapons and EnemyWeapons subclasses.
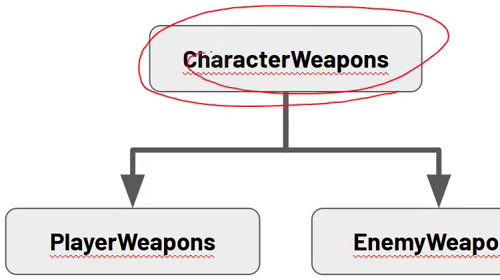
The separation lets the player attack through mouse and keyboard input, while an enemy can attack based on distance to the player. You’ll implement the player-specific controller here.
The CharacterWeapons Script
Create CharacterWeapons.gd inside scripts/character. Extend Node2D and declare the starting weapon scene, current weapon, and owning character:
class_name CharacterWeapons
extends Node2D

@export var weapon_to_equip : PackedScene

var current_weapon : Weapon

@onready var character : Character = $".."
The controller node is a direct child of the character, so $".." gives you the parent character reference.
Add the functions below. _ready() equips the starting weapon if one is assigned. equip_weapon() removes an existing weapon, instantiates the new scene, adds it as a child, aligns its position, assigns its owner, and calls _equip().
unequip_weapon() returns immediately when there is no current weapon. Otherwise, it calls _unequip() and queues the weapon node for deletion.
func _ready ():
	if weapon_to_equip:
		equip_weapon(weapon_to_equip)

func equip_weapon (weapon_scene : PackedScene):
	if current_weapon:
		unequip_weapon()

	current_weapon = weapon_scene.instantiate()
	add_child(current_weapon)
	current_weapon.global_position = global_position

	current_weapon.owner_character = character
	current_weapon._equip()

func unequip_weapon ():
	if not current_weapon:
		return

	current_weapon._unequip()
	current_weapon.queue_free()
Don’t attach this base script directly to a node. The specialized controller scripts inherit from it.
The PlayerWeapons Script
Create PlayerWeapons.gd in scripts/character. It extends CharacterWeapons and handles player input:
class_name PlayerWeapons
extends CharacterWeapons

func _process (delta : float):
	var mouse_pos : Vector2 = get_global_mouse_position()
	var mouse_dir : Vector2 = global_position.direction_to(mouse_pos)

	if current_weapon:
		current_weapon.set_aim_direction(mouse_dir)

		if Input.is_action_just_pressed("attack"):
			current_weapon._try_use()
Each frame, the script finds the direction from the controller’s global position to the mouse. If a weapon is equipped, it updates that weapon’s aim direction. Pressing the attack action calls _try_use(), which checks the cooldown before allowing an attack.
Hooking Up the PlayerWeapons Node
Connect the controller in the editor:
- Select the player’s
PlayerWeaponsnode. - Attach
PlayerWeapons.gd. - Drag
WeaponSword.tscninto the Inspector’s Weapon To Equip slot.
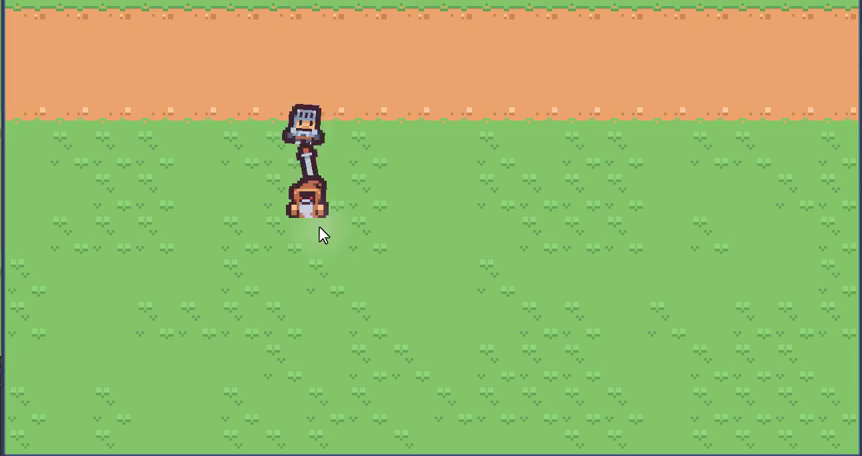
Run the game. The sword is instantiated at startup and rotates to follow the mouse.
Implementing the Melee Attack
Aiming is connected, but the melee weapon’s _use() still needs an action. Open the sword scene and its attached melee weapon script. Add references to AnimationPlayer and HitBox, then replace the empty _use() with animation playback:
class_name MeleeWeapon
extends Weapon

@export var damage : int
@export var hit_force : float

@onready var anim : AnimationPlayer = $AnimationPlayer
@onready var hit_box : Area2D = $HitBox

func _use ():
	anim.play("attack")
The inherited _try_use() calls this function only after the cooldown has passed. Rapid clicks therefore won’t restart the attack every frame.
Testing the Attack
Run the game again. The sword should equip automatically, follow the mouse, and play its attack animation when you left-click. Repeated clicks trigger the animation only once every 0.5 seconds, matching use_rate.
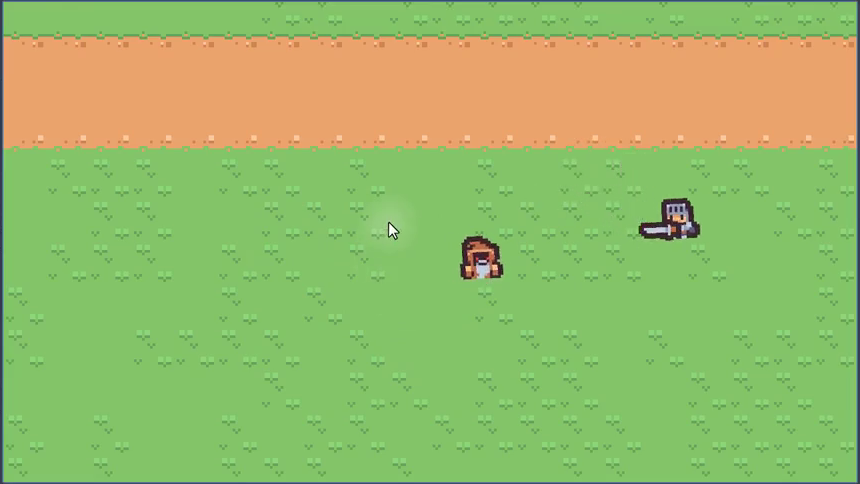
The sword can aim and animate, but it doesn’t deal damage yet. Hit detection and applying damage are the next stage of the project.
Recap and Next Steps
You now have a reusable weapon foundation and a sword that the player can equip, aim, and animate. In this tutorial, you covered:
- Shared item properties, smooth aiming, and a use-rate cooldown in
EquipItem. - Weapon inheritance, a sword sprite and hitbox, and a jab animation.
- Equipping and unequipping through
CharacterWeapons. - Mouse aiming and attack input through
PlayerWeapons.
With these pieces connected, you’re ready to continue with hit detection and damage handling.
To follow the full project and build your Godot skills through a guided path, explore the Intermediate Godot Mini-Degree.
Did you come across any errors in this tutorial? Please let us know by completing this form and we’ll look into it!
FINAL DAYS: Unlock coding courses in Unity, Godot, Unreal, Python and more.