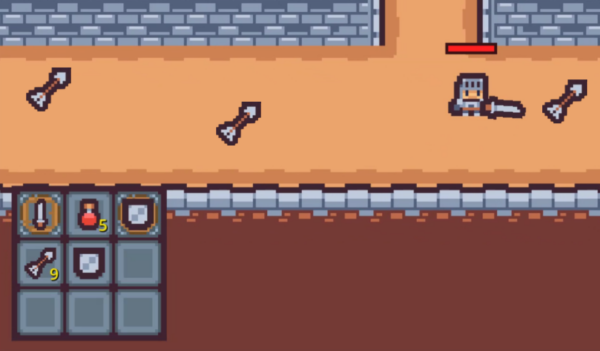
A Godot inventory system needs to track both what an item is and how many the player holds. Drawing on Zenva’s experience teaching coding and game development across more than 400 courses, this tutorial guides you through that split in an action RPG: item resources hold the shared properties, while inventory slots track items and quantities.
You’ll create item types, configure weapons and consumables, and write the logic for stacking, removing, and finding items. This assumes you have Godot installed, know basic GDScript, and are working with the project’s Player scene, sprites, and equipment scenes.
Table of contents
Download Project Files
The files and full project are available through the course included in the Intermediate Godot Mini-Degree. If you’d like the full guided path, you can follow along there, or keep reading this free tutorial to work through the item data and inventory logic.
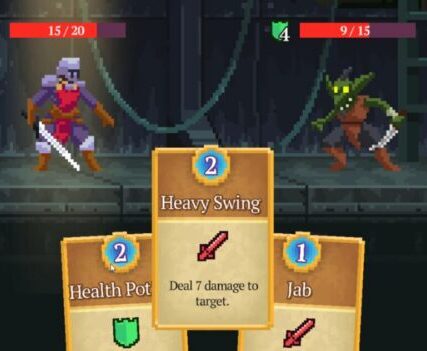
Build the Item Data for Your Godot Inventory System
Start with Godot’s resource system. You’ll define item types in scripts that extend Resource, then create individual .tres files for the items in your game.
Planning the Item Data Hierarchy
Instead of putting every item into one catch-all type, use a base class for shared properties and subclasses for distinct categories. This makes the system expandable and lets later code require a specific type, such as WeaponItemData, without accepting an arrow or health potion as an equippable weapon.
- ItemData: the base resource, with a display name, description, icon, and maximum stack size.
- WeaponItemData: inherits from
ItemDataand provides a separate type for weapons. Equipping logic is not added here. - ShieldItemData: inherits from
ItemDataand categorizes shields separately from weapons. - ConsumableItemData: inherits from
ItemDataand represents items such as health potions or food.
Creating the Base ItemData Script
In the FileSystem dock, create an Items folder inside Scripts. In that folder, create item_data.gd.
Change its base type from Node to Resource so you can save instances as resource files. Give it a global class_name so other scripts and the editor can reference the type:
class_name ItemData
extends Resource
Organizing the Project Folders
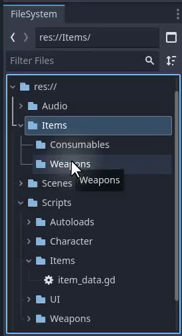
At the project root, res://, create another folder named Items. Inside it, create Weapons and Consumables folders for the resource files.
Creating the Arrow Resource
An arrow can use the base ItemData type because it doesn’t need the special behavior of a weapon, shield, or consumable.
- Right-click the
Items/Weaponsfolder and choose New Resource…. - Search for
ItemData, select it, and click Create. - Save the file as
arrow.tres.
Double-click the resource to open it in the Inspector. It has no editable properties yet, so your next step is to add them to the script.
Adding Properties to ItemData
In item_data.gd, use @export to expose the following properties in the Inspector:
display_name: the name shown in the inventory UI and when hovering over an item.description: a short explanation of the item and what it does.max_stack_size: the maximum quantity in one slot. Weapons can be limited to one, while arrows and consumables can stack higher.icon: the texture that represents the item in the UI.equip_scene: a packed scene for equippable items. This stays empty for arrows and consumables but is available to weapons and shields through the base class.
class_name ItemData
extends Resource

@export var display_name : String
@export var description : String
@export var max_stack_size : int = 1
@export var icon : Texture
@export var equip_scene : PackedScene
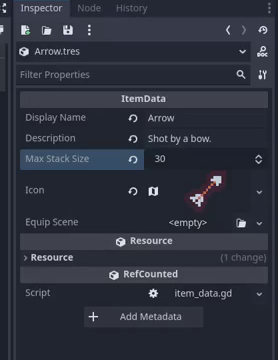
Select arrow.tres again to see all five fields.
Configuring the Arrow
Fill in the arrow’s Inspector properties:
- Display Name: Arrow
- Description: Shot by a bow.
- Max Stack Size: 30
- Icon: drag in the arrow sprite from
Sprites/Items/. - Equip Scene: leave empty because the arrow is not equipped directly.
Creating the WeaponItemData Subclass
In Scripts/Items, create weapon_item_data.gd. For now, it only needs its own class name and the ItemData base type:
class_name WeaponItemData
extends ItemData
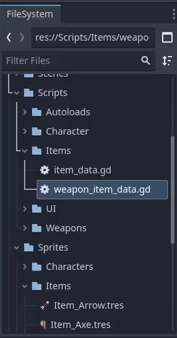
The subclass gives weapons a distinct type that later equipping code can require.
Creating the ShieldItemData Subclass
Create shield_item_data.gd in the same folder. Like the weapon subclass, it establishes a category without implementing equipping behavior yet:
class_name ShieldItemData
extends ItemData
Creating the ConsumableItemData Subclass
Create consumable_item_data.gd. Consumables also need a health-gain value, which specifies how much health the player gains when using the item:
class_name ConsumableItemData
extends ItemData

@export var health_gain : int = 1
Creating the Health Potion Resource
The New Resource… dialog now lists your subclasses when you search for ItemData. In Items/Consumables, create a ConsumableItemData resource named health_potion.tres, then set its fields:
- Health Gain: 2
- Display Name: Health Potion
- Description: +2 Health
- Max Stack Size: 12
- Icon: the health potion sprite from
Sprites/Items/. - Equip Scene: leave empty.
Creating the Sword Resource
In Items/Weapons, create a WeaponItemData resource named sword.tres. This is your first item with an assigned equip scene:
- Display Name: Sword
- Description: Light weapon with quick attacks.
- Max Stack Size: 1, so swords do not stack.
- Icon: the sword sprite.
- Equip Scene:
weapon_sword.tscnfromScenes/Weapons/.
Your Turn
For practice, use the same resource-creation pattern for the bow and axe, choosing WeaponItemData for both. The shield needs ShieldItemData; the next sections review your weapon setup and walk through that shield configuration.
Reviewing the Axe and Bow
Check that the axe is a separate WeaponItemData resource with its display name, description, icon, and equip scene filled in.
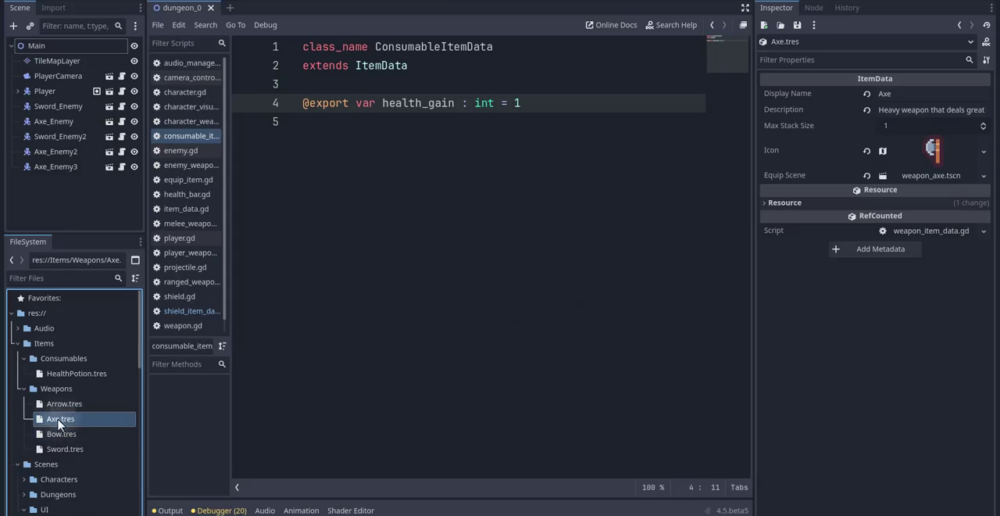
The bow follows the same pattern: its own WeaponItemData resource with its own display name, description, icon, and equip scene.
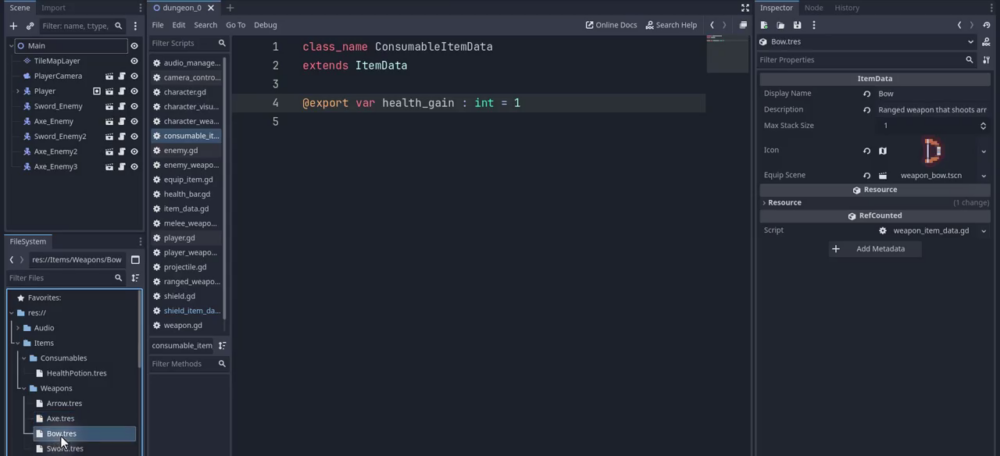
Creating the Shield Item Data
The shield uses ShieldItemData so the game can distinguish it from weapons. To create its resource:
- Create a new Resource in the editor.
- Select ShieldItemData in the Create New Resource dialog.
- Save the resource with the name shield.
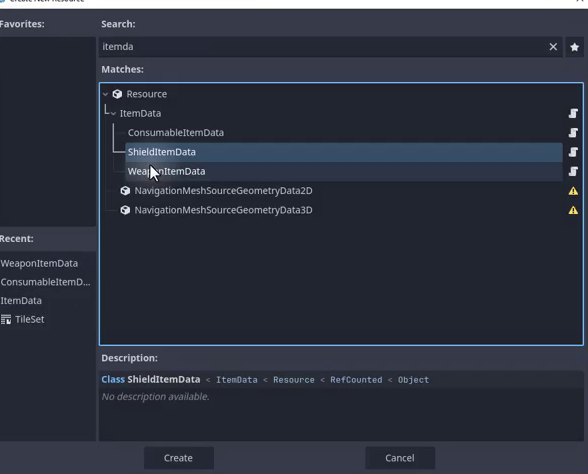
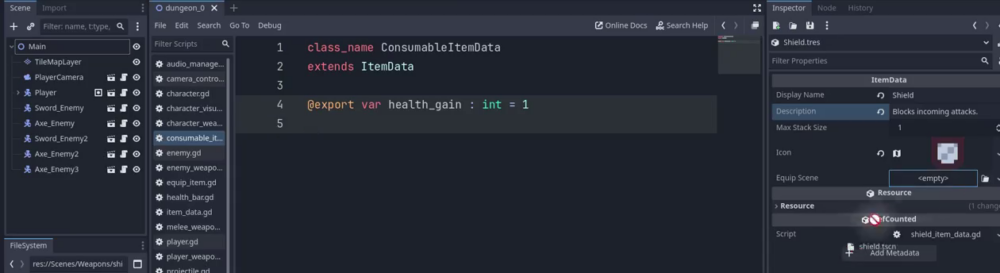
Select the shield resource and fill in its Inspector properties:
- display_name: Shield
- description: Blocks incoming attacks
- icon: the shield icon asset
- equip_scene: the shield scene file
Next Steps
You now have a set of item resources ready for the inventory. You can extend it with more weapons, consumables, or other items; next, you’ll write the logic that stores them.
Create the Inventory Script and Item Slots
A single script will hold the inventory data and logic on a child node of the Player. It doesn’t need a visual representation or physics.
Creating the Inventory Script
Create an Inventory folder inside Scripts, then create inventory.gd inside it. Extend Node rather than Node2D, and give the script the class name Inventory:
class_name Inventory
extends Node
The ItemSlot Subclass
Before adding the inventory variables, define an inner class named ItemSlot. Each slot stores an ItemData reference in item and an integer count in quantity:
class_name Inventory
extends Node

class ItemSlot:
	var item : ItemData
	var quantity : int
Signals
Declare two signals so other parts of the game, such as the UI, can respond to changes without being tightly coupled to the inventory script:
UpdatedInventory: emitted when the inventory changes, including when an item is added or removed.UpdatedSlot: emitted when a particular slot changes, passing thatItemSlotto listeners.
Variables and Export Fields
Next, add the slot array and the exported fields that configure the inventory:
item_slots: a typed array holding the inventory’sItemSlotinstances.size: the starting number of slots, defaulting to9.start_items: a dictionary withItemDataresources as keys and integer quantities as values, allowing you to configure starting items in the Inspector.
With the signals and variables in place, the script looks like this:
class_name Inventory
extends Node

class ItemSlot:
	var item : ItemData
	var quantity : int

signal UpdatedInventory
signal UpdatedSlot (slot : ItemSlot)

var item_slots : Array[ItemSlot]

@export var size : int = 9
@export var start_items : Dictionary[ItemData, int]
Outlining the Inventory Functions
Outline the functions before filling in their behavior. This gives you the structure of the inventory in one place:
_ready()will create the slots and add starting items when the node enters the scene tree.add_item(item)will add one item, returningtrueon success orfalsewhen there is no room.remove_item(item)will remove one instance of an item.remove_item_from_slot(slot)will remove one item from a specific slot, useful when a player selects a slot to consume an item.get_item_slot(item)will return the first slot containing the specified item.get_empty_item_slot()will return the first empty slot, ornullif none is available.has_item(item)will report whether the inventory contains an item, such as arrows a bow could check for later.
For now, add these placeholders:
func _ready ():
	pass

func add_item (item : ItemData) -> bool:
	return false

func remove_item (item : ItemData):
	pass

func remove_item_from_slot (slot : ItemSlot):
	pass

func get_item_slot (item : ItemData) -> ItemSlot:
	return null

func get_empty_item_slot () -> ItemSlot:
	return null

func has_item (item : ItemData) -> bool:
	return false
Add and Remove Inventory Items
Implementing add_item
Start with add_item. It first looks for a slot containing the item and tries to increase that stack. If the matching slot is full or no match exists, it looks for an empty slot instead.
- Use
get_item_slot(item)to find the first matching slot. - If that slot exists and its quantity is below
max_stack_size, increase the quantity by one. - Otherwise, use
get_empty_item_slot()to find a free slot. - If no empty slot exists, return
false. A caller handling world pickups can use that result to avoid destroying an item the player couldn’t collect. - If an empty slot is available, assign the item and set its quantity to
1. - Emit both update signals and return
true.
# adds an item to the inventory
func add_item (item : ItemData) -> bool:
	var slot : ItemSlot = get_item_slot(item)

	if slot and slot.quantity < item.max_stack_size:
		slot.quantity += 1
	else:
		slot = get_empty_item_slot()

		if not slot:
			return false

		slot.item = item
		slot.quantity = 1

	UpdatedInventory.emit()
	UpdatedSlot.emit(slot)

	return true
Implementing remove_item
The remove_item function delegates the removal to remove_item_from_slot. First, check has_item(item) and return if the item isn’t present. Otherwise, find the matching slot and pass it to the slot-removal function:
# removes an item from the inventory
func remove_item (item : ItemData):
	if not has_item(item):
		return

	var slot : ItemSlot = get_item_slot(item)
	remove_item_from_slot(slot)
Removing an Item From a Slot
Now fill in remove_item_from_slot. If the slot contains no item, return immediately. If its quantity is 1, clear slot.item by setting it to null. For a larger quantity, subtract one instead. Finish by emitting both update signals:
# removes an item from the specified slot
func remove_item_from_slot (slot : ItemSlot):
	if not slot.item:
		return

	if slot.quantity == 1:
		slot.item = null
	else:
		slot.quantity -= 1

	UpdatedInventory.emit()
	UpdatedSlot.emit(slot)
Find Inventory Items and Empty Slots
Finding a Slot That Contains a Specific Item
Implement get_item_slot by looping through item_slots. Return the first slot whose item matches the supplied resource. If the loop finishes without a match, return null:
# returns an item slot containing the specified item
func get_item_slot (item : ItemData) -> ItemSlot:
	for slot in item_slots:
		if slot.item == item:
			return slot

	return null
Finding an Empty Slot
For get_empty_item_slot, look for the first slot whose item is null. Return null if no empty slot is available:
# returns an item slot with no item in it
func get_empty_item_slot () -> ItemSlot:
	for slot in item_slots:
		if slot.item == null:
			return slot

	return null
Checking Whether the Inventory Has an Item
The has_item helper also searches the slots, but returns a Boolean rather than a slot. Return true at the first matching item, or false if there is no match:
# is this item in the inventory?
func has_item (item : ItemData) -> bool:
	for slot in item_slots:
		if slot.item == item:
			return true

	return false
Initialize the Player’s Inventory
Filling in the _ready Function
With the helpers complete, fill in _ready to create the slots and populate them with starting items.
First, loop over range(size), create each slot with ItemSlot.new(), and append it to item_slots. The default size produces nine empty slots.
Then loop through the start_items dictionary. Each key is an ItemData resource, and its value is the starting quantity. The nested loop calls add_item(key) once for each item to add. Use start_items[key] to access a dictionary value by its key:
func _ready ():
	# create slots
	for i in range(size):
		item_slots.append(ItemSlot.new())

	# add start items
	for key in start_items:
		for i in range(start_items[key]):
			add_item(key)
Attaching the Inventory to the Player
Open the Player scene and add a default Node as a child of the Player root. Rename it Inventory and attach inventory.gd.
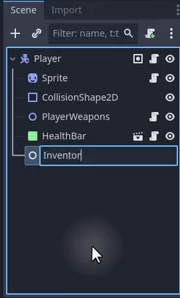
Leave the exported Size at 9. Press Play; the game should run without errors as the slots are created.
Configuring the Starting Items
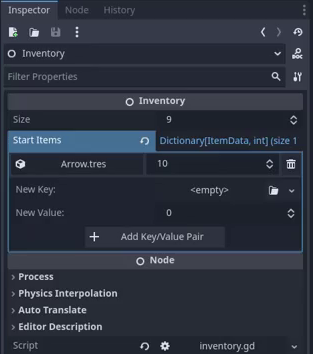
Open the Start Items dictionary in the Inspector. Click Add Key/Value Pair, drag an ItemData resource from the FileSystem dock into the key field, and enter its starting quantity as the value. For example, use the arrow resource from the weapons folder with a quantity of 10.
Repeat this for other starting items, such as a bow, shield, and health potions.
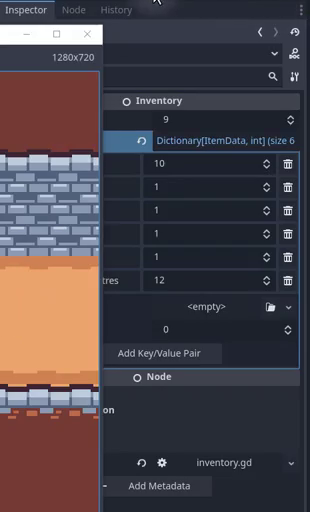
When you press Play, the inventory data is initialized, but the items won’t appear on screen yet. This inventory has no user interface; displaying, equipping, and using items through that interface comes after the logic covered here.
Recap and Next Steps
You now have item resources and the core inventory logic for your action RPG. In this tutorial, you:
- Defined shared item properties and separate weapon, shield, and consumable resource types.
- Configured item resources with icons, stack limits, and equipment scenes where applicable.
- Created inventory slots and signals for inventory-wide and slot-specific changes.
- Implemented item stacking, removal, and lookup helpers.
- Attached the inventory to the Player and configured starting items in the Inspector.
Your next step is to build the inventory UI so the player can see and interact with these items. The data and logic you’ve put in place provide the foundation for that work.
Continue building your action RPG with the Intermediate Godot Mini-Degree. Follow the full guided project to connect these inventory foundations to the rest of the game.
Did you come across any errors in this tutorial? Please let us know by completing this form and we’ll look into it!
FINAL DAYS: Unlock coding courses in Unity, Godot, Unreal, Python and more.