A Godot dialogue system needs to do more than display an NPC’s words: it also has to handle player input and decide what happens when the conversation ends. Zenva’s experience teaching coding and game development across more than 400 courses provides the foundation for this walkthrough, where you’ll connect those pieces into a reusable NPC conversation system.
You’ll create a dialogue resource, build a panel with a character portrait and typewriter text, lock player controls during conversations, and let a wizard give the player a sword. This tutorial assumes you know Godot basics and are working with the course’s RPG project, including its player, inventory, weapon, and interaction systems.
Download Project Files
The project files and full project are available through the course included in the Intermediate Godot Mini-Degree. Follow that guided path if you’d like the complete project, or keep reading for the dialogue-system walkthrough.
Plan Your Godot Dialogue System
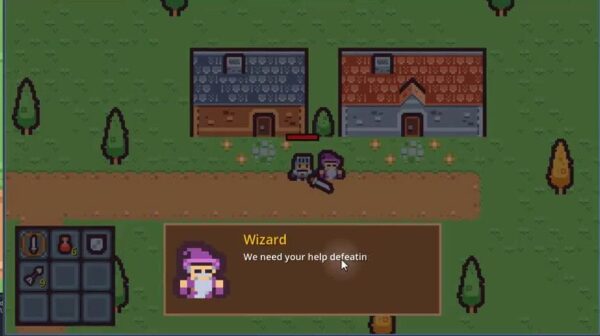
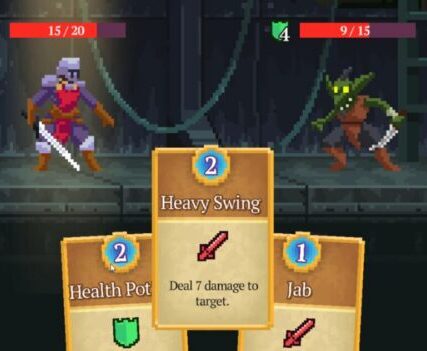
The player will approach an NPC, press the interaction key, and see a dialogue panel at the bottom of the screen. Pressing E advances through the conversation, and the NPC can optionally give the player an item at the end. Start by defining the data each conversation needs.
Planning the Dialogue Data
A conversation brings together the speaker’s name, their icon, their dialogue lines, and any item they hand over. Store these in a custom resource instead of hard-coding them into a script. Godot resources are saveable data assets, so you can create a separate conversation asset from the FileSystem dock for each NPC.
Creating the Dialogue Script
- Open the
Scriptsfolder in the FileSystem dock. - Right-click, choose New Folder…, and name it
Dialogue. - Right-click the new folder and choose New Script….
- Name the script
dialogue.gdand click Create.
This script describes a data asset rather than a node, so it extends Resource. Giving it a class_name makes the custom type available in the editor. Replace the script’s content with:
class_name Dialogue
extends Resource

@export var npc_name : String
@export var npc_icon : Texture2D

@export var lines : Array[String]

@export var item_to_give : ItemData
@export var item_to_give_quantity : int = 1
Each exported variable becomes an Inspector field on the resource:
npc_namestores the speaker’s name.npc_iconstores theTexture2Ddisplayed beside the text.linescontains one string for each line of dialogue.item_to_giveoptionally references anItemDatareward.item_to_give_quantitysets the reward quantity, with a default of 1.
For example, an NPC could ask the player to clear out monsters and provide a few arrows. The item and quantity fields keep that reward in the conversation data.
Creating a Dialogue Resource
Keep conversation assets separate from the scripts:
- Right-click the
res://root in the FileSystem dock and create a folder namedNPC Dialogue. - Right-click that folder and choose New Resource….
- Search for and select the custom
Dialoguetype. - Save the resource as
NPC_Welcome.tres.
Configuring the Dialogue
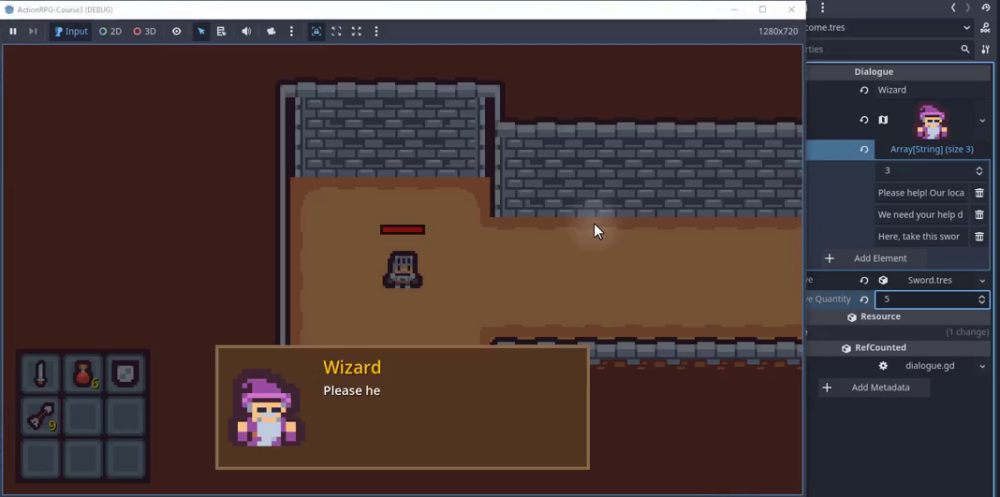
Select NPC_Welcome.tres to edit its fields in the Inspector. Find the wizard sprite in Sprites/Characters and drag it into Npc Icon, then set Npc Name to Wizard.
Set the Lines array size to 3 and enter these lines in order:
- Element 0: “Please help! Our local dungeon has been overrun with monsters.”
- Element 1: “We need your help defeating these monsters.”
- Element 2: “Here, take this sword. I think it can help you out.”
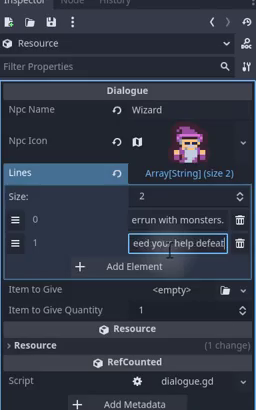
From the Items folder, drag Sword.tres into Item To Give. Leave Item To Give Quantity at 1.
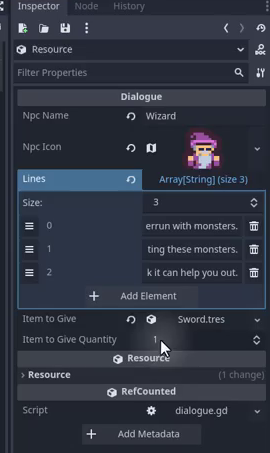
You now have the wizard’s conversation in one resource. Duplicate and adjust resources to create more conversations without changing the dialogue code.
Build the NPC Dialogue UI
Next, create the panel that will display the NPC’s icon, name, and dialogue. The UI lives under the player’s HUD, a CanvasLayer whose children render directly to the screen.
Creating the Background Screen
In the Player scene, add a Panel as a child of HUD and rename it DialogueScreen. This will dim the game world while the conversation is open.
- Set Layout > Anchors Preset to Full Rect.
- Under Theme Overrides > Styles, create a New StyleBoxFlat in the
Panelfield. - Set its Bg Color to black and lower the alpha (A) value to around 150, leaving the game visible behind the overlay.
Adding the Dialogue Panel
Add another Panel as a child of DialogueScreen and name it DialoguePanel. The outer screen will toggle the whole UI, while this inner panel holds the conversation.
- Set Layout > Layout Mode to Anchors and Anchors Preset to Center Bottom.
- Under Transform, set the size to roughly 600 by 200. Reapply Center Bottom if needed, then move the panel slightly up from the screen edge.
- Create a
StyleBoxFlatunder Theme Overrides > Styles and choose a background color.
Creating a Border Effect With a BG Child
Duplicate DialoguePanel, rename the copy BG, and move it inside DialoguePanel as a child.
- Set
BG‘s Anchors Preset to Center. - Set its size to around 590 by 190 so the parent remains visible as a thin outline.
- Create a new
StyleBoxFlatforBGand give it a darker color.
Adding the NPC Icon
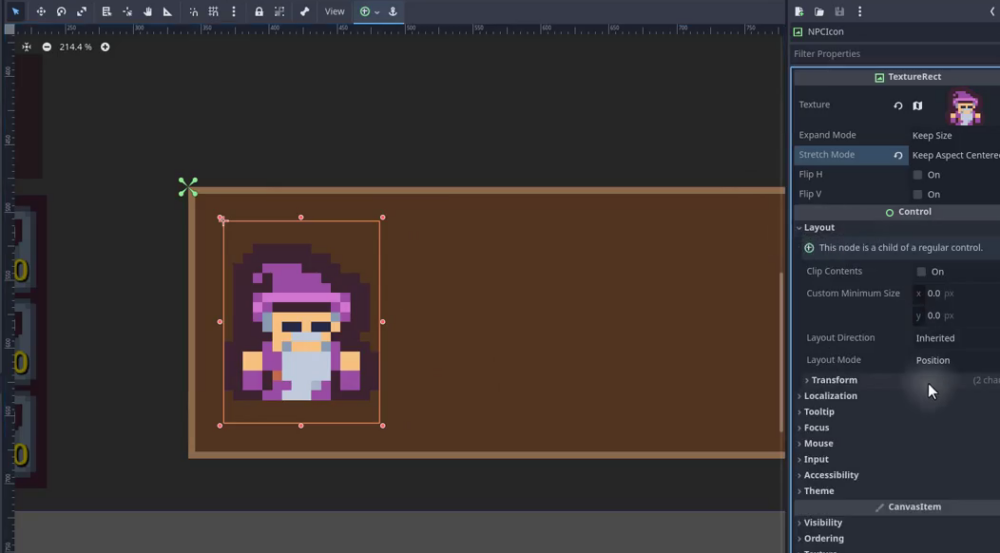
Add a TextureRect under DialoguePanel and rename it NPCIcon. Drag in the wizard sprite as a placeholder texture.
To keep the image from warping when resized, set Stretch Mode to Keep Aspect Centered. Position the icon on the left of the dialogue box, set Layout Mode to Anchors, and choose Left Wide for the preset. Adjust the margins until the icon fits.
Adding the NPC Name Label
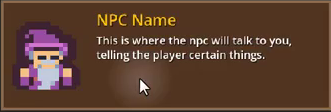
Add a Label under DialoguePanel and name it NPCName. Give it placeholder text such as NPC Name. Set its layout mode to Anchors and its preset to Top Wide, then adjust its position and size.
Create a New LabelSettings resource under Label Settings. Set the font size to around 28, choose a color such as warm yellow, and add a subtle shadow.
Adding the Dialogue Text Label
Duplicate NPCName, move the copy down inside the panel, and rename it Dialogue. Change the placeholder text to “This is where the NPC will talk”.
Set Autowrap Mode to Word so long lines wrap within the label. Create a separate LabelSettings resource, set the font size to around 20, reduce the line spacing, and add a small shadow.
Setting Up the Dialogue Controller Node
With the UI arranged, add a generic Node as a child of Player and name it DialogueController. Create dialogue_controller.gd in Scripts/Dialogue and attach it to that node.
Declaring the Controller’s Variables
The controller needs the active resource, references to the UI and player, and two variables to track the text reveal and current line. Start the script with:
class_name DialogueController
extends Node

var current_dialogue : Dialogue

@onready var dialogue_screen : Panel = $"../HUD/DialogueScreen"
@onready var npc_name_text : Label = $"../HUD/DialogueScreen/DialoguePanel/NPCName"
@onready var npc_icon : TextureRect = $"../HUD/DialogueScreen/DialoguePanel/NPCIcon"
@onready var dialogue_text : Label = $"../HUD/DialogueScreen/DialoguePanel/Dialogue"

@onready var player : Player = $".."

var visible_chars : float
var current_line : int
visible_chars will increase over time to reveal the text character by character. current_line tracks the conversation’s position in the lines array.
Laying Out the Function Stubs
Add the functions you’ll fill in next. _ready handles startup, set_dialogue opens a conversation, _process animates the text, _set_line prepares a line, and close_screen closes the UI and restores control.
func _ready():
    pass

func set_dialogue(dialogue : Dialogue):
    pass

func _process(delta):
    pass

func _set_line(line : String):
    pass

func close_screen():
    pass
Add Typewriter Text, Input, and Item Rewards
You can now fill in the controller functions, starting with opening and closing the window before adding input and rewards.
Closing the Dialogue Window on Start
Call close_screen from _ready so the UI starts hidden. The helper hides the panel and clears the active dialogue. Leave the movement TODO in place until you connect player controls.
func _ready ():
	close_screen()

func close_screen ():
	dialogue_screen.visible = false
	current_dialogue = null
	# TODO: Enable player movement
Opening a New Dialogue
In set_dialogue, store the incoming resource, show the screen, and load the NPC’s name and icon. Set current_line to zero and pass the first line to _set_line.
func set_dialogue (dialogue : Dialogue):
	current_dialogue = dialogue

	dialogue_screen.visible = true
	npc_name_text.text = dialogue.npc_name
	npc_icon.texture = dialogue.npc_icon

	current_line = 0
	_set_line(dialogue.lines[0])

	# TODO: Disable player movement
Preparing the Line for the Typewriter Effect
A Label’s visible_characters property controls how many characters appear. A value of 0 hides them all; a value of 3 shows the first three. Reset the counters and assign the full text so it is ready to reveal:
func _set_line (line : String):
	visible_chars = 0
	dialogue_text.visible_characters = 0
	dialogue_text.text = line
Animating the Text in _process
Increase visible_chars by 30 * delta each frame for roughly 30 characters per second, independent of frame rate. Cast the float to an integer when assigning it to the label:
func _process (delta : float):
	visible_chars += 30 * delta
	dialogue_text.visible_characters = int(visible_chars)
Testing the Typewriter Effect
Temporarily comment out the close_screen() call in _ready so the window stays visible at startup. Run the game with placeholder text in the label to see the character-by-character reveal.
Handling Player Input to Advance the Conversation
Extend _process so input is handled only when a dialogue is active. When the player presses interact, close the window if the current line is the last one. Otherwise, advance the index and prepare the next line.
func _process (delta : float):
	visible_chars += 30 * delta
	dialogue_text.visible_characters = int(visible_chars)

	if not current_dialogue:
		return

	if Input.is_action_just_pressed("interact"):
		if len(current_dialogue.lines) == current_line + 1:
			# TODO: Give player item
			close_screen()
		else:
			current_line += 1
			_set_line(current_dialogue.lines[current_line])
Wiring Up a Test Dialogue
Add a temporary exported resource and call set_dialogue in _ready, keeping close_screen() commented out:
@export var test_dialogue : Dialogue

func _ready ():
	# close_screen()
	set_dialogue(test_dialogue)
Select DialogueController and drag the wizard’s welcome resource into Test Dialogue. Run the game: the first line appears with the typewriter effect, E advances the dialogue, and another press after the final line closes the window.
Giving the Player an Item at the End of the Dialogue
Replace the reward TODO in the input-handling branch with a check for item_to_give. When an item is assigned, loop through the configured quantity and add it to the player’s inventory before closing the window:
	if Input.is_action_just_pressed("interact"):
		if len(current_dialogue.lines) == current_line + 1:
			if current_dialogue.item_to_give:
				for i in range(current_dialogue.item_to_give_quantity):
					player.inventory.add_item(current_dialogue.item_to_give)

			close_screen()
		else:
			current_line += 1
			_set_line(current_dialogue.lines[current_line])
Complete the wizard’s conversation to receive a sword. To test the quantity, set it to 5 on the resource and complete the conversation again, then return the quantity to 1.
Lock Player Controls During Conversations
The dialogue now displays text and gives rewards. Next, stop the player from moving, attacking, or starting another interaction while a conversation is open.
Disabling Player Movement
Open character.gd and add a movement flag near the top. Keeping it on the base Character allows it to apply to other characters as well as the player.
var can_move : bool = true
In _physics_process, wrap the call to _move in a check:
func _physics_process(delta):
	if can_move:
		_move(delta)
Movement runs while can_move is true. Setting it to false stops that movement logic.
Disabling Weapon Usage
Add the equivalent flag to character_weapons.gd:
var can_use : bool = true
Then open player_weapons.gd, where weapon input is read. At the start of _process, return early when can_use is false, before the existing input and firing logic:
func _process (delta : float):
	if not can_use:
		return

	var mouse_pos : Vector2 = get_global_mouse_position()
	var mouse_dir : Vector2 = global_position.direction_to(mouse_pos)

	# ... rest of the function
A Central Toggle on the Player
In player.gd, add toggle_usability so one function can change both flags. Passing true enables movement and weapons; false disables them.
func toggle_usability (toggle : bool):
	can_move = toggle
	weapons.can_use = toggle
The same toggle also needs to disable interactions, preventing the player from repeatedly triggering the NPC while the dialogue is open.
Wiring In the Interaction Controller
Declare an InteractionController reference near the top of player.gd. Don’t use @onready here: toggle_usability may be called before the player’s _ready runs.
var interaction_controller : InteractionController
Extend the toggle to resolve that reference when needed, then call the existing interaction controller’s enable() or disable() method:
func toggle_usability (toggle : bool):
	can_move = toggle
	weapons.can_use = toggle

	if not interaction_controller:
		interaction_controller = $InteractionController

	if toggle:
		interaction_controller.enable()
	else:
		interaction_controller.disable()
Calling toggle_usability From the Dialogue Controller
Return to dialogue_controller.gd. At the end of set_dialogue, call player.toggle_usability(false) to disable movement, weapons, and new interactions:
func set_dialogue (dialogue : Dialogue):
	current_dialogue = dialogue

	dialogue_screen.visible = true
	npc_name_text.text = dialogue.npc_name
	npc_icon.texture = dialogue.npc_icon

	current_line = -1
	_set_line(dialogue.lines[0])

	player.toggle_usability(false)
In close_screen, restore those controls with player.toggle_usability(true):
func close_screen ():
	dialogue_screen.visible = false
	current_dialogue = null

	player.toggle_usability(true)
Testing the Locked Dialogue
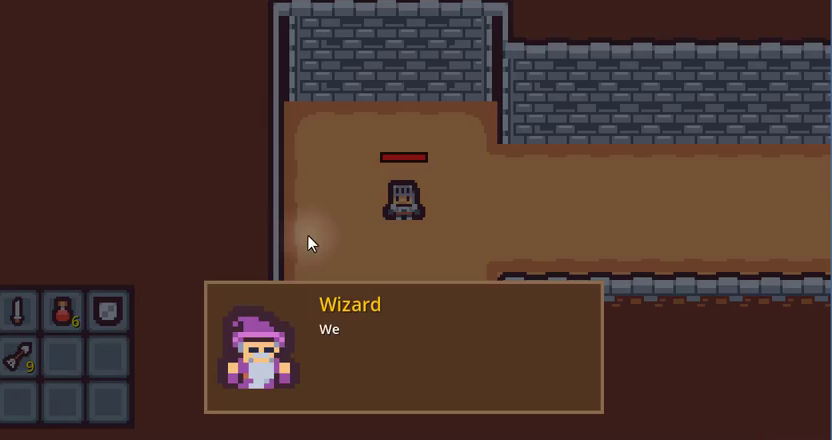
Run the game and open the test conversation. Movement, weapon use, and new NPC interactions should be disabled until the window closes, while the dialogue’s input handling advances the conversation.
Once you’ve checked the control lock, remove the temporary test-dialogue setup and return to closing the window at startup.
Challenge
Before continuing, try connecting the system to an NPC yourself:
- Create an NPC scene in the overworld.
- Add an
Interactablenode. - Attach a new script with the class name
DialogueNPC. - Use the interaction to open a custom
Dialogueresource.
The next section walks through that setup.
Connect the Dialogue to an NPC
With the resource, UI, and controller ready, you can connect them to a wizard in the overworld.
Setting Up the Dialogue NPC Scene
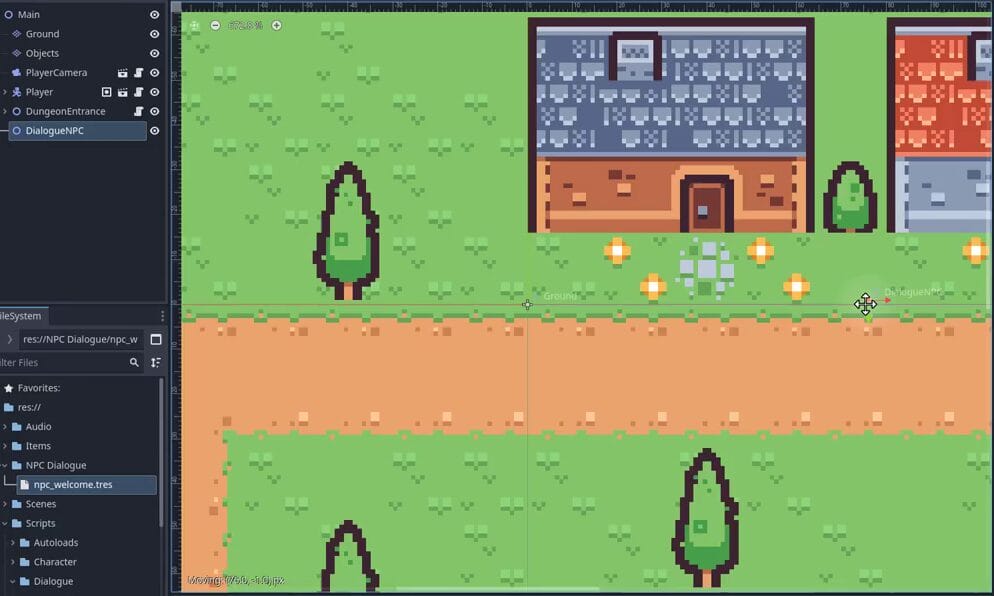
In the overworld scene, select Player and hide the dialogue window in the editor so it doesn’t cover the viewport. Then build the NPC:
- Create a
Node2D, rename itDialogueNPC, and place it somewhere the player can reach. - Add a
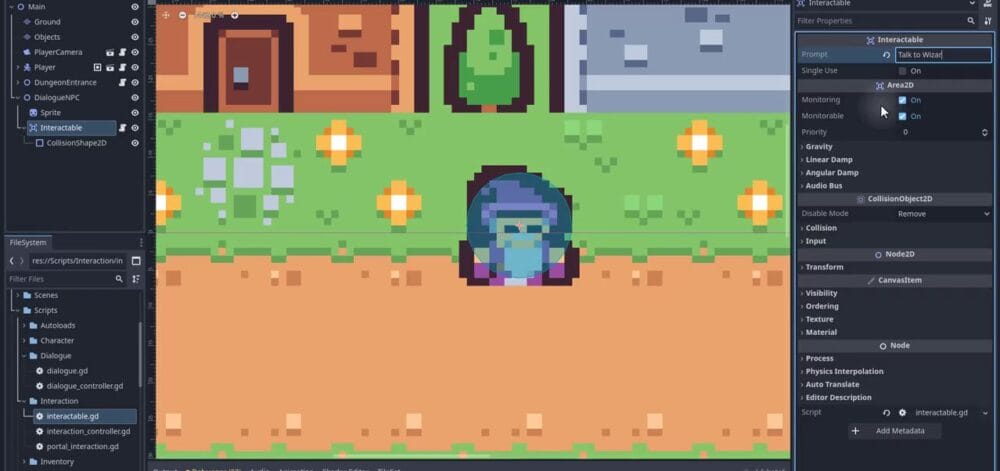
Sprite2Dchild namedSpriteand assign the wizard texture. - Add an
Area2Dchild namedInteractableas the interaction zone. - Under
Interactable, add aCollisionShape2Dwith aCircleShape2D. Adjust its radius to the desired interaction range. - Attach the project’s existing
Interactable.gdscript toInteractableand set its Prompt toTalk to Wizard.
Your scene branch should contain:
- DialogueNPC (Node2D)
- Sprite (Sprite2D)
- Interactable (Area2D)
- CollisionShape2D
Creating the Dialogue NPC Script
Attach a new script to DialogueNPC and save it as dialogue_npc.gd in Scripts/Dialogue. Export a resource for the NPC’s conversation and reference its Interactable child:
class_name DialogueNPC
extends Node2D

@export var dialogue : Dialogue
@onready var interactable : Interactable = $Interactable
Connecting the Interact Signal
The Interactable node emits an Interact signal when the player is in range and presses the interaction key. The signal includes the interacting Player. Connect it in _ready and create a handler:
func _ready ():
	interactable.Interact.connect(_on_interact)

func _on_interact (player : Player):
	pass
Exposing the Dialogue Controller on the Player
In player.gd, add an @onready reference to the DialogueController child beside the other node references:
@onready var dialogue_controller : DialogueController = $DialogueController
This lets code with access to the player reach its dialogue controller.
Triggering the Dialogue on Interact
Back in dialogue_npc.gd, use the player passed by the signal to start the NPC’s assigned conversation:
func _on_interact (player : Player):
	player.dialogue_controller.set_dialogue(dialogue)
The complete NPC script is:
class_name DialogueNPC
extends Node2D

@export var dialogue : Dialogue
@onready var interactable : Interactable = $Interactable

func _ready ():
	interactable.Interact.connect(_on_interact)

func _on_interact (player : Player):
	player.dialogue_controller.set_dialogue(dialogue)
Assigning a Dialogue and Testing
Select the DialogueNPC instance and drag the wizard’s welcome resource into its exported Dialogue field.
Run the game and approach the wizard. The Talk to Wizard prompt appears within interaction range. Press E to start the conversation, then advance through the lines while movement and weapon use remain disabled.
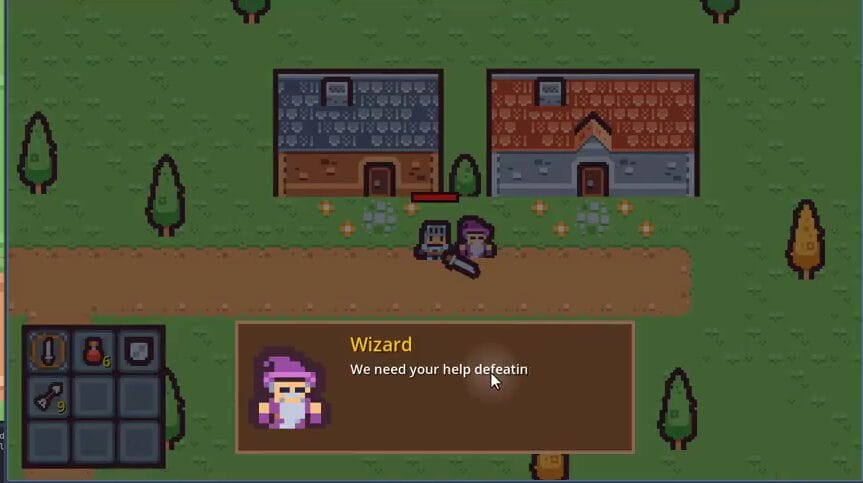
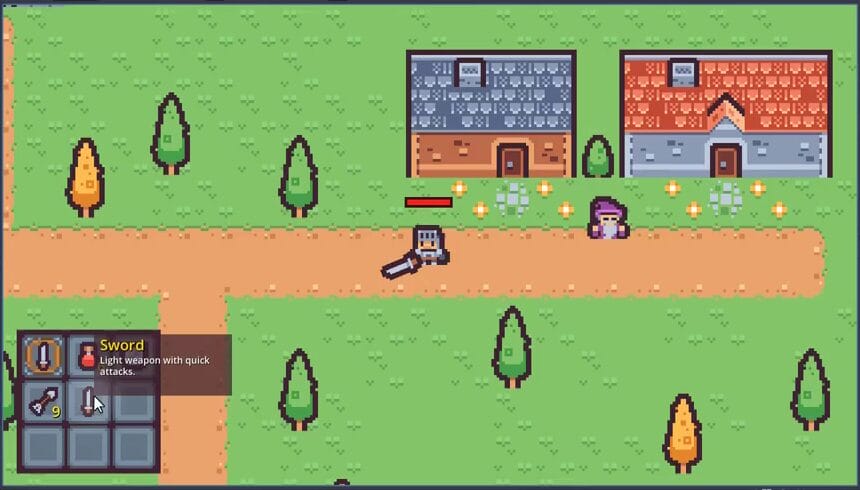
After you advance past the final line, the window closes, player control returns, and the configured sword reward is added to the inventory.
Where to Take This Next
Each NPC can use a separate Dialogue resource, so you can add conversations without further dialogue-system code. Try NPCs that share lore, explain movement or combat, or hand out starter items like the wizard’s sword.
Recap and Next Steps
You now have an NPC conversation that connects reusable dialogue data to the player’s UI and controls. Along the way, you’ve covered how to:
- Store names, portraits, dialogue lines, and item rewards in a custom resource.
- Build a dialogue panel with wrapped text and a typewriter reveal.
- Advance conversations through player input and deliver configured rewards.
- Disable movement, weapons, and new interactions while dialogue is active.
- Connect an NPC’s interaction signal to the dialogue controller.
Next, put those pieces to work with another conversation resource, whether your NPC explains the world or offers the player a starting item.
For a structured path through the full project and more Godot development, continue with the Intermediate Godot Mini-Degree and build on the systems you’ve practiced here.
Did you come across any errors in this tutorial? Please let us know by completing this form and we’ll look into it!
FINAL DAYS: Unlock coding courses in Unity, Godot, Unreal, Python and more.