Table of contents
Introduction
Welcome everyone! No matter how many years pass, RPGs remain a popular genre. Many developers dream of making their own, whether to experiment with never-before-seen mechanics or a simple desire to tell a deep and interactive story. Given Unreal Engine’s amazing graphical capabilities, it is also a top engine choice for many pursuing this in order to capture the unique aesthetic style they’re after.
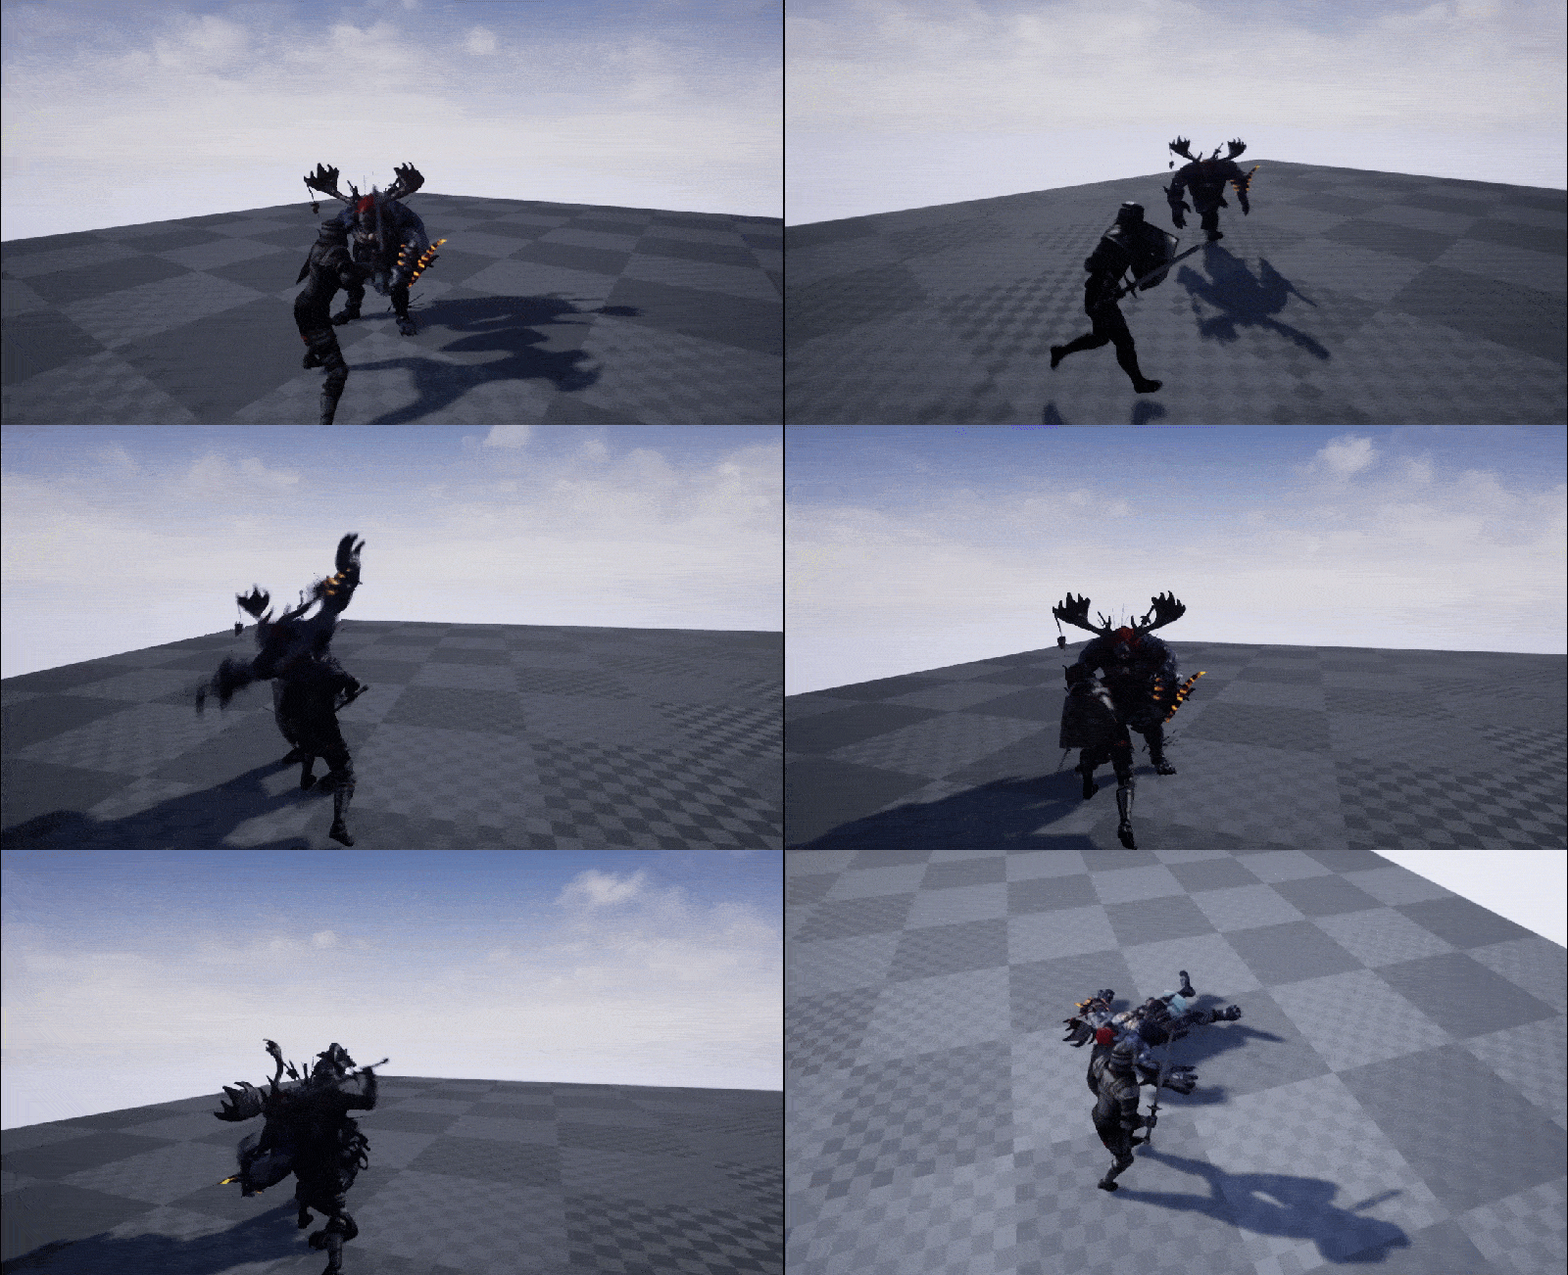
In this tutorial, we’ll be taking the first steps on this path and show you how to create an action RPG with Unreal Engine. It will feature a third-person player controller, who can move, jump, attack and block, along with an enemy who will chase after the player and attack them. This tutorial will also cover the basics of setting animation transitions for that as well. The project shown here can be a great basis for a much larger game, or just a good way to learn many of the systems in the Unreal Engine. Regardless, if you’re ready to start making your own RPGs, let’s dive in.
If this is your first time using the engine, though, then we recommend you view our Unreal Engine Beginner’s tutorial first.

Did you come across any errors in this tutorial? Please let us know by completing this form and we’ll look into it! FINAL DAYS: Unlock coding courses in Unity, Godot, Unreal, Python and more.
Project Files
This tutorial will be using a few models and animations from Mixamo. You can choose to get your own, or download the ones we’ll be using for the project.
Also, you can download the complete project to see how all the levels, models and blueprints interact.
Creating the Project
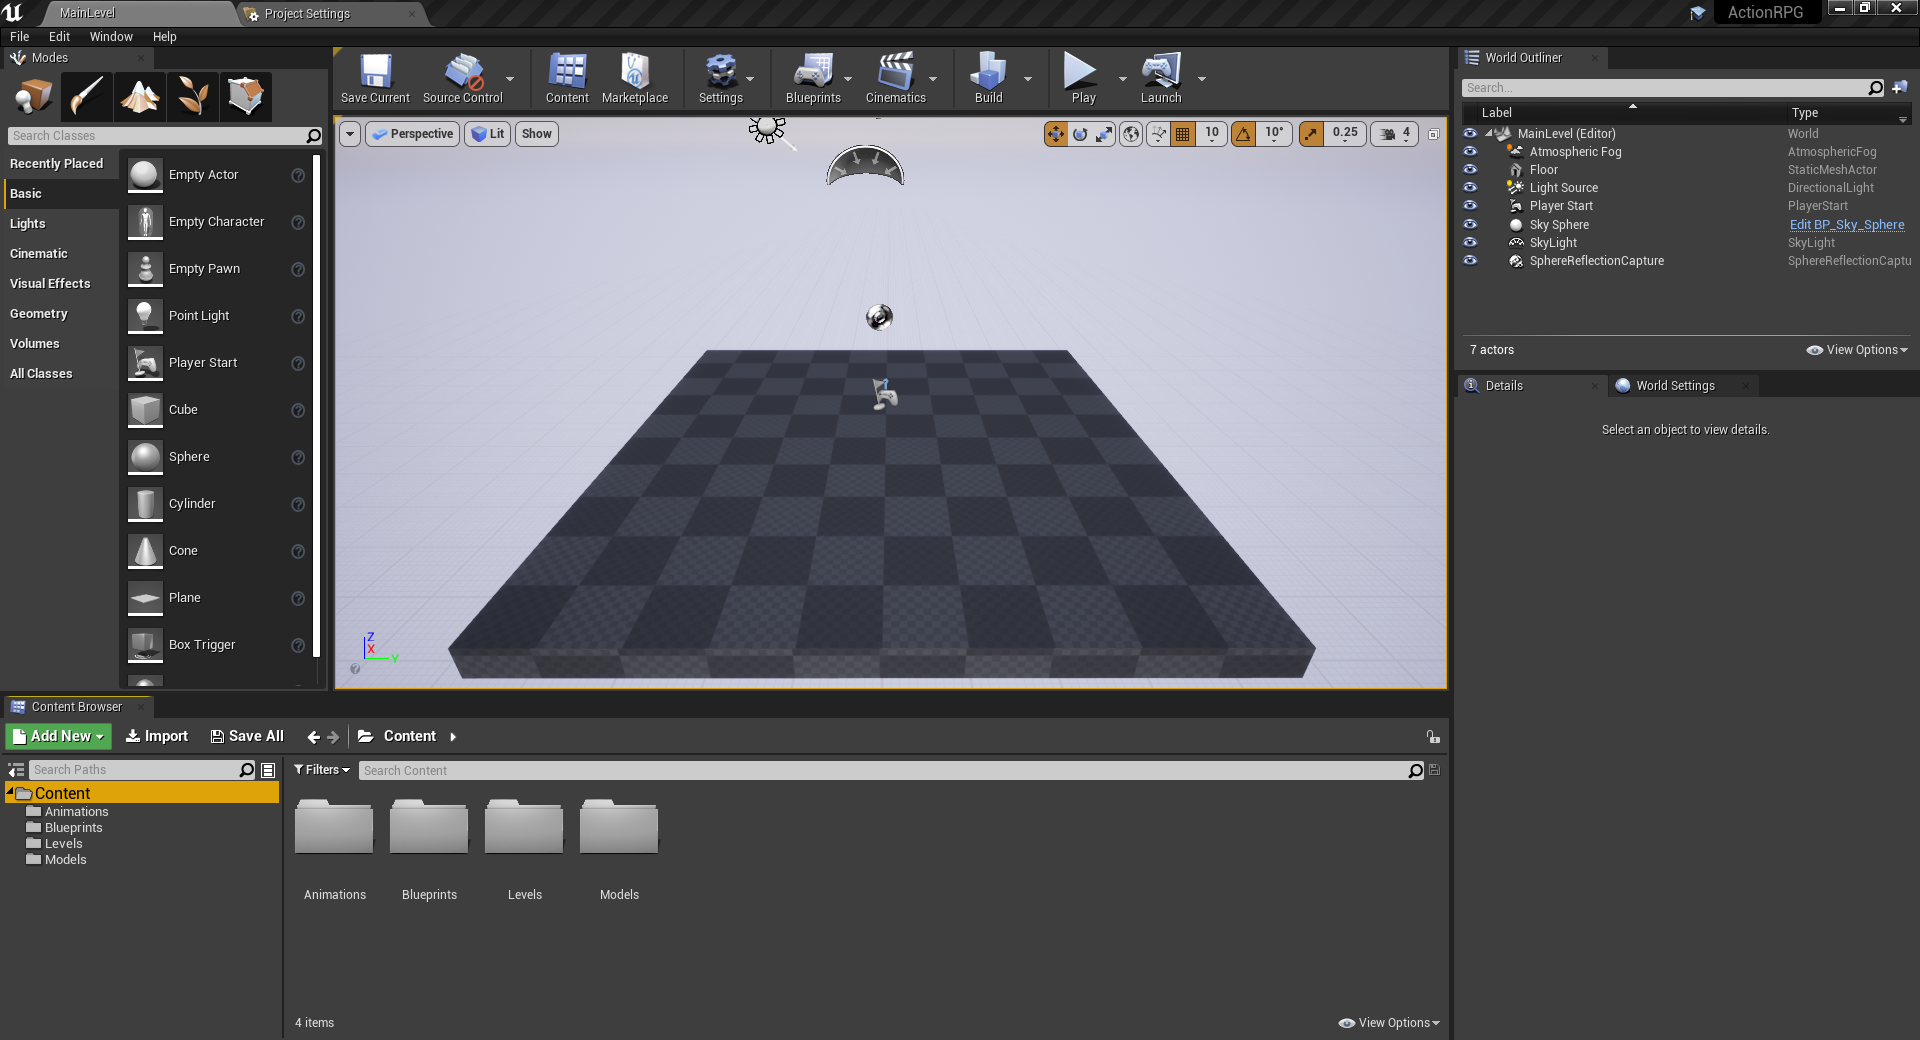
To begin, let’s create a new project (you don’t need to include the starter content). When the editor opens up, let’s create four new folders.
- Animations
- Blueprints
- Levels
- Models
Save the current level to the Levels folder as MainLevel.
Next, download the assets from the beginning of the tutorial and extract them anywhere on your computer.
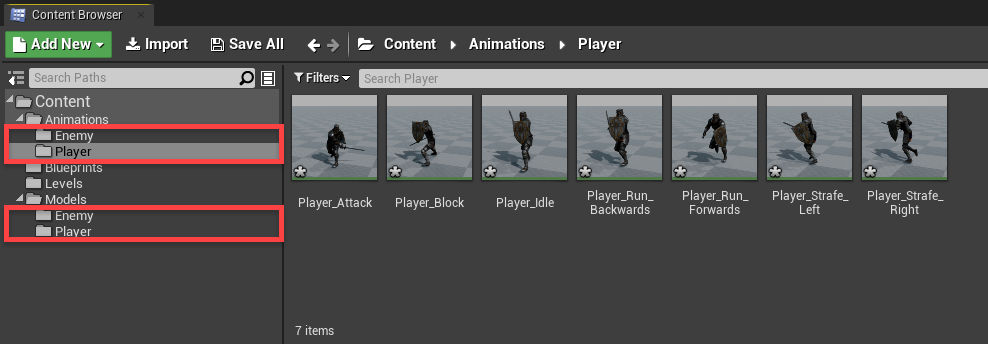
- First, open the Models Contents Folder folder and drag the contents into our project’s Models folder.
- Import all those assets when promoted to.
- Then do the same for the Animations Contents Folder.
- When asked to select a skeleton for the animation, choose either the player of enemy one depending on the animation.
You should now have both models and all the enemy and player animations needed for the tutorial.
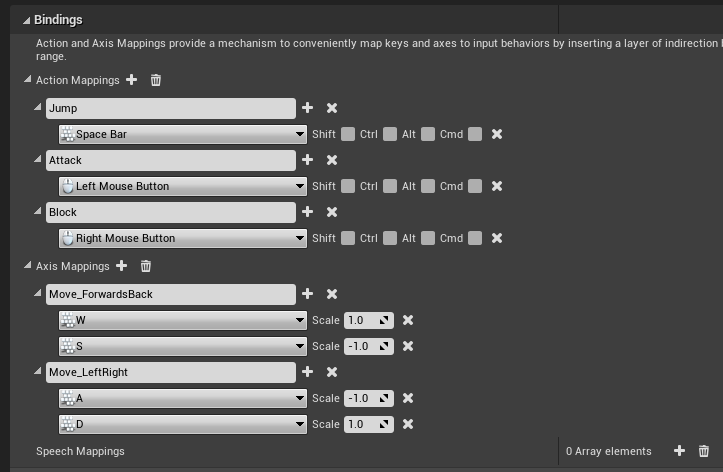
Before we start creating the player, we’ll need to setup the control inputs. In the Project Settings window (Edit > Project Settings…) go to the Input screen.
Here, you want to create three new Action Mappings and two new Axis Mappings. Fill them in as seen in the image below:
Creating the Player
Time to create our player. In the Blueprints folder, create a new blueprint (parent class of Character) called Player. Double-click it to open the blueprint editor.
We have a few components already created for us.
- CapsuleComponent (collider)
- ArrowComponent (defines the forward direction)
- Mesh (our player’s skeletal mesh)
- CharacterMovement (movement, jumping, etc)
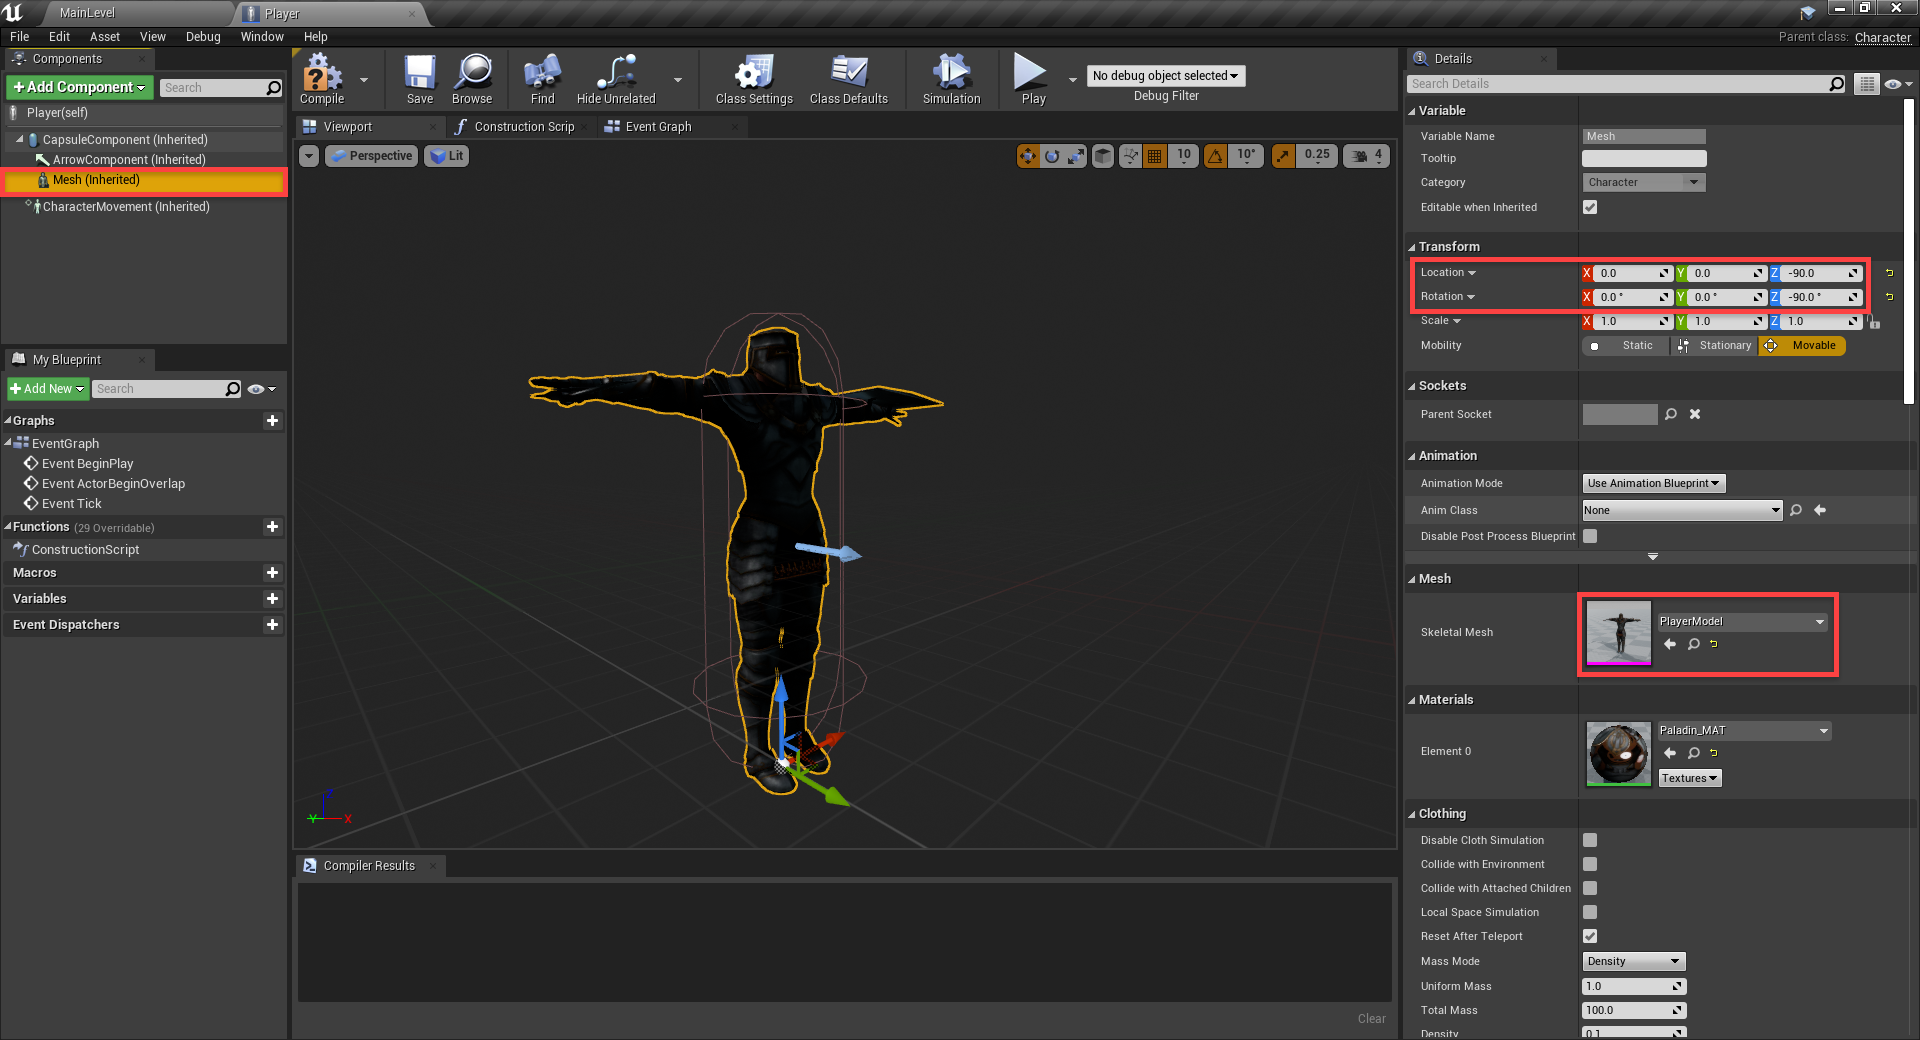
First, select the Mesh.
- Set the Skeletal Mesh to PlayerModel
- Set the Location to 0, 0, -90
- Set the Rotation to 0, 0, -90
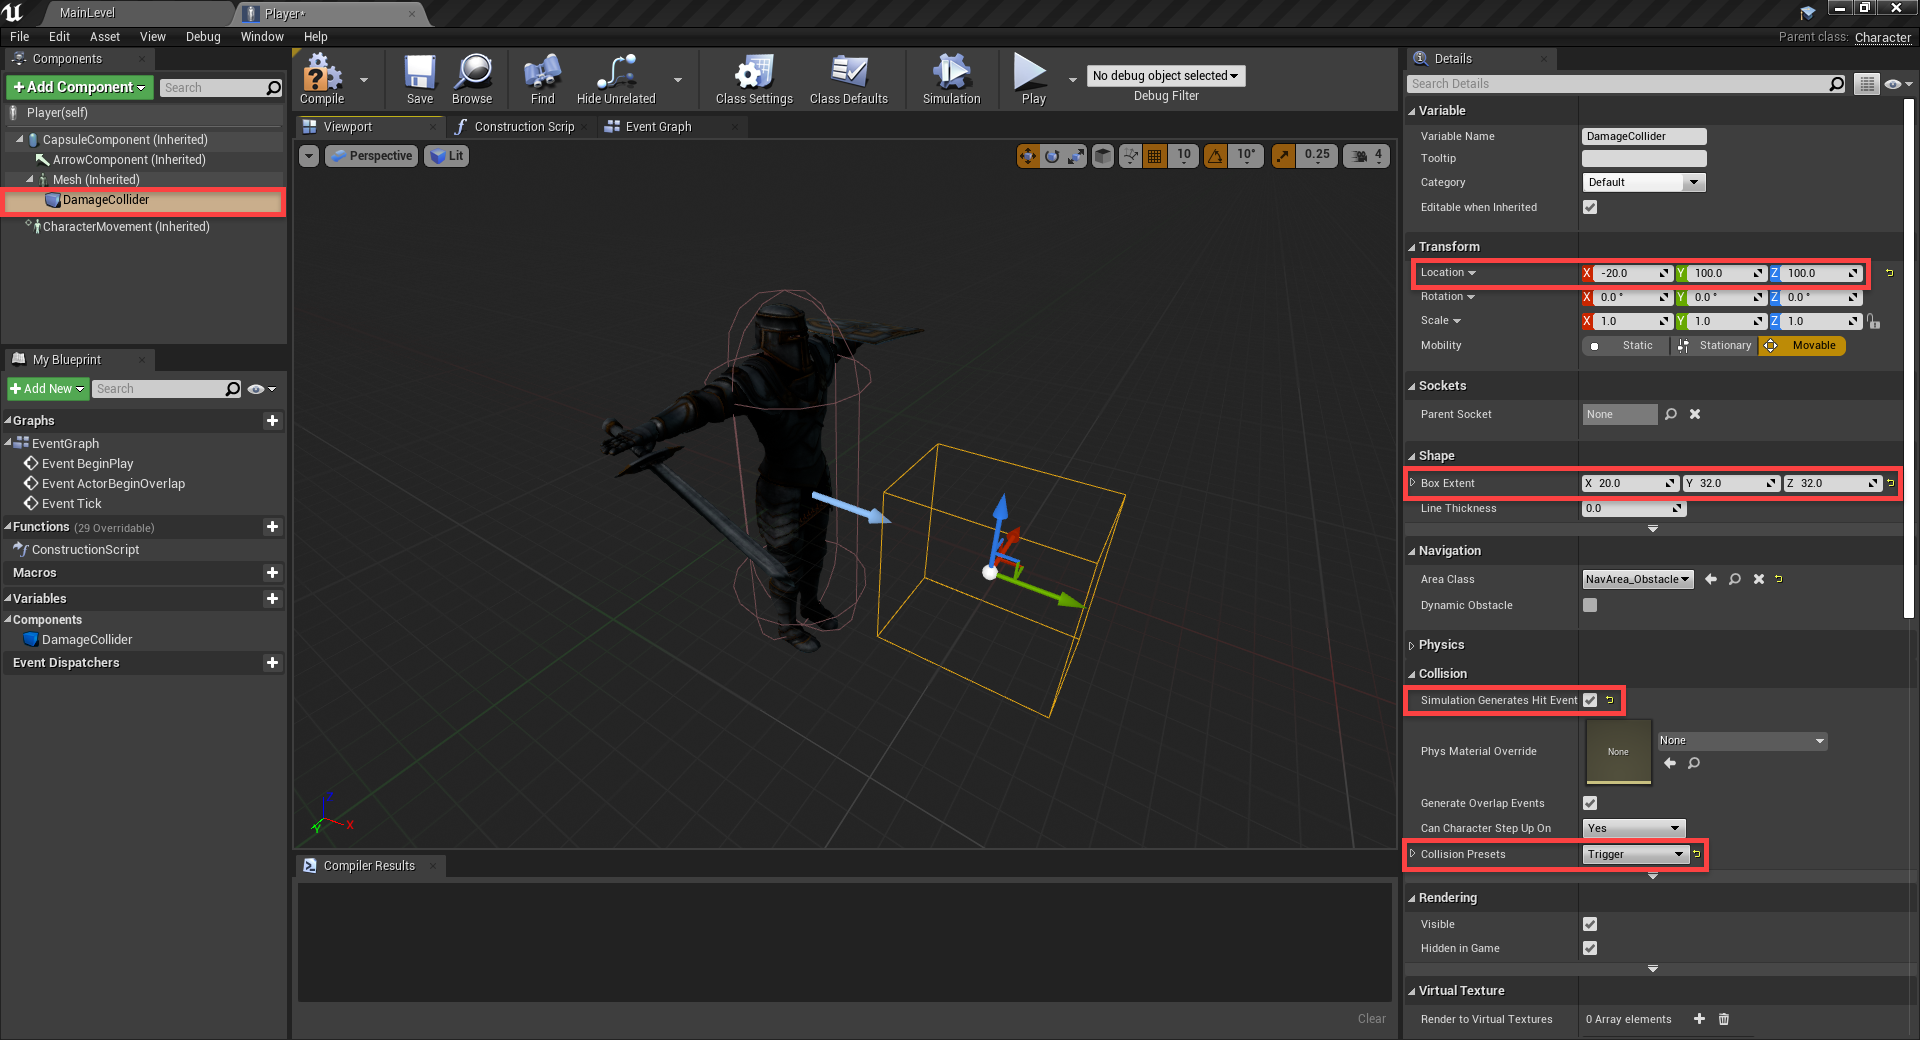
When attacking, we’ll need to check if we’re actually hitting anything. This will be done with a damage collider. Create a new Box Collision component and make it a child of the mesh.
- Set the Location to -20, 100, 100
- Set the Box Extents to 20, 32, 32
- Enable Simulation Generates Hit Events
- Set the Collision Presets to Trigger
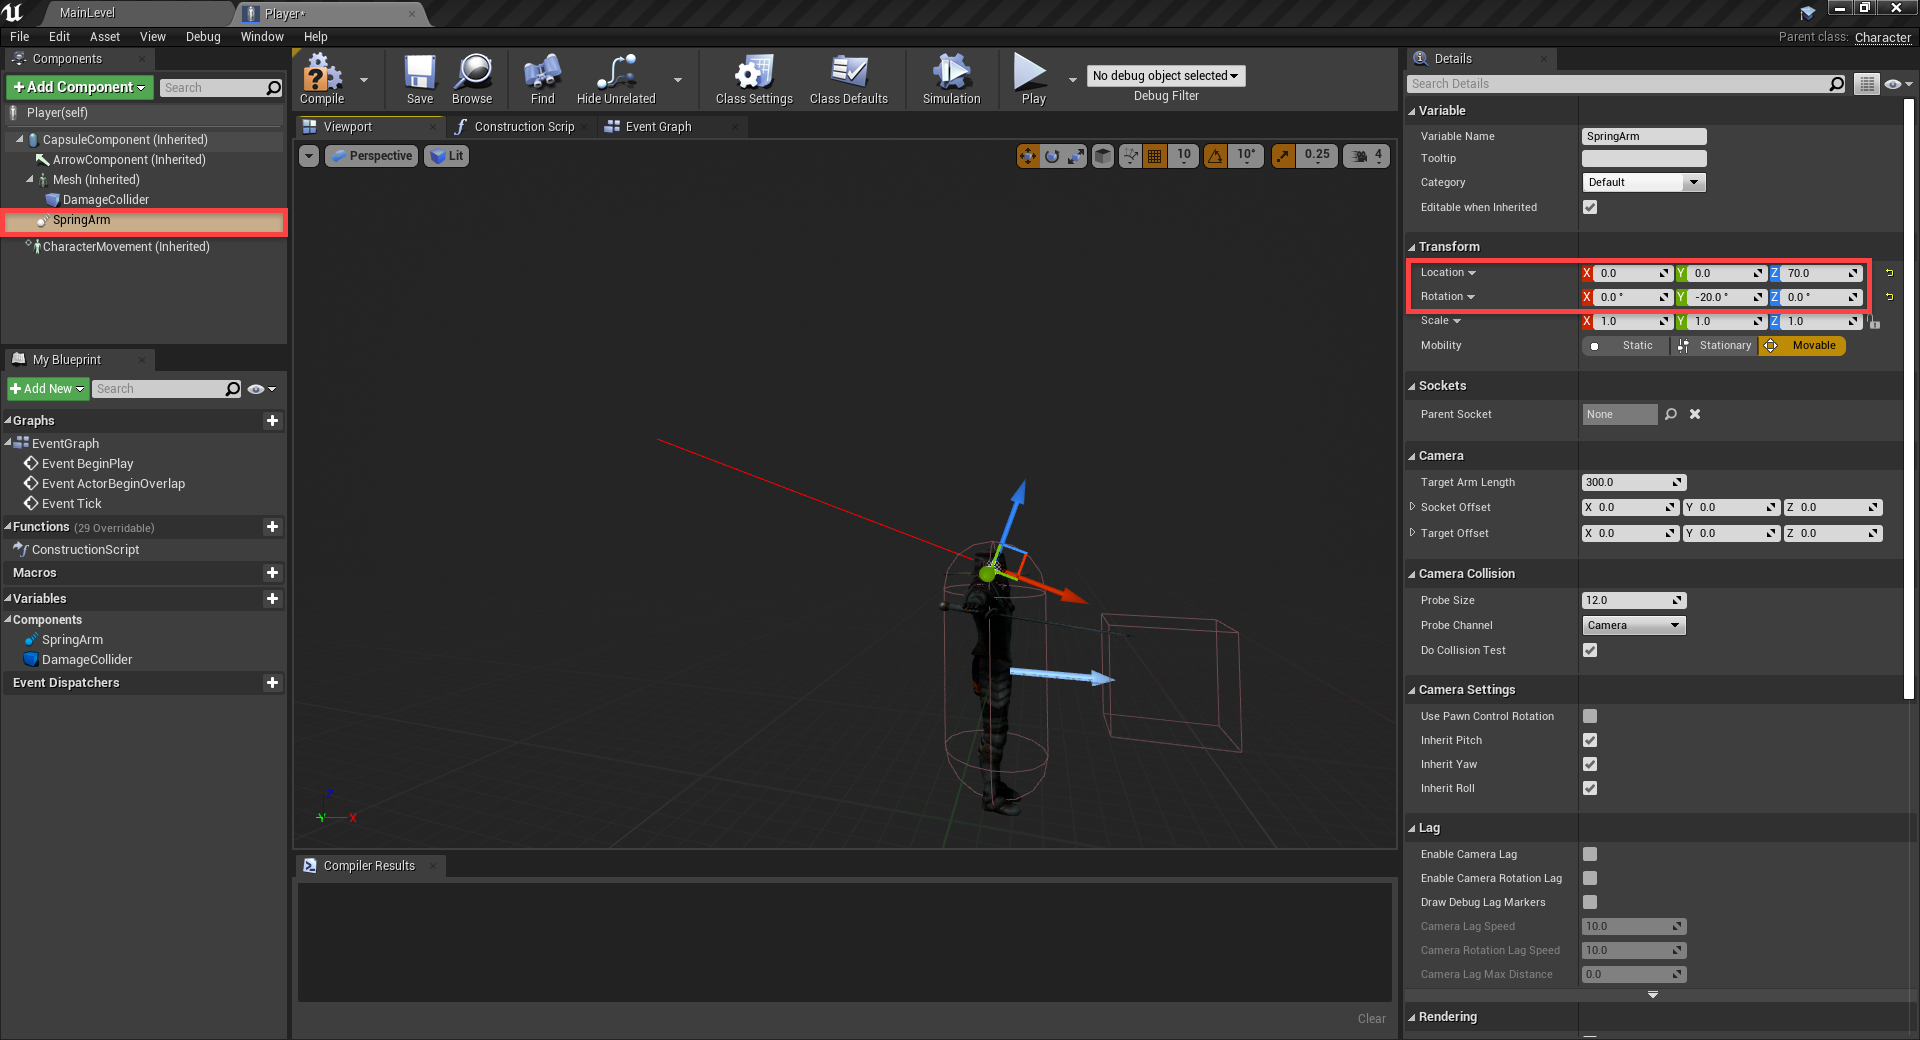
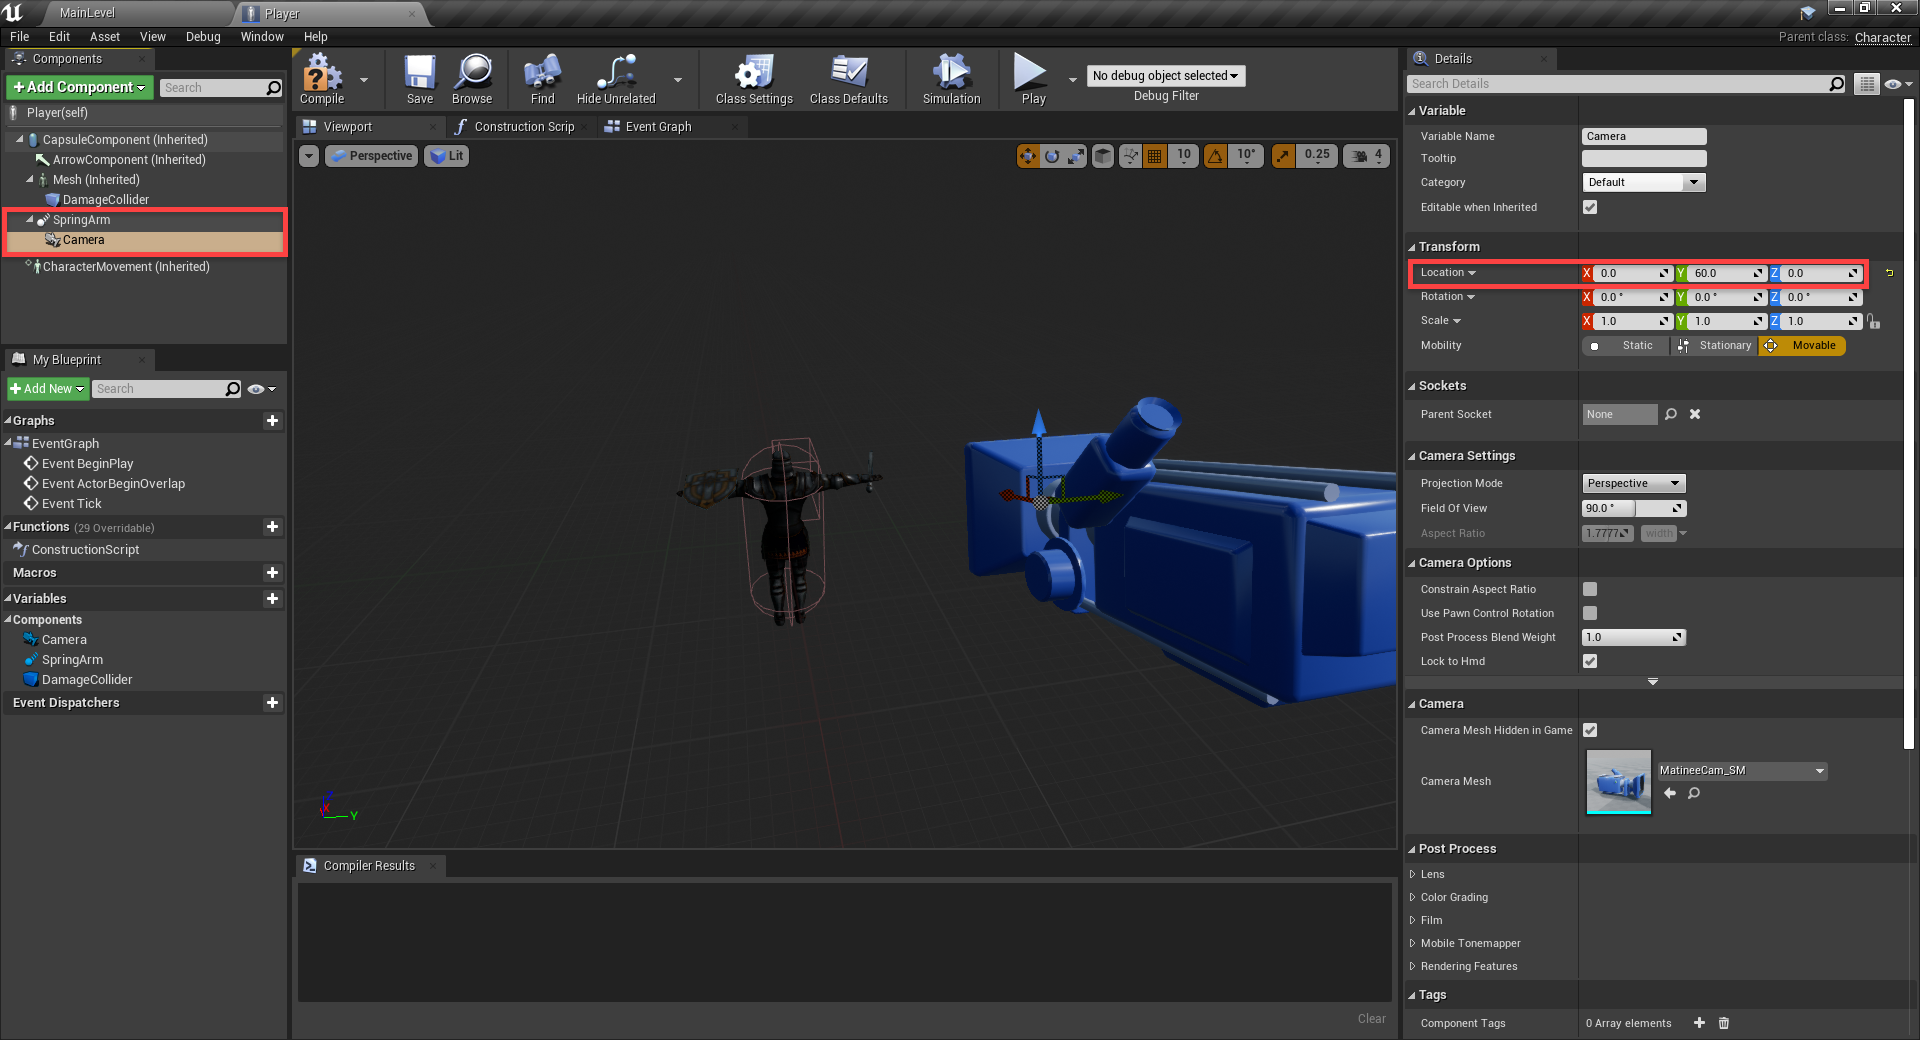
Next, we need to setup the camera. In order to have it orbit around our player, we’ll first create a Spring Arm component. This holds its children at a distance.
- Set the Location to 0, 0, 70
- Set the Rotation to 0, -20, 0
As a child of the spring arm, create a Camera component.
- Set the Location to 0, 60, 0
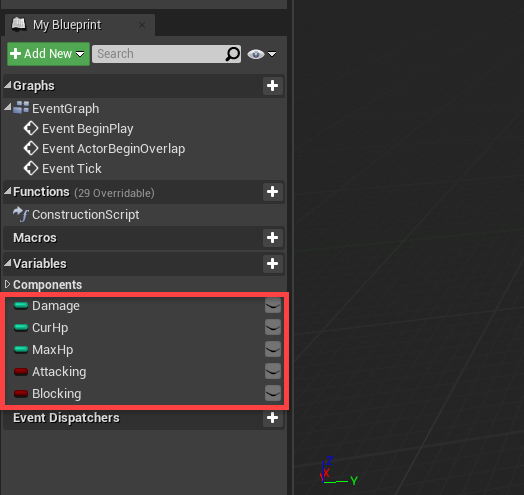
Now that we’ve got all of our components setup, we can begin with our variables.
- Damage (Integer)
- CurHp (Integer)
- MaxHp (Integer)
- Attacking (Boolean)
- Blocking (Boolean)
You can then click the Compile button and fill in some default values.
- Damage = 1
- CurHp = 5
- MaxHp = 5
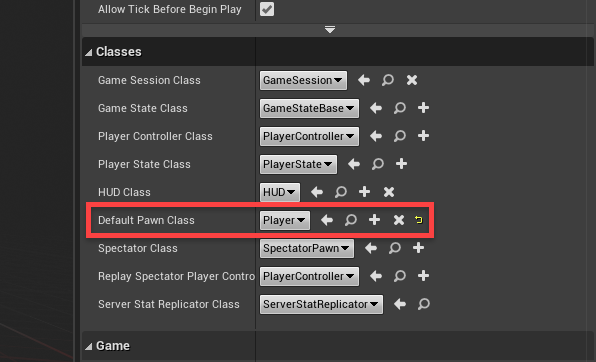
Next, let’s go back to the level editor and create a new blueprint. This is going to be of parent class GameModeBase and it’s going to be called MyGameMode. Open it up, and all we’re going to do here is set the Default Pawn Class to Player.
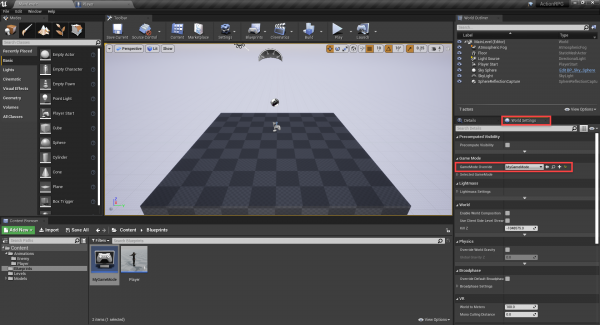
Back in the level editor, let’s go to the World Settings panel and set the GameMode Override to our MyGameMode. Now when we press play, the player should spawn.
Camera Orbit Logic
Let’s go to our player’s event graph and begin by implementing the camera orbit functionality. This will allow us to move the mouse around, causing the camera to move around the player like in a third-person game.
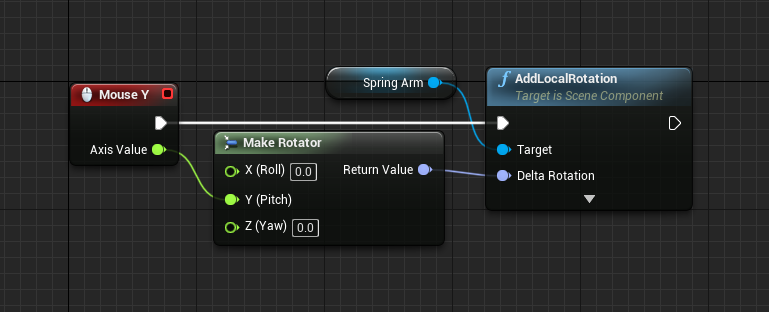
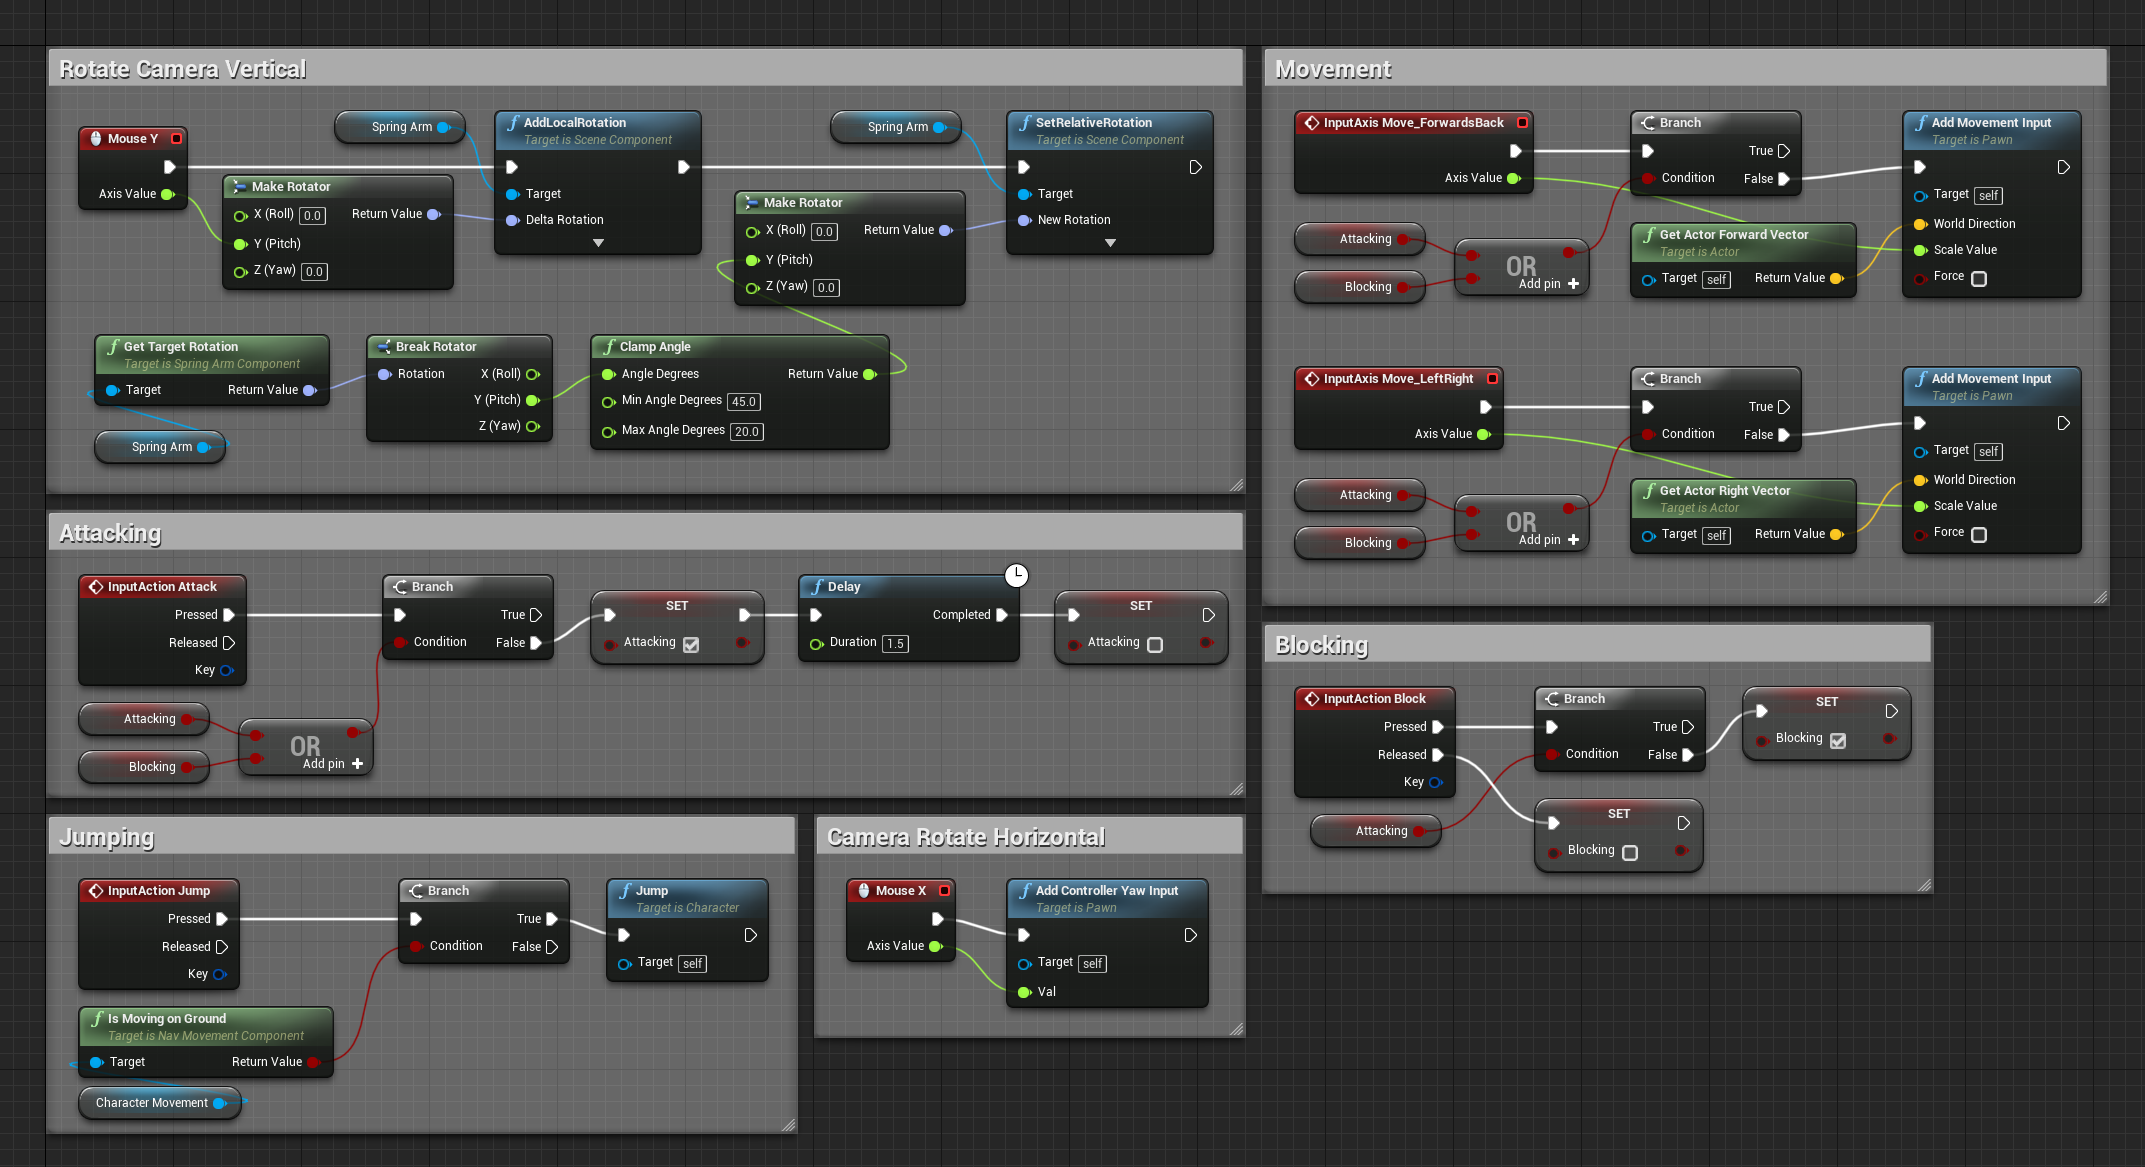
The Event Mouse Y node gets triggered when we move the mouse up and down. We’re creating a rotation along the Y axis and adding that to the spring arm. If you press play, you should see it in work.
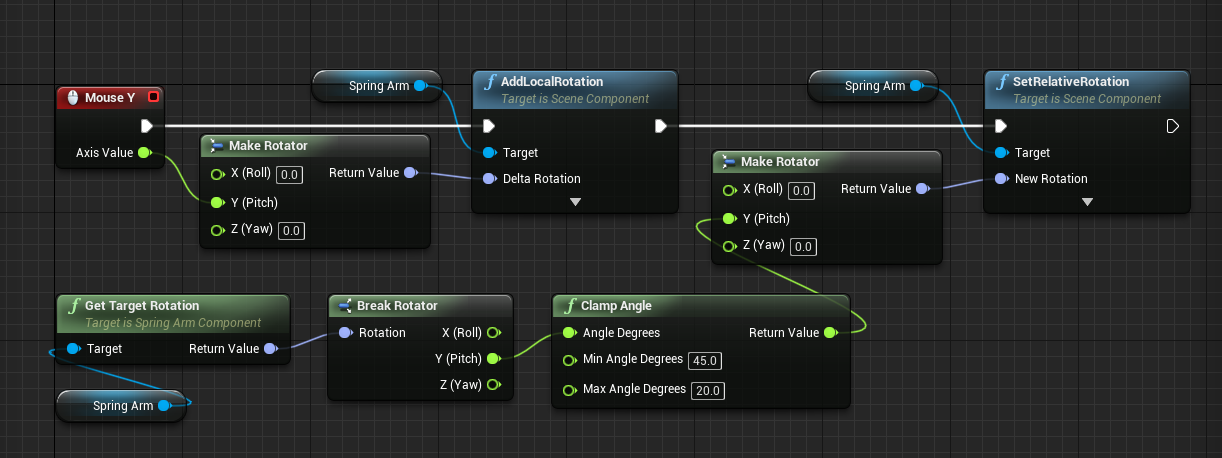
One problem though, is that we can rotate all the way around. What we need to do, is clamp the rotation. Prevent it from moving too far up and too far down. We’ll be using the Clamp Angle node to clamp the Y rotation axis. Now if you press play, you’ll see that there’s a limit to where you can rotate the camera vertically.
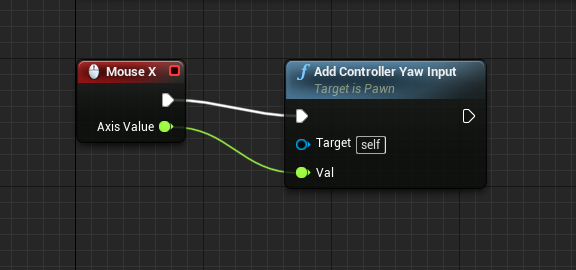
For the horizontal rotation, we can just use the Event Mouse X node and plug that into the Add Controller Yaw Input node. This will automatically rotate the player vertically.
We now have a fully working camera orbit.
Moving the Player Around
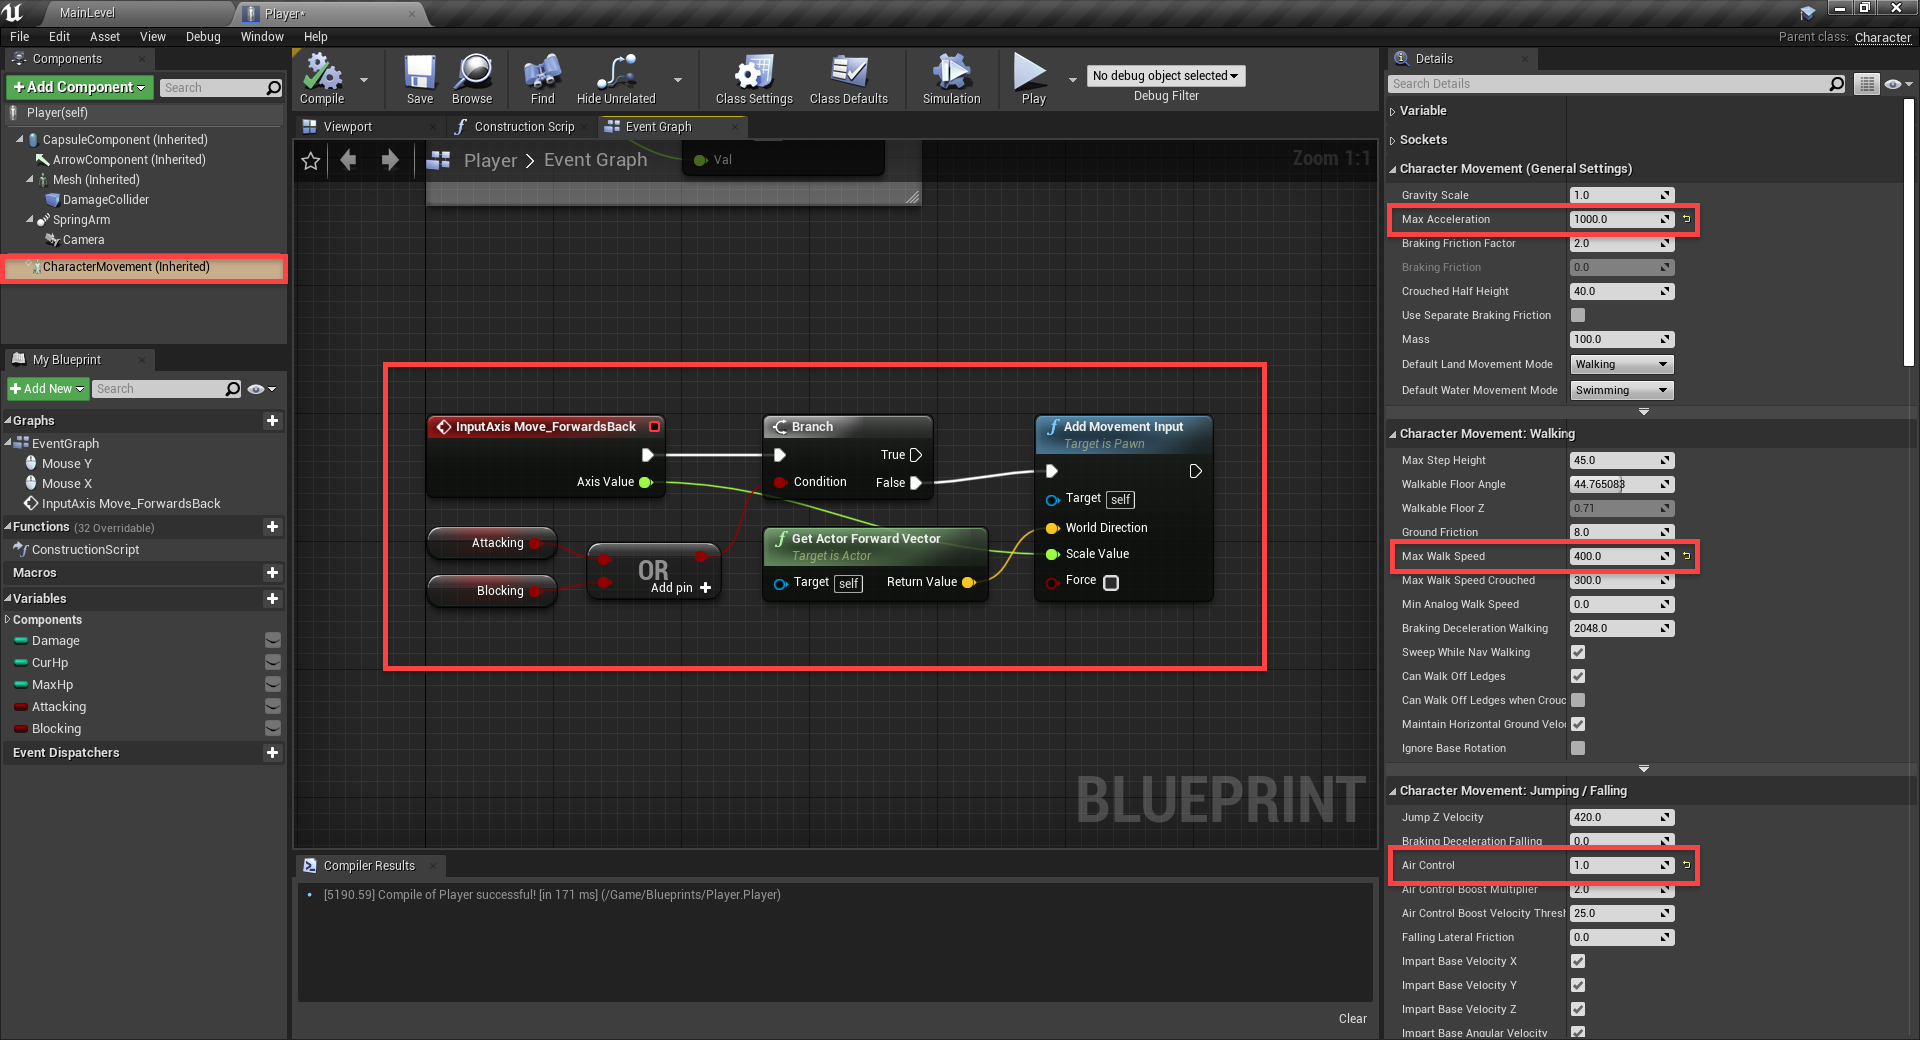
For the player movement, we’re first going to be checking for when the player is using the Move_ForwardsBack input axis. We’ll then check if they’re currently attacking or blocking. If not, then we’ll move them in the respective direction.
We can also select the CharacterMovement component to change some of the movement properties.
- Set the Max Acceleration to 1000
- Set the Max Walk Speed to 400
- Set the Air Control to 1.0
Now if you press play, you should be able to move forwards and back relative to where you’re facing.
Horizontal movement is basically the same, but we’re checking for the Move_LeftRight input and setting the world direction to the player’s right vector.

If you press play, you should see that we can now fully move around. Since we’re using the character parent class, it comes with a bunch of pre-made things such as jumping. To implement jumping, we just need to check if we’re on the ground, then trigger the jump node.

Attacking and Blocking
The player can attack and block incoming attacks. First, for attacking we’ll check for the appropriate input and make sure we’re not already attacking or blocking. Then we’ll set the attacking variable to true, wait 1.5 seconds (duration of the attack animation) and set it back to false.

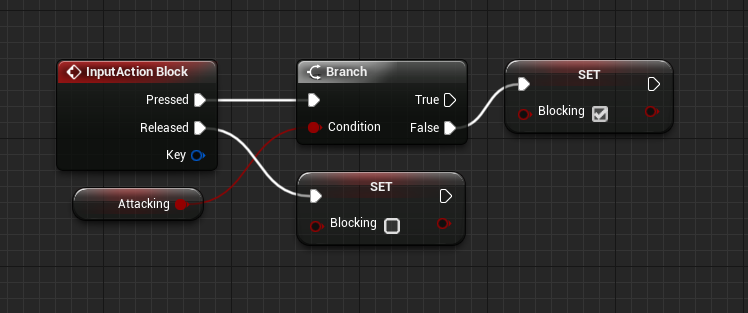
It’s similar for blocking. We’ll check for the input, make sure we’re not attacking then set the blocking variable to true. When we let go of the button, we’ll set it to false.
Here’s an overview of everything you should have in the graph so far. I’ve commented the different sections to make it easier to read. You can do this by selecting a group of node, then right clicking them and clicking Create Comment From Selection.
Player Animations
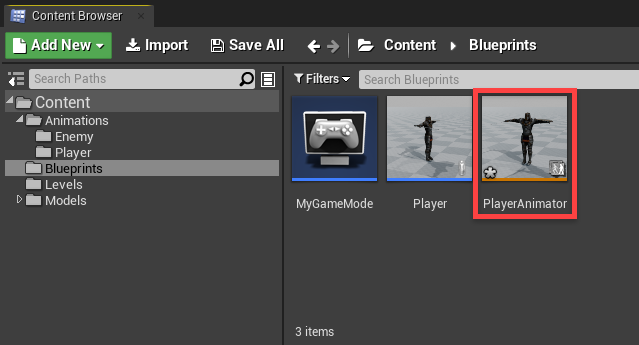
We’ve got our player setup but the model is static. To fix this, let’s go to the Blueprints folder and create a new Animation > Animation Blueprint. When it asks for a skeleton, choose the player model. Call the blueprint PlayerAnimator.
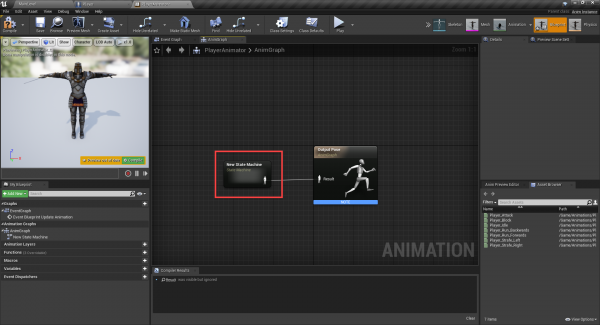
Double-click to open it up. First, we’re going to create a new state machine (right click and create state machine node). Plug this into the Output Pose. A state machine basically determines what animation to play based on given inputs (are we moving? attacking? blocking?).
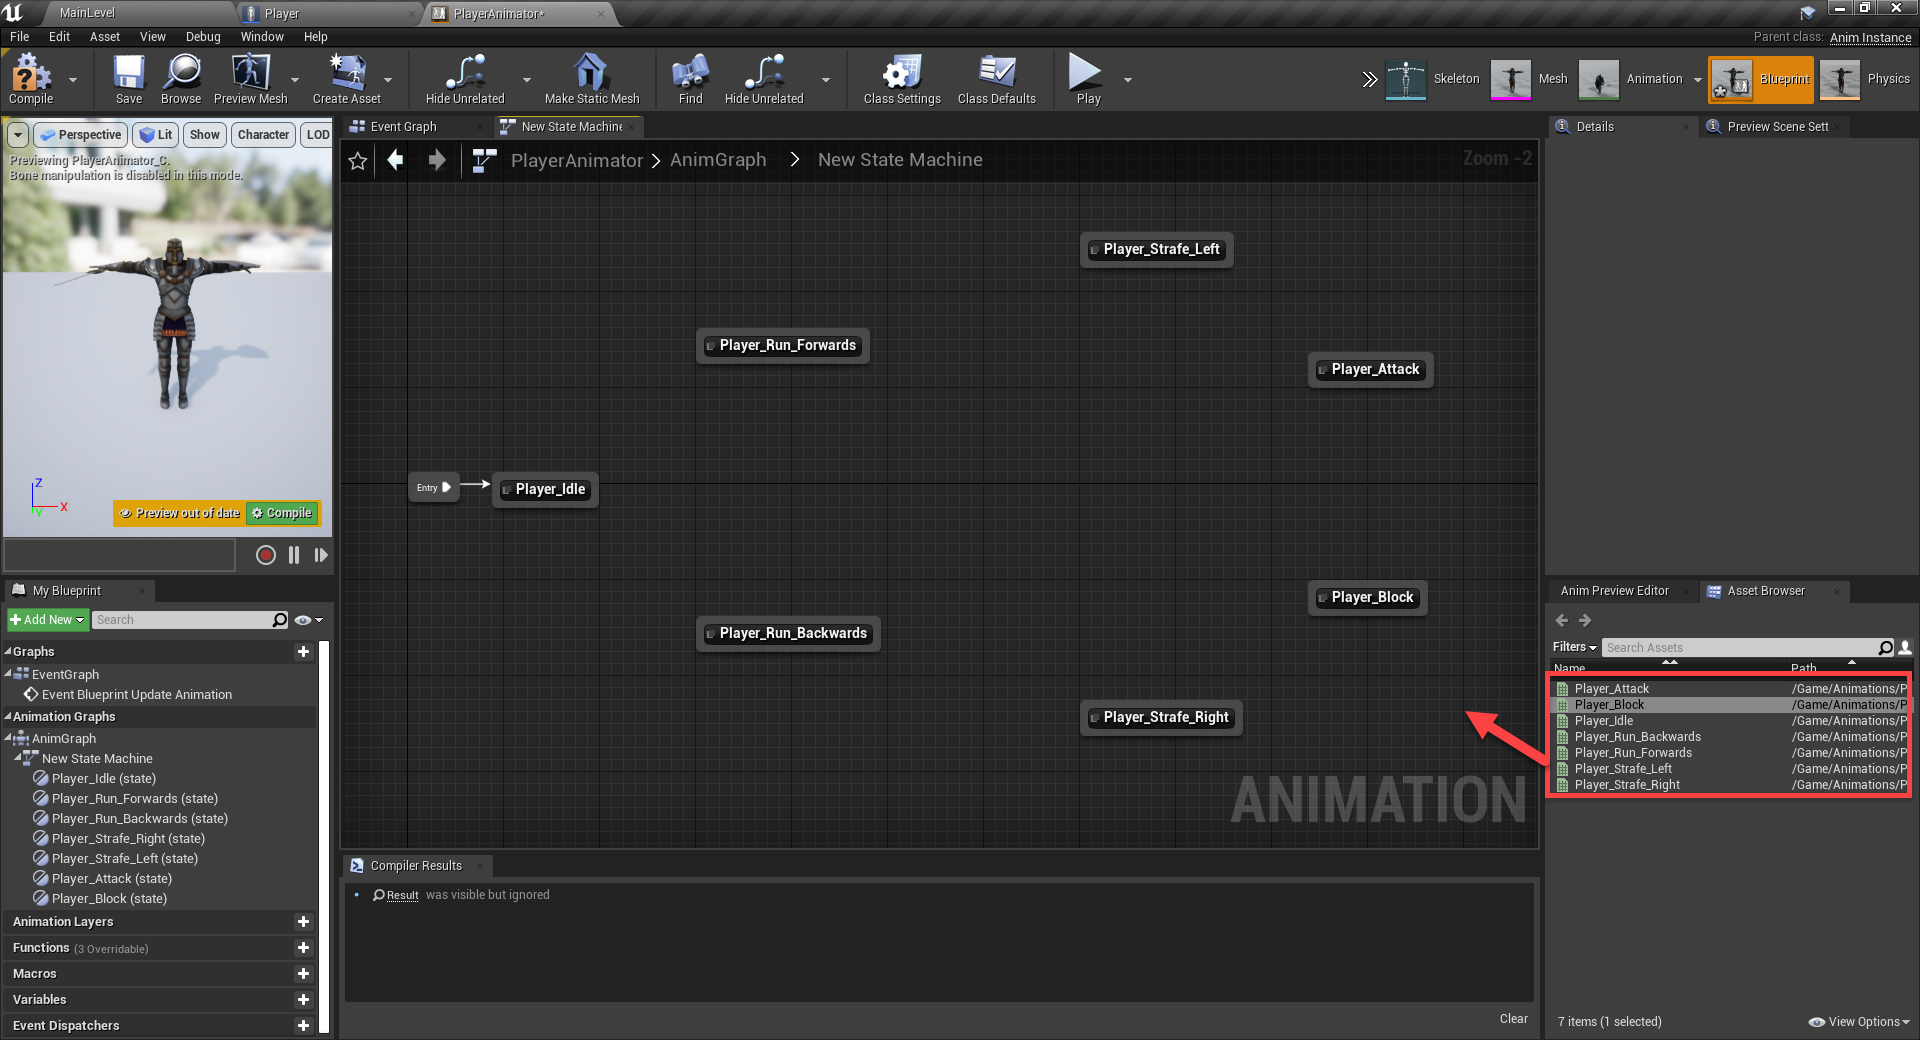
Double-click on the state machine to open it up. This is where we’re going to connect the 7 animations we have. Drag them in like so, and connect the entry node to the idle animation.
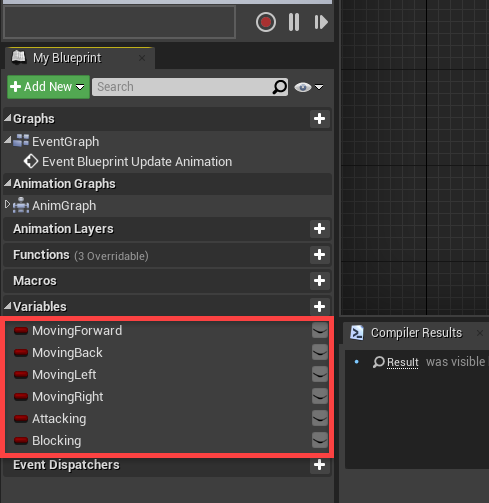
At the bottom left we can create the variables we’ll be using. All these are booleans.
Let’s start with the idle animation. Connect that to all other animations which we can transition to.
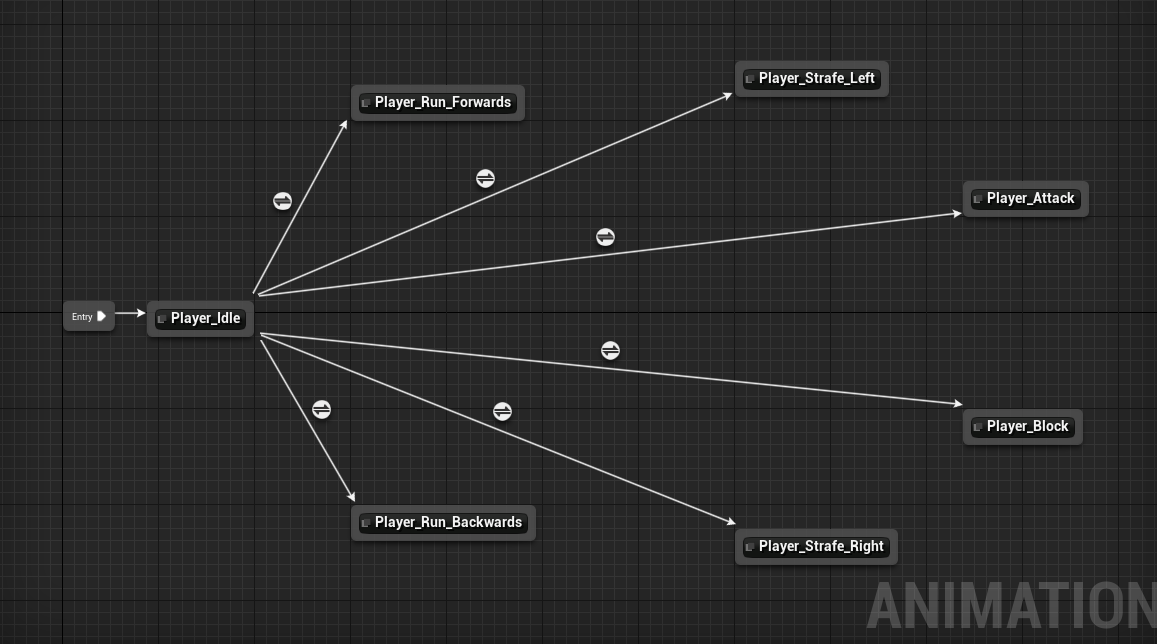
You’ll see that each connection has a white circle button. Double-click on the run forwards transition, it will take us to a graph where we can setup a condition. This is going to return true or false for whether or not we can enter the transition.
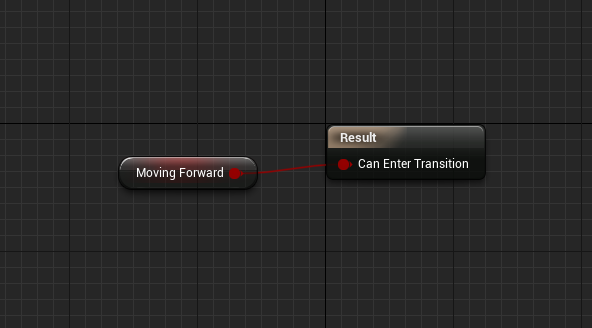
We can then go back to the state machine. Select the transition we just made and click Promote to Shared. Call it To Forward. This is basically a saved transition rule we can use again without needing to go back into the same graph.
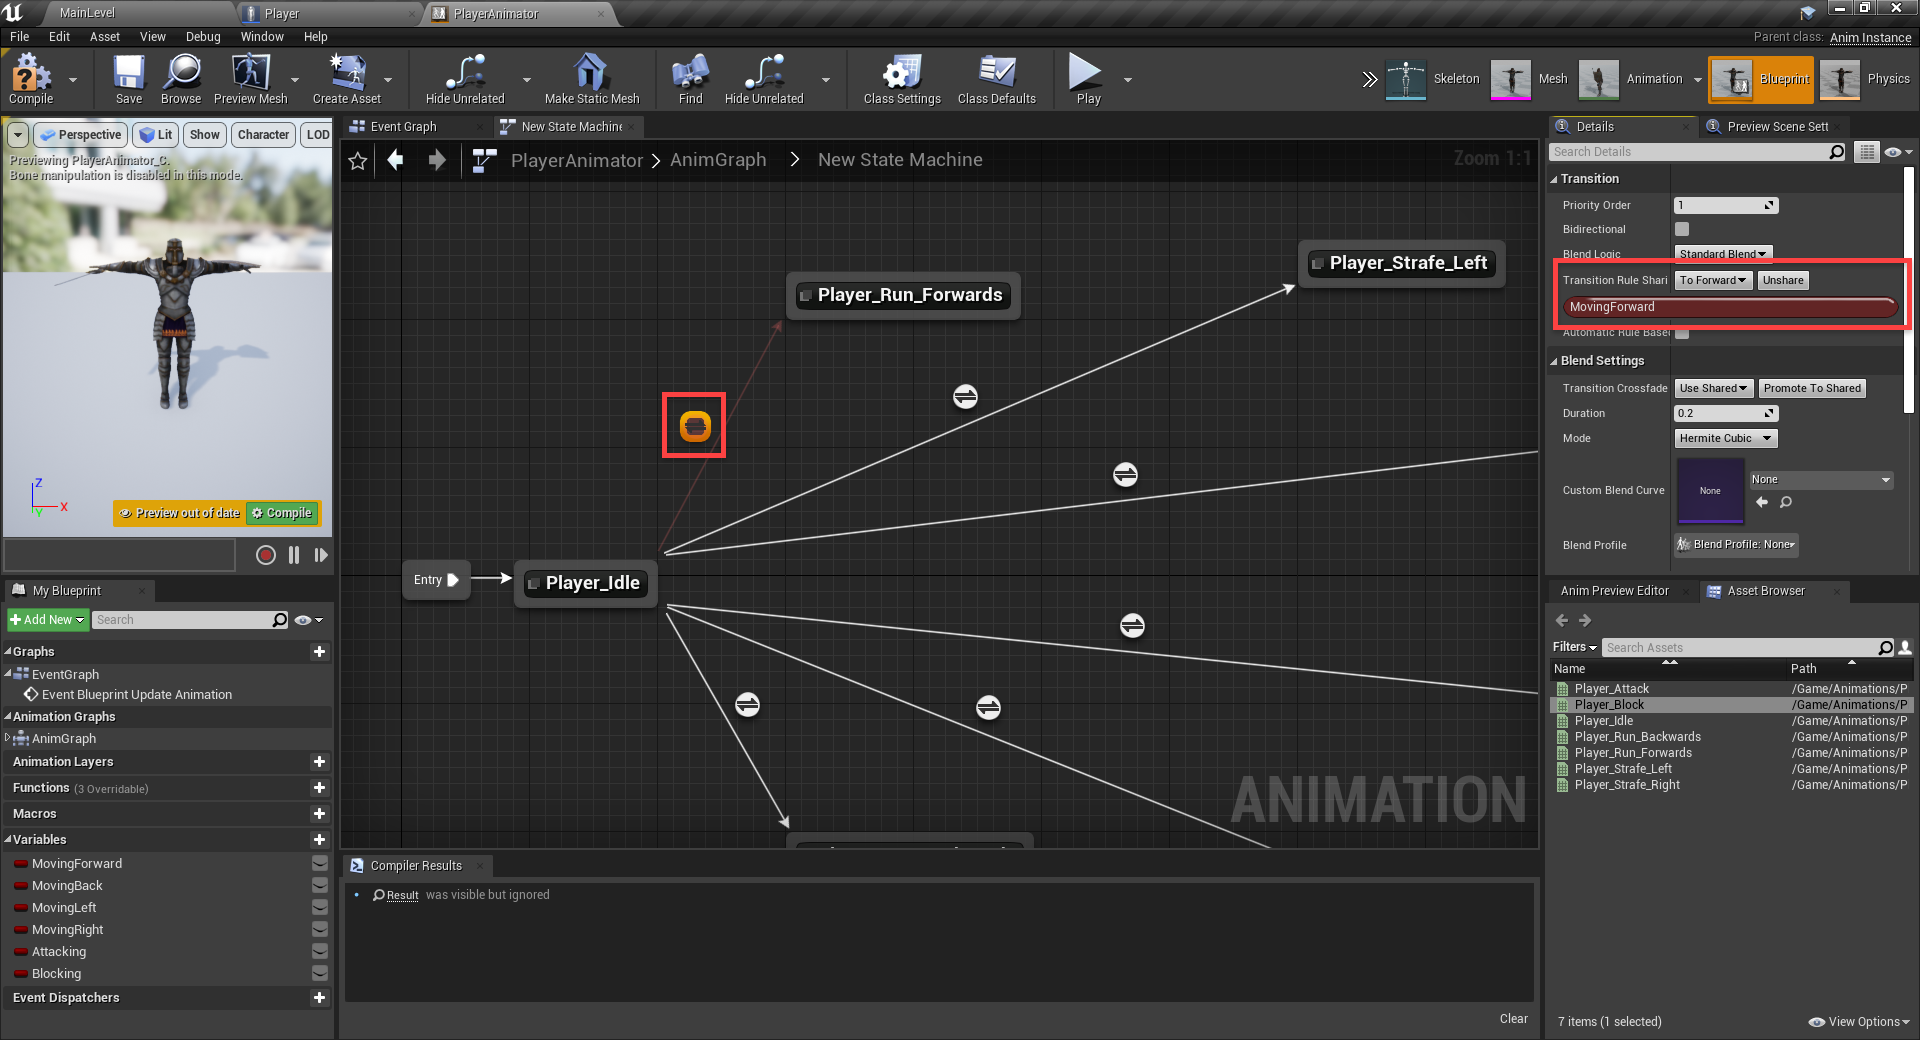
Let’s go ahead and fill in the rest for the appropriate transitions.
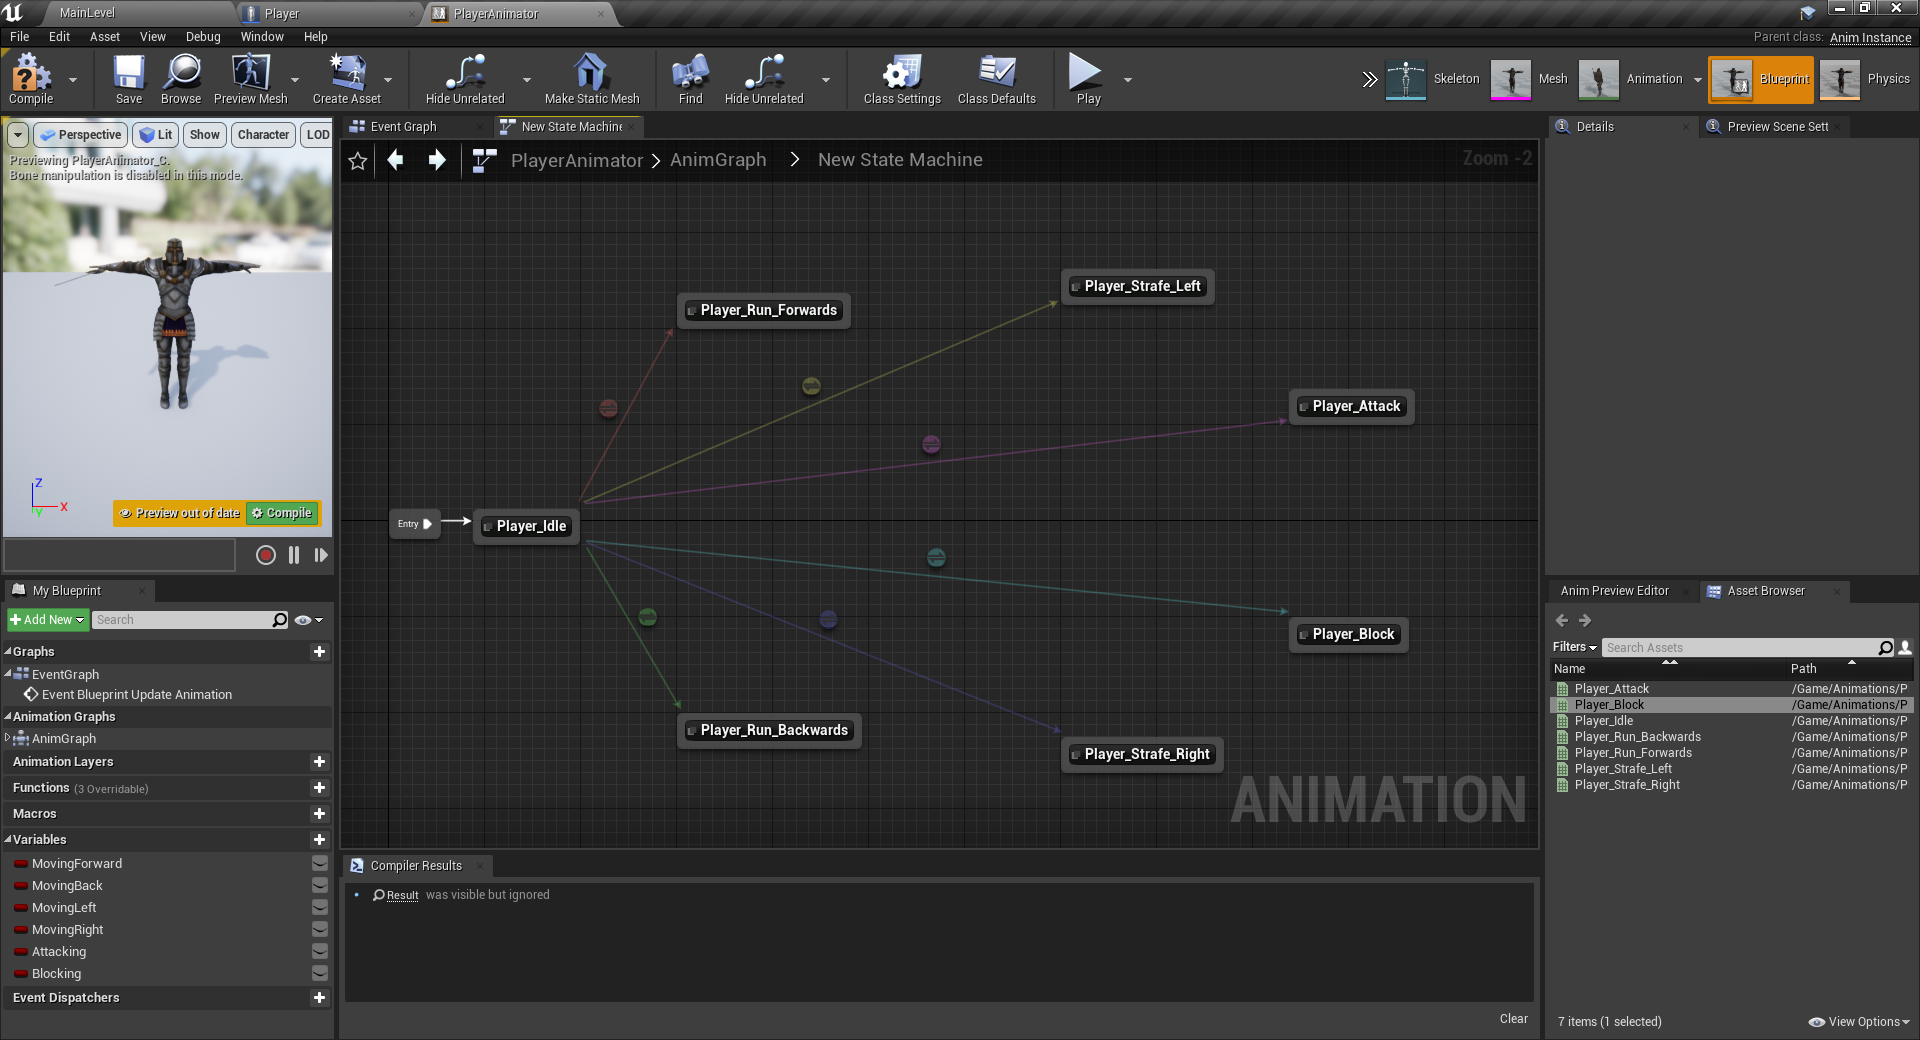
We’ve got transitions from the idle animation, but what about back to it? Create a transition from each animation, back to idle. The condition is going to be the same as the one going to it, but with a not node in-between. Basically the opposite.
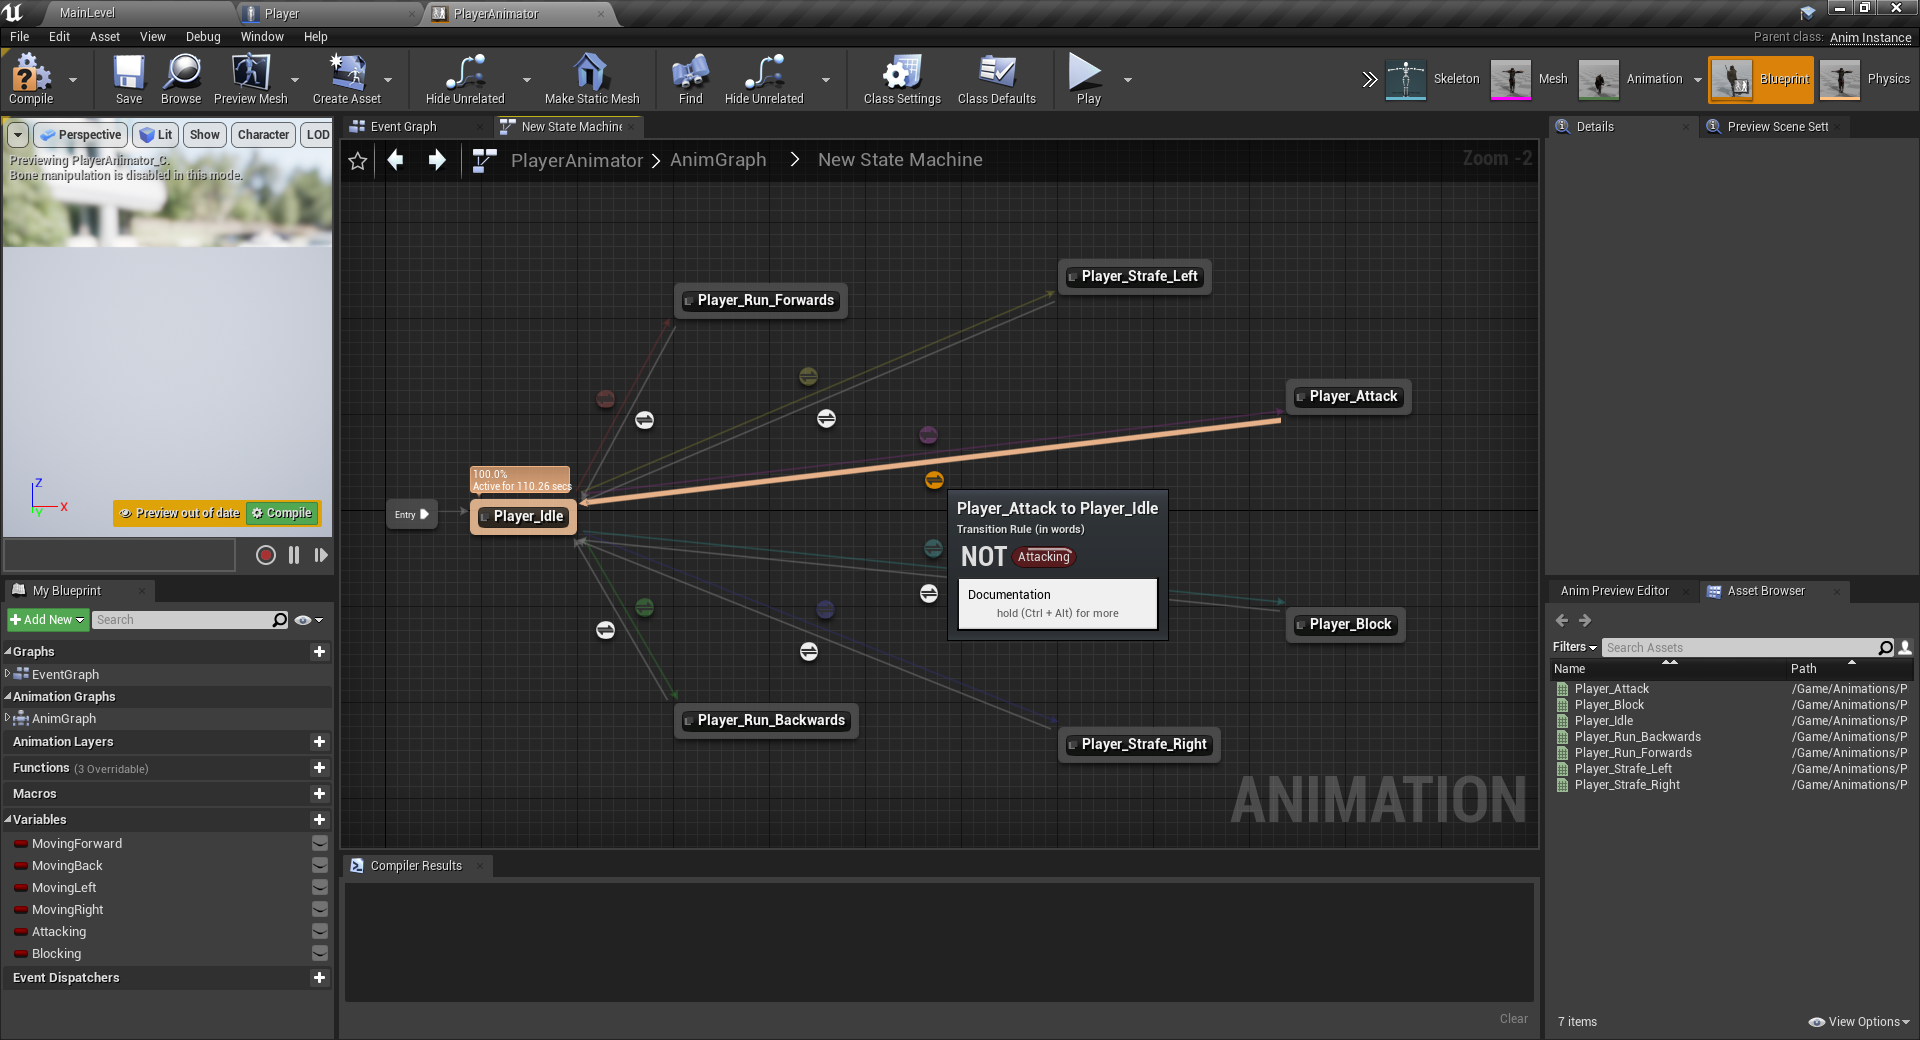
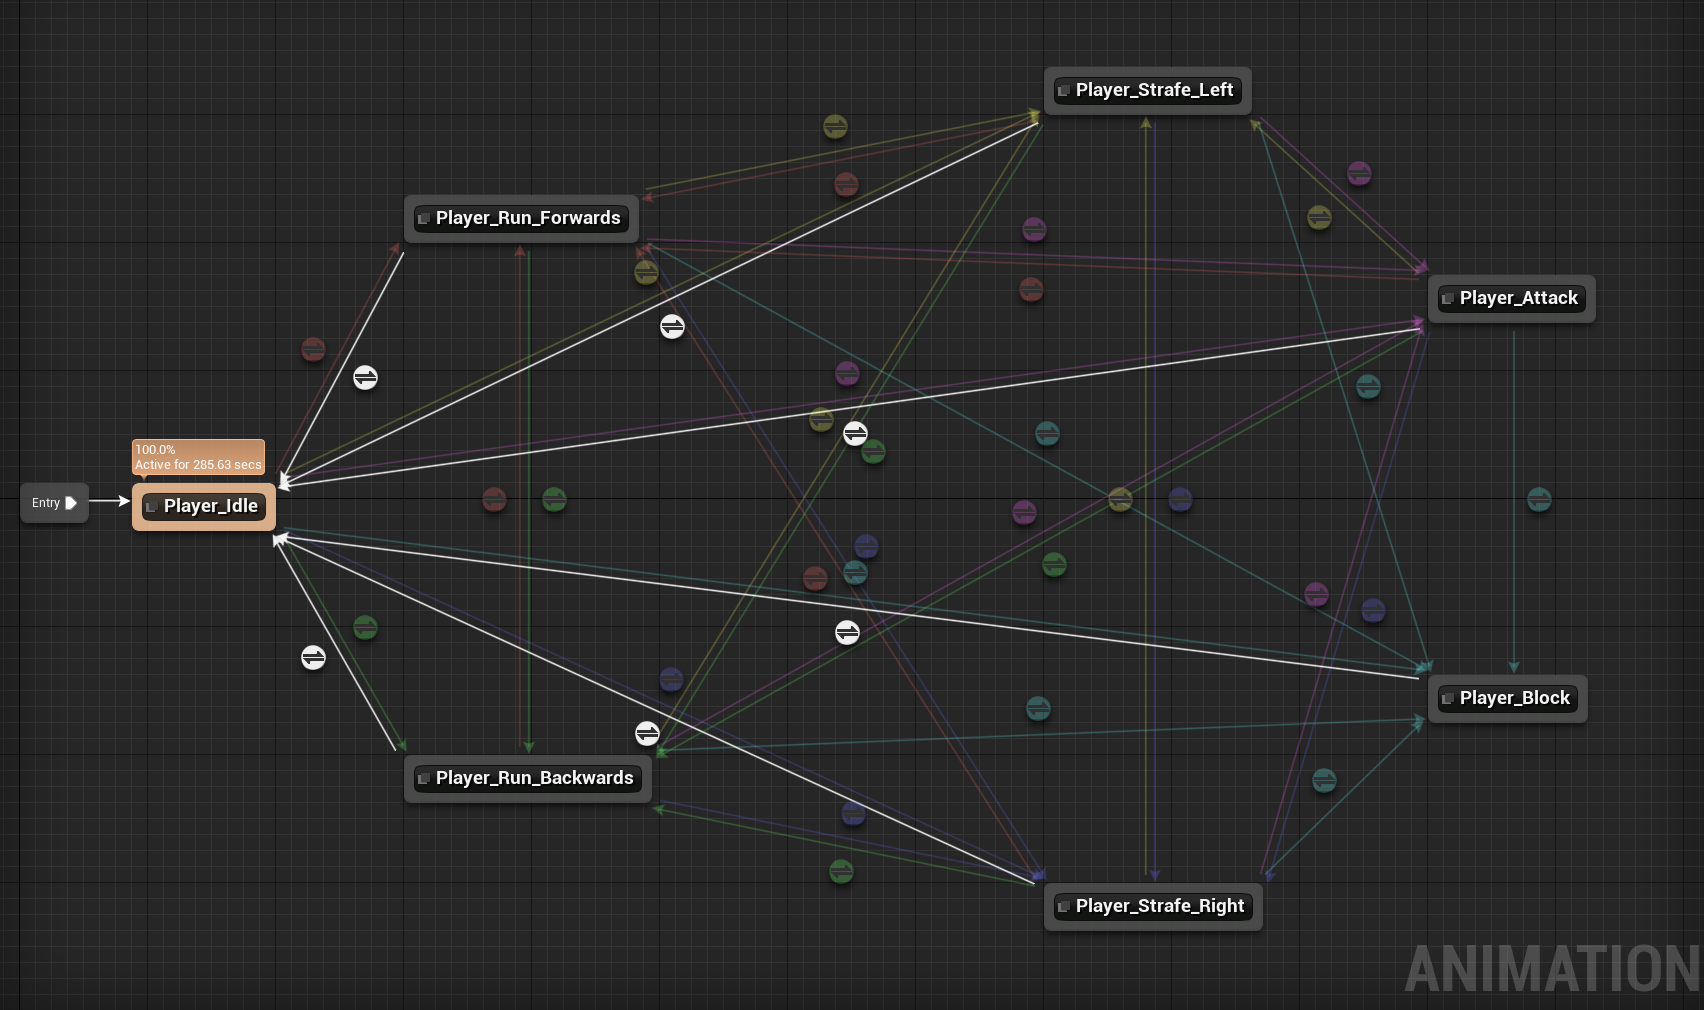
From here, all the animations are pretty much the same in the way they’re connected, except for the Player_Block one. For that, we can only transition back to idle. So create a transition from all the other animations, using the To Blocking transition rule.
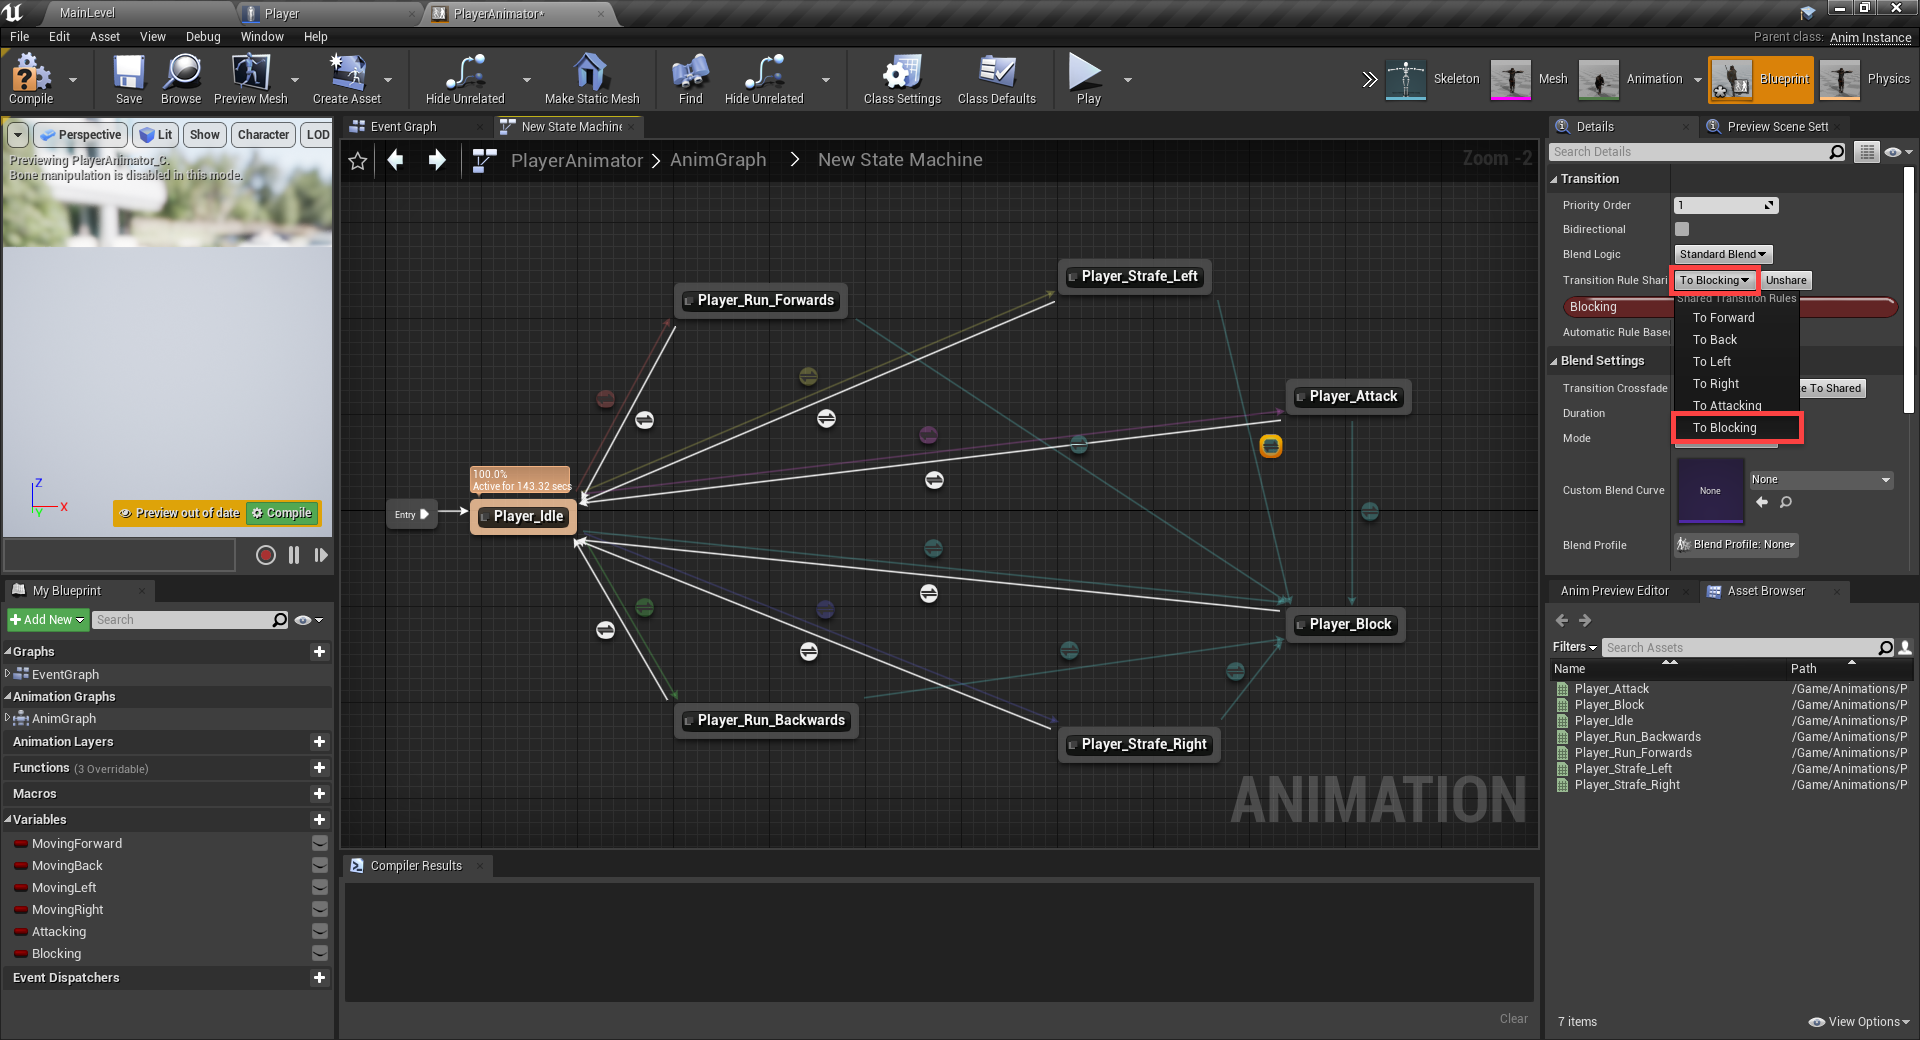
For the rest of the animations, we want to create a transition to and from every other animation like we already have with the idle animation. Just make sure that there’s no return transition from the block animation.
Here’s what the final state machine should look like. Basically for each animation – think what animations can it transition to.
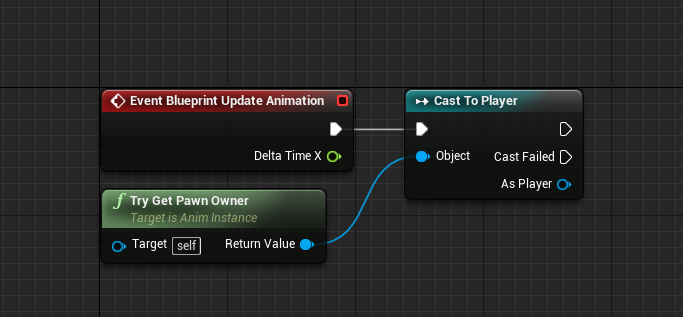
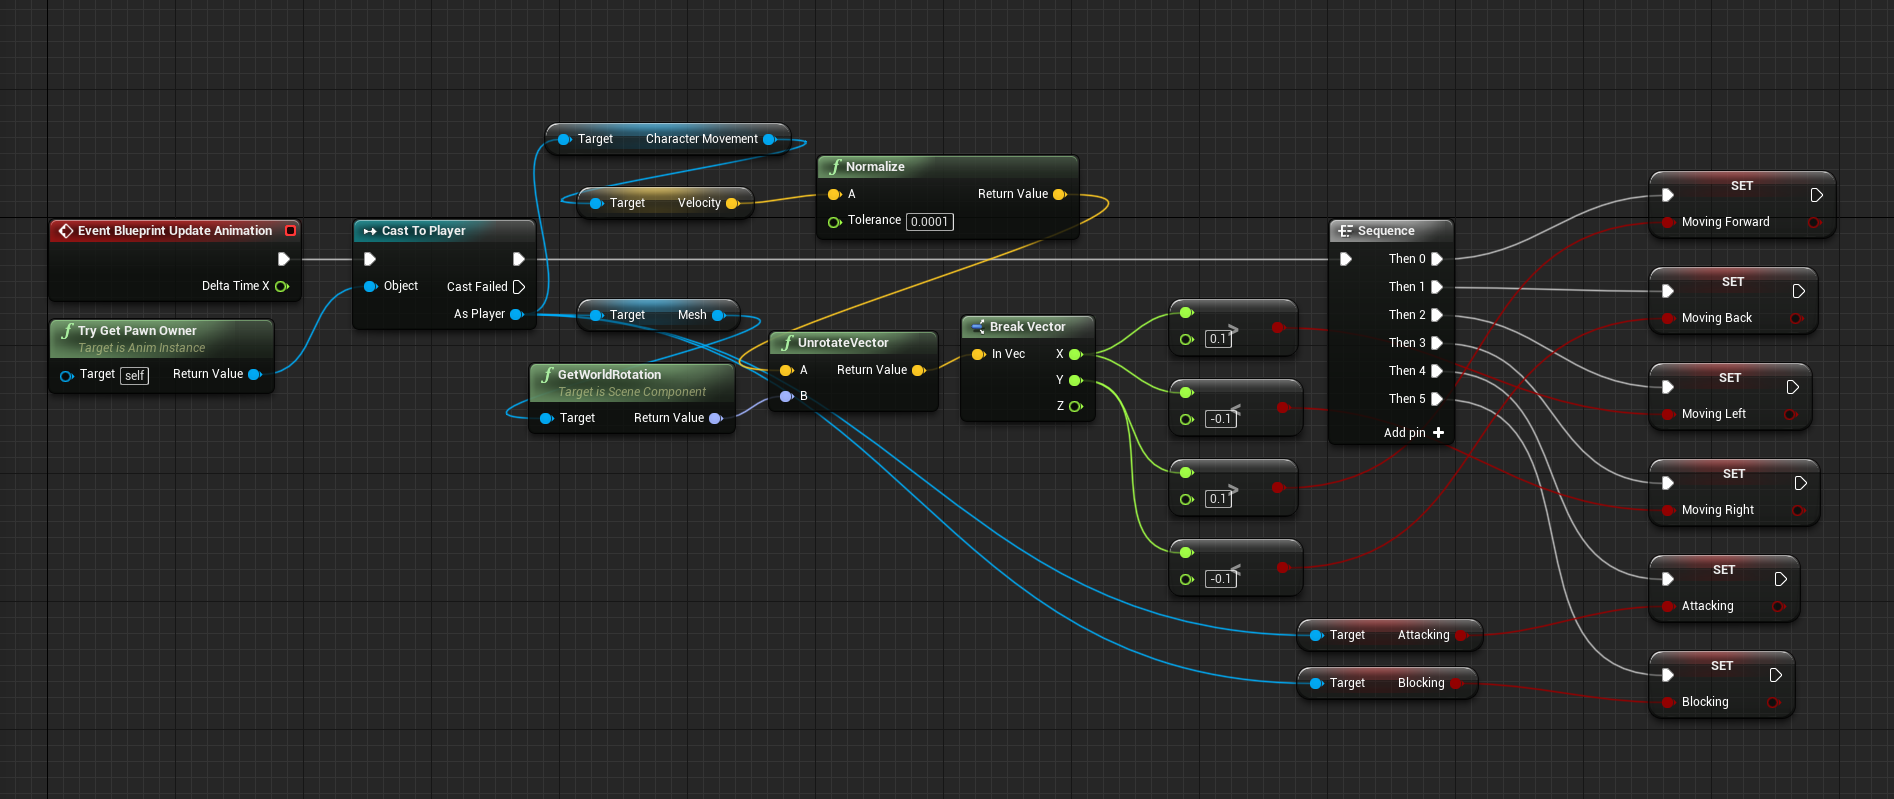
We’ve got the animations setup, but there’s no logic behind setting the variables yet. Go to the Event Graph tab, and there are two nodes by default. Each frame, we want to cast the pawn owner to a player class so we can access its properties.
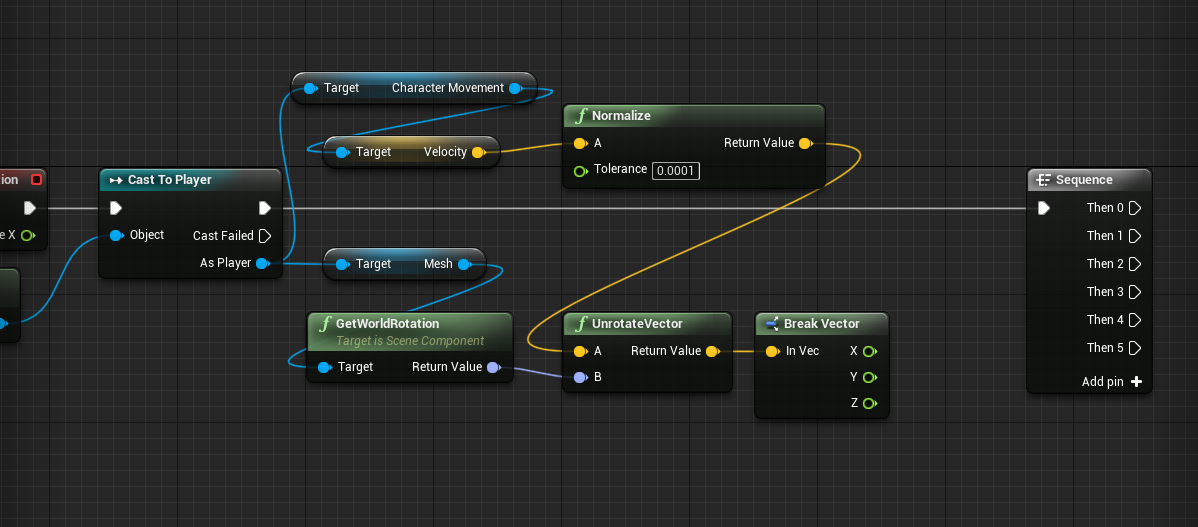
What we want to do is get the player’s velocity. We’ll use this to determine which direction we’re moving in, so we can decide which animation to play. The sequence node can trigger a number of different nodes sequentially. Click Add pin so we have 5 outputs.
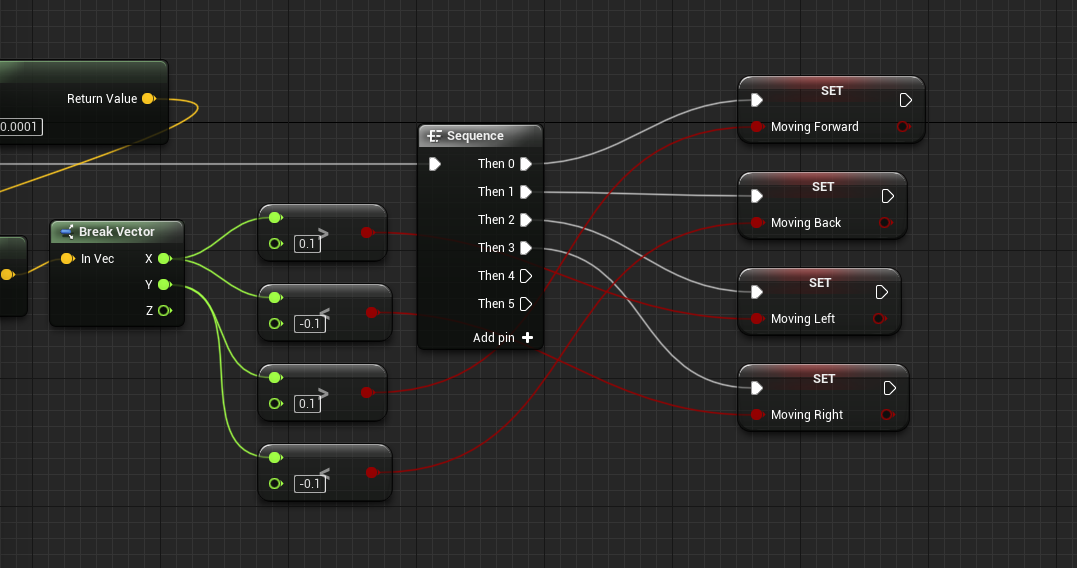
Here’s how we want to set the moving booleans.
The attacking and blocking booleans will just be based on our player’s respective variables.
Finally, back in the Player blueprint select the Mesh component and set the Anim Class to PlayerAnimator.
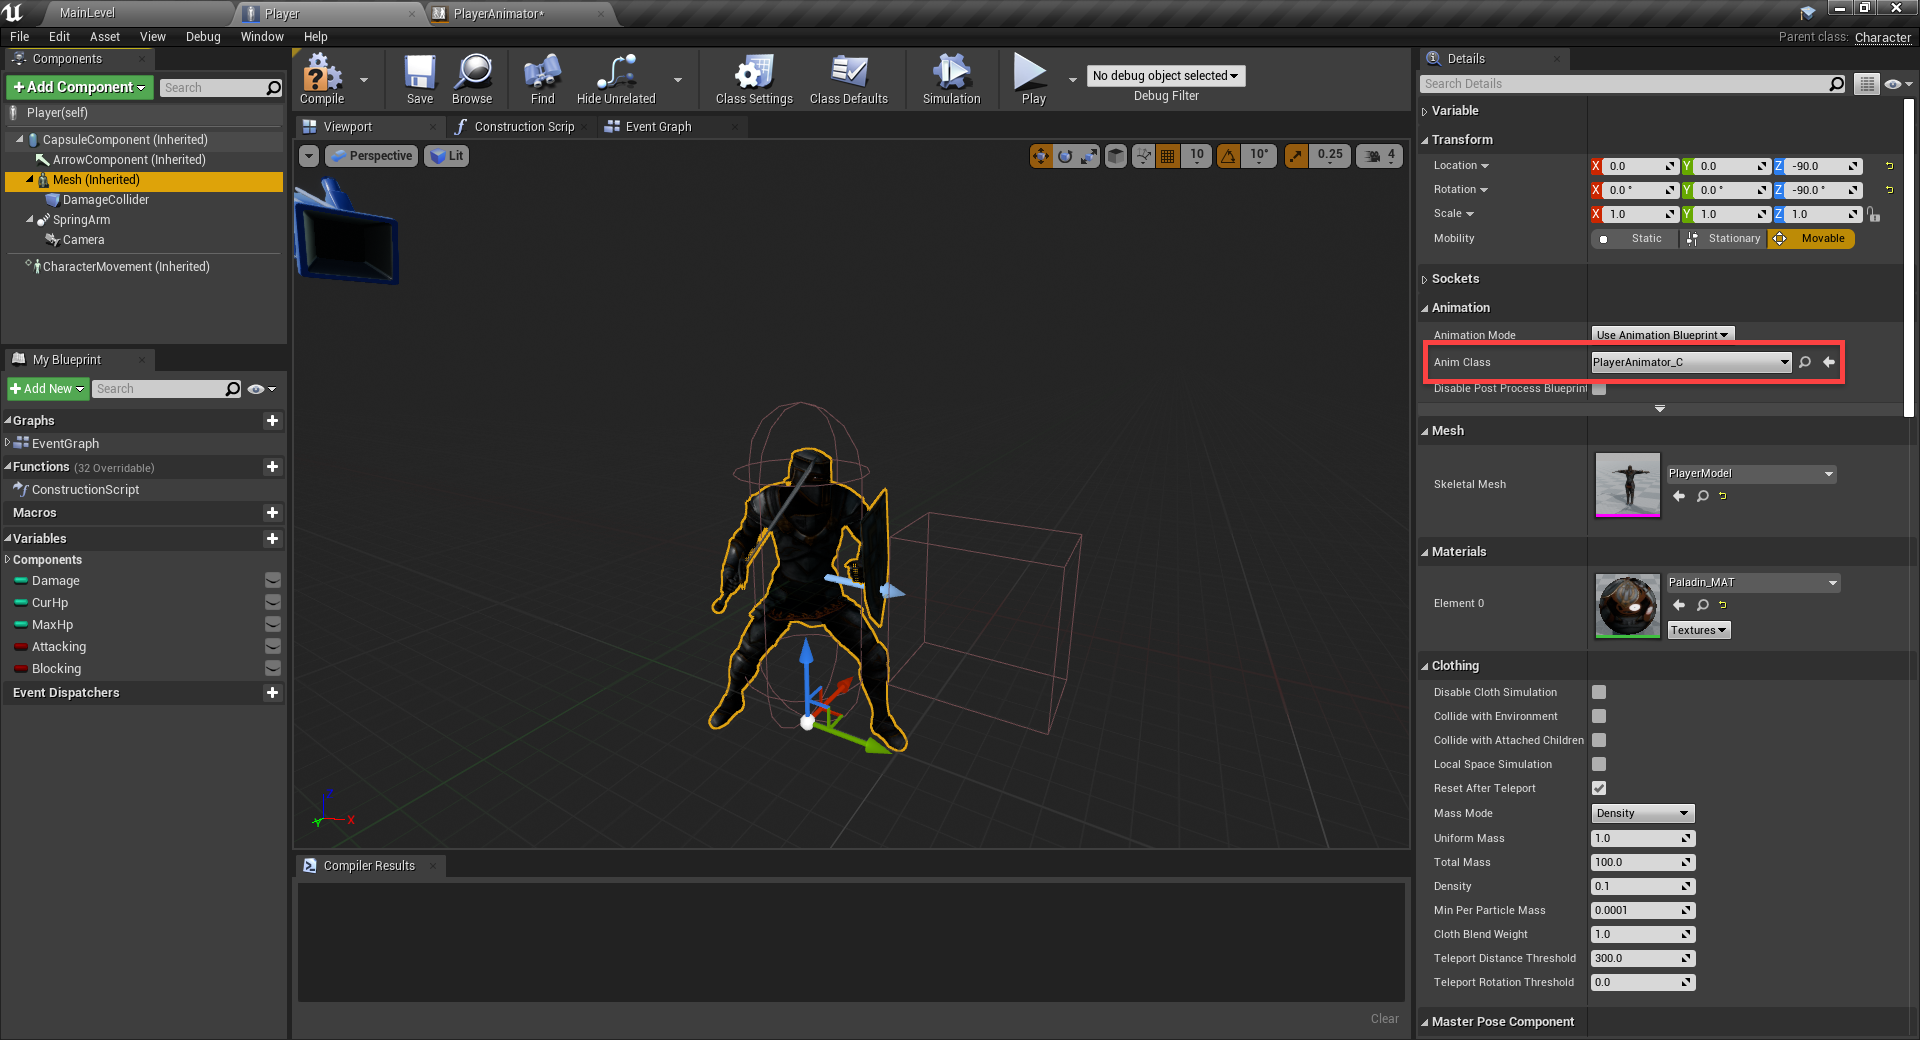
You should now be able to see the animations playing in-game!
Navigation Volume
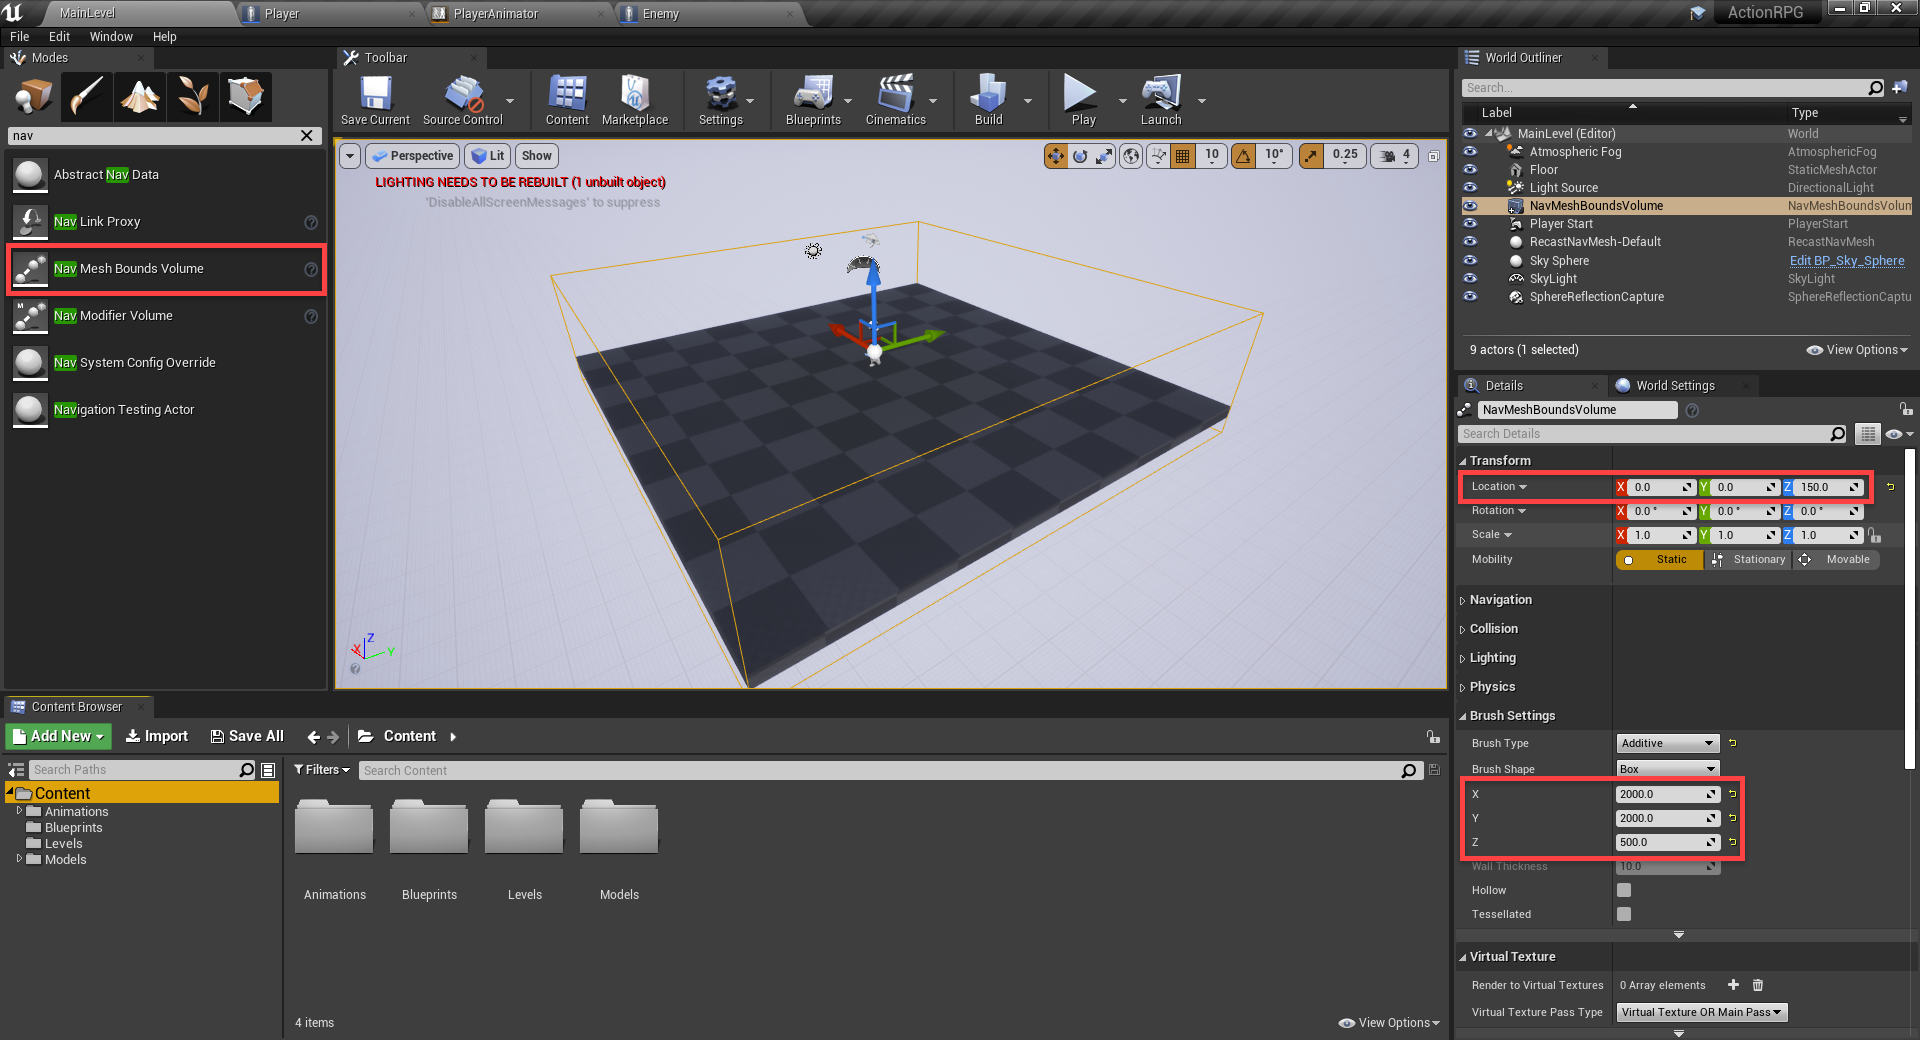
Before we create the enemy, we’ll need to setup the nav mesh. This allows an AI to move freely through an environment, navigate around and over obstacles. In the Modes panel, search for the Nav Mesh Bounds Volume object and drag that in.
- Set the Location to 0, 0, 150
- Set the X and Y to 2000
- Set the Z to 500
I also increased the size of the ground. You can press P to toggle the nav mesh visibility.
Creating the Enemy
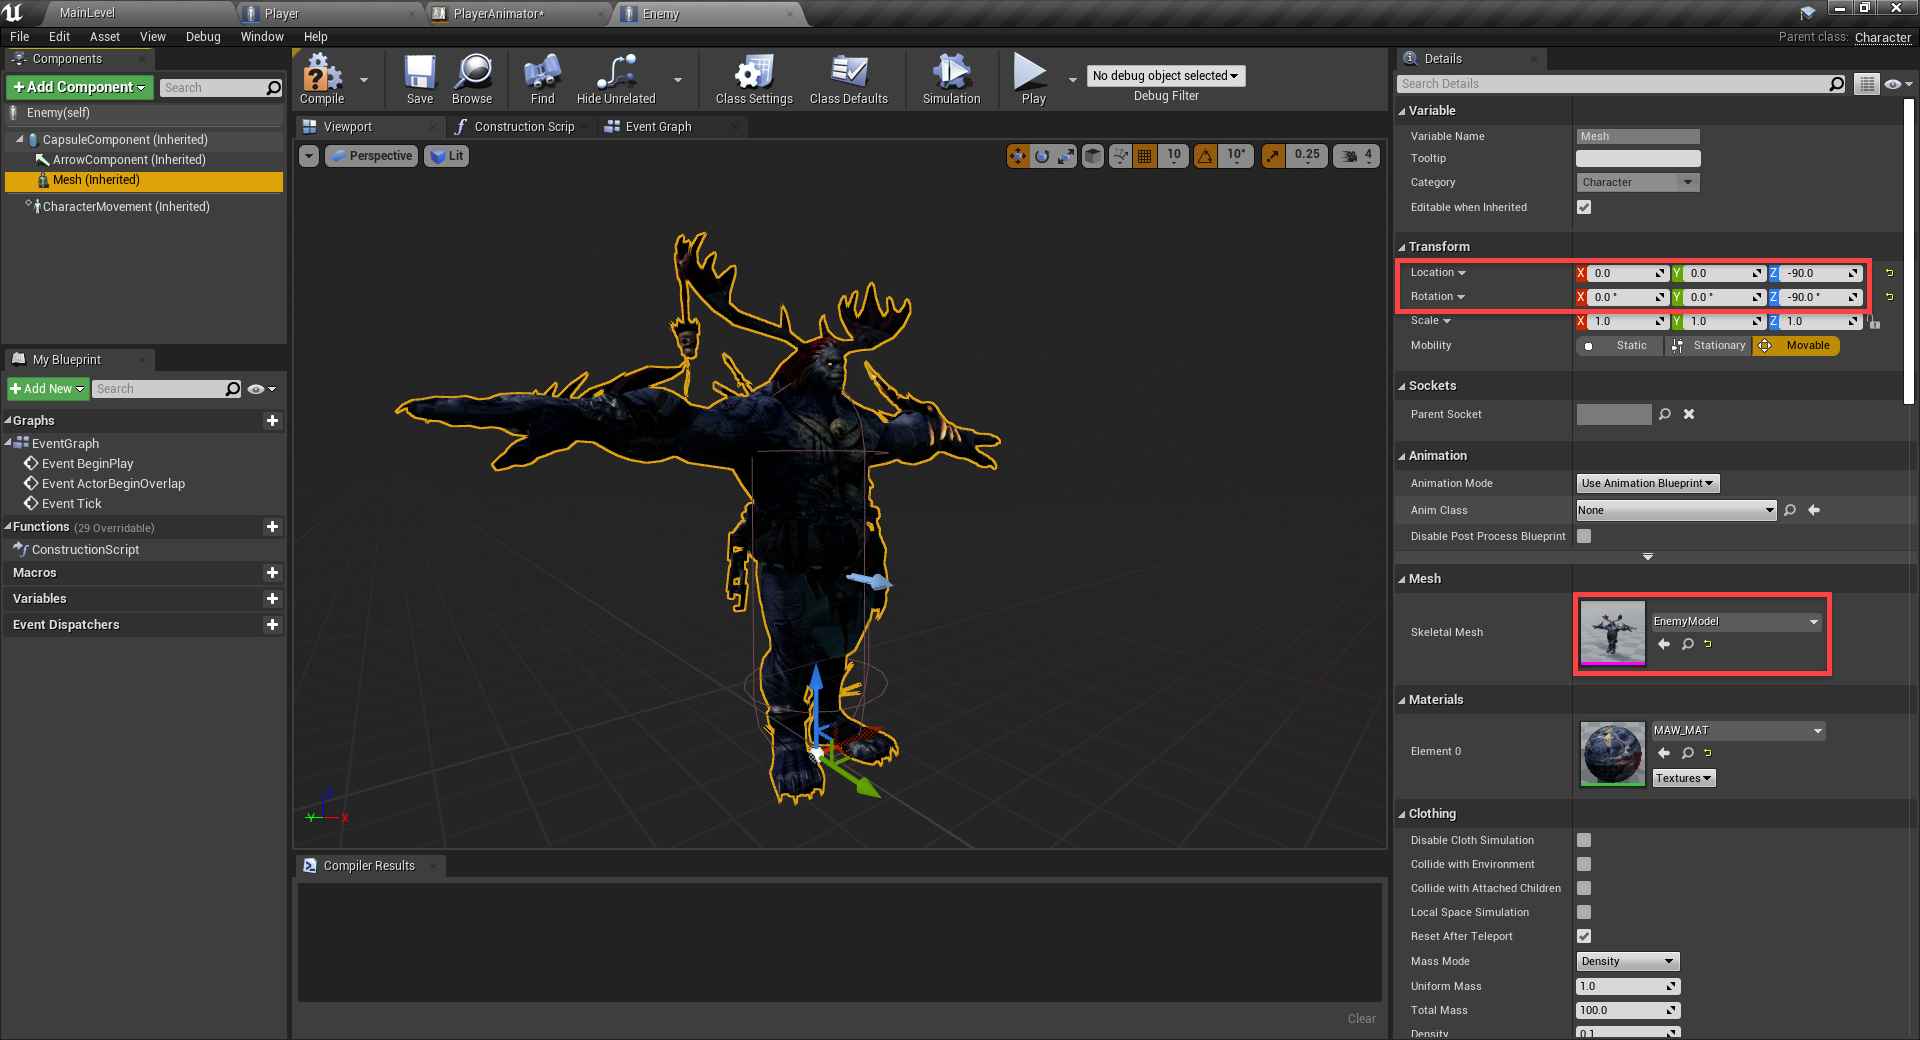
In the Blueprints folder, create a new blueprint of type Character. Call it Enemy. In the blueprint, we’re just going to modify the mesh component.
- Set the Static Mesh to EnemyModel
- Set the Location to 0, 0, -90
- Set the Rotation to 0, 0, -90
Now for the variables.
- Health (Integer)
- Default value = 5
- Damage (Integer)
- Default value = 1
- Attacking (Boolean)
- Dead (Boolean)
- Target (Player)
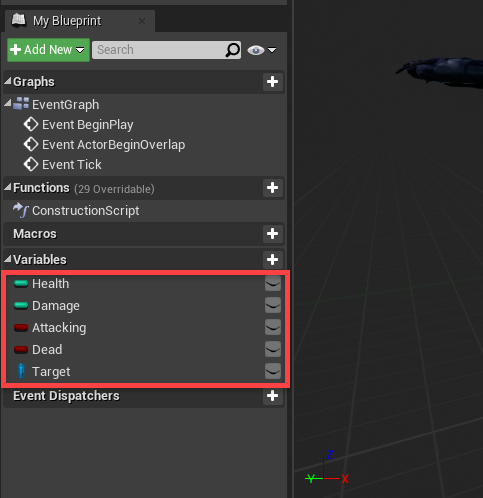
In the Event Graph, we’re first going to get the player.

Then every frame we’ll use the AI Move To node. This will use the nav mesh to move the enemy towards the player. Make sure to set the Acceptance Radius to 150 so the enemy won’t go inside the player.
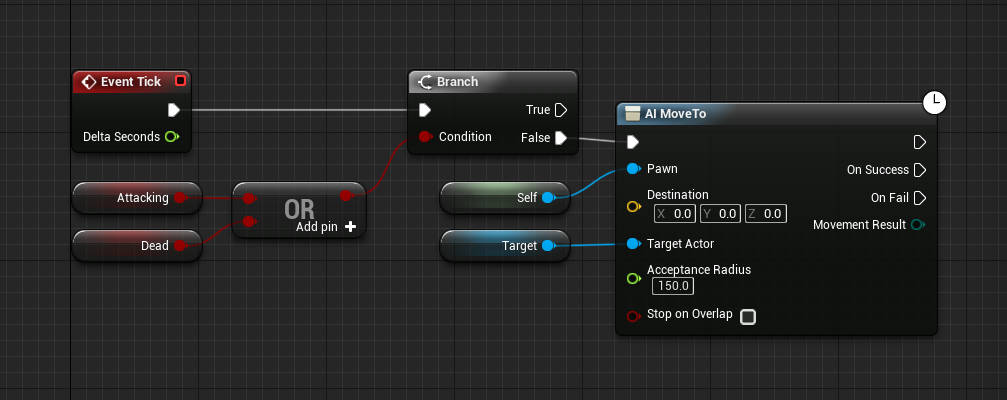
The On Success output gets triggered once the enemy reaches the player. When this happens we’re going to enable the attacking variable if we can, wait 2.667 seconds (attack animation duration), then re-enable the attacking variable.

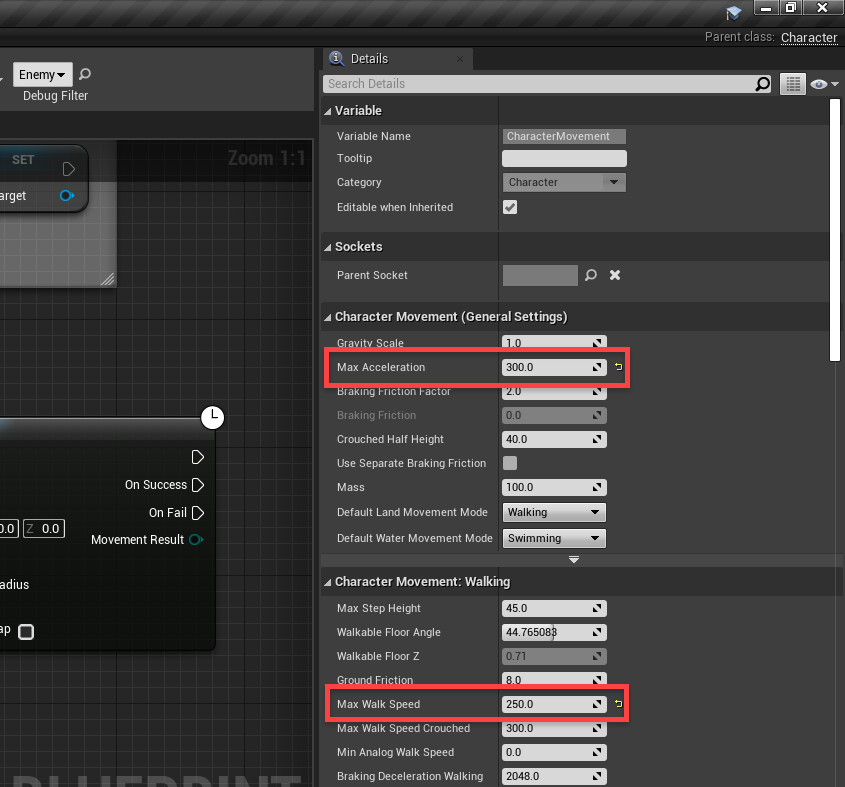
Select the CharacterMovement component.
- Set the Max Acceleration to 300
- Set the Max Walk Speed to 250
Back in the level editor, we can drag in an enemy, press play and test it out!
Enemy Animations
Like with the player, create a new animation blueprint called EnemyAnimator. Make sure you’re also linking the enemy skeleton.
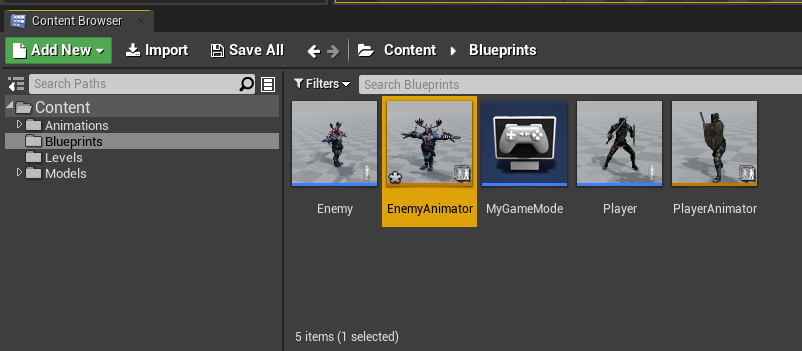
Inside the enemy animator, create a new state machine, then double-click it to enter.
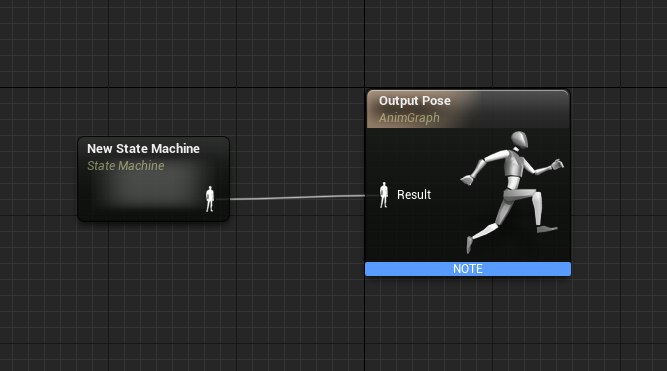
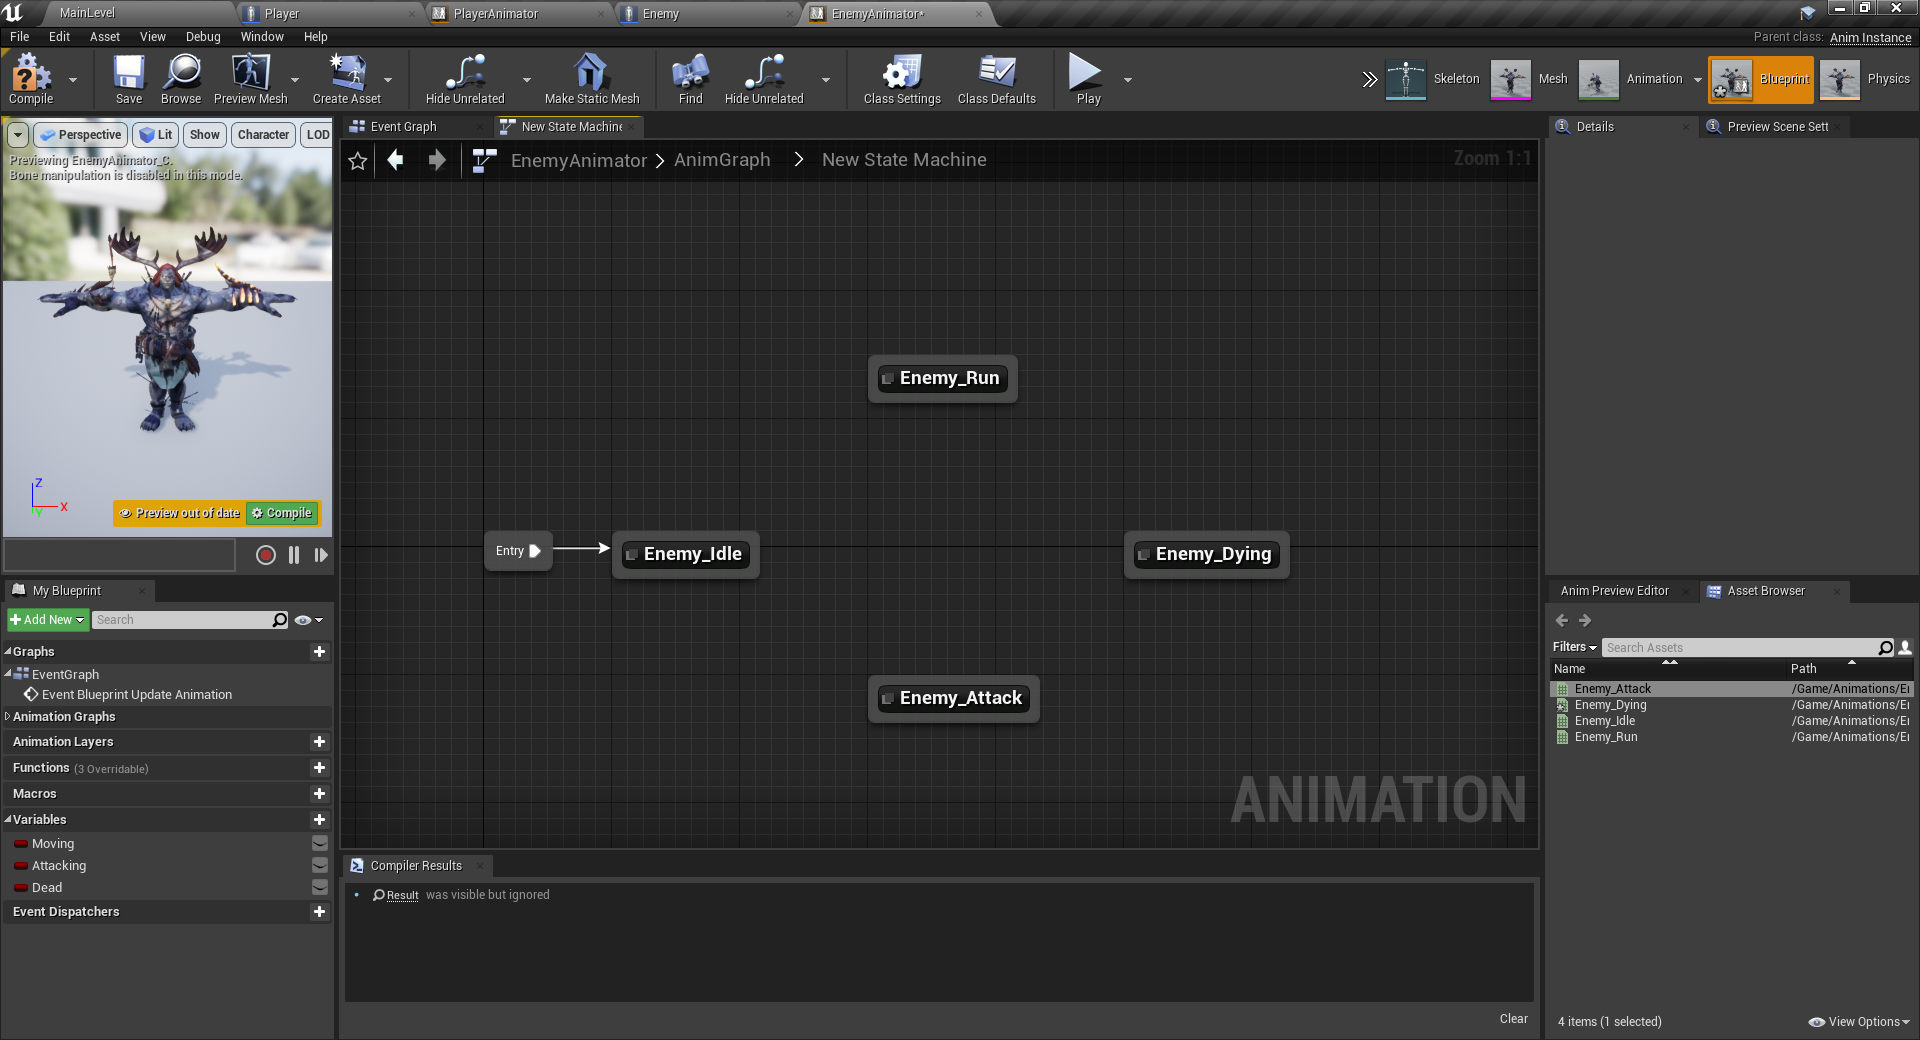
Start with the variables.
- Moving (Boolean)
- Attacking (Boolean)
- Dead (Boolean)
Then we can drag in the 4 animations. Connect the entry to the idle animation.
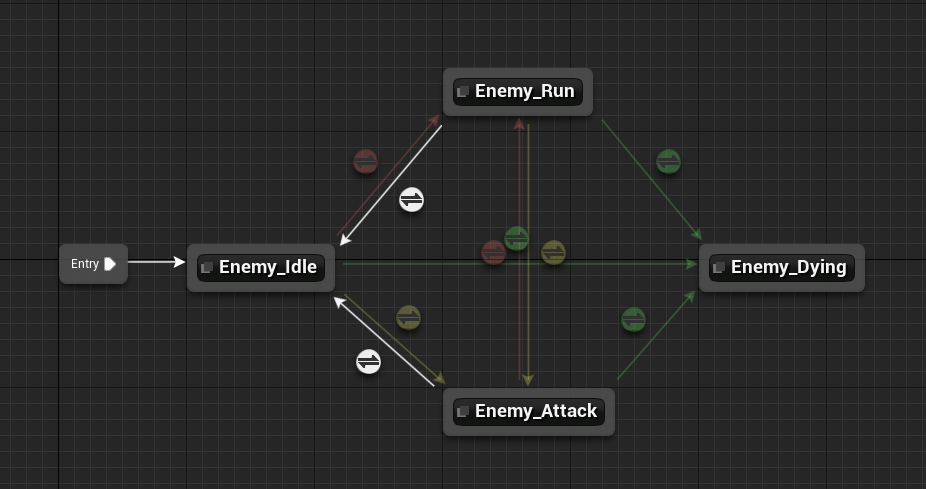
Hook the transitions up like below. Make sure that the dying animation has no exit transitions.
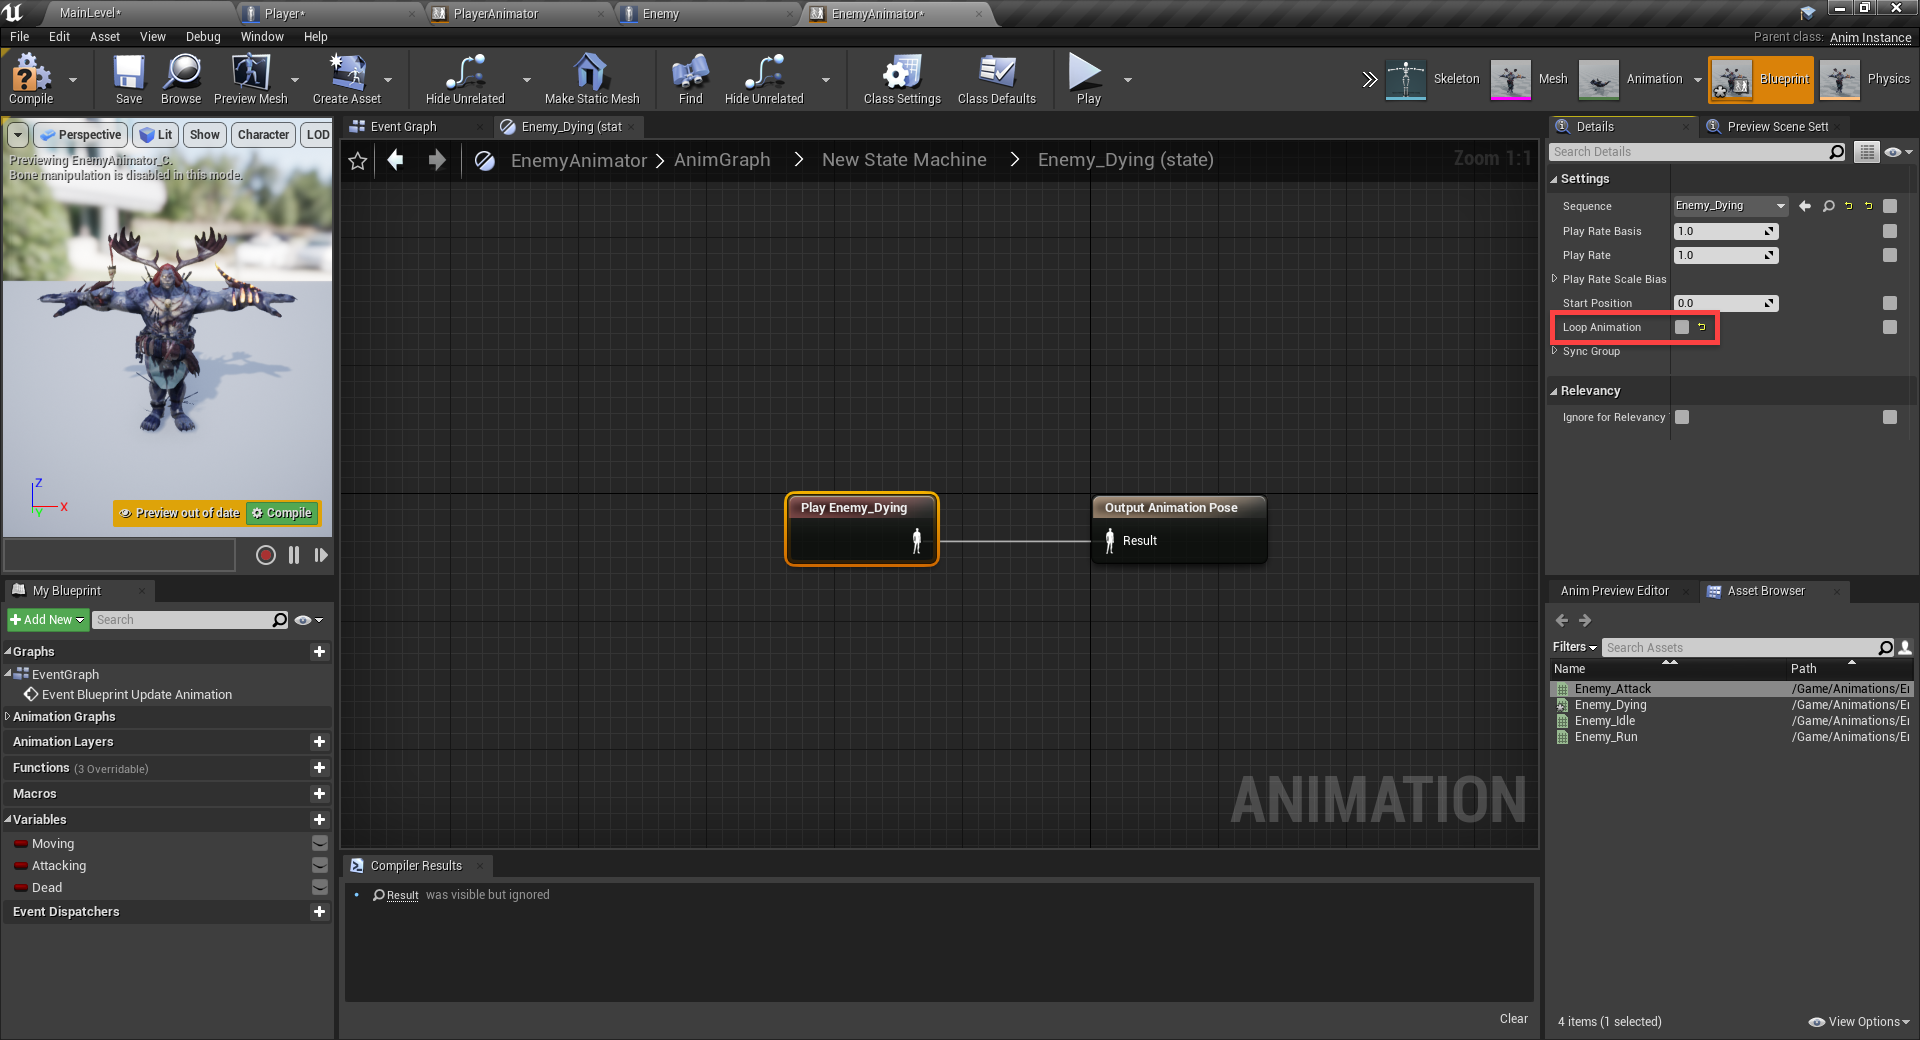
To prevent the dying animation from looping – double click it, select it and disable Loop Animation.
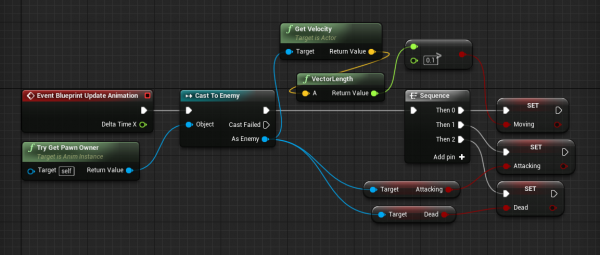
In the Event Graph, we’ll want to hook it up like this.
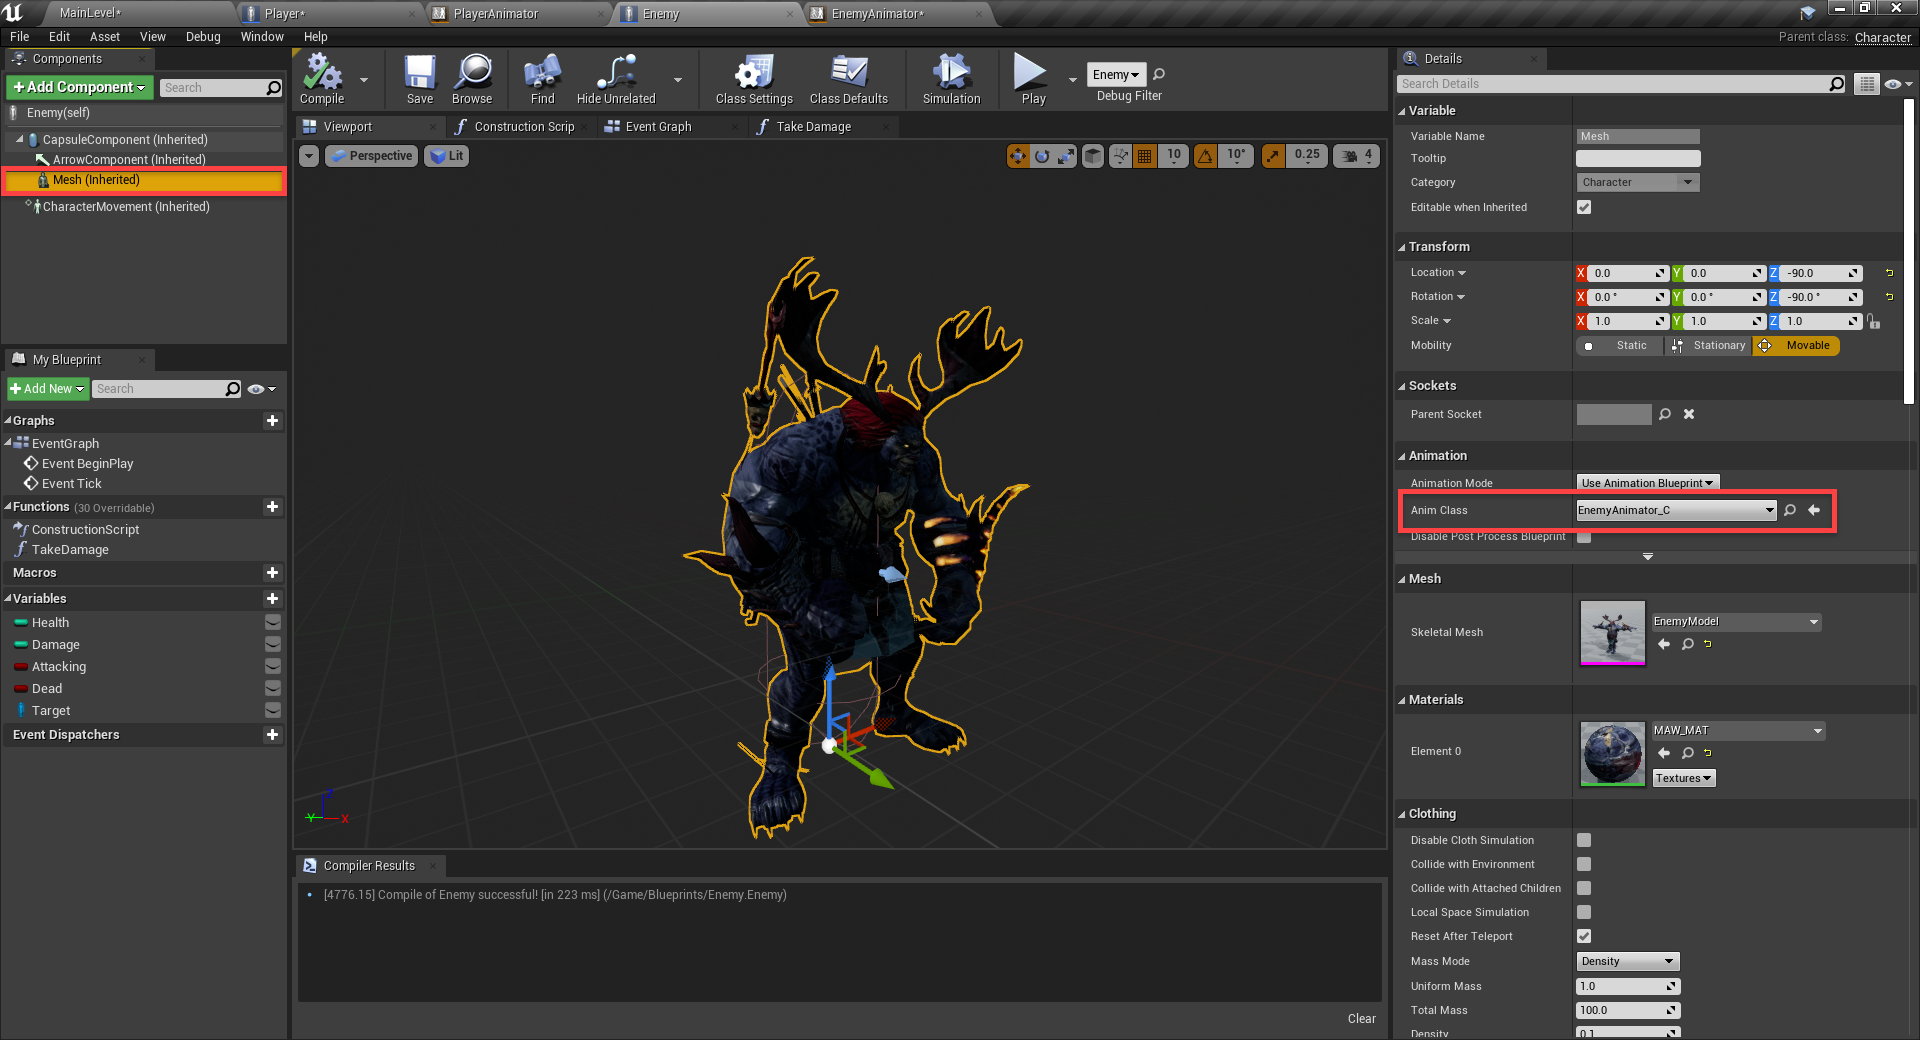
Finally, back in the Enemy blueprint, select the mesh and set the Anim Class to EnemyAnimator.
Damaging the Enemy
Let’s now implement the ability for the player to damage the enemy. In the Enemy blueprint, let’s create a new function called TakeDamage. Create an input of type integer called DamageToTake.
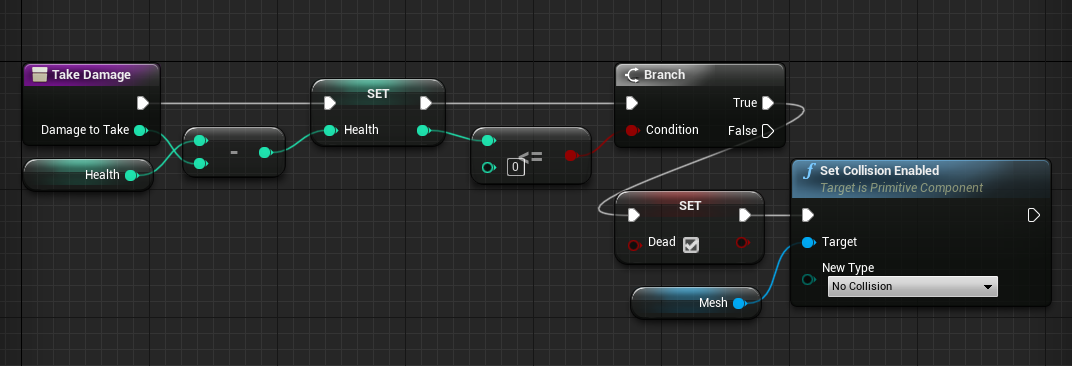
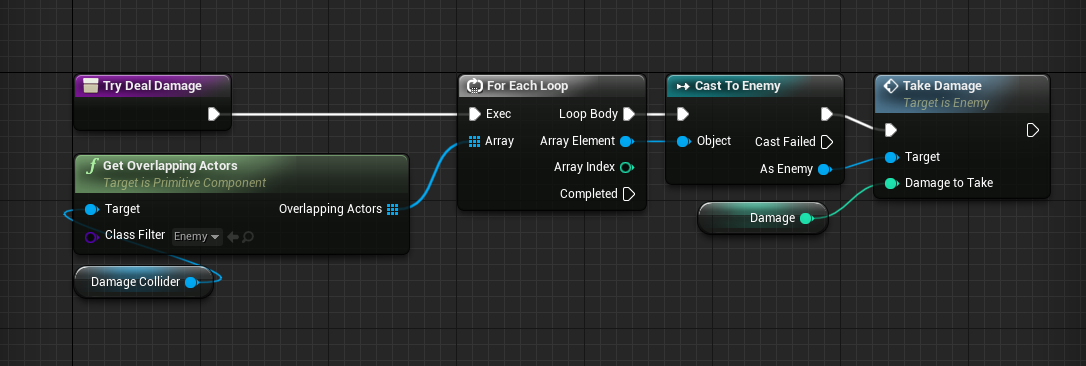
This will be called over in the Player blueprint. In there, create a new function called TryDealDamage. This will get an array of enemies overlapping the damage collider. We’re just going to call their take damage function.
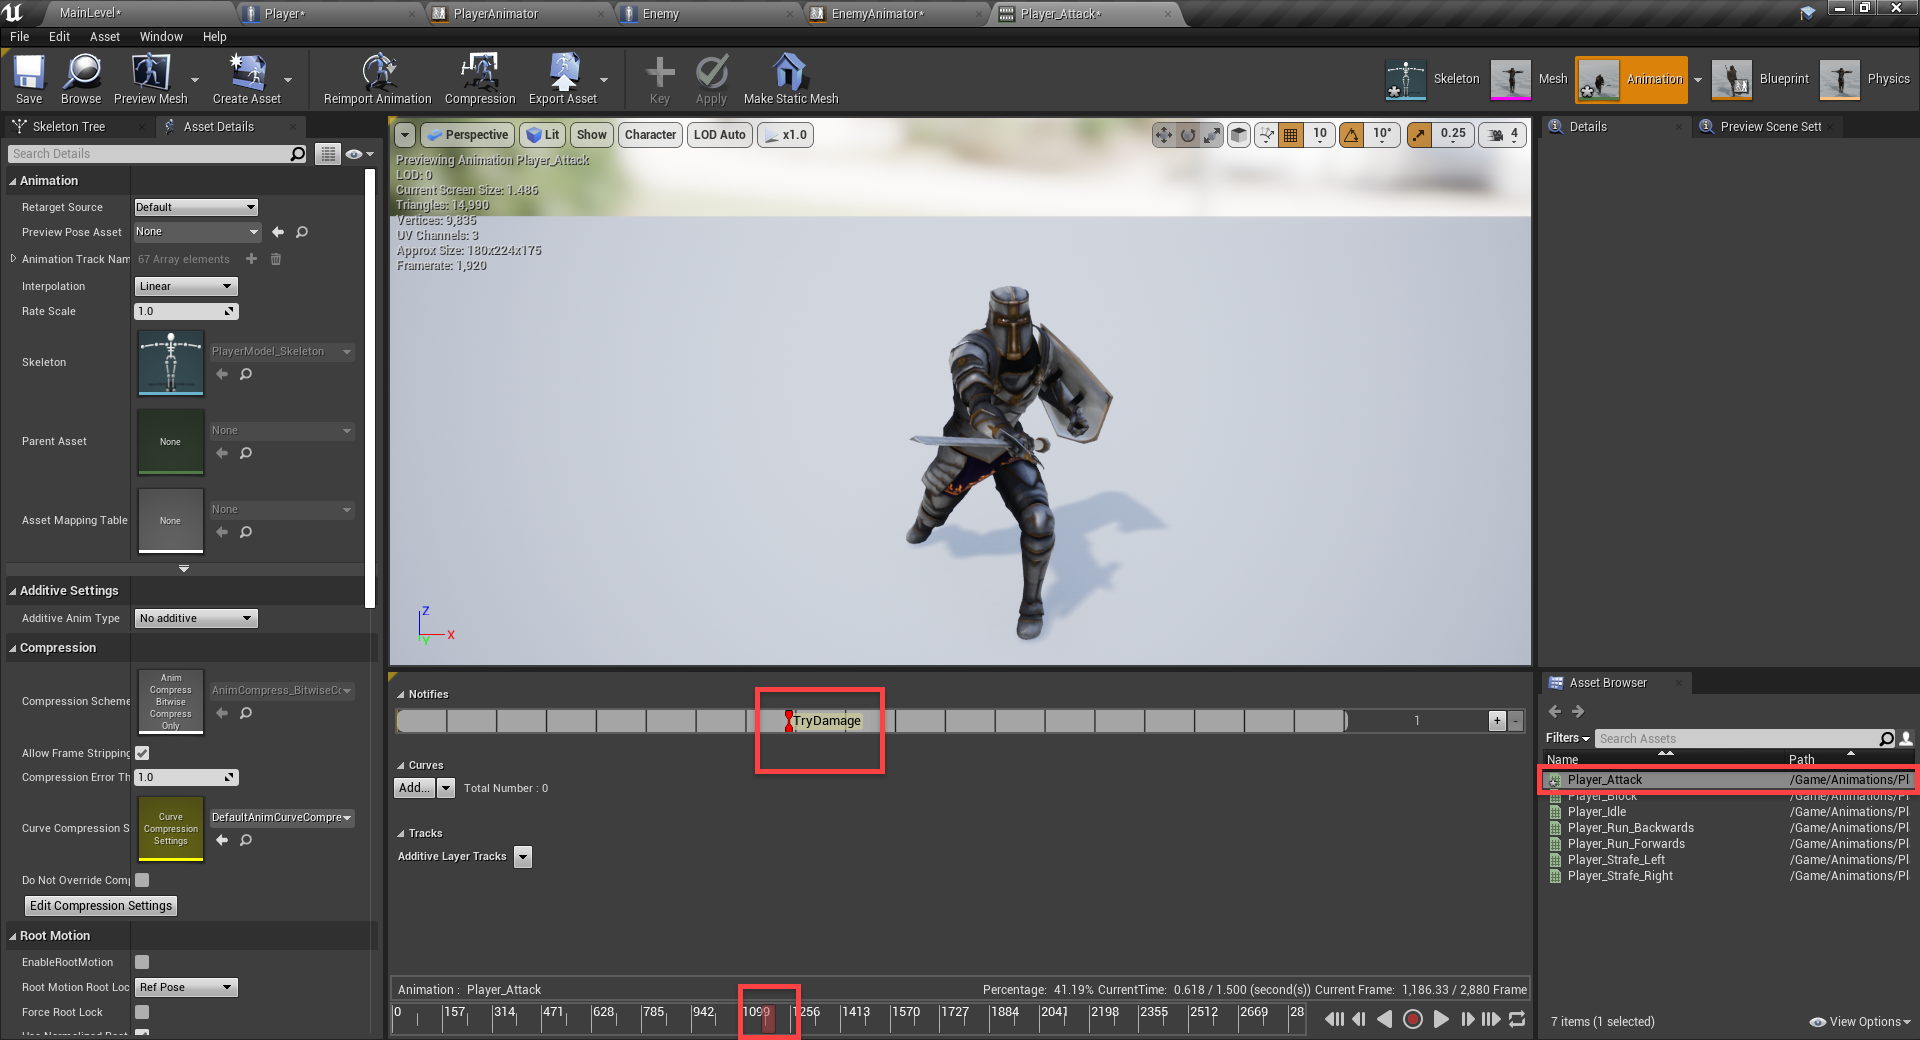
The TryDealDamage function will be called when our animation “hits” the target. So let’s go to our PlayerAnimator and double click on the Player_Attack animation to open it up. Move the play head to where we want to attack. Right click the notfies timeline and select Add Notify > New Notify. Call this TryDamage. A notify is basically a custom event which triggers at a certain point in the animation.
Over in the PlayerAnimator event graph, we can create the AnimNotify_TryDamage node. We just want to cast the player again and call the TryDealDamage function.
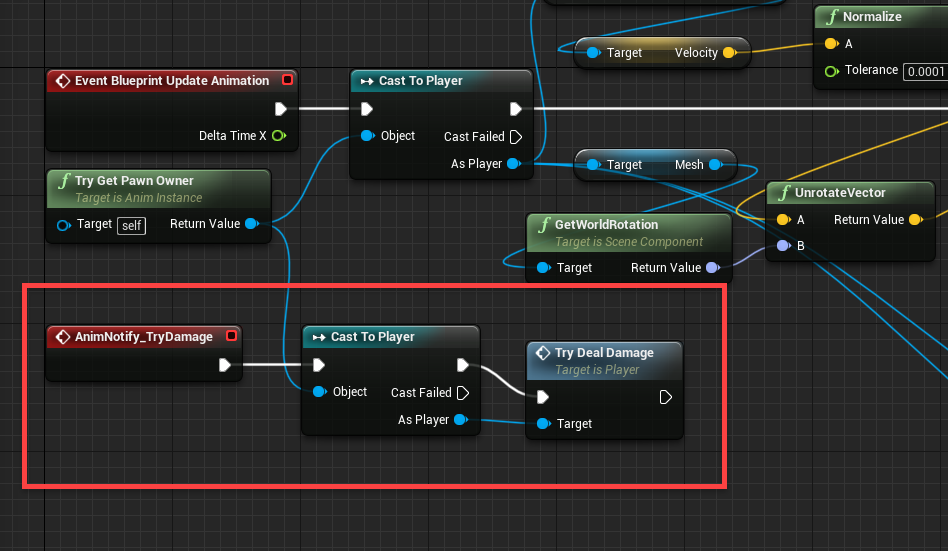
We should now be able to press play and defeat the enemy.
Attacking the Player
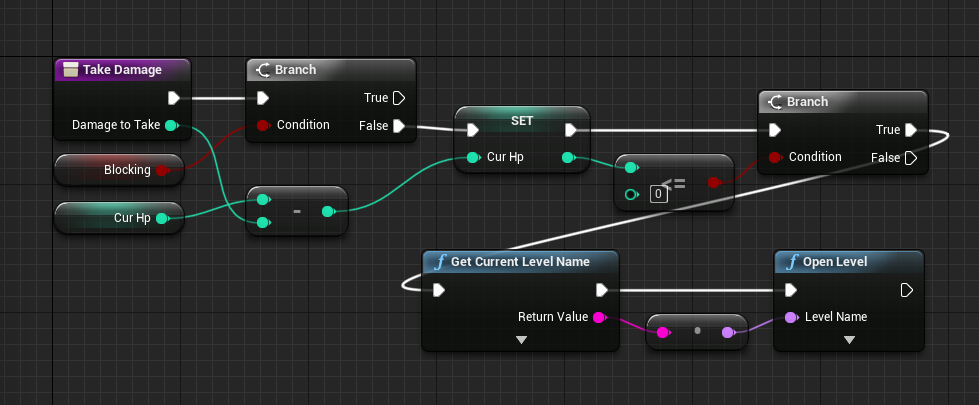
Now we need to implement the ability for the enemy to attack too. In the Player blueprint, let’s begin by creating the TakeDamage function. This will have an input of type integer called DamageToTake. When the player’s health reaches 0, the level will restart.
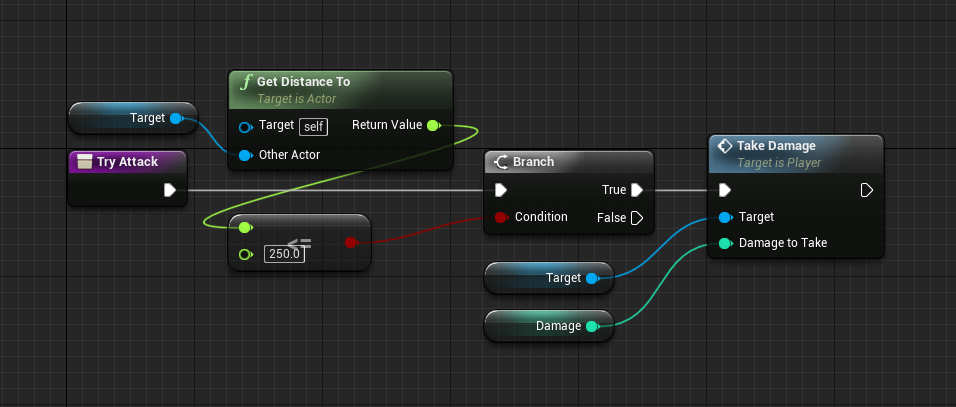
In the Enemy blueprint, create a new function called TryAttack. Here, we’re just checking our distance from the player and if it’s within a range, we’ll deal damage.
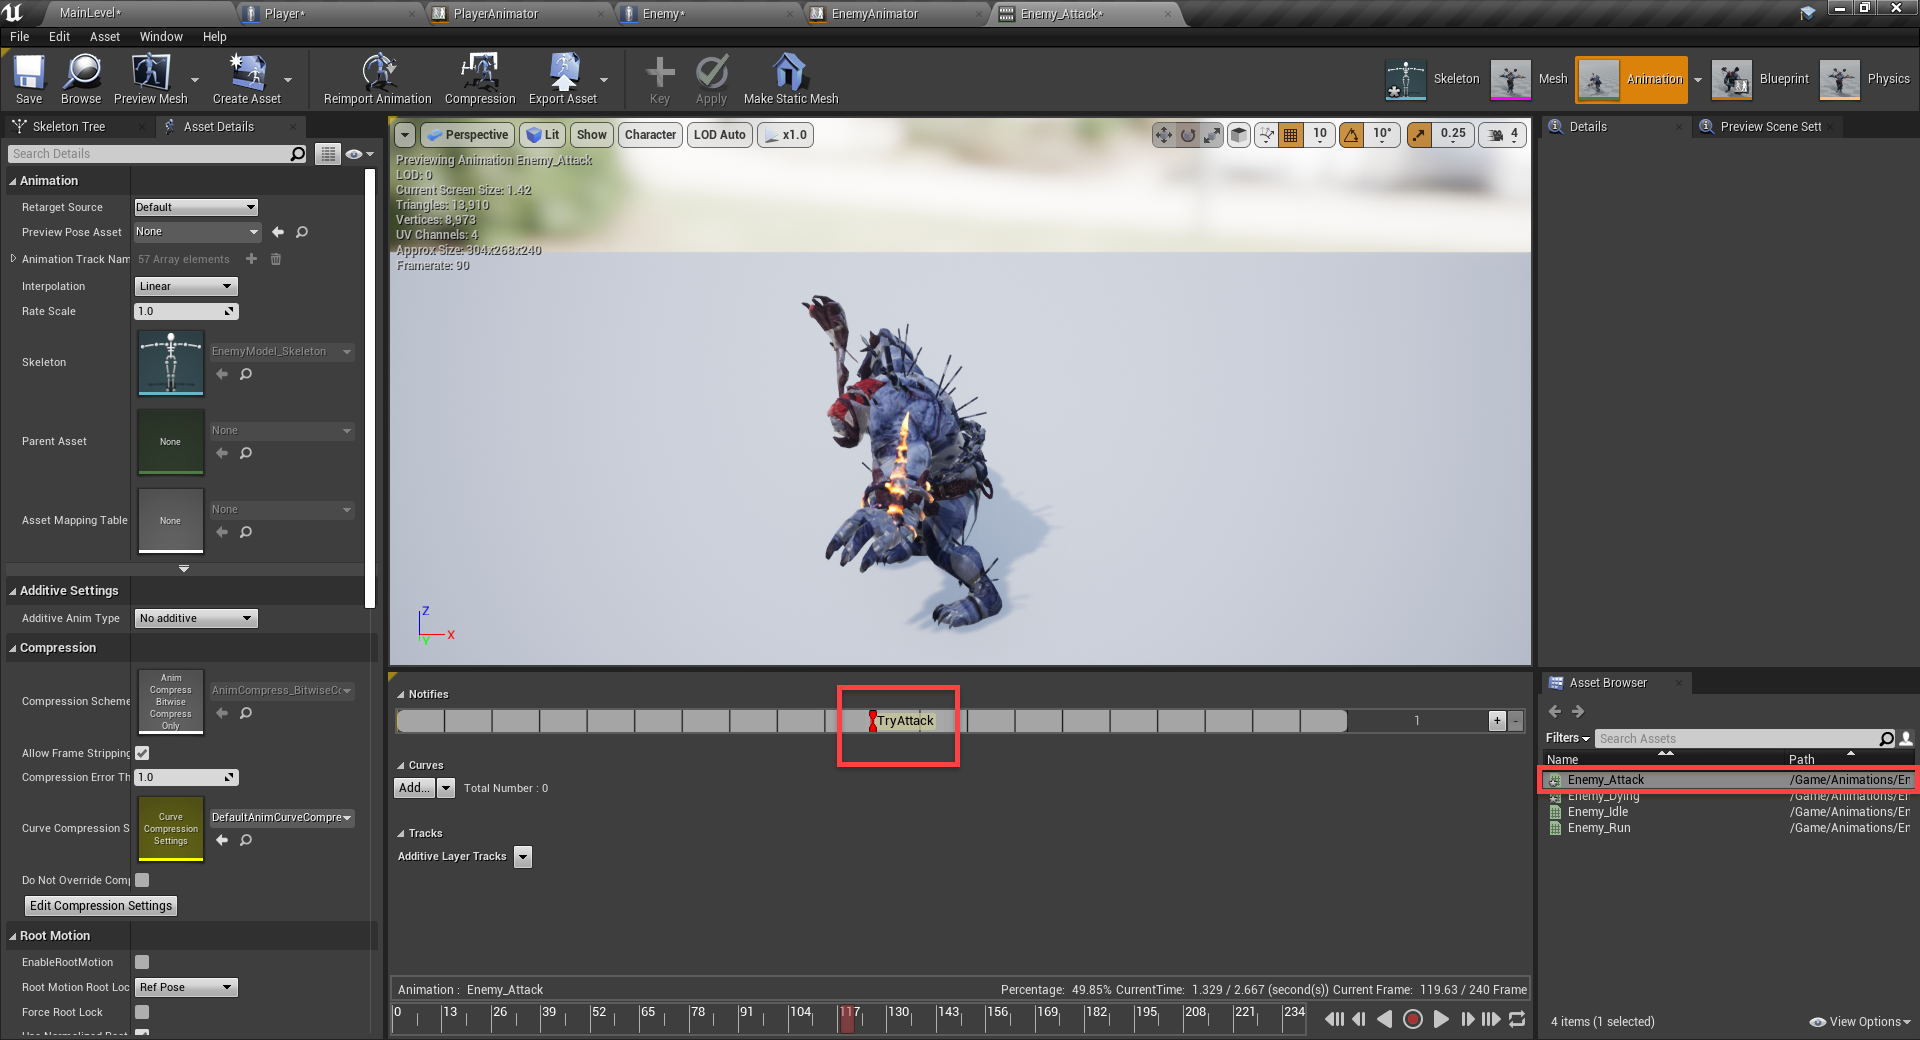
Finally, we need to go to the EnemyAnimator blueprint, double-click on the Enemy_Attack animation and create a notify at the point of damage.
In the enemy animator event graph, we can create the notify event node and try attack like so.
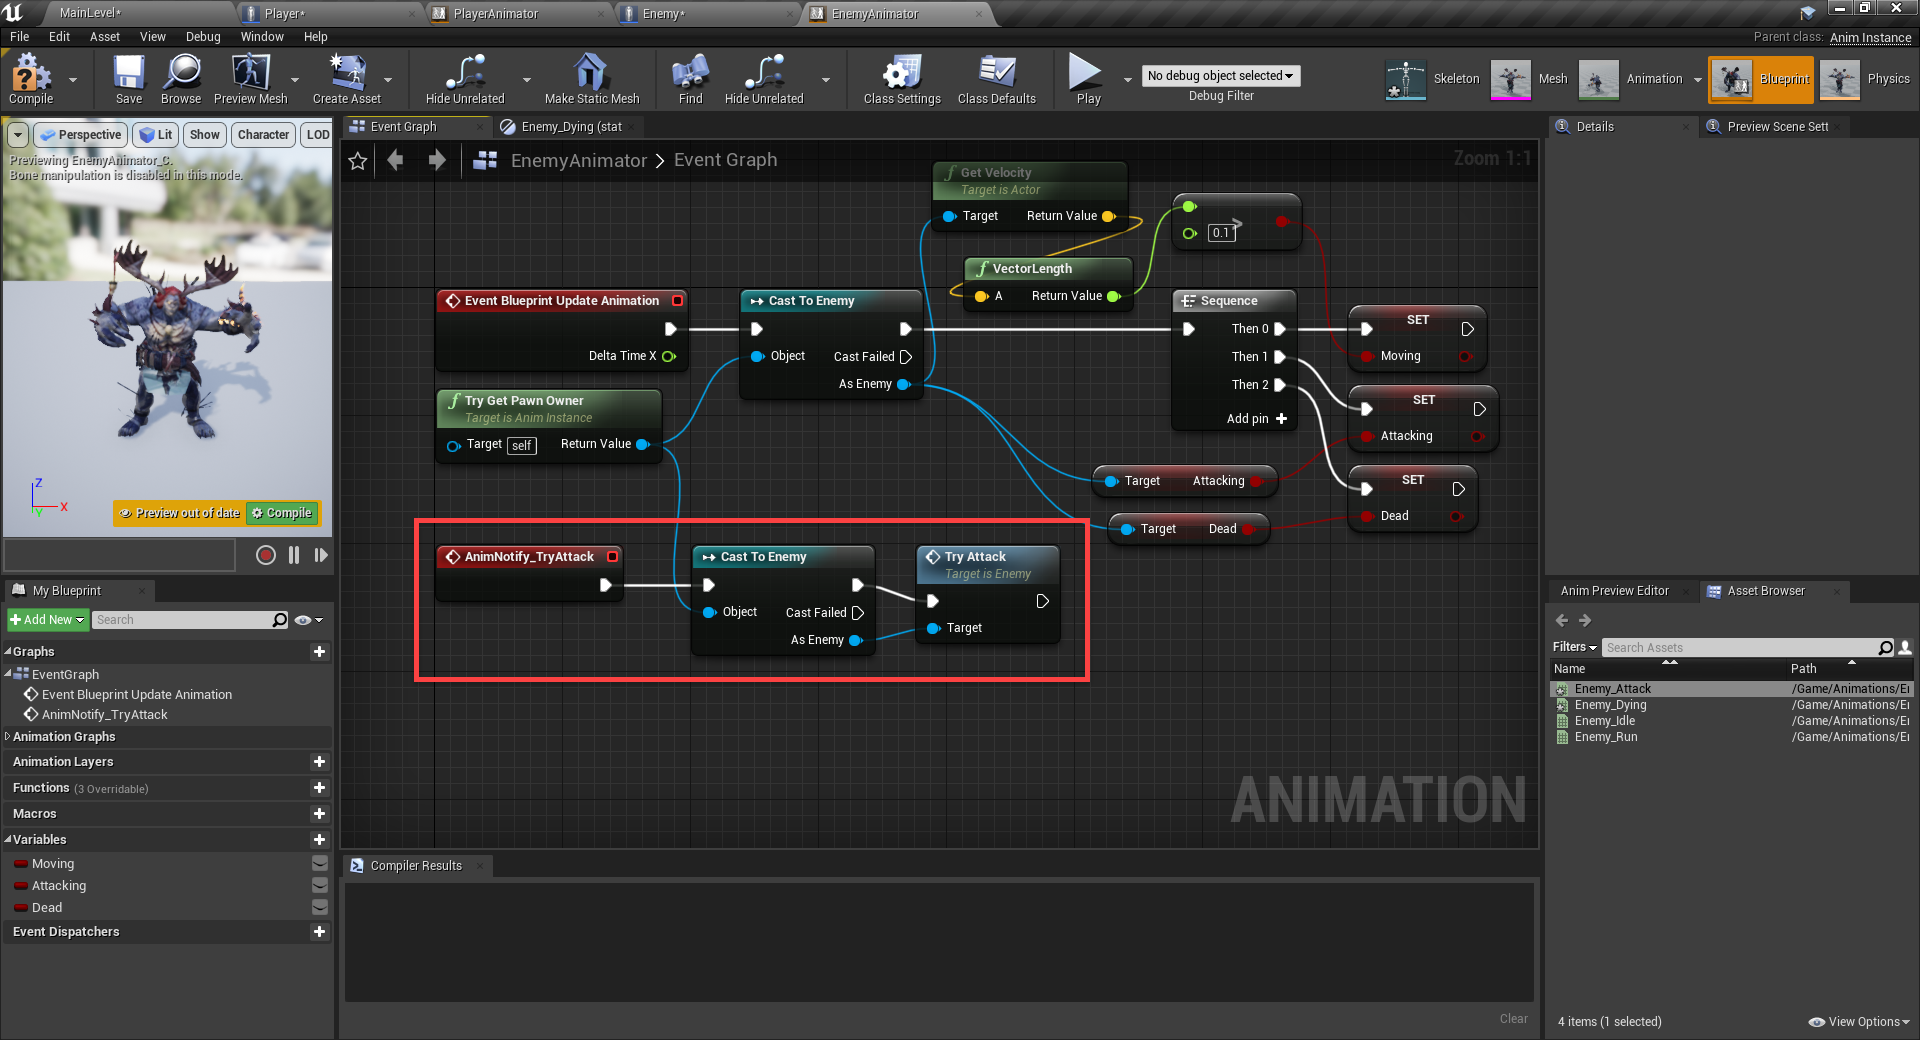
Now you can press play and test it out!
Fixing a Few Things
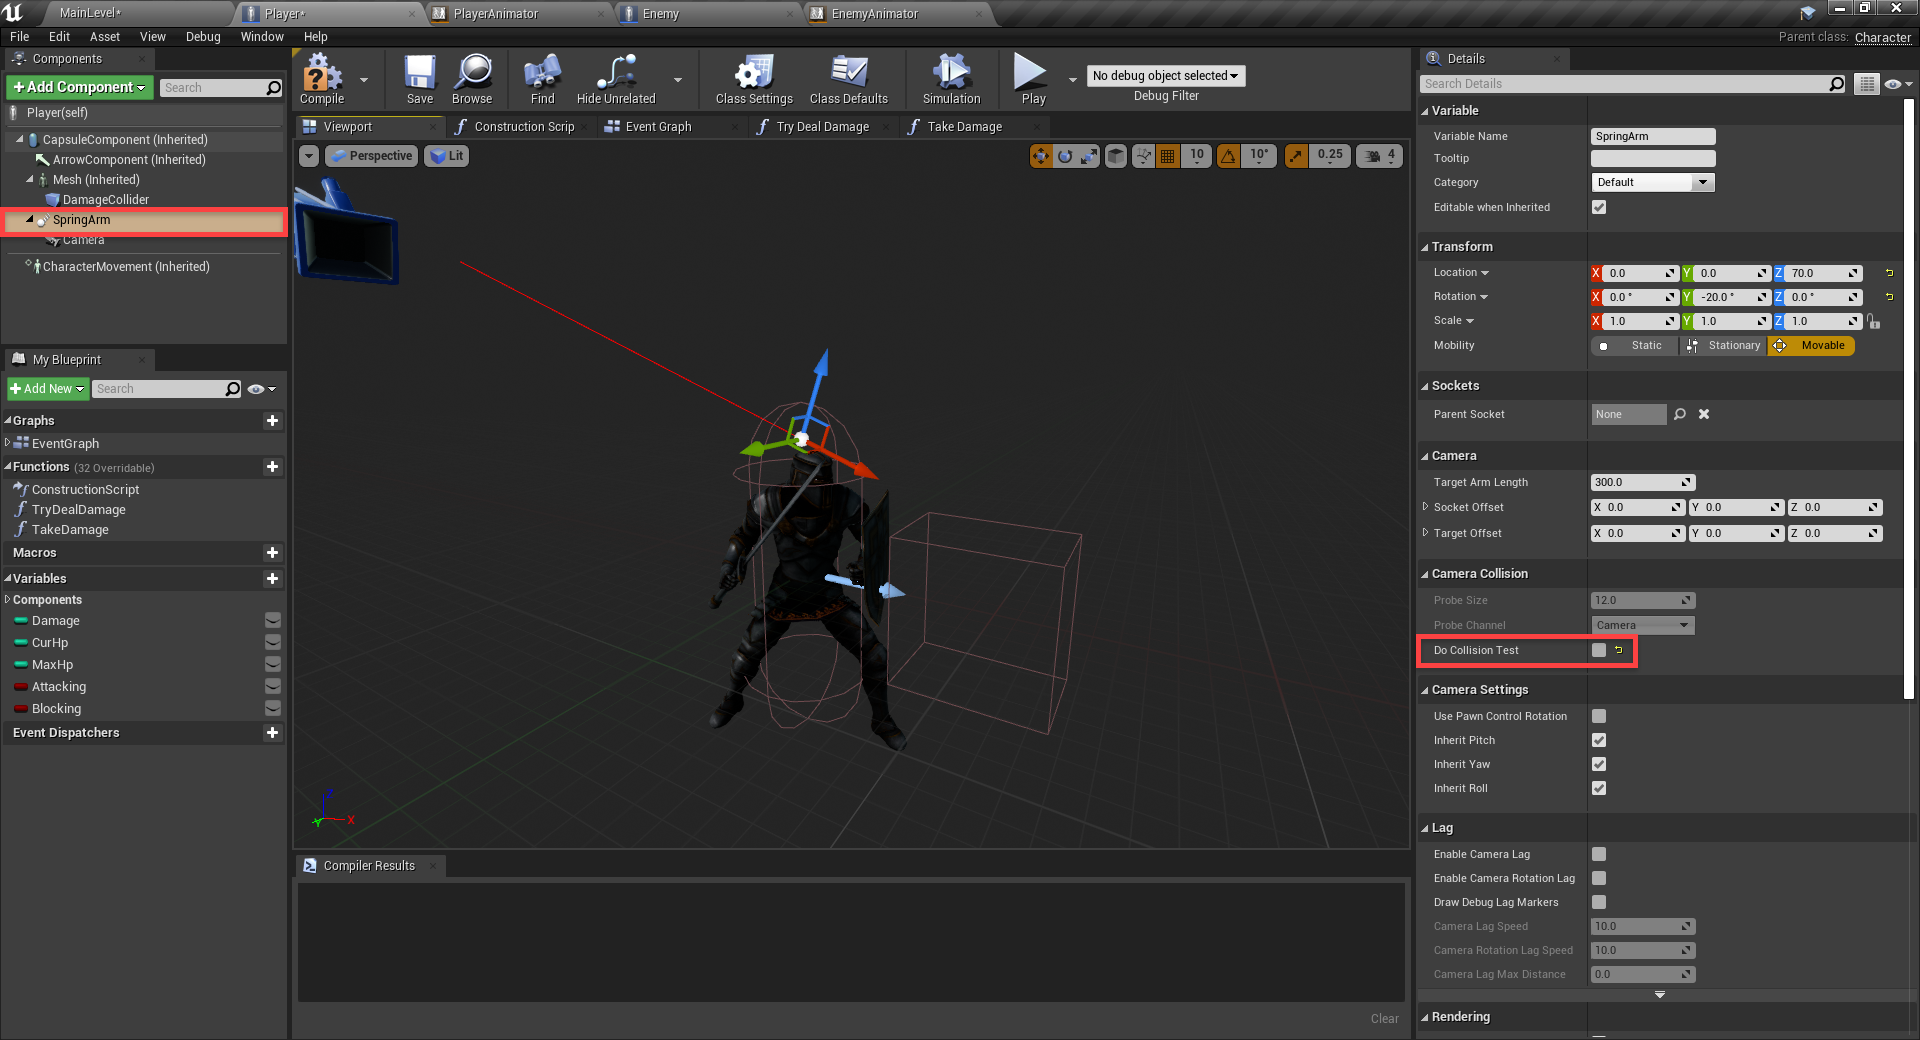
You may notice that when the enemy attacks, your camera glitches out a bit. This is because the camera automatically moves depending on if there’s anything between it and the player. Go to the Player blueprint, select the spring arm and disable Do Collision Test.
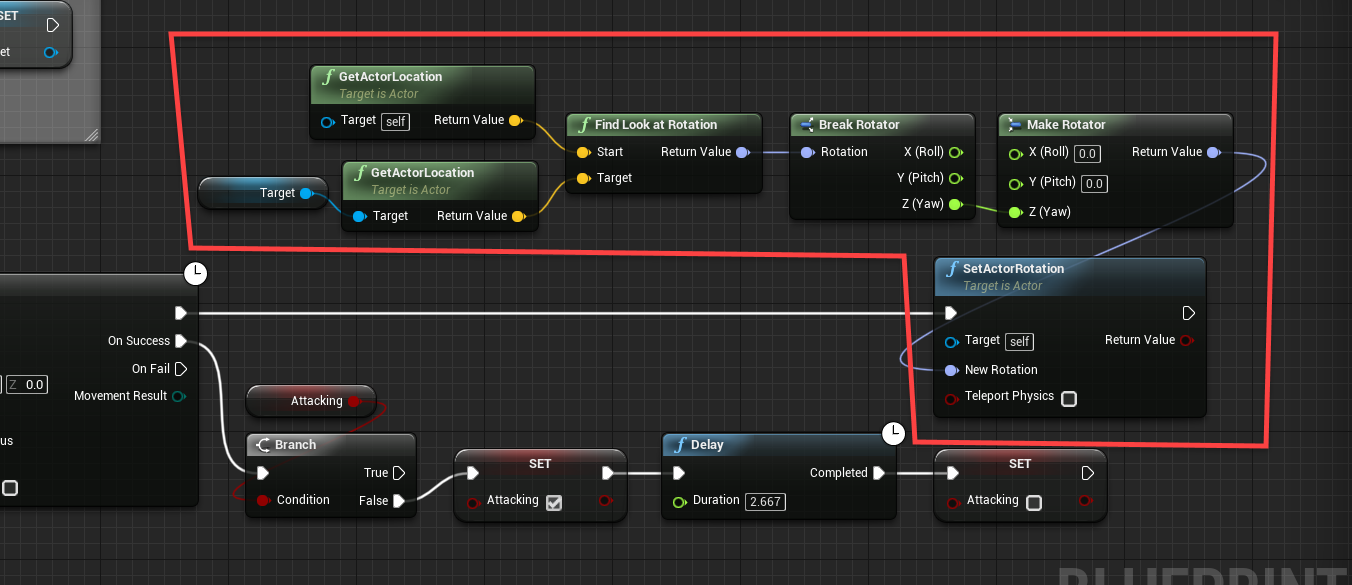
You may also want the enemy to always be facing the player. To fix this, we can go to the Enemy blueprint and add these nodes to the event tick path.
Conclusion
And there you go! We now have a working action RPG!
Through this tutorial, we set up a third-person player controller, a rotatable camera, enemy AI, animation state machines, and more – all using Unreal Engine and blueprints. With these foundations in place, the project can easily be expanded should you want to add more levels, enemies, or a variety of other features. You can, of course, use the fundamentals covered here to create other various types of games.
Either way, we hope you enjoyed the tutorial, and good luck with your game projects!

