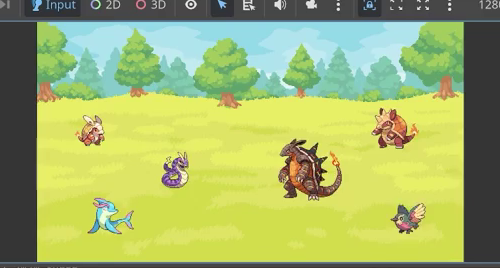
A Godot battle system starts with more than monsters on a screen: you need a scene that positions both teams and a way to keep each monster’s data separate from its sprite. Drawing on Zenva’s experience teaching coding and game development across more than 400 courses, this tutorial walks you through those foundations for a monster collector game, then adds name labels and a first readiness bar.
This tutorial assumes you have Godot installed and know the basics of scenes and GDScript.
Table of contents
Download Project Files
The starter files, supplied assets, and full project are available through the course included in the Intermediate Godot Mini-Degree. You can keep reading the free tutorial below to follow how the battle scene, monster resources, and initial UI fit together.
Set Up the Godot Battle System Scene
Start with the visual foundation: a dedicated battle scene, camera framing, monster slots, and a reusable animated sprite. You will first spawn three player monsters and three enemy monsters, then give them individual identities through resources.
Creating the Battle Scene
First, create a dedicated scene for the battle. In Godot, make a new 2D scene and rename the root Node2D to Battle. Save the scene in a new battle folder inside scenes (so the path becomes res://scenes/battle/battle.tscn).
To run this scene when you launch the project, open Project > Project Settings, go to Run, clear the current main scene, and select scenes/battle/battle.tscn. Running the project at this stage shows a blank window.
Adding the Background
To give the scene something to render, add a Sprite2D node as a child of Battle and rename it to BG. Inside res://graphics/backgrounds/ there are three options (grass, desert, and ice). Pick whichever you like and drag it into the Texture property of the BG node.
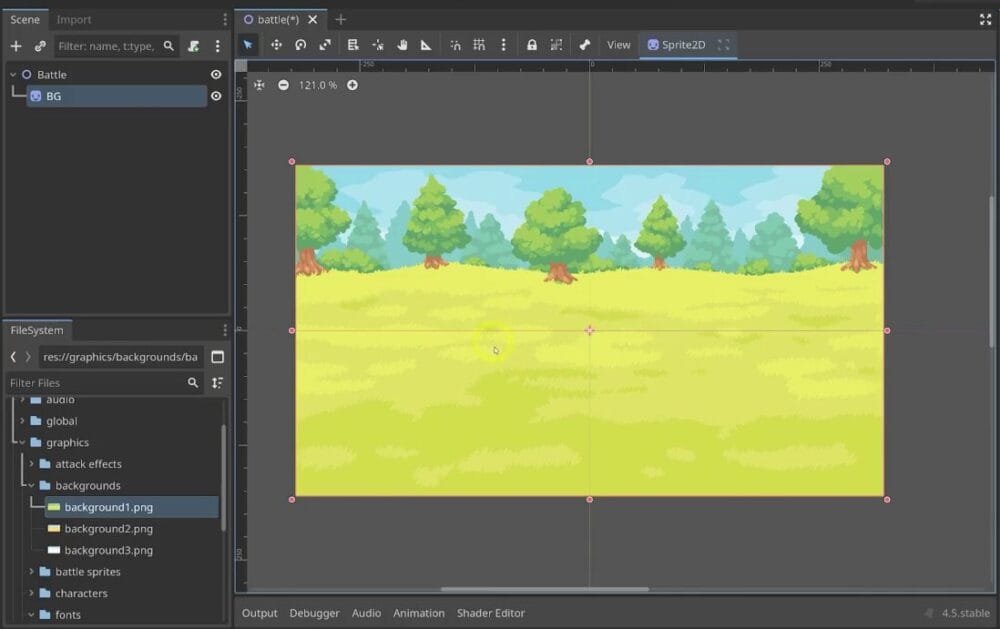
The image initially covers only part of the view. Add a Camera2D child to BG and zoom out in the editor to see the camera outline. In the Inspector, set Zoom to 2 on both axes so the background fills the game window.
To avoid nudging the background by accident while working on other nodes, select BG in the Scene dock and click the lock icon next to its name.
Defining Start Positions
Next, give each side its starting positions. Add a Node2D child to Battle named StartPositions, then add two Node2D children named Player and Enemy.
Inside each of those, add three Marker2D nodes. Markers are ideal here because they only store a position. Arrange the player markers along the left side of the screen (one near the top, one in the middle, one near the bottom), and mirror the layout for the enemy markers on the right side. The exact positions can be fine-tuned later, once real monster graphics are in place.
Monster Container Nodes
To hold the spawned sprites, add another Node2D child to Battle named BattleSprites. Give it two Node2D children named Player and Enemy.
The finished scene tree looks like this:
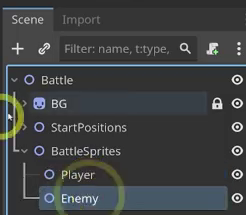
- Battle (Node2D)
- BG (Sprite2D, locked)
- Camera2D
- StartPositions (Node2D)
- Player (Node2D) with three Marker2D children
- Enemy (Node2D) with three Marker2D children
- BattleSprites (Node2D)
- Player (Node2D)
- Enemy (Node2D)
- BG (Sprite2D, locked)
The BattleSprite Scene
The monsters themselves need their own reusable scene. Create a new 2D scene with a Sprite2D as the root node, rename it to BattleSprite, and save it as battle_sprite.tscn in the same scenes/battle folder.
For the sprite’s Texture, pick any monster image from res://graphics/battle sprites/ (for example Sparchu.png). Each monster sheet contains eight images: the top row is the idle animation, the bottom row is the attack animation.
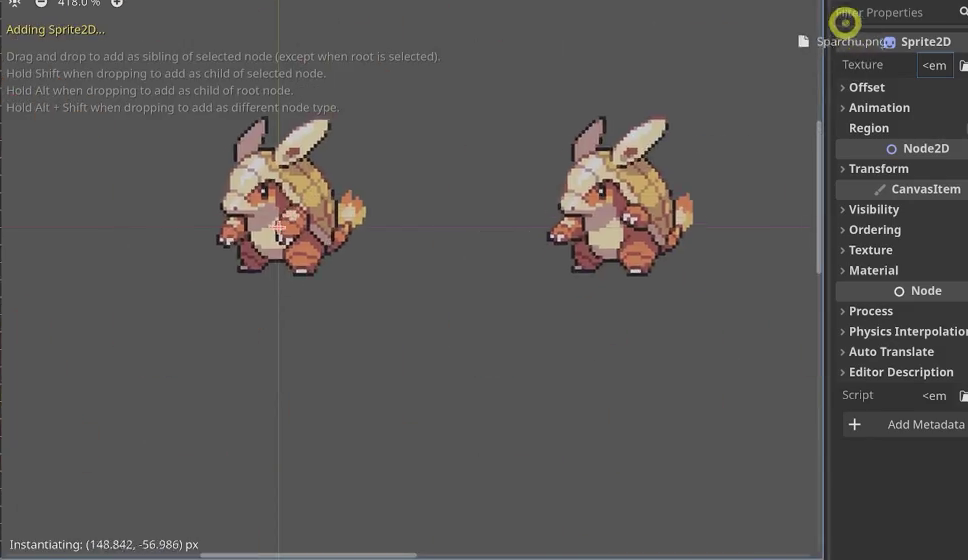
In the Inspector, under the Animation section of the Sprite2D, set Hframes to 4 and Vframes to 2. This slices the sheet into an 8-frame grid that matches the individual animation frames.
Animating the Sprite
Add an AnimationPlayer child to BattleSprite for the idle and attack animations.
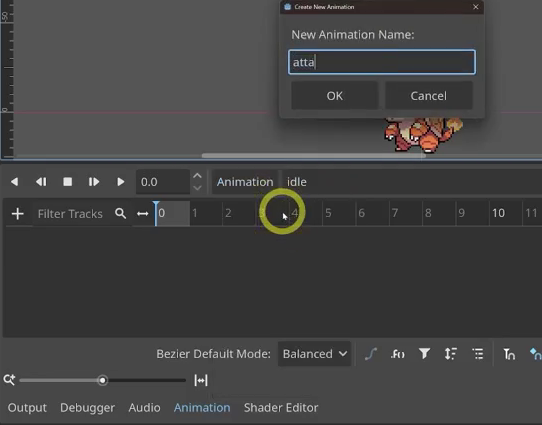
For the idle animation:
- Create a new animation named
idle. - Add a property track targeting the
BattleSpritenode’sframeproperty. - Insert four keyframes at 0.0, 0.2, 0.4, and 0.6 seconds, with frame values 0, 1, 2, and 3 respectively.
- Set the animation length to
0.8seconds, and enable looping and autoplay.
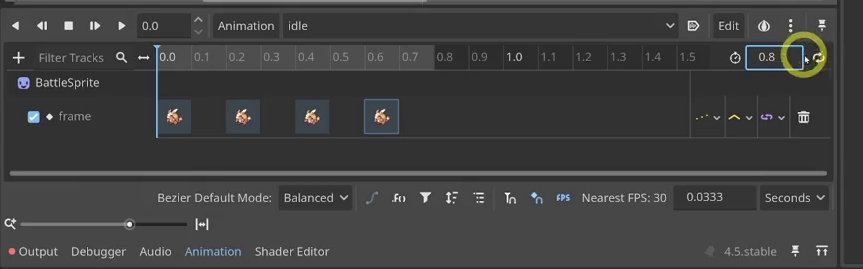
Playing the idle animation now shows the monster cycling through its first four frames.
For the attack animation, follow the same pattern:
- Create a new animation named
attack. - Add a property track on the
BattleSpritenode’sframeproperty. - Insert four keyframes at 0.0, 0.2, 0.4, and 0.6 seconds, with frame values 4, 5, 6, and 7.
- Set the animation length to
0.8seconds (adjust later if you want a different feel).
Spawning Monsters From the Battle Script
Back in the Battle scene, attach a script to the root node using the default settings. It will create one monster at each starting position, with three on each side.
Start with _ready, which calls a helper function twice: once for the player, once for the enemy. The helper takes the container holding the start positions, the parent node the new sprites should be added to, and a boolean saying whether these are player monsters.
extends Node2D

var battle_sprite_scene = preload("res://scenes/battle/battle_sprite.tscn")

func _ready():
    battle_sprite_setup($StartPositions/Player, $BattleSprites/Player, true)
    battle_sprite_setup($StartPositions/Enemy, $BattleSprites/Enemy, false)
The helper iterates over the Marker2D children of the start-positions container. For each one, it reads the marker’s position and asks another function, create_battle_sprite, to do the actual instantiation.
func battle_sprite_setup(start_positions: Node2D, parent: Node2D, is_player: bool):
    for start_pos_marker: Marker2D in start_positions.get_children():
        var pos = start_pos_marker.position
        create_battle_sprite(pos, parent, is_player)
create_battle_sprite instantiates the preloaded BattleSprite scene, calls a setup function on it to pass along the position and player flag, and then parents it to the correct container.
func create_battle_sprite(pos: Vector2, parent: Node2D, is_player: bool):
    var battle_sprite = battle_sprite_scene.instantiate()
    battle_sprite.setup(pos, is_player)
    parent.add_child(battle_sprite)
The setup call gives each sprite its position before it is added to the container. Without that call, all six monsters would appear at the origin.
The BattleSprite Script
Attach a script to the root BattleSprite node (the defaults are fine). It only needs the setup function that the battle script is calling.
extends Sprite2D

func setup(pos: Vector2, is_player: bool):
    position = pos
    flip_h = is_player
setup places the sprite at the provided position and uses flip_h to horizontally mirror player monsters. Because the sprite sheets face one direction by default, flipping the player’s sprites makes the two sides face each other across the battlefield.
Running the Scene
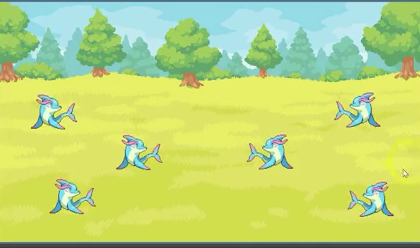
Run the main scene to see six monsters: three on the left facing right and three on the right facing left. The background fills the view, and the monsters play their idle animations.
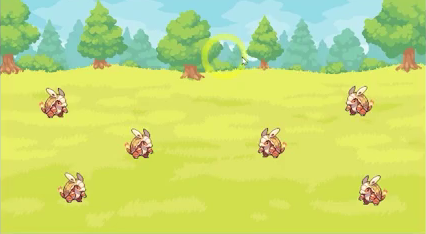
Now that the scene can display both teams, you can replace the shared monster appearance with per-monster resources.
Create Per-Monster Data With Godot Resources
The project’s data.gd script contains a shared monster_data dictionary with base stats, textures, and available attacks. An individual monster also needs its own data, starting with its identity and level. Its on-screen sprite will read from that data container rather than store everything itself.
What Each Monster Needs to Track
Each monster needs values distinct from the shared base data. The resource will eventually need to track:
- The monster’s health and energy points.
- The monster’s current level, which affects its stats.
- The attacks the monster has unlocked. In
data.gd, each monster has anattacksdictionary keyed by level, for example level 0 unlocks the claw attack, level 12 unlocks fire, and so on.
The resource should also give you access to monster_data so you can look up a monster’s maximum HP, element, icon texture, and other base information. In this section, you will expose its ID and level.
Introducing Godot Resources
Godot’s Resource is a built-in data container that suits this separation. Its script is not attached to a scene-tree node, so the resource does not appear in the running scene, but it supports GDScript features such as exported variables and functions. Each monster can have its own resource instance.
Creating the Monster Resource Script
Create a resources folder in the FileSystem dock. Right-click it and choose Create New > Script, not Resource yet.
In the Create Script dialog, leave the language as GDScript and change the Inherits field to Resource. Godot will validate the field once it is spelled correctly. Name the file monster_res.gd and click Create.
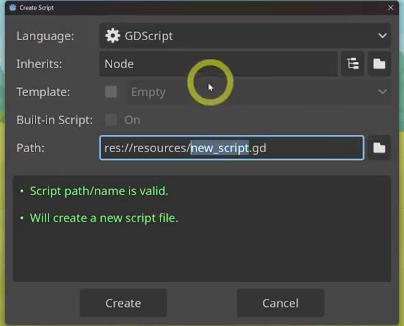
The new script initially contains only the extends declaration:
extends Resource
Registering the Resource With class_name
To make the script available as a custom resource type, you need to register it as a class. At this point, Create New > Resource lists built-in types such as AnimationLibrary and CircleShape2D, but not your monster resource.
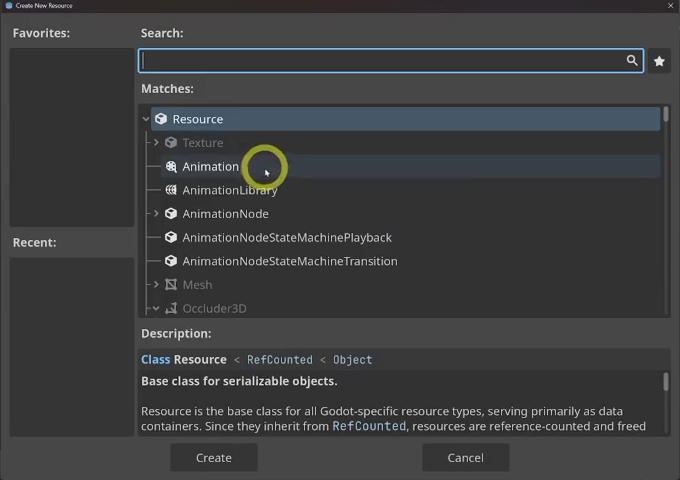
Add a class_name declaration at the top of monster_res.gd:
class_name MonsterResource
extends Resource
Save the file. Now, if you repeat the right-click Create New → Resource flow and type “Monster” in the search, MonsterResource shows up as an available base type.
Creating a Test Resource Instance
Create a resource using MonsterResource and name it Test, producing Test.tres in the resources folder. Select it to view the Inspector, which has no custom properties yet.
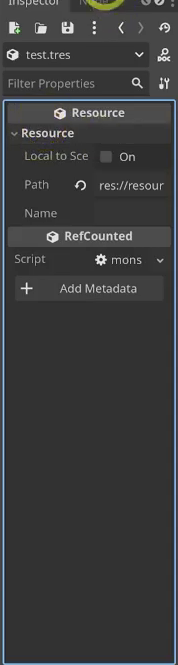
Adding Exported Variables
Open monster_res.gd and add two exported variables: an id typed as Data.Monster, and a level typed as an integer.
class_name MonsterResource
extends Resource

@export var id: Data.Monster
@export var level: int
After saving, select Test.tres again. The Inspector now shows an Id dropdown containing every value from the Data.Monster enum, along with a Level integer field. As a test, pick any monster for the id and set the level to 10.
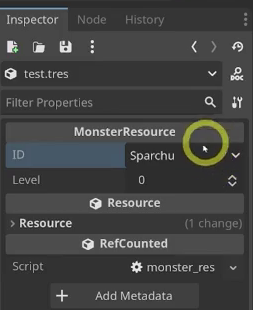
Enums are integers with readable names. The first Data.Monster entry is 0, the next is 1, and so on, so reading res.id in code gives you the underlying integer.
Using the Resource Inside the Battle Sprite
To connect the test resource to the visual, open the battle sprite’s script and add an exported MonsterResource variable:
@export var res: MonsterResource
Back in the scene, select the battle sprite node. The Inspector now shows a Res slot that accepts a MonsterResource. Drag Test.tres from the FileSystem dock into that slot.
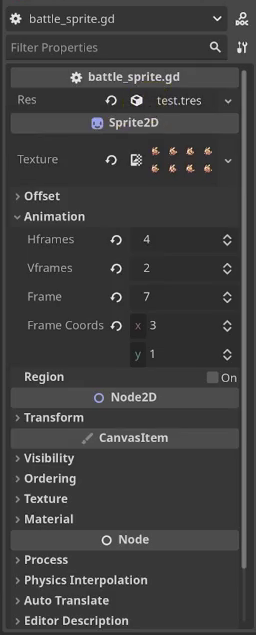
To confirm that the data flows through, add a _ready function that prints the two fields:
func _ready():
    print(res.id)
    print(res.level)
Run the scene and check the debugger output. It prints the selected monster’s integer ID, such as 0 for the first enum entry, followed by the level, 10 in this test. The sprite can now read the resource’s per-instance data.

Driving the Sprite Texture From the Resource
You can now use the resource to choose the sprite’s texture. Its Data.Monster ID is a key into Data.monster_data, where the monster’s battle texture path is stored.
Update _ready in the battle sprite’s script to look like this:
func _ready():
    texture = load(Data.monster_data[res.id]['battle texture'])
The 'battle texture' value is a string path. Wrap it in load() to obtain a texture the sprite can display.
Run the scene again. The battle sprite now shows the texture matching the monster stored in the resource. If you double-click Test.tres, change the Id dropdown to a different monster such as Atrox, and run the scene once more, the sprite updates to the new monster without any code changes.
Wrapping Up
You now have a MonsterResource instance with an ID and a level, plus a sprite that uses the ID to find its texture. Next, you will pass different resources to the player and enemy sprites.
Connect Player and Enemy Monster Teams
The test resource confirms that data can drive a sprite, but assigning the same resource to every sprite still gives both sides the same appearance. To display distinct teams, you will store player and enemy resources in data.gd and pass them through the battle setup.
Storing the Player and Enemy Teams
In data.gd, add two arrays to hold each side’s MonsterResource instances:
var player_monsters = []
var enemy_monsters = []
Add a helper that takes an id and a level, creates a MonsterResource, calls its setup function, and returns the configured instance. You will add that resource setup function shortly.
func new_monster_res(id, level):
	var monster_res = MonsterResource.new()
	monster_res.setup(id, level)
	return monster_res
Use the helper to populate both teams. This sample gives each side three monsters with different IDs and levels; you can choose any monsters declared in the Monster enum.
var player_monsters = [
	new_monster_res(Monster.SPARCHU, 20),
	new_monster_res(Monster.ATROX, 21),
	new_monster_res(Monster.JACANA, 22),
	]
var enemy_monsters = [
	new_monster_res(Monster.CINDRILL, 20),
	new_monster_res(Monster.VULKEO, 21),
	new_monster_res(Monster.GULFIN, 22),
	]
Adding the Setup Function to MonsterResource
The helper calls monster_res.setup(id, level). Open monster_res.gd and add that function so it stores the supplied values:
func setup(new_id, new_level):
	id = new_id
	level = new_level
For this setup, storing the ID and level is enough to give the sprites different appearances; health and energy initialization comes later in the full project.
Passing the Team Data Into the Battle Scene
In battle.gd, update the _ready calls so each battle_sprite_setup receives its corresponding team array. The background lookup in this example is covered under Customizing the Battle Background below.
func _ready() -> void:
	$BG.texture = load(Data.biome_bg[Data.current_biome])
	battle_sprite_setup($StartPositions/Player, $BattleSprites/Player, true, Data.player_monsters)
	battle_sprite_setup($StartPositions/Enemy, $BattleSprites/Enemy, false, Data.enemy_monsters)
Rewriting the Battle Sprite Setup Loop
The original battle_sprite_setup creates a monster for every start position. A team might have fewer monsters, so change the loop to create a sprite only when the team array contains a corresponding resource.
The updated function takes a data: Array parameter, uses an integer start_pos_index from get_child_count(), and checks that the index is within data.size() before creating a sprite.
func battle_sprite_setup(start_positions: Node2D, parent: Node2D, is_player: bool, data: Array):
	for start_pos_index: int in start_positions.get_child_count():
		if start_pos_index < data.size():
			var pos = start_positions.get_child(start_pos_index).position
			var monster_res: MonsterResource = data[start_pos_index]
			create_battle_sprite(pos, parent, is_player, monster_res)
The same index now selects both a starting position and a MonsterResource, which are passed to create_battle_sprite.
Forwarding the Resource to create_battle_sprite
The create_battle_sprite function must accept the resource and pass it along when it calls setup on the newly instantiated battle sprite.
func create_battle_sprite(pos: Vector2, parent: Node2D, is_player: bool, res: MonsterResource):
	var battle_sprite = battle_sprite_scene.instantiate()
	battle_sprite.setup(pos, is_player, res)
	parent.add_child(battle_sprite)
Using the Resource Inside the Battle Sprite
Now update battle_sprite.gd so each sprite receives its resource during setup instead of relying on the shared test resource.
At the top of the script, declare a variable to store the monster resource. Then update the setup function so it accepts the resource, stores it, and uses res.id to look up the correct battle texture path from Data.monster_data.
extends Sprite2D
var monster_res: MonsterResource

func setup(pos: Vector2, is_player: bool, res: MonsterResource):
	position = pos
	flip_h = is_player
	monster_res = res
	texture = load(Data.monster_data[res.id]['battle texture'])
The final line uses the resource’s ID to find its 'battle texture' path in monster_data. Each sprite can now display the monster it was given.
Testing the New Setup
If Godot reports that MonsterResource has no setup function, check that you added it to monster_res.gd as shown above. With the sample teams configured, the scene creates six resources and displays their individual textures.
Try changing entries in player_monsters or enemy_monsters to another monster, such as Monster.CINDRILL or Monster.VULKEO. Run the scene again to see the new lineup.
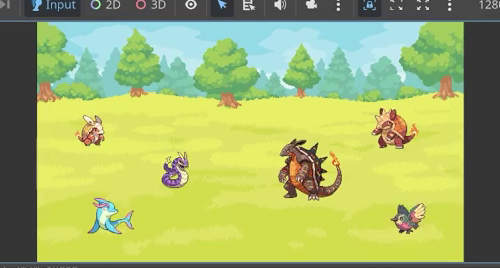
The team data now flows from data.gd into each battle sprite. With those resources connected, you can prepare the background and the first UI elements.
Prepare the Battle Background and Monster UI
The scene is ready for some initial battle logic and UI setup. You will connect the background to the current biome, enlarge the viewport, vary the lineup, and give each monster a name label and a readiness bar. Battle menus and the remaining monster UI belong to the later stages of the full project.
Customizing the Battle Background
The graphics/backgrounds folder contains background1.png, background2.png, and background3.png. The project’s Data singleton already defines Biome.GRASS, Biome.DESERT, and Biome.ICE. A dictionary can connect each biome to its image.
Open data.gd and add the following biome_bg dictionary, which associates each biome with a background image path:
const biome_bg = {
	Biome.GRASS: "res://graphics/backgrounds/background1.png",
	Biome.DESERT: "res://graphics/backgrounds/background2.png",
	Biome.ICE: "res://graphics/backgrounds/background3.png",
}
Still in data.gd, add a variable for the current battle biome, defaulting to Biome.GRASS:
var current_biome: Biome = Biome.GRASS
With the data in place, switch over to battle.gd. In the _ready function, before the monster sprites are set up, update the background sprite’s texture using the dictionary and the current biome:
func _ready() -> void:
	$BG.texture = load(Data.biome_bg[Data.current_biome])
	# ... existing sprite setup
The dictionary holds string paths, so load() converts the selected path into a texture for the background sprite. Run the game with Biome.GRASS, then change the default to Biome.DESERT and run it again to check that the background changes.
Adjusting the Viewport and Camera
To make more room for the UI, increase the viewport size and adjust the battle camera:
- Open Project > Project Settings and, under Display > Window, set the Viewport Width to
1920and Viewport Height to1080. - In the Battle scene, select the Camera2D node.
- In the Inspector, change the Zoom property from
2to3on both axes. The camera outline should now align with the edges of the background sprite.
Adding Variety to the Monster Lineup
Before building the UI, vary the entries in player_monsters and enemy_monsters to get a mix of elements, colors, and sizes on screen. For example, try Monster.POUCH, a plant type, and vary the levels between monsters.
Building the Monster UI Container
Build each monster’s compact UI inside battle_sprite.tscn, starting with a container around its sprite:
- Open
battle_sprite.tscn. - Add a Control node as a child of the root
BattleSpritenode. - Center the Control node on the sprite so that its origin lines up with the monster.
- A
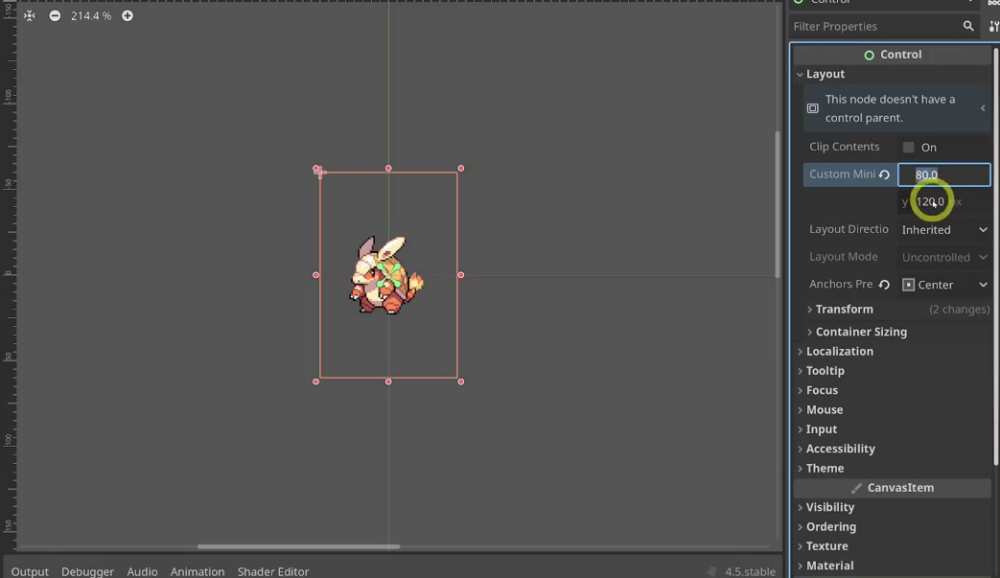
Controlnode inside aNode2Dneeds a fixed size to behave predictably. With theControlselected, in the Inspector find Layout > Custom Minimum Size and set it to80for X and120for Y.
The Control provides an 80 by 120 area for the per-monster UI.
Displaying the Monster’s Name
The first UI element inside the Control node is a label showing the monster’s name.
- Add a PanelContainer as a child of the
Controlnode and rename it toNameContainer. - Using the Layout menu at the top of the 2D viewport, anchor the
NameContainerto Center Top. - In the Inspector, under Layout > Anchor Offsets, set Left, Top, Right, and Bottom all to
0. The label’s text will be what drives the container’s final size. - Add a MarginContainer as a child of
NameContainer, and then add a Label as a child of theMarginContainer. - Select the
MarginContainerand, under Theme Overrides > Constants, set the margins to4on the left,2on the top,4on the right, and2on the bottom so the name has a little breathing room.
In battle_sprite.gd, add a dedicated ui_setup function to populate the name label from the monster’s data:
func ui_setup():
	# name
	$Control/NameContainer/MarginContainer/Label.text = Data.monster_data[monster_res.id]['name']
Then call ui_setup() from the existing setup function so the name is applied whenever a battle sprite is created:
func setup(pos: Vector2, is_player: bool, res: MonsterResource, new_index: int):
	position = pos
	flip_h = is_player
	monster_res = res
	texture = load(Data.monster_data[res.id]['battle texture'])
	ui_setup()
When the game runs, each monster should now display its own name above its sprite.
Creating the Readiness Progress Bar
Next up is a vertical bar that will eventually indicate when a monster is ready to act. It lives on the left side of the Control canvas.
- Add a TextureProgressBar as a child of the
Controlnode. - In the Layout menu, anchor it to Center Left.
- In the Inspector, set the Fill Mode to Bottom to Top.
- Under Textures, open
graphics/UI/and assignvbar.pngto both the Under and Progress slots. The same image is used for both layers. - Under Layout > Anchor Offsets, set all four values to
0so the bar sits cleanly on the left side of the Control area. - Rename the node to
ReadyProgressBar, since its job is to track whether the monster is ready to act.
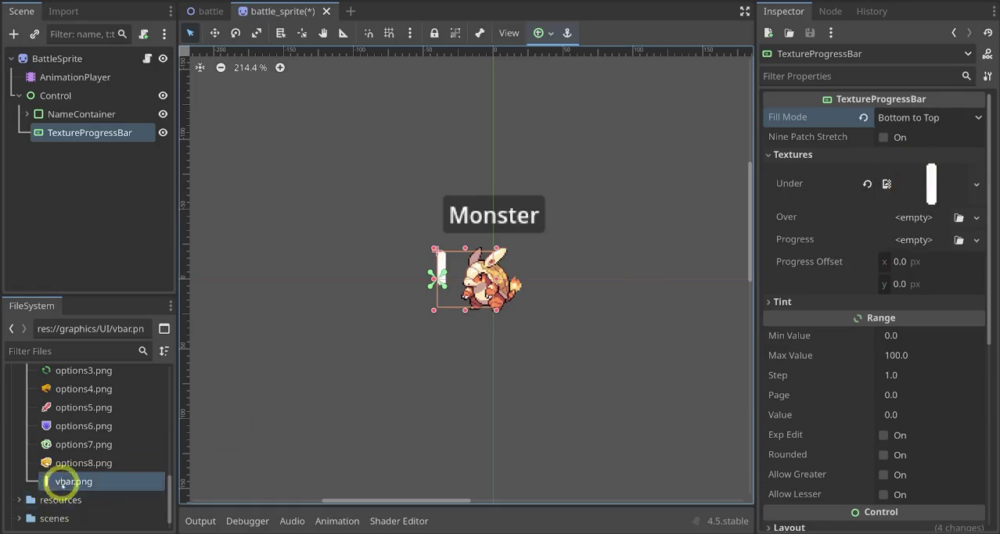
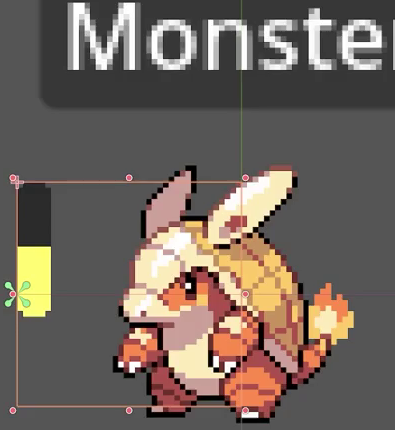
Using one texture for both layers lets you distinguish them with color. Under Tint, set Under to dark gray (#1f1f1f) and Progress to yellow (#ffff6a). Increase the bar’s value in the Inspector to preview the yellow fill rising from the bottom.
A First Pass at Readiness Logic
For an initial readiness implementation, add a _process function to battle_sprite.gd that increases the bar at a constant rate while the sprite is not paused.
Start by declaring a new variable on the script:
var paused: bool
Then add the _process function at the top of the script, which increments the progress bar’s value each frame based on delta:
func _process(delta: float) -> void:
	if not paused:
		$Control/ReadyProgressBar.value += 20 * delta
Since paused defaults to false, each monster’s readiness bar fills when you run the game. The constant 20 is enough to check that the bar is connected; using a monster’s speed stat comes later in the full project.
Recap and Next Steps
You have worked through the foundations of a monster collector battle scene, from reusable visuals to individual monster data and the first UI elements. The key pieces covered are:
- A battle scene with player and enemy starting positions, camera framing, and reusable sprites with idle and attack animations.
- A custom
MonsterResourcethat stores an ID and level and supplies the data used to select each sprite’s texture. - Player and enemy team arrays that control which monsters appear in the scene.
- Biome-based backgrounds, monster name labels, and readiness bars that fill over time.
These pieces establish the scene and data flow for the combat features that follow in the full project. You can revisit the team arrays and biome setting to see how the same scene responds to different data.
To continue building your monster collector project with a structured learning path, explore the Intermediate Godot Mini-Degree and follow the full course beyond this initial battle setup.
Did you come across any errors in this tutorial? Please let us know by completing this form and we’ll look into it!
FINAL DAYS: Unlock coding courses in Unity, Godot, Unreal, Python and more.