Want more GODOT 4 content? Explore the DEVELOP A 3D PLATFORMER WITH GODOT 4 where you can find a comprehensive, project-based curriculum on it!
Ever wanted to create your own 3D game but didn’t know where to start? You’re in the right place with our Godot 3D tutorial!
In this comprehensive guide, we will take you through the process of building your player controller to navigate through a 3D game (with platformers – a great first game – in mind). We will be using Godot’s CharacterBody3D node to manage physics interactions such as running and jumping. By the end of this Godot 3D tutorial, you should have a functional player character who can navigate your 3D game world.
Be aware, that this Godot 3D tutorial assumes familiarity with Godot’s interface and basic functionality, as well as a basic understanding of programming concepts. If you’d like to learn more about Godot, GDScript, and 3D platformers, you can also review our full course, Develop a 3D Platformer with Godot 4 which covers these concepts more in-depth.
Table of contents
Project Files
To follow along with all the steps in this Godot 3D tutorial, make sure to download the project files we’ve included. These files include all the resources you’ll need to complete your 3D platformer scene.
Download Project Files Here
Player – Part 1
In this Godot 3D tutorial part, we will begin creating our player controller to allow us to navigate the platformer scene. We will store the player controller as its own scene for easy editing throughout the game.
The Player Scene Node
To begin our Godot 3D tutorial player, we need to create the scene for our player controller and add the relevant nodes. We will be using Godot’s CharacterBody3D node to handle the physics interactions, such as changing the player’s velocity, detecting the ground, and walking up slopes.

So that we can easily identify it, we will rename this node to “Player”.

The Player Model Node
In our Models folder, we can also find a character asset called characterVampire.obj which can be dragged into the scene and made a child of our Player node.

This can then be renamed to “Model” so that it can be easily identified.

The model is also the wrong size by default, so we will increase the Scale to 1.5 on all axes, along with setting the Position to (0, 0, 0). This will make sure our model is the right size, and that the position of the Player node is set to the feet of the visual model.

The Collision Shape Node
The next step in our Godot 3D tutorial player is to create a collision shape, similar to the platform object that we created in the previous lesson. To do this, add a CollisionShape3D as a child node of Player.

For the shape, we will be using a CapsuleShape3D. As a general rule, capsules make the best colliders for player characters and other humanoid objects that will move around and interact with the game level. This is due to them being roughly the same shape as a human, and the smooth bottom edge allows for easily moving up slopes, as there is no hard edge to catch on other object’s colliders.

With our capsule collider added, we now need to scale it to fit the player model. We can do this from the side view. Scale the collider to match the height and width of the Player‘s Model using the orange circles found around the collider. You may also need to reposition the collider using the movement tool. Alternatively, you can set the values directly in the Inspector.

Make sure that the collider lines up with the feet of the Player’s Model.

The Camera Node
The final element that our Player scene needs is a Camera3D node. This will be our viewport into the level and will allow the game’s view to track the player as they move.

We can then position the camera so that it is facing down on the player.

Finally, tick the Current value in the Inspector to tell Godot to use this camera as the viewpoint.

We can now press the Play button to test the game (keep in mind, our Godot 3D tutorial is still in its early stages!). You may get asked to select a scene, if so, choose the Select Current option. With everything set up, you should now see the player model from the viewpoint of our camera.

Depending on the placement of your camera node, you may find the player looks a little far away or a little too close. To fix this, change the FOV property until you find a value you are happy with. Lower values will “zoom in” the screen, while higher values will “zoom out”.
Lighting the Scene
Currently, our scene is looking very dark. To fix this we will add a DirectionalLight3D node to the scene.

This will act as our sunlight in the level, so we will angle the arrow downward to spread the light evenly.
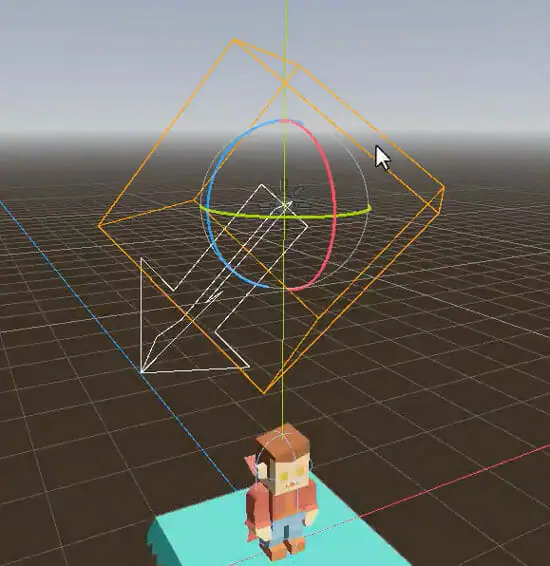
We can also easily add shadows to the scene by enabling them on the light.

Now if you play the game you will see the scene looks much better.
The Player Script
In the next section of our Godot 3D tutorial, we will begin programming our player controller, so to set up for that we can add a script to our Player node. We can call this “Player.gd” and make sure that it inherits from CharacterBody3D, as we will be using this node’s functionality to build the controller.

Once created, a script editor will open containing a premade starter script. For this course, we will be removing this code, however, it may be useful to look over it another time. For now, we will remove all but the first line, leaving your Player.gd script looking like the following:
extends CharacterBody3D
With this complete, we are ready to start programming our player controller. In the next lesson, we will be focussing on making our player move and jump.
Player – Part 2
In this Godot 3D tutorial section, we are going to continue creating our player controller. Before we can begin scripting anything, we need to set up our inputs, which will allow us to detect if specific keys and buttons are being pressed.
Setting Up Inputs
To set up our inputs we need to open the Project Settings window, accessible from the Project dropdown on the menu bar.

To add our Inputs, we will be using the Input Map tab. Here we can define inputs for anything, such as movement, jumping, or any other sort of button interaction you would like to detect.

We will start by adding a new input called “move_forward”. It’s important to name your inputs something unique and descriptive, as we will be using the names to identify each input in our scripts.

With this action created, we can link a key press event to it. To do this, use the + symbol at the end of the action to open the Event Configuration window. Here, you can choose the W key as the input by pressing it on your keyboard.

With this input action set up, it means that whenever we are listening for the “move_forward” input, we are actually checking if the W key is pressed on the player’s keyboard. We can then do the exact same thing for the move_backward action, and the S key.

As a challenge, try setting up the left and right movement inputs, as well as jumping with the space bar, without using the solution below.
Solution:

Creating Variables
With the inputs set up, we are ready to begin scripting our player controller for our Godot 3D tutorial. We will begin by creating the variables required to make the player move around the scene. As always, our variables will be placed at the top of the script, just below any extends lines. The first variable will track our movement speed, it will be called “move_speed”, be of type float, and hold a value of 4.0 by default.
var move_speed : float = 4.0
Our second variable will track our jump force. We can name it “jump_force”, make it a float and give it a default value of 8.0.
var jump_force : float = 8.0
With the jump force in place, we will also want a force to pull us back toward the ground. This will be our “gravity” variable, which will also be a float, with a default value of 20.0.
var gravity : float = 20.0
We will also create another variable called “facing_angle”, of type float. However, this won’t have a default value as we will be setting it every frame. This will track an angle in degrees of where our player is facing, which we can use to set our character model’s direction to follow the player.
var facing_angle : float
To rotate the character model, we will need to store it as a variable, this will be of type MeshInstance3D and be called “model”. This can then be set to the “Model” child-node, and loaded using the onready prefix and the get_node method.
@onready var model : MeshInstance3D = get_node("Model")Creating the Player Movement
With our variables created, we are ready to use them to make the player move. The first step to this is to add some code to a _physics_process method. _physics_process runs at a constant rate every second, as opposed to every frame, like _process, making it perfect for physics calculations.
func _physics_process(delta):
    var input = Input.get_vector("move_left", "move_right", "move_forward", "move_backward")
This allows us to use the get_vector method, supplied by Godot, to calculate our player’s movement direction based on their keyboard presses, which is then stored in the input variable. In the get_vector method, we supply the names of each of our inputs for the relevant directions. We can then calculate the direction and store it in a new variable, dir.
func _physics_process(delta):
    ...
    var dir = Vector3(input.x, 0, input.y)
Here we create a 3D Vector to define where the player is moving. We don’t want the player to move in the y direction (up and down) with the movement keys, so we set y to zero. And get_vector returns a 2D Vector, so we use the input.y value as our z-axis to convert it to 3D.
func _physics_process(delta):
    ...
    velocity = dir
Here, we assign our dir variable to the Player node’s velocity, which is a variable supplied by the CharacterBody3D. We can then finally call the move_and_slide method to run the player’s movement methods.
func _physics_process(delta):
    ...
    move_and_slide()
We can now save this script, and press the play button to test the player’s movement. With everything set up, you can see the movement keys (W, S, A, D – if you have set the same inputs as us) move the player character around the screen. There are a few issues, however:
- We aren’t moving based on our move_speed variable, so we can not change the speed.
- If we walk off the edge of the platform, our character doesn’t fall.
- We have no way to jump.
As a challenge before the next section of our Godot 3D tutorial, try making the player move at the rate of the move_speed variable. Currently, we are moving at one unit per second, however, our move_speed is set to 4.0, so we want our character moving at four units per second.
Player – Part 3
In this Godot 3D tutorial section, we will continue working on the player controller script. Previously, we noticed that our player was not moving at the correct speed and that our player character didn’t face the right direction, so we will begin by fixing these problems.
Changing the Movement Speed
Currently, when we calculate the direction for the player to move, we only use the input variable, which has a speed of about 1.0 units / second. To easily fix this, we can multiply our dir value by our move_speed variable.
func _physics_process(delta):
    ...
    velocity = dir * move_speed
    ...
When you test this using the play button, you will see that the player character moves around four times as fast, due to our move_speed variable being set to 4.0.
Rotating the Model
Our character model currently stares at the camera no matter where we are moving. This isn’t ideal, so instead we can make our model rotate to the direction we are moving in. To do this, we will add some new code to our _physics_process method.
func _physics_process(delta):
    ...
    facing_angle = Vector2(input.y, input.x).angle()
Here we calculate the facing_angle value based on our inputs. You may notice our y and x axes are backward, this is because we are getting the y-axis rotation, so the y value comes first. We then use the angle method to convert our y-axis vector into an angle.
func _physics_process(delta):
    ...
    model.rotation.y = facing_angle
We can then set the y-axis rotation of the character model to be the facing_angle variable. With this in place, you can play the game and you will find the character rotates as you move. However, it does snap back toward the camera if you are not moving, which isn’t perfect. The rotation is also very harsh, there is no smoothing applied to it, which makes it look very unnatural.
The reason our character snaps back is that we are always setting our model’s rotation, even if we are not moving. To fix that, we can check if there are any movement inputs from the player and act accordingly.
func _physics_process(delta):
    ...
    if input.length() > 0:
        facing_angle = Vector2(input.y, input.x).angle()
This if statement will check if there are any inputs being held down, which would make the length of the input variable more than zero. If there are, we can run the code to update the facing_direction variable. Now when you press play, you will find the character doesn’t keep snapping back.
We can also smooth the rotations by lerping the angle.
func _physics_process(delta):
    ...
    model.rotation.y = lerp_angle(model.rotation.y, facing_angle, 0.5)
Here we set the from angle, the to angle, and the speed at which we want to lerp between the two angles. For now, we will set this speed to 0.5, but feel free to try changing up the value. Now when you press play you will find there are no more sharp rotations.
Applying Gravity
With these fixes in place, we are ready to move on to making our player jump. The first step to implementing jumping is making the player fall, so that when we implement the jump event they won’t just fly away. Currently, when we walk across the edge of the platform, our player just floats in mid-air, so we need to implement our gravity force. We will start by adding an if statement at the top of our _physics_process method.
func _physics_process(delta):
    if not is_on_floor():
This if statement will check if the player is standing on the floor. If they are not, we want to apply gravity to the CharcterBody3D’s velocity.
func _physics_process(delta):
    if not is_on_floor():
        velocity.y -= gravity * delta
However, later in our code we directly set the velocity value again, which would overwrite this gravity force. As a fix for this, we will remove the line “velocity = dir * move_speed” and replace it with two lines assigning the x and z axes individually.
func _physics_process(delta):
    ...
    velocity.x = dir.x * move_speed
    velocity.z = dir.z * move_speed
    ...
This way, we are not overwriting the y-axis value and our gravity will work. Now when you press play and walk off the platform, you will find your character falls as expected. In the next part of our Godot 3D tutorial, we will be finishing our movement script by adding the ability to jump.
Player – Part 4
In this final Godot 3D tutorial part, we will set up the jump systems in our player controller.
If you have had any issues following along so far, feel free to download the code from the Course Files. Everything we have programmed so far will be commented (#) to explain what it does to help you with your own project. It is also good practice to add your own comments as you go so that when you come back later on, you know exactly what everything does.
Adding Jumping
In the previous lesson, we began our jumping systems by implementing gravity into our game. We can now add a new if statement below our gravity code to see if the player is ready to jump.
func _physics_process(delta):
    ...
    if Input.is_action_pressed("jump) and is_on_floor():
Here, we combine two different checks to see if our player is pressing the jump key, and if the player character is on the floor. If both of these return true, we can then perform the jump code below, however, if either the player isn’t pressing jump, or if the player isn’t touching the floor, the code won’t run.
func _physics_process(delta):
    if Input.is_action_just_pressed("jump") and is_on_floor():
        velocity.y = jump_force
When the player presses jump and is on the floor, we want to set our y velocity to be our jump_force value. This will make the player jump upwards as a result of the force. Now, when we press play we can test out jumping by using the spacebar. You should find you fall back to the ground as expected, and can’t jump in mid-air.
Resetting the Player
The final thing we will want to do is reset the player when they fall from the platform. Currently, if our player character falls off, they will fall forever and the player will need to restart the whole game to start the level again. This isn’t optimal, so instead we will create a game_over function that can be run to reset the game.
func game_over():
This function will be called whenever the player dies, such as when they fall from the platform or when they touch an enemy.
func game_over():
    get_tree().reload_current_scene()
To reset the scene, we will call the reload_current_scene method on our root node of the tree, which will reload the current level that we are in. To make use of this, we then want to check if our y position is below a given threshold, if it is, the player will have fallen from a platform.
func _physics_process(delta):
    ...
    if global_position.y < -5:
        game_over()
This will then check if the player’s y position is less than -5, and if so, call the game_over function to reset the scene. If you want to check how far -5 is, move the player character in the scene to that position and compare it to the platform.

Feel free to find a value you prefer. If you now play the game, you will find the game_over function runs as expected when you fall from the platform. We’ve gotten a fantastic start to 3D now with this Godot 3D tutorial!
Godot 3D Tutorial Wrap-Up
And with that, we conclude this Godot 3D tutorial! We now have a fully working player character that can navigate, jump, and interact with the 3D world in a platformer game! This is just the start though. By adding more mechanics, refining your levels, and implementing graphics and audio, you can turn this base into your own fully-fledged 3D game.
We hope you’ve enjoyed this Godot 3D tutorial and found it informative. Remember, with game development, the best way to learn is by doing. Don’t be afraid to experiment, tinker, and make mistakes – that’s all part of the process.
Good luck with your game development journey and stay tuned for more useful tutorials from Zenva!
Get industry-ready with the DEVELOP A 3D PLATFORMER WITH GODOT 4! Perfectly suited to any skill level, you’ll get the tools you need to succeed while building a slew of projects!
Did you come across any errors in this tutorial? Please let us know by completing this form and we’ll look into it!

FINAL DAYS: Unlock coding courses in Unity, Godot, Unreal, Python and more.
