One game level is fine, but many games require more. For Godot, this involves scenes, and being able to change scenes in Godot is likewise super important.
In this in-depth guide, we shall explore setting up multiple levels and learn how we can change Godot scenes. We will begin by creating an end flag feature for our game, which transports the player to the next level or returns them back to the first level.
Creating an immersive, exciting gameplay experience with multiple levels is a fantastic way to engage your players. If you are interested, you can also review our full course, Develop a 3D Platformer with Godot 4 which covers these concepts in more detail.
Without delay, let’s jump into it.
Table of contents
Project Files
Download the project files that accompany this tutorial by clicking the link below. Inside, you’ll find all the assets to help guide you through this tutorial.
Download Project Files Here

End Flag
In this first, we are going to set up an end flag for our levels. The end flag is an object located at the end of each level, and when the player collides with it, they are either teleported to the next level or returned to the first level if they have reached the end of the game. In other words, this is the trigger we will use to change scenes in Godot.
Creating the End Flag Object
Our EndFlag object will have a very similar setup to our coins and enemies. To start with, we will be using an Area3D node as the root node for our End Flag.

Remember to rename this to “EndFlag” so that it can be easily identified.

For this object, we will be using the flag.obj asset as our Model.

We will make this a child of our EndFlag root node, and rename it to “Model“.

We will set the Position value to (0, 0, 0) and set the Scale to around 1.3 to match the size of the player.

Finally, we will add a CollisionShape3D node to the object.

We will make this a BoxShape3D and scale it to about the size of the flag.

Scripting the Flag
With our node tree set up for the object, we are ready to add a new script to the EndFlag root node, which will handle the player collisions.

We won’t need the _ready or _process functions, so we can remove these from the file. However, we will need to connect a body_entered signal to the script.

Before we begin adding code to this method, however, we need to create a variable to hold the next scene to load into. We can call this “next_scene”, which needs the @export_file(“*.tscn”) tag to make it visible in the inspector as a scene input box.
@export_file("*.tscn") var next_sceneWe can test this by selecting our EndFlag object in the scene, and dragging our “Level1.tscn” scene into the Next Scene property in the inspector.

We can now add code in the _on_body_entered method to check if the player has touched the spike, and if so, to change the scene to the next_scene value.
func _on_body_entered(body):
    if body.is_in_group("Player"):
        get_tree().change_scene_to_file(next_scene)
Here, we use the get_tree method to get the root of the current scene, and then use the change_scene_to_file method to switch out the scene to the next level. If you play the game to test this now, you should find that when you touch the flag the scene is reset, as it is reloading the same level. We can now save the EndFlag object as its own scene, by dragging it into the FileSystem.

In the next part, we will be setting up multiple levels so that we have something for our EndFlag object to connect to (as to change scenes in Godot you do, in fact, need multiple scenes).
Multiple Levels
With everything set up for us to change scenes in Godot, we are ready to create a second level for our game. To start with, we are going to create a New Scene using the button in the Scene menu dropdown.

Like with our Level1 scene, this will be a 3D Scene.

We will rename the root node of the scene to “Main”.

We can now save this scene (CTRL + S) as “Level2.tscn”.

We can now begin dragging in all of our different elements from the FileSystem. For our example game, we have many scenes which can be dragged in:
- Coin
- Enemy
- EndFlag
- Player
- Spikes
- PlatformLarge
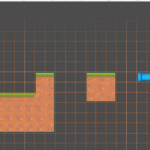
These will act as our building blocks for all of our levels, and we can use them and duplicate them around any new scene to create a brand new level. Remember to make sure to test it often to make sure it’s possible to make all of the jumps without being too easy. Here is our design for a second level.

As this is our second – and currently last – level, we need to make sure the Next Scene value of the EndFlag returns to Level1.tscn, which it should already. For our End Flag on Level1 we want our Next Scene property to point to level 2, so that when you touch the End Flag on level 1, it loads the second level.

We also want to copy our DirectionalLight and WorldEnvironment nodes into our Level2 scene from Level1 so that our second level doesn’t look bland.

We can also create a new environment on the WorldEnvironment node, to do this, select Make Unique from the dropdown so that it doesn’t overwrite the Level1 WorldEnvironment.

We can then change values like the Background Color to make the atmosphere different from the first level.

You can then use this to make as many new levels as you want for your game.
Godot – Change Scenes Wrap-Up
We have reached the end of this tutorial on how to change scenes in Godot. You have successfully learned how to set up an end flag feature and build multiple levels in your game using Godot. We also faced the challenge of designing levels so they are tough but not frustratingly impossible. Now you can make your games more immersive and engaging for players who crave levels of increasing difficulty.
You can continue to experiment with more complex scenarios and design, keeping in mind the principles we used here. With a little creativity, you can build fantastic multi-level games that will keep players coming back for more. You can also explore further applications with the ability to change scenes in Godot – such as multiple maps for RPGs. Whatever you pick, you now have a new tool to leverage in your arsenal.
All the best in your Godot journey and keep creating amazing games!
Want to learn more? Try our complete DEVELOP A 3D PLATFORMER WITH GODOT 4 course.
Did you come across any errors in this tutorial? Please let us know by completing this form and we’ll look into it!

FINAL DAYS: Unlock coding courses in Unity, Godot, Unreal, Python and more.