What’s a website without a little fun and games now and then? Even if you’ve never made a game before, or have no experience with game engines like Unity, that’s okay! Instead, you can channel the power of React Components and put your web development knowledge to work adding some fun aspects to your website.
This tutorial’s project will revolve around utilizing React, Canvas, and the create-react-app in React to create a simple card game called War. It’s recommended that you have some basic beginner experience with Canvas and React before delving in. As in additional note, I will be using Visual Studio Code throughout this whole project, and you can utilize that as a reference for the rest of the code and images below.
The source code is for the project can be found here! Also, be sure to check out this refresher course on props and states before getting started!
Did you come across any errors in this tutorial? Please let us know by completing this form and we’ll look into it! FINAL DAYS: Unlock coding courses in Unity, Godot, Unreal, Python and more.
Table of contents
Overview of the Game Setup
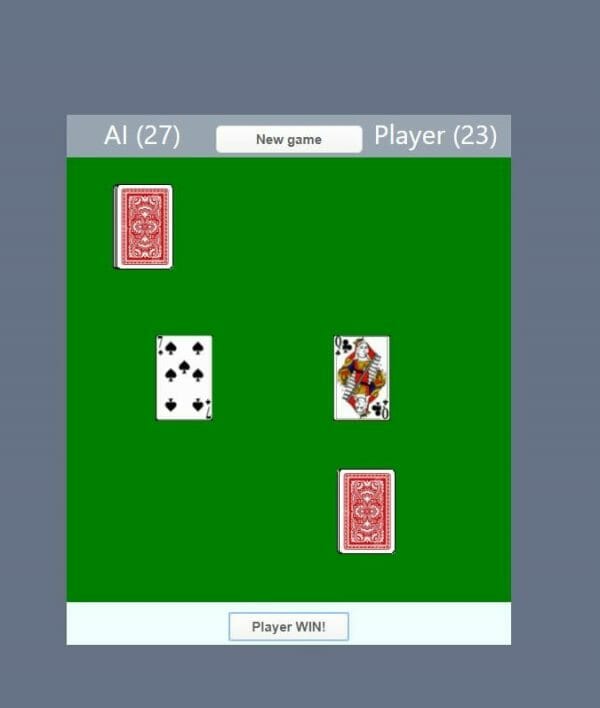
If you’ve never played War as a child, it is a simple game with a simple objective: win all the cards. The deck is divided evenly amongst the players, given to them with the card facing down. Each player will reveal their top card at the same time. The player who has the highest card takes both cards and moves them to the bottom of their stack. If two cards are played of equal value, then both players will keep playing cards down until one of the players has a higher card then the other. Then that winner takes all the cards again and places them at the bottom of his stack. The player with no cards left loses. We will use one big React component with methods and functions to create it.
Quick Overview: What is Canvas?
HTML canvas is an HTML element that is utilized to draw graphics and animate them. This can be used for anything from cartoon animation, video game design and/or graphical user interface animation.
Quick Overview: What is create-react-app?
Create-react-app is a tool that will give you a prebuild react workspace. It helps you utilize your time more efficiently by giving you a foundation to work with. You import the foundation that you will be working with one simple command.
Installing Create React App
Open your terminal window. You can do this by clicking Terminal at the top and then New Terminal. Then type:
npm install create-react-app
This will install the create-react-app tool and all its dependencies. Once it’s installed you will go ahead and run the following command to create a new React project and the name the project:
Create-react-app war-game
In the above code, war-game would be the name of the project we will be making but it can be named anything you would like but I named it war-game for this project as the game is based on the card game called War.
Now let’s move into the project folder by typing:
war-game
Now you can start the live development server that will automatically update anytime you make changes by using the following command:
npm start
Editing your folder structure.
We are going to need to make a few changes in your folder structure. Open up src in the war-game folder and create a images folder.
![]()
Here is where we will be uploading the three images we will be using for our project.
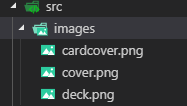
Let’s go into our App.css folder which will be out main CSS for our main component and change a few of the standard settings that have been put in place for us with the create react app. Your current folder should look like the following:
.App {
  text-align: center;
}

.App-logo {
  animation: App-logo-spin infinite 20s linear;
  height: 40vmin;
  pointer-events: none;
}

.App-header {
  background-color: #282c34;
  min-height: 100vh;
  display: flex;
  flex-direction: column;
  align-items: center;
  justify-content: center;
  font-size: calc(10px + 2vmin);
  color: white;
}

.App-link {
  color: #61dafb;
}

@keyframes App-logo-spin {
  from {
    transform: rotate(0deg);
  }
  to {
    transform: rotate(360deg);
  }
}
Let’s go over some of the CSS properties used in the class above. The property animation is being used with the @keyframes keyword to create rules and define how the animation will act. It’s a very useful property to help allow yourself to create CSS animations.
Pointer events property controls how the internal HTML will react to the cursor interacting with it. For instance in the property above its defined as none, which means that it will prevent all types of clicks and cursor option associated with that specific class.
Remove everything under the App class brackets and create a new class called App-body. It should like this now:
.App {
  text-align: center;
}

.App-body {
  background-color: #687186;
  min-height: 100vh;
  min-width: 400px;
  max-width: 800px;
  display: flex;
  flex-direction: column;
  align-items: center;
  justify-content: center;
  font-size: calc(10px + 2vmin);
  color: white;
}
Once you have done that let’s go ahead and save it. We will use that App-body class later on. Now one more quick change that must be made is with the App.js file. Your current file should look like the following:
import React from 'react';
import logo from './logo.svg';
import './App.css';

function App() {
  return (
    <div className="App">
      <header className="App-header">
        <img src={logo} className="App-logo" alt="logo" />
        <p>
          Edit <code> src/App.js </code> and save to reload.
        </p>
        <a
          className="App-link"
          href="https://reactjs.org"
          target="_blank"
          rel="noopener noreferrer"
        >
          Learn React
        </a>
      </header>
    </div>
  );
}

export default App;
Let’s open that up and just quickly replace the original imports at the top with the following:
import React from 'react';
import './App.css';
import WarGame from './WarGame.js';
We do this because we don’t need the logo and won’t be using it and we will be importing a new component that we will be making, which will hold the main game called WarGame.
Now let’s restructure the function App by just having it contain two div containers. One with the App class and the other with the App-body class that we recently made. In between those two, we will put our WarGame component.
function App() {

  return (
    <div className="App">
      <div className="App-body">
      <WarGame> </WarGame>
      </div>
    </div>
  );
}

export default App;
The main component WarGame:
Create a new JavaScript file named WarGame and create a new CSS file named WarGame. We will add the styling of the WarGame CSS and then finish it up with the JavaScript component.
Open up the WarGame.css file and create the following classes:
- CardTable
- CardTableHeader
- HeaderText
- CardTableMainArea
- CardTableFooter
- TableCanvas
- HiddenImage
All these classes will have simple stylings.
.CardTable{
    background-color: rgb(116, 164, 236);
    max-height: 600px;
    height: 500px;
    min-width: 400px;
    width: 500px;

}
What does it do?
CardTable will be the class that will be in the div encapsulating the game.
.CardTableHeader{
    display: table;
    background-color: rgb(156, 165, 179);
    height: 48px;
    width: 100%;
}
What does it do?
CardTableHeader will be associated with the Card Count for the AI and the player, as well as the button.
.HeaderText{
    display: inline-block;
    width: 33%;
}
What does it do?
HeaderText will be the class styling of the Player and AI text stating how many cards they have.
.CardTableMainArea{
    overflow: hidden;
    background-color: rgb(102, 202, 110);
    height: 500px;
    width: 500px;
}
What does it do?
CardTableMainArea will be the main class that will reside in the outer div incapsulating the canvas.
.CardTableFooter{
    height: 48px;
    background-color: azure;
}
What does it do?
CardTable will be the class that will be in the div encapsulating the game.
.TableCanvas{
    height: 500px;
    width: 500px;
}
What does it do?
TableCanvas will be the main styling for the actual canvas.
.HiddenImage{
    display: none;
}
What does it do?
Hidden Image will not display anything.
Next, we have the WarGameButton and its pseudo-classes for hover and active.
.WarGameButton {
    -moz-box-shadow:inset 0px 1px 0px 0px #ffffff;
    -webkit-box-shadow:inset 0px 1px 0px 0px #ffffff;
    box-shadow:inset 0px 1px 0px 0px #ffffff;
    background:-webkit-gradient(linear, left top, left bottom, color-stop(0.05, #ffffff), color-stop(1, #f6f6f6));
    background:-moz-linear-gradient(top, #ffffff 5%, #f6f6f6 100%);
    background:-webkit-linear-gradient(top, #ffffff 5%, #f6f6f6 100%);
    background:-o-linear-gradient(top, #ffffff 5%, #f6f6f6 100%);
    background:-ms-linear-gradient(top, #ffffff 5%, #f6f6f6 100%);
    background:linear-gradient(to bottom, #ffffff 5%, #f6f6f6 100%);
    filter:progid:DXImageTransform.Microsoft.gradient(startColorstr='#ffffff', endColorstr='#f6f6f6',GradientType=0);
    background-color:#ffffff;
    -moz-border-radius:6px;
    -webkit-border-radius:6px;
    border-radius:6px;
    border:1px solid #dcdcdc;
    display:inline-block;
    cursor:pointer;
    color:#666666;
    font-family:Arial;
    font-size:15px;
    font-weight:bold;
    padding:6px 24px;
    text-decoration:none;
    text-shadow:0px 1px 0px #ffffff;
}
.WarGameButton:hover {
    background:-webkit-gradient(linear, left top, left bottom, color-stop(0.05, #f6f6f6), color-stop(1, #ffffff));
    background:-moz-linear-gradient(top, #f6f6f6 5%, #ffffff 100%);
    background:-webkit-linear-gradient(top, #f6f6f6 5%, #ffffff 100%);
    background:-o-linear-gradient(top, #f6f6f6 5%, #ffffff 100%);
    background:-ms-linear-gradient(top, #f6f6f6 5%, #ffffff 100%);
    background:linear-gradient(to bottom, #f6f6f6 5%, #ffffff 100%);
    filter:progid:DXImageTransform.Microsoft.gradient(startColorstr='#f6f6f6', endColorstr='#ffffff',GradientType=0);
    background-color:#f6f6f6;
}
.WarGameButton:active {
    position:relative;
    top:1px;
}
If you look at the properties in the classes above you might be asking yourself what all these -moz and -webkit properties are for the classes. Well, they are called vendor prefixes but also referred to as browser prefixes at times. Prefixes were and still are used when a certain browser doesn’t support the full functionality of certain CSS modules. You can use those capabilities and support them right away with the use of prefixes and not have to worry about different browser not working or waiting on browser manufacturers to catch up.
The major browsers use the following prefixes:
- -webkit-(Chrome, Safari, newer versions of Opera, almost all iOS browsers)
- -moz-(Firefox)
- -o-(Old versions of Opera)
- -ms-(Internet Explorer/Microsoft Edge)
Open up WarGame.js and in the imports import React Component, WarGame.css and two different images, deck and cover.
import React, { Component } from 'react';
import './WarGame.css';
import CadrDeckImage from './images/deck.png';
import CadrCover from './images/cover.png';
Create a class for the file named WarGame and it will extend Component. Remember that the main class name will always be the same as the file it is in.
class WarGame extends Component {
    constructor(props)
    {
        super(props);
Quick Overview: Constructors?
A constructor is a method that gets called during the creation of the class, for this project it would be the WarGame class. It would automatically get called before the component is mounted.
Quick Overview: Super()?
Super refers to its parent class, the constructor class. You also can’t use this in a constructor until after you’ve called it. So if you want to use this.state you need to specify super and pass the props to it.
Create a constructor, super and then we will need to create a few different states. You’ll need a few states associated with the players, the AI, the Cards themselves and the game state. You will also need to set a few binding states.
        this.state = {AppMode: 'NoAction',  // NoAction, Game, PlayerWin, AIWin
                    MoveState: 'NoState',
                    CardsDeck: new Array(52),
                    PlayerDeck: new Array(52),
                    AIDeck: new Array(52),
                    PlayerBank: new Array(52),
                    AIBank: new Array(52),
                    MoveCount: 0

        };
        this.TableCanvas = React.createRef()

        // binding for set this
        this.StartNewGame.bind(this);
        this.DoOneMove.bind(this);
        this.EndMove.bind(this);
        this.GetOneCardFromDeck.bind(this);
        this.componentDidUpdate.bind(this);
        this.render.bind(this);
        this.draw_card.bind(this);

  }
Now we will need to create the animation to this meat and bones of this program, thankfully that’s what javascript is for. We will write up the rest of the javascript methods, the methods that will be running the cogs for us and that will make sense of all these binding and set states. It’s good to get a broad understanding of the structure and functionality of the project we are working on before moving forward with it. The following is a break down of methods that we will be making and what they will be doing:
- GetOneCardFromDeck: Will get a card from the deck.
- MoveDeck: Removes one card from the deck.
- GetCardCount: Get’s the card count of the cards in the deck at the time of running.
- StartNewGame: This will initialize the program and start a new game, as well as clearing and randomizing the AI & player decks.
- DoOneMove: DoOneMove will be our card check state management system. It will control whether the cards match, they don’t match or neutral.
- EndMove: In end move, we will check the scores between the AI and the player to see who wins.
- componentDidUpdate: This will update all the canvas content on the screen
- draw_card: This will move the cards that are drawn to the middle of the screen.
- BtnOnMoveClick: This will handle the event handler and call the method DoOneMove and changes the sate of MoveCount by one. Then we return everything in their appropriate divs.
Let’s move onto making the first three methods of the card game. Use GetOneCardFrom deck and create an anonymous function that will either return a random number with 52 being maxed or return a count of the cards if no card is present/state that there is no card left.
GetOneCardFromDeck = () =>{
    let rnd = Math.round(Math.random() * 52);
    if(this.state.CardsDeck[rnd] != 0){
      this.state.CardsDeck[rnd] = 0;
      return rnd;
    }
    // This card is absent! - We need get next one
    for(let count = rnd + 1; count < 52; count ++){
      if(this.state.CardsDeck[count] != 0){
        this.state.CardsDeck[count] = 0;
        return count;
      }
    }
    // let's look down
    for(let count = rnd - 1; count >= 0; count --){
      if(this.state.CardsDeck[count] != 0){
        this.state.CardsDeck[count] = 0;
        return count;
      }
    }
    // If we are here - no cards in deck!
    return - 1;
  }
Moving onto MoveDeck we will create an anonymous function with an argument of the deck that will remove one card from the deck.
MoveDeck = (deck) =>{
  for(let count = 0; count < 51; count ++){
    deck[count] = deck[count + 1];
  }
  deck[51] = null;
}
GetCardCount will take a parameter of the deck like above but will return the number of cards in the deck.
GetCardCount = (deck) =>{
  let count;
  for(count = 0; count < 52; count ++){
    if(deck[count] == null){break};
  }
  return count == 52 ? 0:  count ++;
}
StartNewGame will initialize the game and fill both decks for AI and the player. It will then set the state of MoveState and AppMode.
  StartNewGame = () =>{
    // Init new Game
    // Fill deck of cards and clearing AI & players decks
    for(let count = 0; count < 52; count ++){
        this.state.CardsDeck[count] = 1;
        this.state.PlayerDeck[count] = null;
        this.state.AIDeck[count] = null;
        this.state.PlayerBank[count] = null;
        this.state.AIBank[count] = null;

    }
    // now get random item and pass it to player or AI
    for(let count = 0; count < 26; count ++){
      this.state.PlayerDeck[count] = this.GetOneCardFromDeck();
      this.state.AIDeck[count] = this.GetOneCardFromDeck();
    }
    this.setState({MoveState: 'NoState'});
    this.setState({AppMode:   'Game'});

  }
DoOneMove will be a method with a switch case for the MoveState.
  DoOneMove = () =>{
// There are 2 options:
// 1. Banks is empty. Need to put one card
// 2. Banks is NO empty. Need to put three cards + one
  let PlayerCard = -1;
  let AICard = -1;
  let BankCardCount;
  let PlayerCount = 0;
  let AICardCount = 0;

    switch(this.state.MoveState){
      case 'Equality':
        // 2-nd option
        // Here we need to check - is there enough cards.
        PlayerCount = this.GetCardCount(this.state.PlayerDeck);
        AICardCount = this.GetCardCount(this.state.AIDeck);
        if(PlayerCount < 4){
          this.state({AppMode: 'AIWin'});
        }
        if(AICardCount < 4){
          this.state({AppMode: 'PlayerWin'});
        }

        // Put 3 cards + 1 to the bank
        BankCardCount = this.GetCardCount(this.state.PlayerBank);
        for(let count = 0; count < 4; count ++){
            PlayerCard = this.state.PlayerDeck[0];
            AICard     = this.state.AIDeck [0];
            this.MoveDeck(this.state.PlayerDeck);
            this.MoveDeck(this.state.AIDeck);
            this.state.PlayerBank[BankCardCount] = PlayerCard;
            this.state.AIBank[BankCardCount]     = AICard;

            BankCardCount ++;
        }

        if((PlayerCard % 13) == (AICard % 13)){
            this.setState({MoveState: 'Equality'});
          }
        else
        {
          this.setState({MoveState: 'EndMove'});
        }


        break;
      case 'EndMove':
        this.EndMove();
        this.setState({MoveState: 'NoState'});
        break;
      case 'NoState':
      default:
        // 1-st option
        PlayerCard = this.state.PlayerDeck[0];
        AICard     = this.state.AIDeck [0];
        this.MoveDeck(this.state.PlayerDeck);
        this.MoveDeck(this.state.AIDeck);

        BankCardCount = this.GetCardCount(this.state.PlayerBank);
        console.log(BankCardCount);
        this.state.PlayerBank[BankCardCount] = PlayerCard;
        this.state.AIBank[BankCardCount]     = AICard;

        if((PlayerCard % 13) == (AICard % 13)){
          //
          this.setState({MoveState: 'Equality'});
        }else{
          this.setState({MoveState: 'EndMove'});
        }
        break;

    }
  }
EndMove will decide whether we have a winner or loser or if our cards are the same as the ai.
  EndMove = () =>{
    // End move
    let BankCardCount = this.GetCardCount(this.state.PlayerBank);
    let PlayerCard = this.state.PlayerBank[BankCardCount - 1] % 13;
    let AICard = this.state.AIBank[BankCardCount - 1] % 13;
    let count;
    let AICardCount;
    let PlayerCardCount;

    if(PlayerCard == AICard){
      // Do nothing. We can't here!!!
    }else
    {
      if(PlayerCard > AICard)
      {
        // Player win!
        // move cards to players deck
        console.log('Player win!');
        PlayerCardCount = this.GetCardCount(this.state.PlayerDeck);
        for(count = 0; count < BankCardCount; count ++)
        {
          this.state.PlayerDeck[PlayerCardCount] = this.state.PlayerBank[count];
          this.state.PlayerBank[count] = null;
          PlayerCardCount ++
        }
        for(count = 0; count < BankCardCount; count ++)
        {
          this.state.PlayerDeck[PlayerCardCount] = this.state.AIBank[count];
          this.state.AIBank[count] = null;
          PlayerCardCount ++
        }
        // Chek AI deck
        AICardCount = this.GetCardCount(this.state.AIDeck);
        if(AICardCount == 0){
          this.setState({AppMode: 'PlayerWin'})
        }
      }
      else
      {
      // AI win!
        // move cards to AI deck
        console.log('AI win!');
        AICardCount = this.GetCardCount(this.state.AIDeck);
        for(count = 0; count < BankCardCount; count ++)
        {
          this.state.AIDeck[AICardCount] = this.state.AIBank[count];
          this.state.AIBank[count] = null;
          AICardCount ++
        }
        for(count = 0; count < BankCardCount; count ++)
        {
          this.state.AIDeck[AICardCount] = this.state.PlayerBank[count];
          this.state.PlayerBank[count] = null;
          AICardCount ++
        }
        // Chek Player deck
        AICardCount = this.GetCardCount(this.state.PlayerDeck);
        if(AICardCount == 0){
          this.setState({AppMode: 'AIWin'})
        }
      }
    }
  }
ComponentDidUpdate will update our canvas and draw it with images of the cards.
  componentDidUpdate(){
      let TableCtx = this.refs.TableCanvas.getContext("2d");
    let count;

      TableCtx.fillStyle = "green";
      TableCtx.fillRect(0, 0, 500, 500);

      // Draw current scene
      // 1. Player and AI Deck
      let CardsInDeck = Math.floor(this.GetCardCount(this.state.AIDeck) / 13);
      TableCtx.drawImage(this.refs.CadrCover, CardsInDeck * 70, 0, 70, 96, 50, 30, 70, 96);

      CardsInDeck = Math.floor(this.GetCardCount(this.state.PlayerDeck) / 13);
      TableCtx.drawImage(this.refs.CadrCover, CardsInDeck * 70, 0, 70, 96, 300, 350, 70, 96);


      //2. banks

    let CardsInBank = this.GetCardCount(this.state.PlayerBank);
    console.log('Cards in player bank - ' + CardsInBank);

    //players bank
    let bc_x = 300;
    let bc_y = 200;

    for(count = 0; count < CardsInBank; count ++)
    {
        if(count % 4 == 0)
        {
          this.draw_card(this.state.PlayerBank[count], bc_x, bc_y);
          this.draw_card(this.state.AIBank[count], bc_x - 200, bc_y);
        }
        else
        {
          this.draw_card(-1, bc_x, bc_y);
          this.draw_card(-1, bc_x - 200, bc_y);
        }
        bc_x += 16;
        bc_y += 16;
    }
  }
draw_card will move the card on the canvas and draw it.
draw_card(CardNumber, DestinationX, DestinationY){

    let TableCtx = this.refs.TableCanvas.getContext("2d");

    if(CardNumber == -1)
    {
      TableCtx.drawImage(this.refs.CadrCover, 6, 0, 64, 96, DestinationX, DestinationY, 64, 96);

    }
    else{
      // size of 1 card in image at tis time: 64*96
      let SourceX = (CardNumber % 13) * 64;
      let SourceY = Math.floor(CardNumber / 13) * 96;

      TableCtx.drawImage(this.refs.CadrDeckImg, SourceX, SourceY, 64, 96, DestinationX, DestinationY, 64, 96);
    }

  }
BtnOnMoveClick will be an anonymous function that will handle our event handling for MoveCount state.
BtnOnMoveClick = event => {
    this.DoOneMove();
    this.setState({ MoveCount: this.state.MoveCount + 1 });
  };
Render will render everything back into the DOM.
  render = () => {
    let BtnText = "Move";
    switch (this.state.MoveState) {
      case "EndMove":
        // Someone will win! Let's chek it
        let BankCardCount = this.GetCardCount(this.state.PlayerBank);
        let PlayerCard = this.state.PlayerBank[BankCardCount - 1] % 13;
        let AICard = this.state.AIBank[BankCardCount - 1] % 13;
        if (PlayerCard > AICard) {
          BtnText = "Player WIN!";
        } else {
          BtnText = "AI WIN!";
        }
        break;
      case "Equality":
        BtnText = "WAR! - next step";
        break;
      default:
        BtnText = "Move";
        break;
    }

    let AICardCount = this.GetCardCount(this.state.AIDeck);
    let PlayerCardCount = this.GetCardCount(this.state.PlayerDeck);
    //
    return (
      <div className="CardTable">
        <div className="CardTableHeader">
          <div className="HeaderText"> AI ({AICardCount}) </div>

          <button
            className="WarGameButton HeaderText"
            onClick={this.StartNewGame}
          >
            {" "}
            New game{" "}
          </button>

          <div className="HeaderText"> Player ({PlayerCardCount}) </div>
        </div>
        <div className="CardTableMainArea">
          <canvas
            ref="TableCanvas"
            className="TableCanvas"
            width={500}
            height={500}
          />
        </div>
        <div className="CardTableFooter">
          {this.state.AppMode == "Game" ? (
            <button
              className="WarGameButton"
              onClick={this.BtnOnMoveClick.bind(this)}
            >
              {" "}
              {BtnText}{" "}
            </button>
          ) : (
            this.state.AppMode
          )}
        </div>

        <img
          ref="CadrDeckImg"
          className="HiddenImage"
          src={CadrDeckImage}
          alt="deck"
        />
        <img
          ref="CadrCover"
          className="HiddenImage"
          src={CadrCover}
          alt="deck"
        />
      </div>
    );
  };
}
export default WarGame;
Now just type npm start in your terminal if you don’t have it up and you should have the project up and working perfectly!
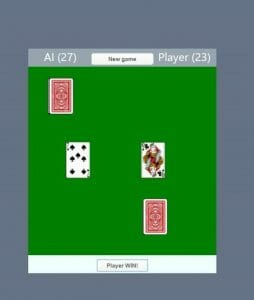
And there you have it! You now have your very own war card game built only with Canvas and React Components. Though you can certainly improve upon it, it’s a great start to adding more spice to your websites (or to pass the time).
