You can access the full course here: Responsive Web Design for Beginners
Table of contents
Part 1
In this lesson, you will learn how to set up the Brackets code editor.
Downloading and Using Brackets
For editing code, you can use any kind of text editor. Whichever one that you feel best suits you is the best one to use. The only exception to this is that you cannot use word processors like Microsoft Word. They apply extra formatting to the text that prevents it from working with code compilers.
If you’d like to try out the editor used in this course, you can download it from this website: http://brackets.io/. There will be a Download Brackets button which you can click on to get the latest version. The installation process is the same as for any other type of software.
Once you open Brackets, you will see something like this. This is the basic Getting Started project that the software provides.
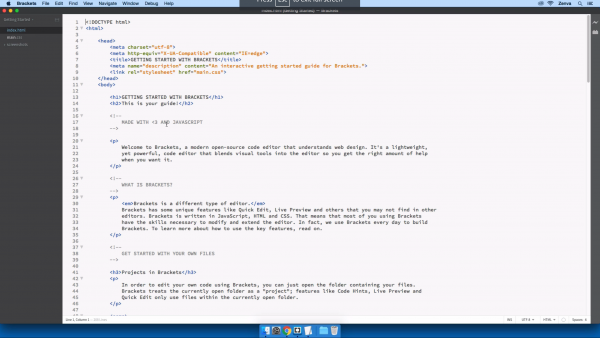
On the left-hand side, you will see a panel with different files. This is where all the files in your project will be displayed.
For web development, you have to put all the involved files into a single folder. This includes all graphics, CSS, HTML, etc. In Brackets, you can then click on the Getting Started button, which will have a drop-down menu that says Open Folder…. Then you can navigate to the web project’s main folder, though you don’t have one yet. If you then click on the folder’s name, the drop-down menu will appear again, where you can open a new folder or go to one that you have previously loaded.
For dealing with individual files, you can click on them to show a preview. If you double-click on the file, a new section will appear in the left-hand panel called Working Files. This will contain all the files that you have double-clicked on and are editing. When you have finished editing, you can click on the x next to the file name. Doing so will remove it from the Working Files section. This is how Brackets handles the files UI so that you can stay more organized.
That’s a basic overview of the Brackets code editor. If you would prefer using a different editor, feel free to do so. The major editors like Atom, Sublime, VSCode, Notepad++, or others will all work fine for this course.
Part 2
In this lesson, you will learn some tips on how to work more efficiently in the Brackets code editor.
Useful Features to Enable
The first few tips are regarding three different settings in the View tab. They are Line Numbers, Word Wrap, and Highlight Active Line.
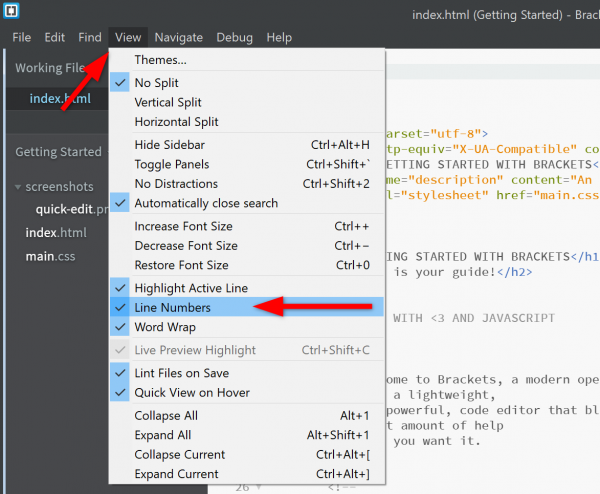
By default, Line Numbers and Word Wrap should be on. Line Numbers will turn on the line numbers, which is very useful for doing troubleshooting. Word Wrap will make sure that after a given point, the text will wrap to a new line so that you don’t have to scroll horizontally. The Highlight Active Line setting will not be on by default. This setting will make it so that the line you have selected is highlighted. It can be helpful so that you know where you are working in your code. If you’d like to have it on, click on the setting.
Another helpful setting to enable is found under the Edit tab and it is called Auto Close Braces.
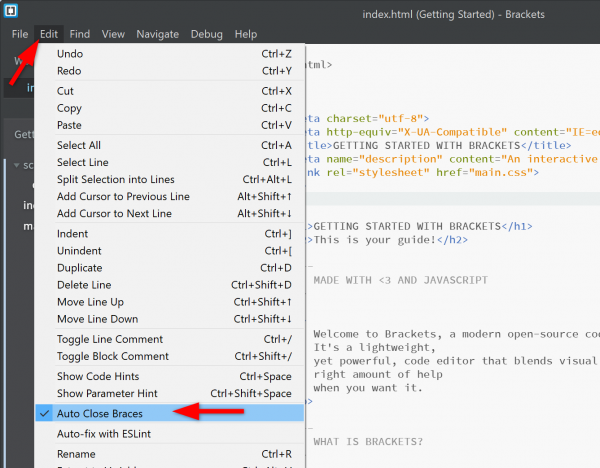
This may already be on. If not, it is advised that you turn it on. It will automatically put in the closing tag when you write the opening tag of an HTML element. This setting will save you a lot of typing, plus you don’t have to worry about forgetting the closing tag.
The last helpful feature is the Live Preview function of Brackets. This will show an update to date preview of the code you are writing. You can find this under the File tab, or by using the shortcut Ctrl + Alt + P, or by clicking on the lightning bolt button on the right-hand side of the screen.
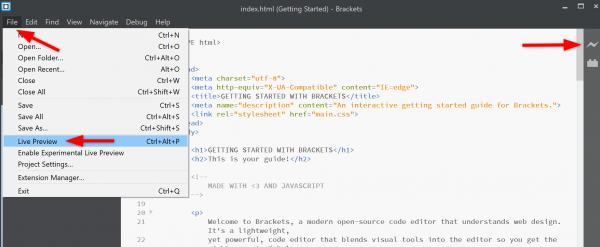
This will open a new page in Google Chrome that will display the current page that you have open inside Brackets. This web page will continuously update as you edit the code in Brackets without you having to manually refresh anything.
This feature isn’t perfect and you may occasionally have to refresh it manually. It also only works for Google Chrome, so if you use a different web browser you unfortunately cannot take advantage of this feature. However, even with these slight issues, it is a very helpful feature.
Hopefully you find these tips helpful for working with the Brackets code editor. They should allow you to work a little faster once you start coding for your web projects.
Transcript 1
Hi there, I wanna welcome you to this HTML 5 and CSS 3 course. My name is Geoff Blake, and I’ll be your instructor, your guide during this course. Now the purpose of this course is to reinforce some important HTML and CSS concepts for you and to help you go further into the world of responsive web design.
So we’ll start things off by getting the code editor that we’re gonna be using, Brackets, set up properly and then we’ll go into a short review of HTML and CSS to really reinforce some key important concepts that are critical for you to know. And even if you’re comfortable with web design already, I’m sure that there’s gonna be some key distinctions, some critical points, that you’re gonna pick up on here.
And then once we get through that, we’re gonna dive into this thing called media queries, where you’ll gain an understanding of exactly what they are and how they work and you and I are gonna create a simple example together to showcase exactly how media queries work.
And then after that we’re gonna jump into CSS Flexbox. Have you heard of this before? This is an improved method for building page layout structures that take very little code to pull off, so you’re gonna see exactly what that’s all about. And then finally, you’ll be introduced to something else called CSS Grids, which is a newer approach for building page layouts and structuring your content.
So I hope all of this sounds great. Without further ado, let’s jump into it.
Transcript 2
Okay, let’s jump right into it. The first thing that we need to do – the first order of business is to get you set up with a code editor. Now there are tons and tons of different code editors available, some are free, some are paid, some are modern and new, others are a little older and outdated. It doesn’t really matter which one you use, and truth be told it really boils down to personal preference, but here I’m gonna be using a code editor called Brackets.
So if you want to use the same code editor that I’m using, head over to Brackets.io, and you can go ahead and download em and install ’em on your side. Installation is very simple, in fact it’s so simple that it isn’t even really worth spending time here walking you through the process. I’m sure you can handle it on your own. If you’re using a different code editor, perhaps you’re using Atom on your side, or maybe Notepad Plus Plus, or Sublime, whatever you want to use it doesn’t really matter I really have to stress that.
The only- the only exception is you can’t use a Word processor, you can’t use an application like Microsoft Word or you know maybe Google Docs. You know something like that, you can’t use that you have to use a dedicated code editor.
Okay, so once you have Brackets installed, he’ll look something like this on your screen, this is what you’ll see here. And lemme kind of give you the lay of the land at least here inside Brackets just to make sure that we’re all comfortable here, we’re all on the same page. Obviously this main area here is our work area. Over on the left hand side you’ll see a vertical sidebar, and you may see something slightly different on your side inside Brackets than what we’re seeing here. You might see code, you might see something like this, okay and that’s perfectly fine.
Now, what I wanna do here is I wanna set up our web project and get that loaded into Brackets, and lemme kind of explain how this works here, because, for whatever reason, a lot of people find this a little bit confusing. I’m gonna drill all the way down to my desktop just for a moment, and sitting on my desktop I’ve got my project folder and it’s inside this project folder where I have all of the files that you and I are gonna be working on.
And I hope you know this already, but again just to make sure we’re all comfortable here, here’s the deal. Here’s how it works in web design in web development. When you’re working on a web project, all of the files that are a part of your project have to reside inside a single folder, so I’m talking about all of the HTML files, all your CSS files, all your graphics, all of your supporting files, any media files that you have, all that stuff has to reside inside of a single folder.
Now as far as Brackets is concerned, here’s how it works. Back inside Brackets, Brackets can only think of, or it can only think about one web project at a time, and this is because typically how you’ll be working is, you’ll be working on multiple files at any given time, not single files. Okay so check this out, what I’m gonna do is go over inside the vertical sidebar over on the left-hand side.
Here it reads ‘getting started’ towards the top, that’s actually a drop-down menu and what I’m gonna do is I’m gonna click on ‘open folder’, and then what I’m gonna do is I’m gonna go and navigate to wherever my web project folder is located. For myself here, obviously, it’s sitting on the desktop there. I’m gonna go and select ’em and open ’em up, and then that loads that project and all of his corresponding files into the sidebar inside Brackets. So that’s how it works, so everything that I see here I also see down on my desktop. Anything that happens here also happens down on the desktop, that’s the deal.
But as I was saying just a moment ago, Brackets can only think about one project at a time. If I want to switch over to another web project, I can go to the drop-down menu up towards the top, and I can go and switch back, for instance, back to ‘getting started’. Then that project loads in. So Brackets does not multitask. Brackets focuses on one project at a time, and we can flip back and forth between those projects from the drop-down menu inside the sidebar,.I hope that make sense.
Now what we can do here this is kinda neat this is kinda cool. We can single click on individual files if we want to kinda get a preview of those files, or what I could do is I could double click on a file and what that does is that actually divides this vertical sidebar in two, top and bottom. We now have a working files area and then of course the project down below. So I can go and double click on some files, I could begin working on those files and then when I’m finished working on those files I can simply close out of them and they get removed from that working files list. That’s the deal that’s how Brackets works -that’s how Brackets thinks. I should say really about your projects and how you can open up files inside your projects.
Transcript 3
Now, before we really get ripping into code and really start working on things, I wanna throw a few tips related to working with Brackets your way.
So here’s what I’m gonna do. Over on the left-hand side, go ahead and double click on Index.html – if you are following along on your site. And these tricks, these tips that I wanna show you will just help things move a little bit faster for you inside Brackets.
The first batch of options that I wanna show you reside underneath the View menu. So I’m gonna head up to the View menu here. Make sure that Line Numbers is turned on. If you’re not sure what that is, that’s the line numbers that appear over inside the vertical column there, over inside the sort of the margin area, if you will. This is really handy when you’re trying to troubleshoot things.
As a matter of fact, I was just troubleshooting something yesterday, and I was writing down on a scrap piece of paper which line number I was working on so I wouldn’t lose my spot. Or, as a matter of fact, just yesterday, as well, I was communicating with another developer and I was showing him a file, and I said, “I think there’s a problem “on line number,” (it escapes me, exactly what line number it was). But, “Line number 12, there’s an issue there, can you take a look at it for me?” Things like this. So line numbers come in very, very handy.
So, from the View menu, make sure you have Line Numbers turned on. Also, I would strongly suggest that you have Word Wrap turned on, as well, to avoid horizontal scrolling. These two options, by the way, Line Numbers and Word Wrap, they should be turned on by default. Okay?
Now, the other option that I wanna show you here is just above those two: Highlight Active Line. You can turn this on if you want. And what will happen is the active line that your cursor is currently on will, obviously, highlight, as you can see there. This makes finding your place inside code a lot easier. It’s entirely up to you if you wanna have Highlight Active Line turned on or disabled. Up to you. Okay?
Now, the next item that I wanna show you, this guy is critical. He’s found underneath the Edit menu, down towards the bottom there. Auto Close Braces. Make sure this guy is turned on. What that will do is, as you begin typing out some HTML code, perhaps something like this, and I go and close a tag or an element, it will automatically throw in the closing tag for me, which is huge. Because if you’re like me, you’re always forgetting to close your HTML elements. Anyway, there you go. I wanted to show you that.
The last thing that I wanna show you is unique to Brackets here as well. It’s a feature that Brackets has that no other code editor has. And this is called Live Preview. Essentially, Live Preview connects Brackets directly to Google Chrome and updates Chrome instantly and automatically as you and I are working on our web projects. So this means there’s no need to save your projects and refresh your browser, and, you know, this sort of thing, constantly going back and forth.
How do you activate ’em? Well, you could head to your File menu if you want, and then head down to Live Preview. That’s perfectly fine. Or you can use your handy keyboard shortcut, that’s fine as well. But I think what most people do is they head for the Lightning Bolt icon way over in the top right corner. Go ahead and click on that guy. And that will fire up a new instance of Chrome, and it will load in the page, the current page, that you have open inside Brackets. And, as I’m saying here, what’s great about this is any change that you make here is automatically going to update inside Chrome for us. No saving, no refreshing, nothing like that, which is great.
Now, I have found that Live Preview can sometimes flake out. Sometimes the connection is lost. Sometimes we do have to do an actual refresh, you know, things like this. The other thing that I wanted to mention, too, is it only works with Google Chrome, unfortunately, and it’s only going to preview the current file that we have open inside Brackets.
Anyway, I wanted to bounce these tips, these tricks, these aspects of Brackets off of you so that you can work a little bit more efficiently with your code.
Interested in continuing? Check out the full Responsive Web Design for Beginners course, which is part of our Full-Stack Web Development Mini-Degree.
