You can access the full course here: Unity 2D Projects – Super Plumbers
Table of contents
Part 1
Project Setup
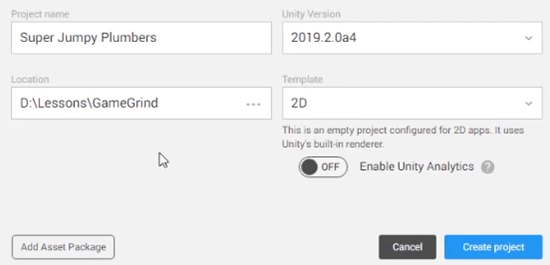
We will start this lesson off by opening Unity and creating a new project. This project will be called Super Jumpy Plumbers and use the 2D Template. We will be using version 2019.2.0a4 for this project.
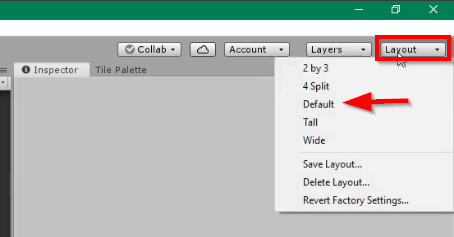
Once the project loads, it’s advised for you to hit Layout in the top right corner and click Default. This way our Unity screen setups will match.
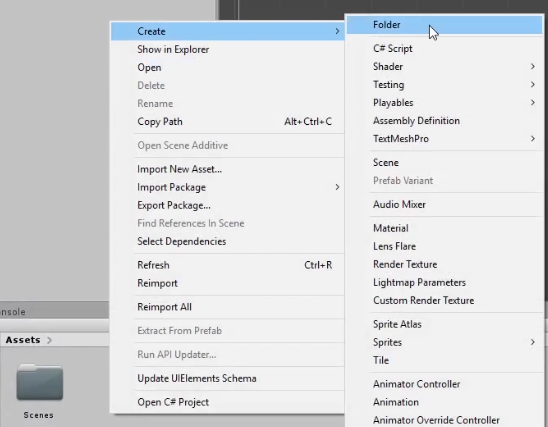
Let’s move onto our assets. Down with the assets folder, we’re going to right-click, select Create, and then select Folder. We will call this new folder Sprites and use it to store our sprite assets. Once you choose some sprites, you can drag and drop the sprite PNGs into the Sprites folder in Unity.
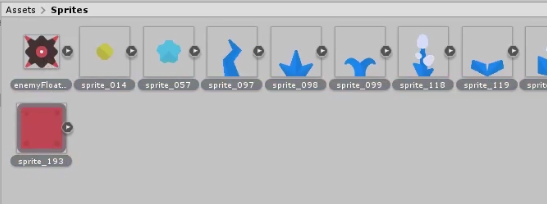
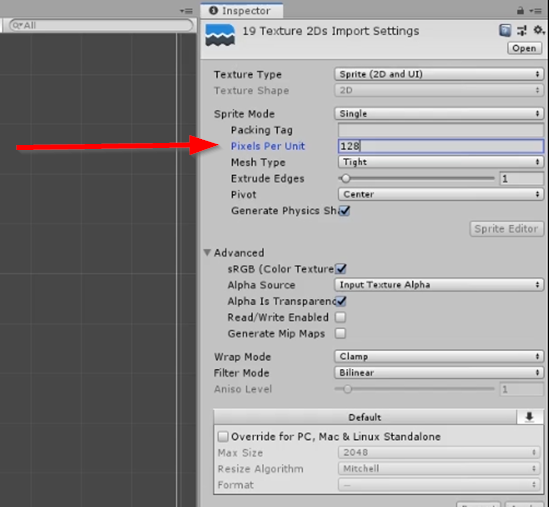
After adding the sprites, select the first sprite, hold shift, and select the last sprite. This should select all the sprites. With them all selected, we want to change the Pixels Per Unit in the Inspector to be 128 and Apply the change. Our sprites are 128×128 in size, so this change will allow Unity to recognize each sprite as one unit by one unit.
Sprite Atlas & Tile Palette
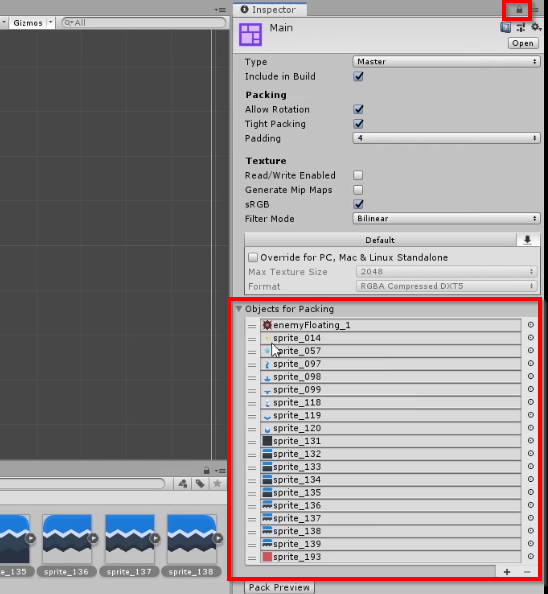
Our project setup is done, so let’s work on our Sprite Atlas. In the Sprites Folder, right click and Create a Sprite Atlas called Main. Our Sprite Atlas will essentially make a map of the sprites in our project. In so doing, Unity can load in this single asset and use the map to locate the sprite it needs to load in at any moment.
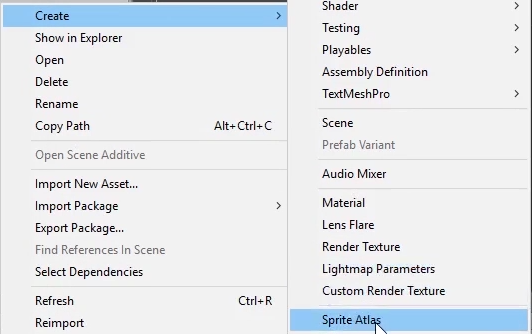
After creating it, click on the Sprite Atlas and turn to the Inspector. At the top, we want to hit the Lock icon so that our Sprite Atlas is safe from mis-clicks for the moment. After which, we can take all our sprites and add them to the Objects for Packing list in the Sprite Atlas.
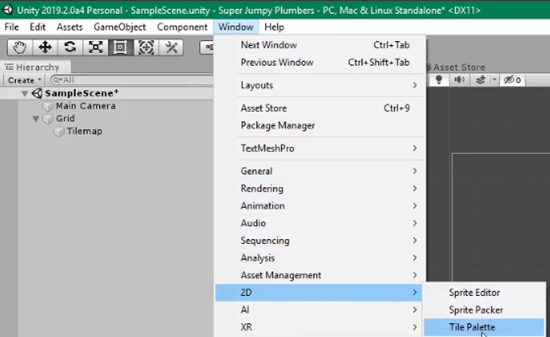
Right now, though, our sprites are just images on the Sprite Atlas, and we need to make a proper Tile Palette to use them. Within the Assets, we’re going to Create a new Folder called Tiles. Next, we can select Window in the top bar menu, select 2D, and select Tile Palette.
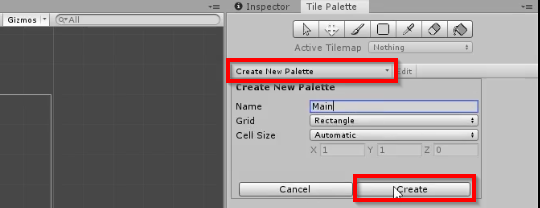
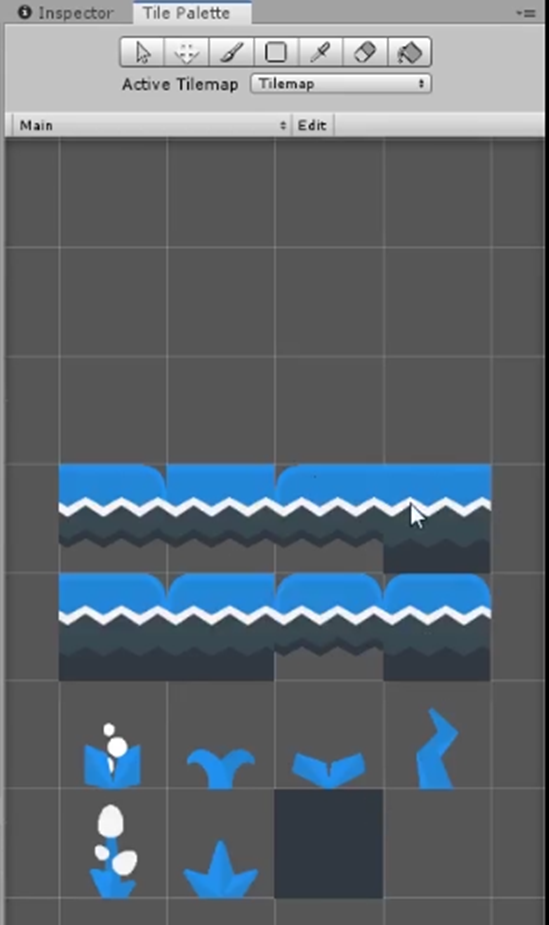
This will pull up a new window, which we will dock next to the Inspector. Once docked, we can select Create New Palette to create a new Tile Palette called Main. We will save this in our Tiles folder for our project.
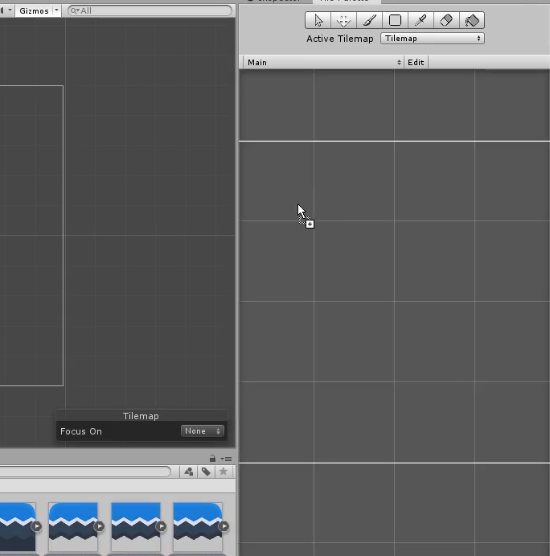
After which, we can easily add our sprites to the Tile Palette by selecting them all and dragging and dropping them into the Tile Palette. Once again, we want these saved in the Tiles folder.
Tilemap Painting
We’re now ready to setup and paint our Tilemap. We want start by making a new Tilemap, which we can do by locating the option in the 2D Object submenu of GameObject.
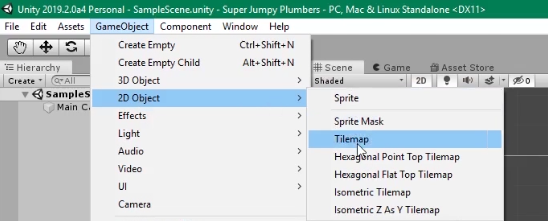
In the Hierarchy, we will see two things created. The Grid object is just a simple grid setup to help with snapping. As a child to it though is our Tilemap which is where we will paint our actual tiles onto the scene. When it comes to painting our Tilemap, we want to do it in layers. One layer will consist of platforms that the player can actually collide with. Another layer will consist of our decorations which won’t collide with the player at all. A third layer will also consist of platforms, but their functionality will differ. Rather than colliding with the entire platform, we want to allow the player to jump through them and only collide when then land from the top.
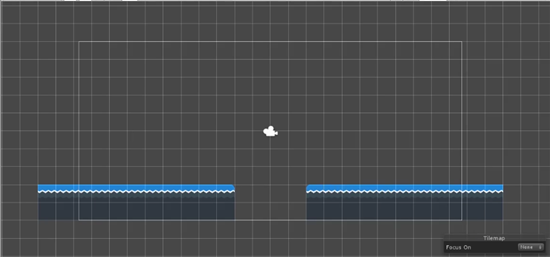
Knowing this, let’s start painting our map. First, we will rename our Tilemap to Main and make sure that’s the GameObject we’re on. Then, from the Tile Palette, we can select the brush and begin painting our first layer which consists of the ground platforms. You can paint whatever sort of ground look you want, and feel free to experiment with other tools from the Tile Palette such as the eraser and selector tool. However, be sure to create a bit of overlap so that when we add the screen wrapper later on, objects have time to teleport before falling.

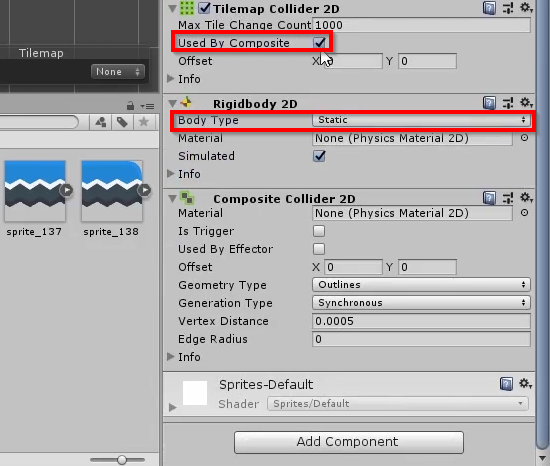
Once you’ve painted the Main layer, head over to the Inspector and Add a Tilemap Collider 2D Component. This will automatically create a collider that matches the size of each tile. However, since it’s inefficient for each tile to have it, we will also Add a Composite Collider 2D Component. With this we also get a Rigidbody 2D Component, which we need to set to static so the platforms don’t react to gravity. Finally, we can select Used By Composite in the Tilemap Collider 2D. This will composite the colliders smartly, turning several colliders into one big collider.
Our first layer is done, so let’s get our decorations in. From the Hierarchy, we can right click Grid, select 2D Object, and select Tilemap to make a new Tilemap layer. We will appropriately call this Decorations.
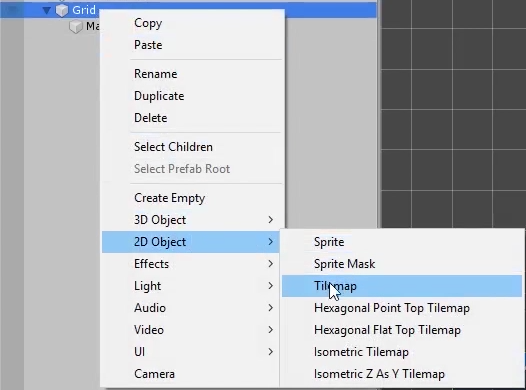
Before doing any painting, though, make sure that the Active Tilemap in the Tile Palette is Decorations.

Afterwards, we can paint the decorations onto our scene.
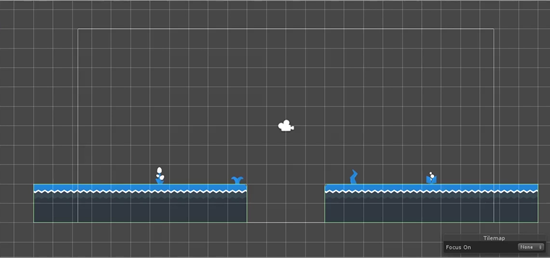
These decorations don’t need anything special, so we can right click Grid again and create another new Tilemap called One-way Platforms. Once again, make sure the Active Tilemap is One-way Platforms before you start painting. Like before, we can then paint our special layer of platforms.
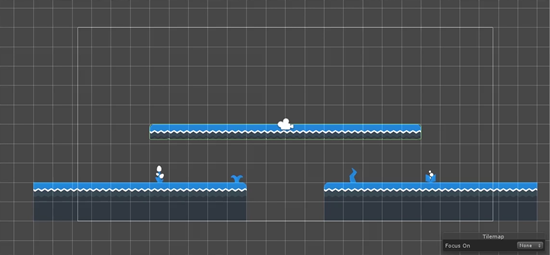
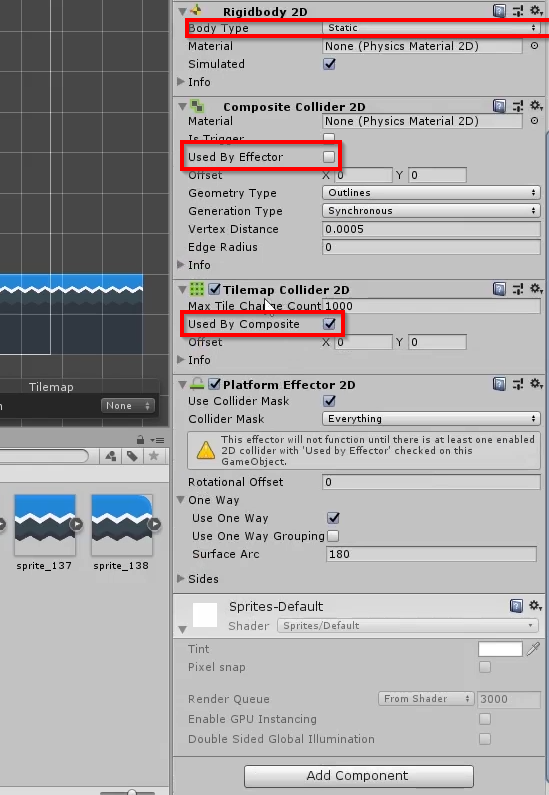
As mentioned, this layer will have some collision, but allow the player to pass through the tile when they’re jumping up. To add this, we need to repeat the process we did for the Main layer and Add the Tilemap Collider 2D Component (set to Used by Composite) and the Composite Collider 2D Component. Once again, we also will change Rigidbody 2D to be static.
However, there is one more component we need to add: Platform Effector 2D. This has a special option called Use One Way which will give us the functionality we want. For it to work, though, we need to select Used By Effector in the Composite Collider 2D Component.
This concludes our first level creation. In the next lesson, we will work on our player character controller.
Part 2
In this lesson, we’re going to set up our player character controller using the Platform Controller 2D from Unity’s Standard Assets.
Importing Standard Assets
Within Unity, we’re going to go into the Asset Store tab and search for standard assets. Once you locate them, we can Import them into the project.
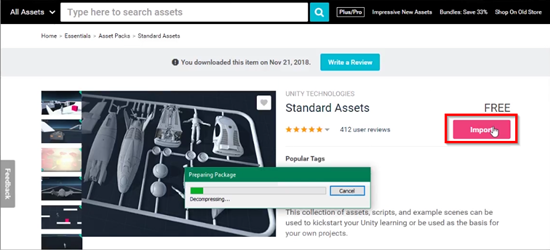
By default, this package comes with a lot of things we don’t want. As such, once the screen gives you the option to select what to import, we want to uncheck most of it. All we want from this package are the 2D, CrossPlatformInput, and Editor folders from the Standard Assets. Once your selections are changed, you can feel free to hit Import in the bottom right corner.
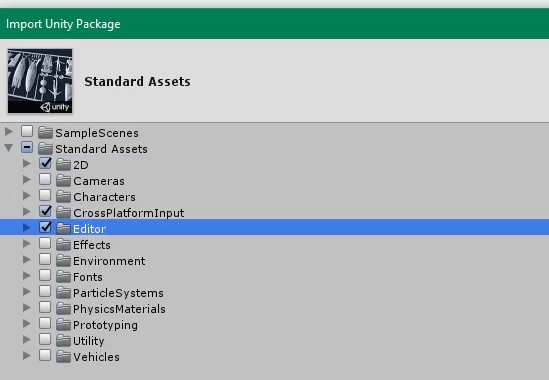
However, in the StandardAssets/Editor folder, delete the Water folder after the import is complete.
Adjusting our Assets
Back in our scene view, we want to navigate to our Standard Assets/2D/Prefabs folder and drag the CharacterRobotBoy onto the scene. Once dragged into the scene, we will change the Transform scale of the character to be 1.3 on the X and Y Axis.
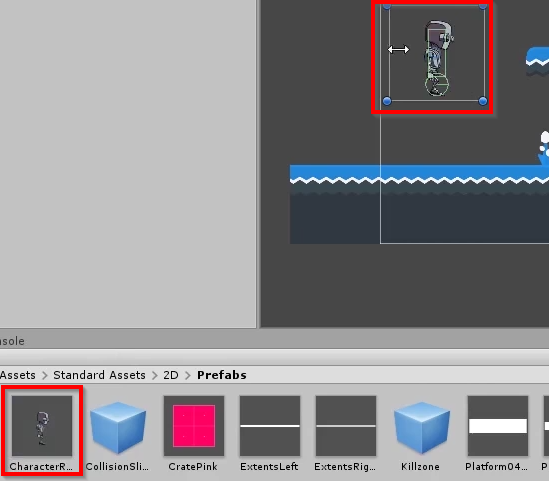

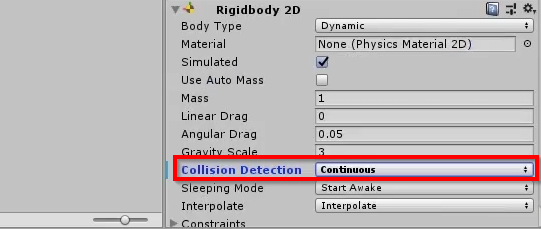
In the character’s Rigidbody 2D Component, we want to change Collision Detection to be Continuous. This way the character won’t get stuck in the ground when hitting the platforms.
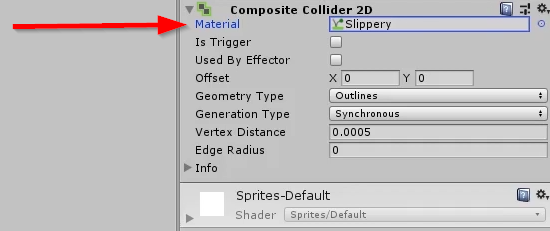
Next, we need to fix the fact that right now our character will get stuck in walls when that collision happens. In the Main Tilemap and One-way Platforms Tilemap, we can head to the Composite Collider 2D Component in each and change the Material to be Slippery. This is a material that came with our standard assets and removes friction from the platforms.
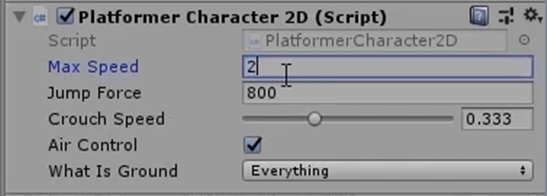
We can hit playtest at this point, and our character is completely functional and able to jump about! Keep in mind the character has a Platformer Character 2D (Script) Component on it which let’s you change several elements like the max speed. We’re leaving the defaults, but you can change the settings as you wish.
In the next lesson, we will work on our enemies and get them moving.
Transcript 1
Hey guys, my name is Austin Gregory and in this course, I’m gonna teach you how to create a classic arcade-inspired game of Super Jumpy Plumbers.
We’re gonna be able to hop and jump our way to high scores, killing enemies and collecting coins along the way. So, these guys will fall off the bottom of the screen here, and they’ll warp to the top, just like that. I can jump on their heads and kill them, and if I kill all the enemies and all the enemies have been spawning, then we’ll go to the next level. I have a one-up here I can collect, pretty cool. And the enemies hit each other and they go the opposite direction, just to make it where they can just kind of go crazy. Notice, no matter where they warp, they will come out the other side.
If I collect these coins here, I get extra points, just like that. And there we go, and back to the beginning. However many levels you would like to have. I just have a couple of levels in the demo, but of course, that’s completely up to you. And also, you can warp across the screen, not just the enemies, anything that you want to add the component to that we write, you can do.
If I die, I have a little spawn point set up right here that’s gonna spawn me back in. We’re gonna learn a lot of cool, simple stuff. And this is all gonna be very basic C#, nothing too advanced, and I’m gonna talk you through most of everything. As long as you have a basic understanding of C#, you’ll be doing all right.
So again, my name is Austin Gregory, and I will see you in the first lesson.
Transcript 2
Hey guys, welcome back. In this first lesson, we’re going to start by laying out our very first level for our Super Jumpy Plumbers. We are going to create a Sprite Atlas, that’s going to keep all of our sprites we’re gonna be using in one simple little atlas. Then we’re gonna reference those sprites in that atlas to create tiles, and we’re going to build a tilemap with. Then we’re gonna use that tilemap to paint our levels, at least one level in this lesson.
So what I want to do is create a brand new project from Unity Hub here. I am going to click on new. I wanna call this Super Jumpy Plumbers. I am going to use the latest version available to me, which is 2019.2.0 a4. This is still in beta, but it works pretty good. And we’re gonna make sure that we select 2D as the default template. And create project.
Now inside of this folder, we have some sprites we’re gonna be using to lay out our levels. There’s a few different styles in here that we can choose from, but I am going to be going with these blue ones I think will work pretty good for this. And then we’ll also use our little red guy here as our enemy. And we’ll just find something in here that will work pretty good for our spawners. Maybe these style tiles like that.
So the first thing I wanna make sure I do is go up to layout and go to default. So we all have this exact same layout here. And I wanna create a new folder that’s going to hold my sprites. That way I can just drag and drop some sprites that I wanna use right into Unity. So I wanna use some floating platforms, these right here will work pretty good. So holding down Shift, I’ll just select these three, drag these in into my sprites folder. I also wanna have some non-floating platforms, some just like solid grounded platforms. So I’ll select these right here, and drag those in. Maybe just a single tile platform that has the edges all around it and is also floating could be useful. And maybe the one that’s not floating as well.
Also, we can grab some decorations here. Holding the Control now, just selecting a few of these. This solid blue tile which is going to be the tile that goes under our ground tiles. Also the object for our spawners, the thing is going to spawn our enemies. I’ll use this red sprite right there. I’ll use this as my enemies. And I also wanna have a coin and some kind of gem that can be our life. So it’s gonna be like a bonus point if we get that. And this can be a one-up or like a one man. So we’ll just bring these into our sprites folder.
Now again with Shift, selecting all of these, I wanna make sure that I have the pixels per unit set to 128. And that’s because my sprites I know by default are 128 by 128. So I wanna make sure that in Unity, one sprite is one unit by one unit. That will give us that result.
Now inside the sprites folder, I also wanna create a sprite atlas. And this is going to be a map that we can put all of our sprites into. And whenever a sprite is referenced that is in this atlas, it’ll make it a lot more efficient, because it will have to just simply reference this one asset. And then using a coordinate find the sprite it wants and grab that sprite. Instead of having to reference an individual sprite that is just on its own, you have to bring in each individual sprite. This let’s you just load in the single atlas and then grab the sprite it wants.
So I’m gonna call this main. So now with my atlas selected, I wanna click on the lock here so we’ve actually locked the Inspector. That way, if I select something else, it is still selected. And then I will take all of these except for my atlas and drag and drop it onto the objects for packing. That’ll make sure it adds it to this atlas. Now if I click pack preview, we can see this is what my atlas looks like.
The next thing I want to do is use these sprites for a tilemap. So we can actually start painting tiles in our game. Right now they are just tiles on a sprite atlas. Right now they are just sprites on a sprite atlas, but I wanna make a tilemap from these sprites. So I’ll create a new folder called tiles. And now I want to go to game object, 2D object and I wanna create a tilemap. And this will create a grid object with a tilemap child.
So if I look at this, if I unlock the Inspector here, we can see that the grid object just has a grid component which allows us to easily define a grid with a size and a gap and the type that it is. And the tilemap is actually the tilemap that’s going to render our tiles. It’s where we can paint our tiles onto it.
But we don’t currently have a tile palette of tiles to paint onto our tilemap. So if I go to Window and I go down to 2D tile palette, I’m just going to dock this over next to my Inspector here. I wanna create a new palette in the drop-down above, so I go to create new palette and I’ll call this one main as well just to keep it very simple. And click create. And I wanna create this inside my tiles folder. Select folder, now all I have to do is take the sprites I want to add to my tile palette. So we can paint them onto our tilemap. So I’m just going to select those, holding down Shift and let’s drag and drop them right into my tile palette. And again, I wanna put this in the tiles folder. There we go, very simple.
All I have to do is just take, and I can paint these right into my scene. So to do this, what I wanna do is I wanna paint on a couple of different layers. I want to have my layer that’s going to be the collision layer. So if my player’s walking on the ground, we will have a collision mask on that or just a simple 2D collider on the ground tiles that the player can stand on top of. I then wanna have my decoration layer, which is just going to my plants, so that you don’t interact with them, but they’re still on a tilemap and they’re still rendered the same way. They’re just not on the layer that has the colliders on it.
And then I wanna have another layer that’s going to be for the two-way platforms. They are going to be, they are going to have 2D colliders on them but they’re going to have an effector that says these interact a little differently than a standard collider, because you can’t collide with them if you’re coming from below them. But if you’re coming from above them, you can collide with them. So it’s a little different, so we’re just gonna put that on different layers so we can add the effector to those colliders only.
So I wanna select my paintbrush and I’m gonna be on my main tilemap, I’ll call that main tilemap. And I’m simply gonna paint my ground tiles. So I’ll take this with my paintbrush selected, and I’ll just paint. And in fact we’ll add a little gap in the middle here. Just take that one. And then take that one. And then I’ll just erase this. And perhaps I wanna raise this other bit so we’re gonna add some ground below it. I’ll just select those with the selection tool and then grab my move tool and drag ’em up. And then I can paint below that. Just like that.
And I wanna add a little overlap off the side of the screen here. Just because of the way our screen wrapping is going to work. I don’t want the objects, if they walk off the right side of the screen to start falling right when they get off the side of the screen, because we wanna give them a second to be able to teleport to the next side of the screen. Which we’ll get into that later on, but I just wanna make sure that we have a little, a little ground hanging off the side of the screen here.
And now with this specific tilemap, the one that we painted the ground on, I wanna add a tilemap collider 2D. And what this does is it adds a simple collider that will kind of match the shape of the tile to each individual tile. But I don’t wanna do that because there’s no reason to have all these individual colliders whenever it just all needs to be the same collider. So what I can do is add a composite collider 2D to the same object.
Now this will add a rigid body 2D to it for the way that it actually works and the way it calculates it, but that’s fine. What I do wanna do is make sure that it’s just static, it doesn’t actually fall with gravity or you can’t push it around, it’s just there. And what I wanna do then is take my tilemap collider and say that it is used by composite. That will let the composite collider kind of override the tilemap collider and do its thing with it. Now we see it’s just one big collider. And that’s exactly what we want. It’s on both sides here because of how it works.
So now I wanna create another tilemap for our decorations, so right-click on grid, 2D object tilemap. And I will call this decorations. And I wanna make sure that I select decorations as my active tilemap and, with that selected, and I wanna just grab and paint a few with my paintbrush selected. A few decorations on the ground here. Just like that. Now these do not need colliders on them, they don’t need to be able to interact with the player in any way. They just need to be there in our world as decorations.
And the next tilemap I wanna create is going to be the one-way platforms. Now this is separate from the other ones, like I said, because it has to have an effector that changes the way the colliders work for just these tiles. For instance, the way it’s gonna work is if our player is lower than the platform, if the y-value of the player is lower than the platform, then we’re not really gonna be able to collide if we’re trying to jump through the platform. But if it’s greater than the platform, then we’re gonna be able to collide with the platform. Now it’s a little more complicated than that but luckily for us, Unity handles it with a simple component.
So what I wanna do with this one is I wanna create another composite collider on it, which will add a rigid body once again that we wanna make sure that that’s static. And I wanna add a tilemap collider once again and say this is used by composite.
So now if I wanted to start painting on this one-way platform selected there. Paint on this with this guy here and then we can just draw this out. We can see the collider being generated as we go, which is very cool. That seems uneven, there we go. And the last thing we have to do for this to work is simply add platform effector 2D. And it says it will not function unless there is one enable 2D collider we’ve used by effector. So what that means is our tilemap collider which is used by composite, so it’s letting the composite kind of override its settings, I need to make sure now that the composite collider which is now in control pretty much says, okay this can also be used by something so used by effector. So this handles what this can do.
And this handles what that can do which again handles what this can do. Pretty simple stuff.
And there we have it. We can see the direction that we will collide with and the direction we will not collide with. You can change this by changing the surface arc by saying it’s not one way. Offsetting the rotational value just like that. But for us, a default is exactly what we want.
And that’s gonna be it for our first level and for our first tilemap setup. We’re gonna add more levels later on with some more. Maybe a couple more levels at least with some more tilemap stuff going on. But this should get us started.
So in the next lesson guys, we’re going to start working on our player character controller. We’re gonna use the one provided by Unity and just make some tweaks to make it work for us. That’s the next lesson guys. My name is Austin, and I will see you there.
Transcript 3
Welcome back, guys. In this lesson, we’re going to set up our player character controller using the Unity 2D Platformer Controller from its Standard Assets. We’re going to build a little character using that – we’re gonna pretty much use the standard prefab that comes with the asset. We’re gonna make a couple tweaks to some of the settings for that component, and then we’re gonna have our guy running around in our level.
So let’s jump into Unity. What I wanna do is go to the Assets Store tab, and I wanna search for standard assets. This is the one we want right here. and all I have to do is simply click Import and import this package. Now, this will come with a lot of stuff that we simply do not need, but we’re going to try to break it down to the things that we do need.
So if I were to just take and just minimize everything, just like that, I can see, I don’t want any of the scenes, I don’t even need the setup scenes. I’m gonna want, I’ll just take all of this and collapse it down as well. It’s a lot of stuff. So, I do not want cameras, I do not want effects, I don’t want the environment or fonts or particle systems, so no physic materials, no prototyping, no utility and no vehicles. All I want is a 2D, I don’t want the characters because the 2D character is inside of the 2D folder, and I want the cross-platform input and the editor. Import those packages.
And after we’ve done that, go back to our scene view here, and I wanna simply go to my Standard Assets folder. I wanna go to 2D, go over to prefabs and we have character robotboy.prefab. Drag this guy out into our game world. Now, he’s a little big, I’m gonna make him just like one by one, maybe like 1.3 by 1.3. That might be fine just like that. And we have an error that is something in editor, yeah, we have water, we don’t want water, we should have deleted that import as well. That way, we can actually compile.
And then just by clicking Play, we have a little guy in our scene here that we can run around our level. And notice, so sometimes whenever I’m falling into the ground, I’m falling pretty fast, I seem to get stuck in my platform, which is not what I want to do. A couple things we could do here, but one thing I wanna try is just by taking the collision detection and setting it to be continuous on our character. That way, it’s constantly checking for collisions.
Let’s try this out, see if it can get stuck again. Notice, with that being set that way, when I fall into the ground, it’s a solid oomph. But if I have it set to discreet, fall to the ground, I kind of hit the ground and then rise back up like it’s trying to resolve the collision, but it’s a little late for that sometimes. So I wanna set that to continuous so we don’t have that problem. It’s a simple solution to a simple problem.
And to change the way that our character behaves, we can change some of the settings from the platform character 2D component that we have right here. So hold down Control, you can see that I crouch and walk, which is a pretty cool feature. I can increase the speed at which I can crouch and walk very simply. Crouching may not be the most useful for this, but it’s in there, so that’s fine. Max speed, you can change the maximum speed they can go. Now, those still accelerate up to that point.
Now, one thing I want to do is, if we try to run up against the wall here, like I do this right here, notice how it gets stuck in the wall. Now, that’s not great. It’s not what we want to do. So what I can do to fix that is if we go to our main tilemap, we go to our composite collider 2D and we can change the physics material 2D to be something slippery. Now, this is included in the standard assets, which is gonna just kinda remove the friction from our collider – from the collision that’s happening here. If we click on this material that we have, we can see Friction and Bounciness, they’re just both set to zero.
Now, we have Sticky, which is very frictiony, and then we have bouncy, which is a little bouncy and a little frictiony. So if we try it with the frictiony on, going up against the wall. I just hit it and slide down. That’s exactly what we want. We also don’t wanna get stuck on the side of our one-way platforms, so we can change the physic material for that as well to slippery. Very cool.
So that’s gonna be it for this lesson, guys. In the next lesson, we’re going to start working on our enemies. My name is Austin and I will see you there.
Interested in continuing? Check out the full Unity 2D Projects – Super Plumbers course, which is part of our Unity Game Development Mini-Degree.
