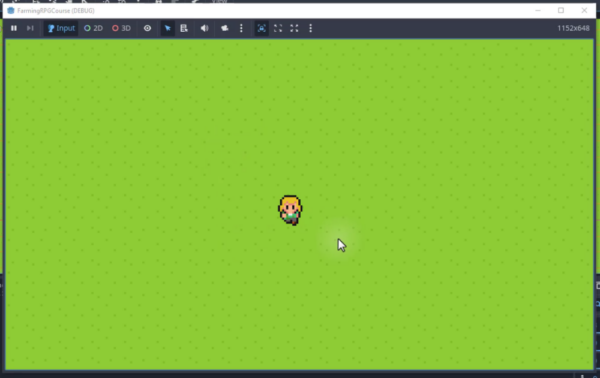
To set up a Godot farming game, you need a visible field, crop data, and a way for player input to reach your farm manager. Drawing on Zenva’s catalog of over 400 coding and game development courses, this tutorial guides you through those foundations, from painting farmland to routing tool input.
This tutorial assumes you know Godot basics and have a project with a player scene and the supplied farming assets. You will build the system’s structure here; crop growth and the actual tilling, watering, planting, and harvesting actions remain placeholders.
Table of contents
Download Project Files
The files and full project are available through the course included in the Godot 4 Game Development Mini-Degree. Choose that guided path if you want to follow the full project, or keep reading for the free setup tutorial.
Set Up Your Godot Farming Game TileMap
Start with a dedicated manager for the farm and a TileMapLayer for the ground. Together, these give you a place to organise farming logic and paint the field your player will walk on.
Creating the Farm Manager
First, create a central node to manage the farm’s state. It will track crops and handle farming actions such as tilling, planting, watering, and harvesting.
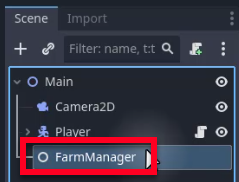
- Create a new, empty Node in your scene.
- Rename this node to FarmManager.
Setting Up the Farm TileMap
Next, add a TileMapLayer as a child of FarmManager. This node lets you paint the farm using a grid of tiles.
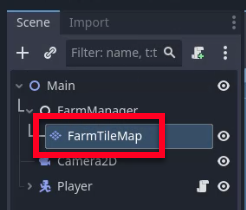
- Add a new TileMapLayer node as a child of the FarmManager.
- Rename this new node to FarmTileMap.
Configuring the TileSet
A TileSet resource contains the individual tiles you can paint. Create one for your tile graphics:
- Select the FarmTileMap node and locate the Tile Set property in the Inspector. Click on “[empty]” and select “New TileSet”.
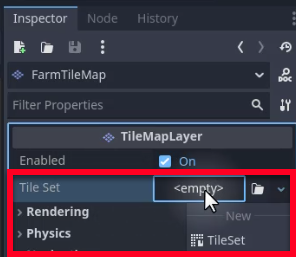
- Click on the newly created TileSet resource to open the TileSet editor panel at the bottom of the Godot editor.
- From the FileSystem dock, drag your tile sheet image (e.g., tileset.png) into the TileSet source panel on the left. Click Yes when asked about automatically creating tiles.
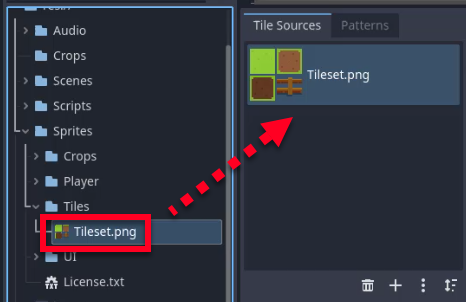
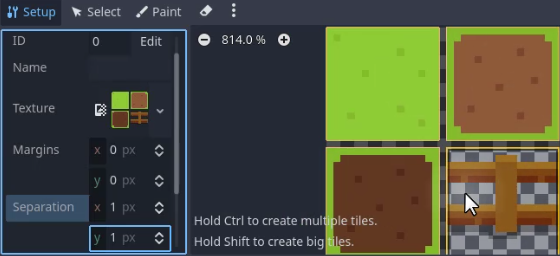
- If your tiles are not sliced correctly in the preview, you may need to adjust their properties. For a tile sheet with a 1-pixel border around each tile, navigate to the Separation property in the Inspector and set both X and Y values to 1. This will ensure the tiles are cut out properly.
Painting the Farmland
With the TileSet configured, you can now paint your farmland onto the scene.
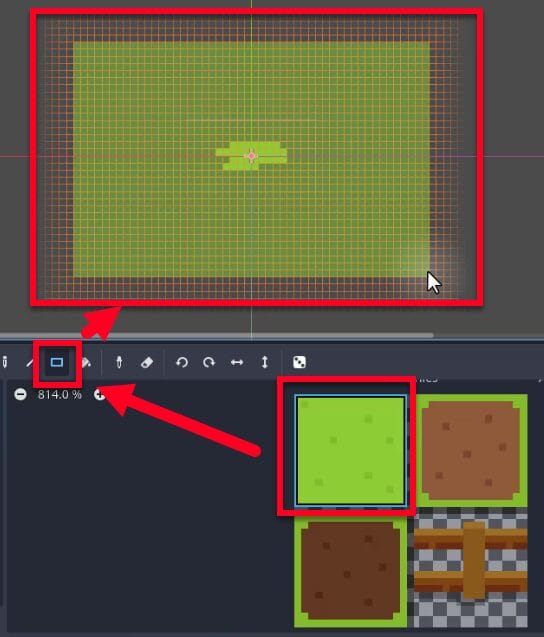
- In the TileMap editor panel, select the grass tile you wish to use.
- Select a painting tool, such as the rectangle tool, to efficiently cover a large area.
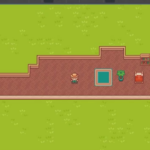
- Click and drag in the main scene view to paint the grass tiles, creating your field.
Adjusting the Render Order
If your player disappears after you paint the TileMap, the ground may be drawing on top of the character. Adjust its Z Index to move it behind the player:
- Select the FarmTileMap node.
- In the Inspector, find the Ordering section.
- Set the Z Index property to a negative value, for example, -100.
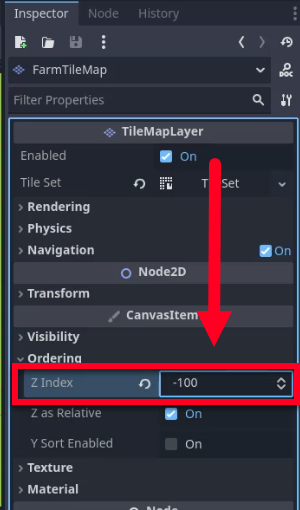
A lower Z Index ensures that the node is drawn behind nodes with a higher Z Index. By setting it to a negative value, your farmland will now correctly appear behind the player and other game objects.
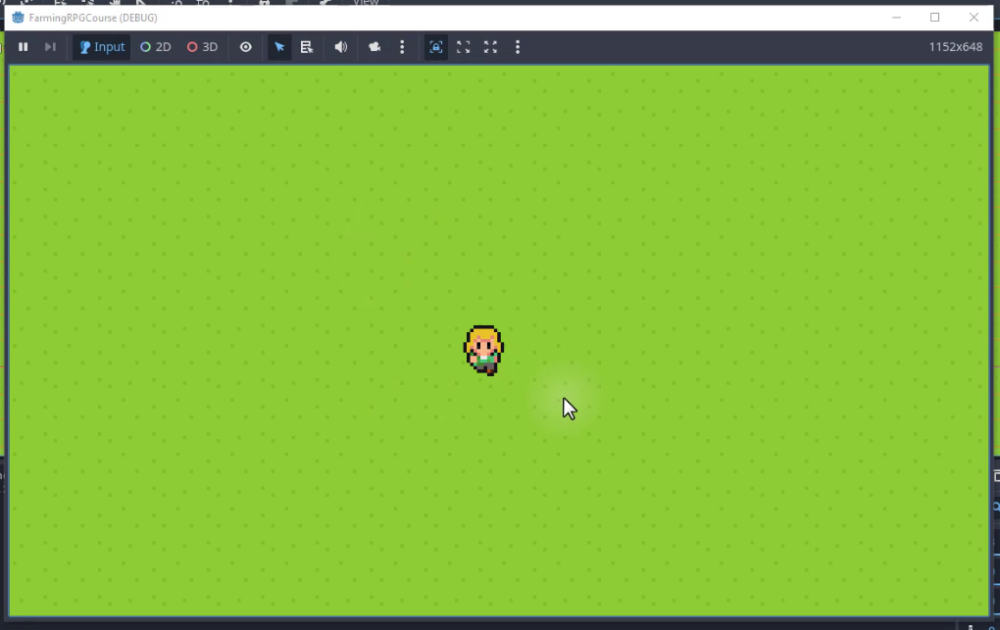
Your farmland is now visible behind the player. Next, define the data that describes each crop, including its growth stages and sale price.
Define Crop Data With Custom Resources
Rather than hard-coding values for each plant, you can define a reusable custom resource and edit each crop’s data through the Godot Inspector.
What Is a Custom Resource?
In Godot, a resource is any piece of data that can be saved to disk, including textures, audio files, scenes, and even plain data objects. By extending the built-in Resource class you can create your own data containers that behave exactly like built-in assets.
Creating the CropData Script
- In the Scripts folder, create a new script named
crop_data.gd.
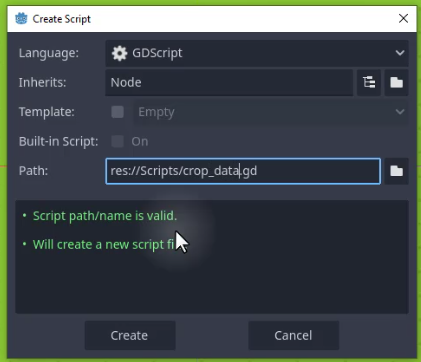
- Replace the default
extends Nodewithextends Resource. - Add a
class_name CropDataso the engine recognises it as a new resource type. - Add the variables shown below.
class_name CropData
extends Resource

@export var growth_sprites : Array[Texture]
@export var days_to_grow : int = 8
@export var seed_price : int = 10
@export var sell_price : int = 20
Understanding the Variables
- growth_sprites – an ordered list of textures that visually represent each growth stage, from seed to harvest.
- days_to_grow – how many in-game days must pass (while watered) before the crop is ready.
- seed_price – the cost to purchase one seed packet from the shop.
- sell_price – the money received when the fully-grown crop is harvested.
Creating Crop Data Files
With the script saved, you can now create individual crop data assets.
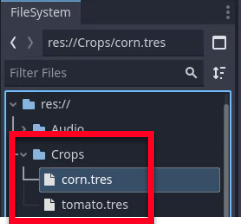
- Right-click the Crops folder and choose Create New ▸ Resource.
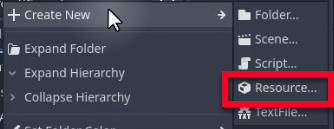
- In the search box type
CropDataand select it.
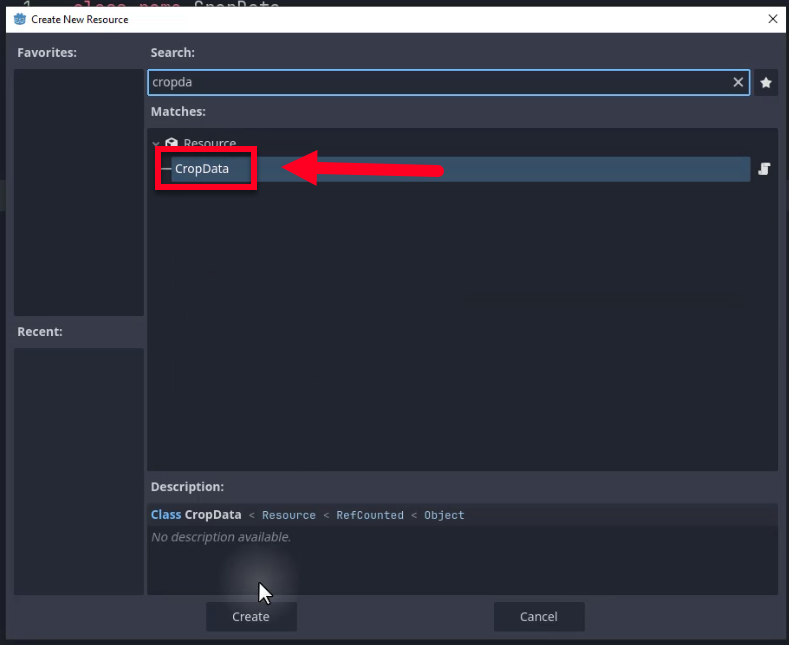
- Name the new resource
tomato.tresand press Create. - Repeat the process for
corn.tres.
Configuring Tomato Data
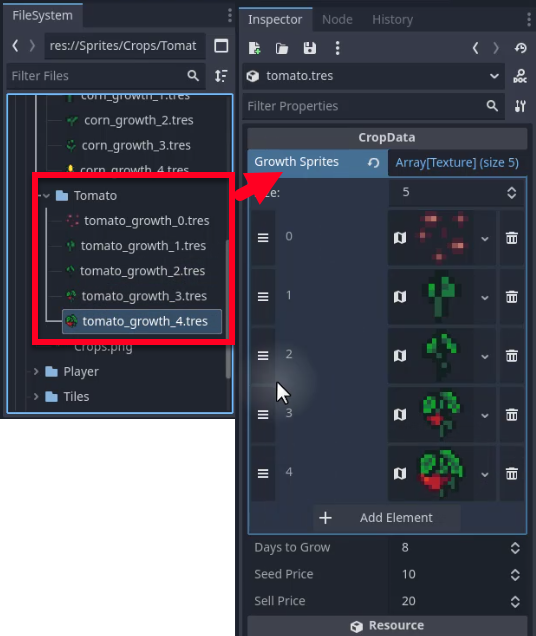
- Open
tomato.tresin the Inspector. - Set Days to Grow to
8(or any value you prefer). - Set Seed Price to
10and Sell Price to20. - Under Growth Sprites set the array size to
5. - Drag the five tomato growth textures (tomato_0, tomato_1, …, tomato_4) into the array slots in order.
Configuring Corn Data
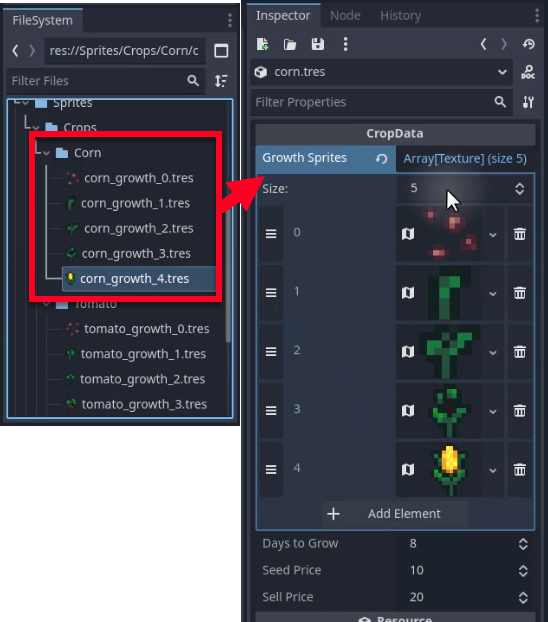
Follow the same steps for corn.tres, assigning the five corn growth textures to the Growth Sprites array. Keep the other values the same for now, or customise them as needed.
Benefits of This Approach
- Non-programmers can balance the game by simply editing resource files.
- New crops can be added at any time without recompiling the project.
- Crop information is centralised and serialised for use in save/load systems.
With the crop resources ready, you can create the scene that holds an individual crop’s data, watering state, and appearance.
Create a Reusable Crop Scene
The Crop scene gives each planted crop a place to store its growth time, watering status, and visual appearance. In this setup, you will initialise those values and leave the day-change functions as placeholders.
Creating the Crop Scene
- In the Scene dock, press Add Child Node and choose Node2D. Rename it to Crop.
- Add a Sprite2D child node (renamed to Sprite) and leave its Texture empty for now; you will assign it through code.
- Save the scene as crop.tscn.
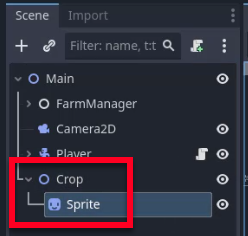
Attaching and Setting Up the Script
- With the Crop root node selected, press Attach Script.
- Name the file crop.gd and confirm.
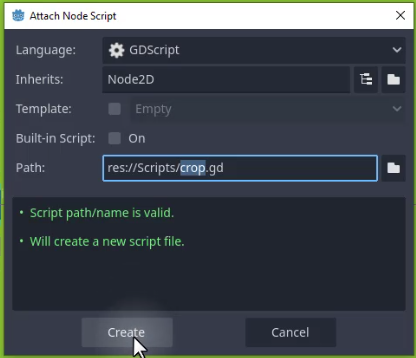
- Immediately give the script a class name so other scripts can reference it:
class_name Crop
extends Node2D
Declaring the Core Variables
The crop needs several pieces of information to function correctly. Add the following variables inside the script, directly under the extends Node2D line:
var crop_data : CropData
var days_until_grown : int
var watered : bool
var harvestable : bool
var tile_map_coords : Vector2i

@onready var sprite : Sprite2D = $Sprite
crop_data– a Resource that stores generic information such as growth sprites and days to grow.days_until_grown– counts down from the value defined incrop_datauntil the crop is ready.watered–trueif the crop received water today.harvestable–trueonce the crop has fully grown.tile_map_coords– the exact tile coordinates on the farm grid, stored as integers to avoid floating-point rounding issues.sprite– a cached reference to the Sprite2D child node.
Initialising the Crop
When a crop is planted, you need to configure it with the correct data, initial watering state, and grid position. Create the set_crop function for this purpose:
func set_crop(data : CropData, already_watered : bool, tile_coords : Vector2i):
    crop_data = data
    watered = already_watered
    tile_map_coords = tile_coords
    harvestable = false

    days_until_grown = data.days_to_grow
    sprite.texture = crop_data.growth_sprites[0]
The function:
- Stores the provided
CropData. - Copies the
already_wateredflag so the crop starts hydrated if the ground was watered before planting. - Records the tile coordinates.
- Sets
harvestabletofalsebecause the crop is brand-new. - Initialises
days_until_grownto the value defined in the resource. - Assigns the first sprite in the
growth_spritesarray (the seed sprite) to the Sprite2D.
Responding to a New Day
The day-change function will check watering and advance growth. Its global signal connection belongs in _ready, but both functions remain placeholders here:
func _ready ():
  pass

func _on_new_day(day : int):
    pass
Store Farm Tile States in the FarmManager
Now bring the tile data together in FarmManager. This script will track the farm’s tiles and crops, including whether the ground is grass, tilled, or watered.
Creating the Script
- In the Scene dock, select the FarmManager node (the parent of FarmTileMap).
- Click Attach Script, choose the Scripts folder, and name the file farm_manager.gd.
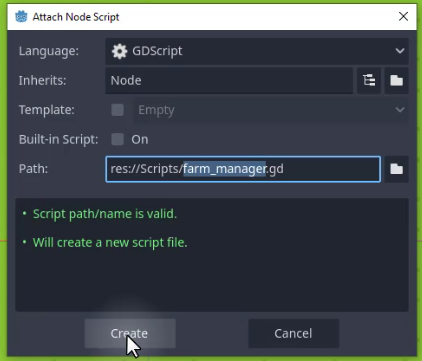
Declaring the Class
Begin the script with a class_name so other scripts can reference it easily:
class_name FarmManager
extends Node
Defining Tile Types With an Enum
An enum (enumeration) is a custom data type that lists a finite set of named constants. You will use it to represent the three possible states of a farm tile.
enum TileType
{
    GRASS,
    TILLED,
    TILLED_WATERED
}GRASS– untouched ground.TILLED– soil that has been hoed.TILLED_WATERED– tilled soil that has been watered.
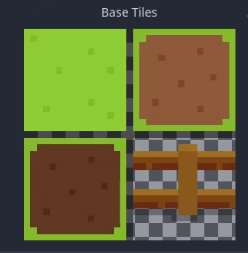
You can see that these three states are within your farm tileset:
Creating a Helper Class for Tile Data
Each tile needs to remember three pieces of information: whether it is tilled, whether it is watered, and which crop (if any) is planted there. Use a small inner class to hold this data:
class TileInfo:
    var tilled : bool
    var watered : bool
    var crop : Crop
Essential Variables
Add the following variables beneath the inner class:
@onready var tile_map : TileMapLayer = $FarmTileMap
var tile_info : Dictionary[Vector2i, TileInfo]
var crop_scene : PackedScene = preload("res://Scenes/crop.tscn")

var tile_atlas_coords : Dictionary[TileType, Vector2i] = {
    TileType.GRASS: Vector2i(0, 0),
    TileType.TILLED: Vector2i(1, 0),
    TileType.TILLED_WATERED: Vector2i(0, 1)
}tile_map– a reference to the FarmTileMap node that displays the tiles.tile_info– a dictionary that maps every used tile coordinate (Vector2i) to its correspondingTileInfoinstance.crop_scene– the packed scene for a crop, which you will instantiate when planting.tile_atlas_coords– a dictionary that translates eachTileTypeinto the correct atlas coordinate inside the tile set texture.
Understanding the Atlas Coordinates
The tile_atlas_coords dictionary links each logical tile type to a position in the tile atlas:
Vector2i(0, 0)– top-left sprite (grass).Vector2i(1, 0)– sprite to the right of grass (tilled soil).Vector2i(0, 1)– sprite below grass (tilled and watered soil).
To find these values, click a tile in the TileSet with the Select option enabled and read its displayed Atlas Coordinates.
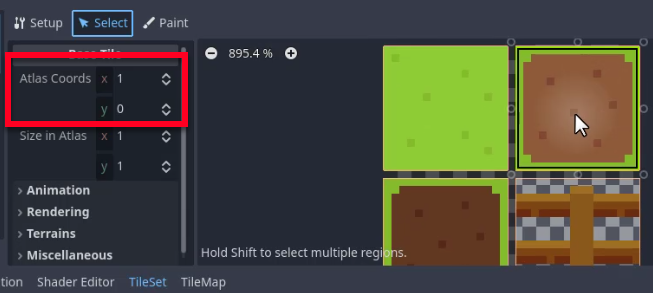
Whenever you need to change the visual appearance of a tile, you will look up the correct atlas coordinate from this dictionary and tell the TileMapLayer to use it.
Add the FarmManager Function Interface
With the variables in place, define the functions that let the player and crop systems interact with the farm. You will create the full set of function placeholders, then implement _ready and _set_tile_state to initialise tile data and update its appearance and state.
1. Required Public Functions
The following list defines each function’s intended role. Most remain placeholders at this stage; only _ready and _set_tile_state receive their implementations below.
_ready()– initialises internal data structures and connects to global signals._on_new_day(day : int)– advances the simulation by one day (e.g. removes tilled soil that is not planted)._on_harvest_crop(crop : Crop)– invoked when a crop is harvested; cleans up the tile.try_till_tile(player_pos : Vector2)– attempts to till the tile under the player.try_water_tile(player_pos : Vector2)– attempts to water the tile under the player.try_seed_tile(player_pos : Vector2, crop_data : CropData)– attempts to plant the specified seed on the tile under the player.try_harvest_tile(player_pos : Vector2)– attempts to harvest the fully-grown crop on the tile under the player.is_tile_watered(pos : Vector2) → bool– returns whether the tile at the given world position is currently watered._set_tile_state(coords : Vector2i, tile_type : TileType)– changes both the visual tile and the internal state of the tile located atcoords.
func _ready ():
  pass

func _on_new_day (day : int):
  pass

func _on_harvest_crop (crop : Crop):
  pass

func try_till_tile (player_pos : Vector2):
  pass

func try_water_tile (player_pos : Vector2):
  pass

func try_seed_tile (player_pos : Vector2, crop_data : CropData):
  pass

func try_harvest_tile (player_pos : Vector2):
  pass

func is_tile_watered (pos : Vector2) -> bool:
  return false

func _set_tile_state (coords : Vector2i, tile_type : TileType):
  pass
2. Initialising the Tile Dictionary in _ready
Replace the _ready placeholder with the following implementation. When the scene loads, you need to create one TileInfo instance for every cell that actually contains a tile. The TileMapLayer node provides get_used_cells() which returns a Vector2i for every non-empty cell.
func _ready():
    # Create a TileInfo object for every used cell
    for cell in tile_map.get_used_cells():
        tile_info[cell] = TileInfo.new()
3. Changing a Tile’s Appearance and State With _set_tile_state
Replace the _set_tile_state placeholder next. The function receives the tile’s coordinates and the desired TileType. It performs two tasks:
- Updates the visual sprite by calling
tile_map.set_cell. - Updates the corresponding
TileInfoinstance so that the simulation logic remains consistent. Grass is neither tilled nor watered. Tilled soil is tilled but not watered, while tilled and watered soil has both flags set to true.
func _set_tile_state(coords: Vector2i, tile_type: TileType):
    # 1. Update the sprite
    tile_map.set_cell(coords, 0, tile_atlas_coords[tile_type])

    # 2. Update the logical state
    match tile_type:
        TileType.GRASS:
            tile_info[coords].tilled = false
            tile_info[coords].watered = false
        TileType.TILLED:
            tile_info[coords].tilled = true
            tile_info[coords].watered = false
        TileType.TILLED_WATERED:
            tile_info[coords].tilled = true
            tile_info[coords].watered = true
Connect Player Tools to the FarmManager
The farm manager now has an interface for tool input. Create a PlayerTools script to track the equipped tool and route the interact action to the appropriate method. The tool types are the hoe, water bucket, scythe, and seed.
1. Scene Setup
- Open the Player scene.
- Add a new Node2D as a child of Player and name it Tools.
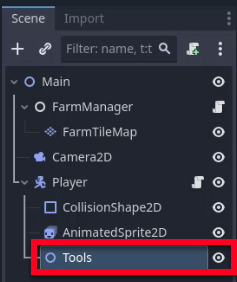
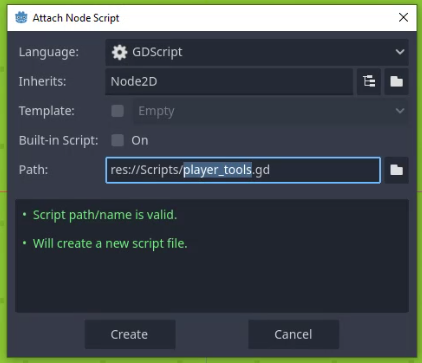
- Attach a new script to Tools and save it as player_tools.gd.
2. Declaring the Script
Begin the script with a class_name so other scripts can reference it easily, then define an enum that lists every possible tool.
class_name PlayerTools
extends Node2D

enum Tool
{
    HOE,
    WATER_BUCKET,
    SCYTHE,
    SEED
}
3. Storing the Current State
You need two variables:
current_tool– the tool currently equipped.current_seed– the CropData resource that will be planted when the tool is SEED.
var current_tool : Tool
var current_seed : CropData
4. Accessing the FarmManager
All tile-changing logic lives in FarmManager, so you cache a reference to it.
@onready var farm_manager : FarmManager = $"../../FarmManager"
5. Listening for Tool-Change Events
Tool-change signals from GameManager will let UI buttons select the equipped tool. That connection will go in _ready(), but the signals are not set up yet. Leave a reminder and use the hoe as the default tool for testing.
func _ready():
    # REMEMBER: connect signals
    current_tool = Tool.HOE
Next, you’ll make a handler that simply stores the values it receives:
func _set_tool(tool : Tool, seed : CropData):
    current_tool = tool
    current_seed = seed
6. Reacting to the Interact Key
In _process(), check for the project’s interact action, mapped to E or F. When it is pressed, a match statement selects the FarmManager method to call.
func _process(delta):
    if Input.is_action_just_pressed("interact"):
        match current_tool:
            Tool.HOE:
                farm_manager.try_till_tile(global_position)
            Tool.WATER_BUCKET:
                farm_manager.try_water_tile(global_position)
            Tool.SCYTHE:
                farm_manager.try_harvest_tile(global_position)
            Tool.SEED:
                farm_manager.try_seed_tile(global_position, current_seed)
7. Testing the Setup
To check that input reaches the farm manager, add a test print statement to try_till_tile:
func try_till_tile (player_pos : Vector2):
  print("TILL")
Run the project and move the player with the arrow keys or WASD. Press E while standing on a grass tile. The TILL message should appear in the output panel, confirming that try_till_tile is being reached.
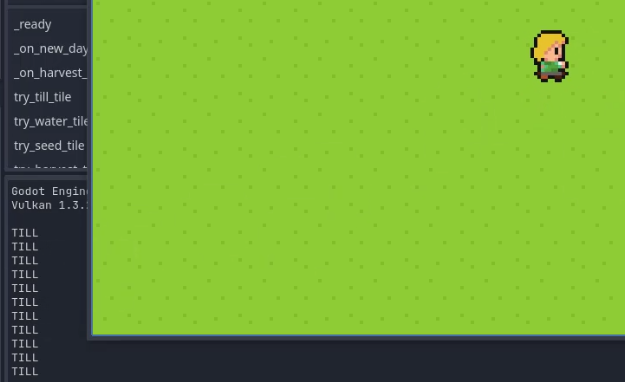
At this point, the tile visuals do not yet change. The actual tilling, watering, seeding, and harvesting logic inside FarmManager is not implemented in this setup.
Recap: Your Farming Game Foundation
You now have the foundation of a farming system, from the field itself to the player input that calls your farm manager. In this tutorial, you have:
- Painted farmland with a TileMapLayer and adjusted its render order.
- Created CropData resources for tomato and corn growth sprites and prices.
- Set up a Crop scene with initial data, watering state, and tile coordinates.
- Defined tile states and implemented the farm manager’s tile initialisation and state-update functions.
- Routed player tool input to farming methods and checked that the tilling method receives it.
The next step is to fill in the farming actions and day-change logic that remain placeholders. Your tile data, crop resources, and tool interface provide the structure for that work.
For a structured path through the full project, continue with the Godot 4 Game Development Mini-Degree and build on the farming-game foundation you have set up here.
Did you come across any errors in this tutorial? Please let us know by completing this form and we’ll look into it!
FINAL DAYS: Unlock coding courses in Unity, Godot, Unreal, Python and more.