You can access the full course here: VR Projects – Third-Person Platformer Game
Table of contents
Adapting a Canvas for VR
To begin, we’ll be adapting our home screen canvas so that it can be seen in VR.
First, select the canvas and set the Canvas component’s “Render Mode” to World Space. Then set the position of the canvas to 0, 0, 6 and the scale to 0.01. This will make it appear a few meters in from of us, at the correct size.
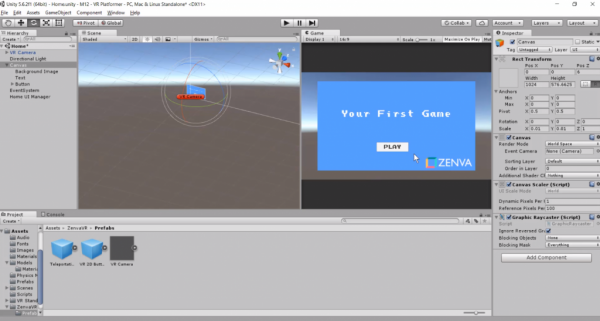
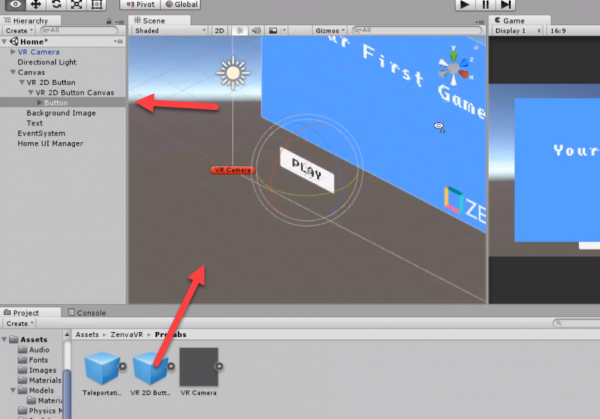
Now since were adapting this for VR, our existing button will not work. So drag the “VR 2D Button” prefab into the scene and delete the “Button” child inside of it. Then drag the object inside of the canvas and make our existing button, a child of the object’s “VR 2D Button Canvas” child.
Menu Background
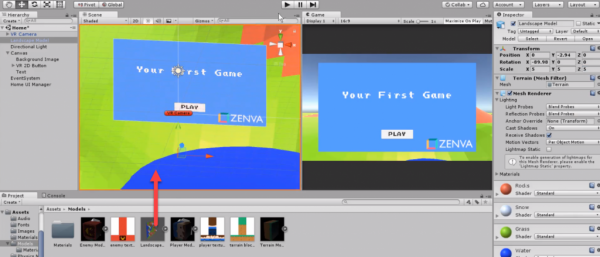
Drag the “Landscape Model” model (in Models folder) into the scene, set the scale to 5 and preposition it to your liking. This is to add in a reference point for the player because some people can feel weird if they’re just floating in the air.
Challenge!
- Adapt the Game Over screen for VR
Transcript
Alright, let’s get started here. So we’re gonna begin by looking at the original game. And on the downloaded files you should be able to find both the original game and the completed game with the VR adaptations. So, I’m gonna go and press play on the original game. I am currently on the scene called home, home screen.
So we start here and we have a scene where there is a canvas that is shown as a screen overlay, so it takes over all the screen. I can go here and press play. And then on the game itself, as we can see, I can move Doris far away from me, closer to me, with the down, with down key, with the up key I can move further away from me, left, right, and I can also jump. And if I run into an enemy I die, and I get this other UI screen, where there is another canvas that is shown as a screen overlay. And I can choose, I can choose here Play Again and I can play one more time. So that is what the game looks like. And that game as it is can’t really be played in virtual reality.
For many different reasons, the original screen, the initial screen, for example, is shown as a screen overlay. And in virtual reality as we know, user interface has to be positioned in real world coordinates, in world space. Something that is just imposed on your view. Even if you look around it’s going to make people uncomfortable and the game, as it currently is, if you’ll try to run this on your head mounted display you’re not gonna see this screen at all. Then the game itself will need more modifications, but we’ll concentrate now on this initial screen. And then you’ll be doing the game over screen as a challenge. Alright, so, the first thing we need to do here is select our canvas and check here, the scaler, the render mode.
We currently have this as screen space, overlay, and the canvas is being scaled at a certain resolution. Now, we can’t have that anymore, as I mentioned, so we need to switch this to world space. Once we set this to world space, we are no longer gonna have that scaling happening for us automatically. Did you notice here there is a default scale here that was set, that was set for us? So we might not want that scale, so we’re gonna set that scale to one. And I’m also gonna position the canvas in the origin of the world. That’s the very first thing that we’ll be doing here. Now, for our camera and for other parts of our project we’ll be using other files as well. Other scripts.
So I’m gonna go and select my assets folder and bring in a few more scripts. I’m gonna bring in this VR standard assets folder which contains files created by Unity and that are provided in the VR samples scene, that you can find in the assets store. I’ve already selected some files that I normally use in VR projects. So it doesn’t contain all of the files. So I’m gonna drag this into my project, like so. And also I’m going to bring in this ZENVA VR folder which contains some tools that we, that we might be needing. Some of them we’ll be using for sure. So these are just some utilities and different tools that are created for virtual reality projects.
And the very first thing that we’ll use from here is this VR camera prefab. So I’m gonna use that VR camera and instead of the default camera. I’m going to delete the default camera. What is this VR camera? This is nothing but the actual default camera with a few scripts already attached to it. And all of these scripts are part of the VR standard assets. So these are files created by Unity. And basically what I’ve done here is provide something that has a working reticle, and the possibility for us to have interactive elements with VREyeRaycaster, and also a drag camera script, that allows me to drag the camera around using the right click of the mouse when on Play mode.
Okay, so now that we have our character here, VR camera, I’m going to give this object a color so that we can always know where it is on the editor, and I’m going to make sure it’s positioned in zero, yep, that’s all good. So now I’m going to reposition the canvas, and I think the canvas should be, let’s say, six meters, or six Unity units away from the camera on the forward direction. So I’m going to select my canvas and change its position to six.
Now this canvas as it is now is absolutely massive, it’s huge. So it’s not exactly what we want, we need to scale this down, so I’m going to scale this down by something like 50, so it will be, instead of one, it will be 0.0, or actually 0., maybe 0.1, to begin with, and then we can decide if we want to scale it further. I’m not changing the zed coordinate, because this is a two dimensional object. I think the, it seems like the current size, I can go and press Play to have a look, and it looks like the current size is still huge.
The best way to get a better idea of the size is actually to put on your head-mounted display, but we can easily tell here that this is just way too big. So maybe we should scale it even more. So I’m just going to select my canvas and on scale here, I’m going to divide this by two, and try that number. And try again, and I’m getting the impression that this might be, it’s still very, very big, so we’re going to set this to 0.01, instead, and that is looking a bit better.
So now it looks like it’s some sort of a banner in front of me, and I want to be able to press Play, but as you can see I can’t press Play, so I’m clicking now, I can’t press Play except when I go with the mouse, but I want to be able to use the reticle to press Play. So what I can do here, is, what I would need is an element with a collider, so that I can use my VREyeRaycaster, and my VR input components of the camera to generate a click on that collider, and then that script would click the button itself, or would call the method that I want to call. So let’s go ahead and explore our button first, the button that we have here. If we scroll down, we’ll see that, whenever we click on the button, we have this method here, HomeUIManager.StartGame executed.
HomeUIManager is an object here that takes care of managing the UI here, as the name very well describes. So what I’m going to do, instead of creating a new script for that, I’m going to use this VR 2D button prefab that I have here, which is already a button, and that already has this behavior. So if we explore this button here, this is something we built on a previous course about 360 photos, this button is mainly an empty object with a collider.
So if we go a bit closer, we can see that it has a very thin collider, and then inside of that there is a canvas, and inside of that there is a button. So that is what I’m going to be using, instead of the button that we already have here. So I’m going to drag in this element here, and let’s try to find it on the map. Why is it not shown? It somehow disappears, that’s a little bit strange.
But in any case, what I want to use is the button that I already had, instead of this button, so I’m going to go and delete the button, I’m going to delete this button here, and it will tell me that it will break the prefab instance, that’s fine, because I’m not going to be using the prefab, I mean, I’m not going to be modifying this button via prefab, I’m fine if this is no longer connected to the prefab, and it’s just its own object, so I’m going to click Continue, and I’m going to drag my button into here.
Now I’m not sure why the button is no longer showing, but let’s start from the top here. So, or actually from the bottom here. So we have our bottom, and it has already like a strange position, so I’m going to set this position to zero, and at least we have the button now, although it’s a little bit strange that it is showing kind of behind the other element.
Now let’s see what else could be happening here. So that is our button, let’s select the canvas that contains that button, and that all seems fine to me. Then the containing object, and the containing object, maybe the zed value here should be zero, or if we position this in zero, zero, and, I’m not very sure why it doesn’t show. Oh, it doesn’t show because the image is first, so we need to drag it underneath the image, and there we go, and now we can move it down.
And if I go and focus I can see that the collider doesn’t really fit the same size as the button, so I can go and edit the collider, if I want to here, by clicking that, and try to increase the size of that collider, and bring this up, and up, whoops, and, and then this part, let’s click Edit Collider there, this part like so. So we’ve got now the collider, and I’m going to test this. Gonna press Play, and I’m going to go select here, and click, click somewhere else. And it works, so we’ve basically wired this up.
Now a home screen like this feels a little bit barren, we’re kind of floating in the middle of nowhere here, and what we can do is bring in a model, at the right model to place in this part. So I’ve got this model from Blender, and if you’re not familiar with Blender, that’s fine. I’m only showing this in case you are, or in case you ever get into Blender, and you want to see how I did it.
So I’ve got this model here, and this model will be then exported, so I’m going to select this model, and I’m going to export that as an .ftx file. Then I need to make sure that selected object is checked, and also that this button is kind of active, like so, and then I go to the corresponding folder, where my project, my Unity project is, and I already did export this, so I already gave this a name, it’s Landscape Model, so I’m going to export it again.
And now back into Unity, I’m going to go to models, and find my landscape model, and bring this here, and position it in the origin, so set that to zero. Leave the rotation as it is, it comes with a default rotation there. Now, I should probably move this down, and I also want to make this terrain much bigger, so I’m going to scale it by five, and now if we press Play, it’s a bit like we are in this big, in this terrain, and we’re kind of floating in the sky, and we can go here and decide that we want to play more, and press Play. I think the sign itself could be a little bit higher. Be positioned a bit higher up. I’m going to move it up just a little bit. Okay, so that’s it for the, for the home screen.
So now your challenge. Your challenge consists of adapting the game over screen, or scene, for virtual reality. So following a similar approach to what we did, is to adapt it. Feel free to try any shortcuts, like for example copying and pasting, yep, that’s fine, or maybe making a prefab out of what we currently have, and then using that prefab again, so do it however you think it should be done, however you want, and then I will show you a solution, there’s not a single solution here. So have a go, pause the video, and then join us back.
Alright, welcome back, so now let’s go and see if we can easily adapt the game over screen for virtual reality. So I’m going first to just have a look at this game over scene. So I’m going to double click on game over, and what we have is basically kind of the same thing, but there is this game over manager, instead, and also the elements here are a little bit different. So I think what I’m going to do is copy a few things, like the camera and the terrain, and when it comes to the canvas, I think I will, let’s see, let’s see, let’s bring in the other canvas and see what we can do. I think we could also, we could do a few things that will facilitate our process here.
Alright, so let’s go back to home, and I know that I will want these things, so I’m going to bring all of that, these three elements, copy, and now game over and paste, so I’m going to delete the main camera, and move my main camera up here where we had it before. And in here we have the home canvas and the game over canvas. So I wonder if we can copy elements from the game over canvas, and if they will look fine in the home canvas, so we can just re-use that, and then just change the wiring of the button.
So first of all, canvas here, I don’t want it to be always in my screen, so I’m actually going to disable it. And I’m going to copy the text, copy all of this, score elements, score value, and see if I can base them here, if it makes any bit of difference. And well, of course their positioning is that of the other canvas, so they are positioned in a different part. So I think that that approach is not going to work here. Instead, what I’m going to do is just copy the components of my first game canvas.
So I’m going to click on the game over canvas, enable it again, and select here, Render Mode, world space, and now I’m going to go to canvas one, and I’m going to copy in here, copy a component, the transfer component, and go to my game over canvas, and paste those values, so now at least we have everything in the right position, and now all that’s left is just to sort out the button aspect, for which we can try to copy this VR button from canvas one. Let’s just move this button to canvas, to the second canvas to see what happens. And, the position, let’s see, the position originally was that, so it will remain on the same, on the same position that it already had, it needs to be after the image. And we can see it there, actually. So now let’s now delete the canvas one.
And just in our canvas two, or in our canvas for game over, we can go to, let’s take a look at the previous button first, so the previous button, when you clicked on that previous button, we were calling GameOverManager.Restart. So I’m going to do that exact same thing here.
So I’m going to delete that button, and inside of VR 2D button, I’m going to find my button. I’m going to change the text from Play to Play Again, so the text is inside. Play, and now it’s going to say Play Again. We will need to increase the size of the button a little bit for this to work. And so let’s select here, and bring it onto, onto focus. I think that we have to scale the canvas here, so, woops. That doesn’t necessarily work. Now the button itself, let’s change the width here, so let’s say three, let’s see if we can modify it like so. There we go. Play Again. And we’ll position it a bit more in the middle, like so.
Alright, so we’ve got that, and now if we scroll down, hit On Click, we can now find our, where is it, game over manager here. So I’m going to select that game over manager, and drag it onto the button. To scroll down here, place it there, and now pick the Restart Game function. Click the game over manager, and where is it, Restart Game. Okay, so I think that should be it. I think that is it. The game over manager, already is linked to the previous text, so we didn’t change that, because we moved, we kept the same labels, so we have the same labels here that we had before. So it seems like we don’t, no longer, no more changes are required, so let’s press Play, and see if we can play again. Object not found. I think it could be because we need to start in the home screen first.
So let’s start in the home screen, and press Play here, and then run into some enemy, and it seems like this is fine, Play Again, and we are able to play again. Alright, so we got that working. And see, Level One could not be loaded, because it has not been added to the build settings. Oh, that’s just the build settings here that seems, it does, I don’t know why it’s giving us this error, but we haven’t done anything in relation to the, to the build settings. It could be because I copied and pasted the previews project, I’m not sure, but it’s not related, that issue, we’ll look at it later, but it’s not related to the screens.
So basically to summarize here, we have adopted both the home screen and the game over screen. And what we did, what’s important here, what to take away, that is important, is that we transformed a canvas, that was a full-screen canvas into a world space canvas. We had to play a bit with the size of this canvas. And you should always test this on your head mounted display to see if it feels the right size. We added this background terrain, because you can’t be just floating in space. You need to have some kind of reference, of some kind of environment.
And also, what we had to do was adapt the buttons, so that the buttons now have a collider around it, because we need a collider to make this interaction working, because what is gonna cause the triggers, is the VREyeRaycaster, and this can be managed through your (mumbles) but also if you had some sort of controller that acts as a pointer, we would simply put this on that controller, if you have like a game, like a controller, say, like the one in the VRER, or Daydream, you would just put this on that pointer, and it would work in the exact same way.
So that’s it for this lesson, and now in the next lesson we’ll continue with more adaptations!
Interested in continuing? Check out the full VR Projects – Third-Person Platformer Game course, which is part of our Virtual Reality Mini-Degree.
