Blender MCP lets an AI coding agent build and refine 3D scenes directly in Blender. In this tutorial, you will use it to turn a visual reference into an original low-poly environment, prepare the assets for Godot, and test the result as a playable first-person scene.
This workflow assumes you have basic familiarity with Blender and Godot, plus an AI coding agent that supports MCP servers.
If you want a structured path for creating complete games with Godot, the Godot 4 Game Development Mini-Degree provides guided, project-based training. You can also keep reading to explore the full Blender MCP workflow.
What Is Blender MCP?
Blender MCP connects Blender to an AI coding agent such as Codex, Claude Code, OpenCode, or another agent that supports MCP servers. This connection gives the agent instructions for working with Blender through the application’s Python API.
The agent does not navigate Blender like a person. It writes and runs Python that creates objects, applies materials, and assembles the scene. This makes Blender MCP useful for rapid iteration and prototyping, especially when you want to explore a visual idea without modeling every asset by hand.
For this workflow, you need Blender installed and open, the Blender MCP add-on installed, an AI coding agent configured with the Blender MCP server, and Godot installed so the agent can create and test the project.
Set Up Blender MCP for AI Scene Generation
Install the Blender add-on
The Blender MCP website provides the add-on required by Blender. Drag the add-on link into Blender. The first pass may ask you to approve the repository, while the next installs the add-on itself.
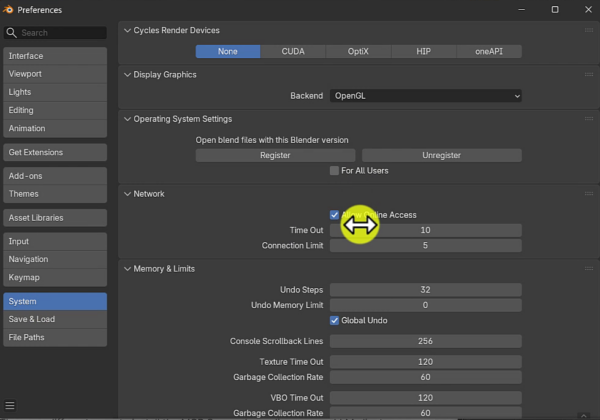
If Blender reports that online access is disabled, open Edit, Preferences, and System. Enable Allow Online Access, then repeat the add-on installation steps.
Connect your AI coding agent
Install the Blender MCP server in your AI coding agent. In the demonstrated workflow, Codex handles the installation from the latest package link. Restart Codex after installation so it can load the new MCP server.
An MCP server works well for an application such as Blender because the agent may need broad access to many modeling and scene-building operations. For a narrower automation that uses only a small part of a program, a reusable skill with command-line tools can require less context.
Choose a Reference for Your AI-Generated 3D Scene
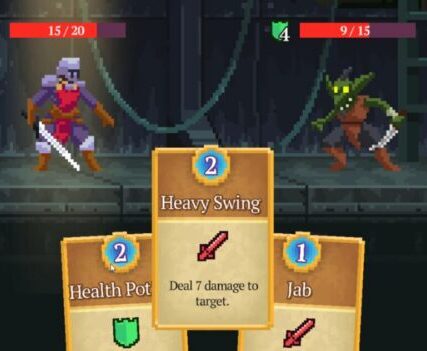
You can start from a game screenshot, your own drawing, a photograph, or another visual reference. Ask the agent to create an original scene inspired by the reference rather than copying it exactly. When you use third-party material, consider copyright and keep the resulting work appropriate for your intended use.
The demonstrated project begins with a reference from a favorite childhood game. Its prompt then adds requirements designed to make the generated Blender environment practical inside Godot.
Write a Godot-Focused Blender MCP Prompt
Tell the agent which game engine will receive the scene and identify the technical constraints that matter for that engine. The demonstrated prompt asks the agent to:
- Design around Godot game-engine functionality.
- Create each reusable object as a clearly named mesh.
- Use a sensible, non-wasteful polygon budget.
- Maintain a consistent scale.
- Place object origins where they make level design easier, such as at the bottom of a tree.
- Avoid overlapping surfaces that can produce visible jittering.
- Generate simple collision geometry using Godot collision naming conventions.
- Create the Godot project headlessly and add a simple first-person controller.
You can adjust these constraints for your own project. For example, you might name the exact objects you need, provide a hand-drawn map, or restrict the collision geometry to simpler shapes.
Generate the Blender Scene with an AI Agent
The demonstration uses Codex with the Astra model at medium reasoning. The agent first reads Godot documentation about 3D asset pipelines and scene importing so it can structure the Blender output appropriately.
Keep Blender open while the agent works. The MCP server connects the agent to Blender’s Python API, allowing it to create the scene by writing and running Python. The agent can capture screenshots of the Blender result, inspect them, and refine the scene.
For a larger project, you could ask the agent to save important asset-pipeline findings in a local document for future reference. In this prototype, the research guides the generated output directly.
Check the tool versions selected by the agent. When it initially targets Godot 4.2 in the demonstration, the request is corrected to use the installed Godot 4.6 version instead.
Review the Blender MCP Result
The generated output includes a Blender scene, a Godot project, preview files, and instructions. The Blender project uses approximately 62,000 visual triangles. That count could be reduced further, but it is acceptable for this prototype.
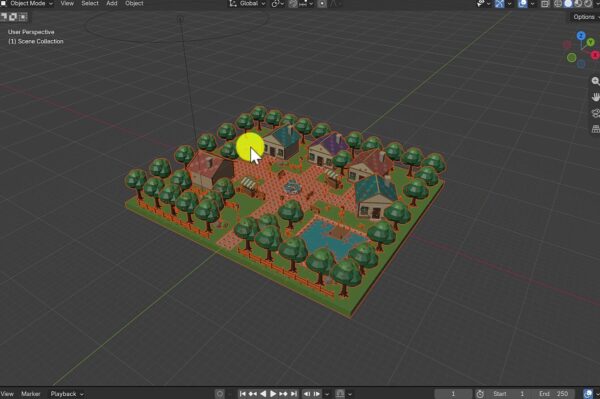
Inspect the individual scene elements before moving on. You can export selected assets or the complete scene, and clear mesh names make the reusable kit easier to understand and extend.
Import the AI-Generated 3D Scene into Godot
Import the generated Godot project and inspect the full environment. In the demonstration, the scene closely matches its Blender version without obvious surface jittering. The project includes an environment, a late-afternoon lighting setup, a player, and organized assets.
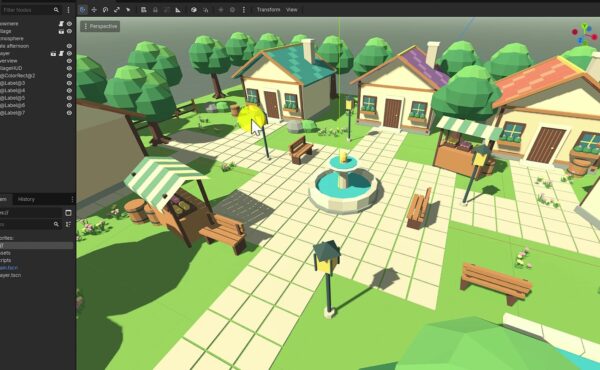
Open individual assets to review their collision setup. The generated fountain includes collision shapes, but its collider is more complex than needed. On a future iteration, you could ask the agent to use only simple cubes, cylinders, or spheres for collision geometry.
Test the Playable Godot Scene
Run the Godot project to test the generated first-person controller. You can move through the village and jump, giving you a quick way to inspect the environment from a player’s perspective.
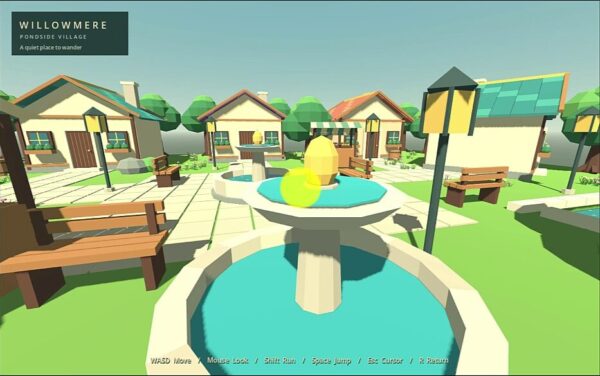
The result began with one reference image and a detailed prompt. You can take the workflow further by specifying a smaller set of elements, supplying your own drawing, or providing a hand-drawn level map for the agent to interpret.
Blender MCP and Godot Workflow Recap
- Install Blender, the Blender MCP add-on, and the MCP server for your AI coding agent.
- Enable online access in Blender if the add-on installation requires it.
- Use a visual reference for inspiration without asking the agent to copy it exactly.
- Specify named meshes, efficient geometry, consistent scale, useful origins, and simple collisions.
- Keep Blender open while the agent builds and reviews the scene through its Python API.
- Confirm the correct Godot version, inspect the generated assets, and test the playable result.
Build your Godot skills through complete, guided projects in the Godot 4 Game Development Mini-Degree, covering the engine, GDScript, game mechanics, and practical development workflows.
Did you come across any errors in this tutorial? Please let us know by completing this form and we’ll look into it!
FINAL DAYS: Unlock coding courses in Unity, Godot, Unreal, Python and more.