If you haven’t read Part 1 of the tutorial yet, it’s highly recommended you do so.
In the first part of our tutorial, we began setting up our tectonic plates with animations and so forth. We’re ready to continue with our educational AR app and set it up so that the correct animation can run at the right time.
Did you come across any errors in this tutorial? Please let us know by completing this form and we’ll look into it! FINAL DAYS: Unlock coding courses in Unity, Godot, Unreal, Python and more.
Table of contents
Continuing with Scripting the Touch Manager
Now it’s time to create the “CalculateDragDirectionOnPlate” function. It takes in a touch end position in pixel coordinates. This is a pretty big function, so let’s take it in steps.
// called after the dragged touch is released
void CalculateDragDirectionOnPlate (Vector3 touchEnd)
{

}
First, we make a variable which will hold the world position of the touch. Then we create a new ray which shoots from the screen to the touch position.
// create world pos for touch end
Vector3 touchEndWorldPos = Vector3.zero;

// create ray from camera to touch
Ray ray = Camera.main.ScreenPointToRay(touchEnd);
This is unlike the normal raycast though. Instead of shooting a ray and checking if it hit a collider, we’re doing a plane raycast. This creates an abstract, flat plane which we then get the position that the ray intersected it. That’s our world position.
// we are raycasting to a plane so it's Y axis remains 0
Plane rayPlane = new Plane(Vector3.up, Vector3.zero);

float enter = 0.0f;

// send the raycast
if(rayPlane.Raycast(ray, out enter))
{
    touchEndWorldPos = ray.GetPoint(enter);
}
We now need to check the distance of the drag. If it’s too short, then we’ll un-assign the plate (we’ll make this later) and return.
// was this not a drag but a tap? if so, unassign the plate
if(Vector3.Distance(touchStartWorldPos, touchEndWorldPos) < 3.0f && touchingPlate)
{
    // un-assign the plate movement
    return;
}
Then, we need to calculate a normalized direction between the two positions. Next, we round the X and Z values to the nearest integer. This means that each axis will be either: -1, 0 or 1. With this, we can then calculate the direction of the drag in 4 ways.
// get direction between 2 points and round it
Vector3 dir = Vector3.Normalize(touchEndWorldPos - touchStartWorldPos);
dir = new Vector3(Mathf.Round(dir.x), 0, Mathf.Round(dir.z));
Now we check for a right, left, forwards or back drag by looking at the axis direction.
Vector3 plateDir = Vector3.zero;

// dragged RIGHT
if (dir.x == 1.0f)
    plateDir = Vector3.right;
// dragged LEFT
else if (dir.x == -1.0f)
    plateDir = Vector3.left;
// dragged UP
else if (dir.z == 1.0f)
    plateDir = Vector3.forward;
// dragged DOWN
else if (dir.z == -1.0f)
    plateDir = Vector3.back;
Then we’ll assign that direction to the plate.
// assign the plate movement
Let’s make that script now.
Scripting the Plate Manager
Create a new C# script called “PlateManager” and attach it to the “Manager” object.
We need to add a few libraries, for using the timelines.
using UnityEngine.Timeline;
using UnityEngine.Playables;
Now let’s start on our variables.
First, we got our left and right plates which hold all the data for their corresponding plates. “currentlyAnimating” is a bool which is true when we’re animating the plates.
// plates
public Plate leftPlate;             // left tectonic plate
public Plate rightPlate;            // right tectonic plate

// states
public bool currentlyAnimating;     // are the plates currently animating?
Then we need to list all the playable assets (timelines) for each of our animations.
// timeline playable assets
public PlayableAsset transformForwardsBackAnim;
public PlayableAsset transformBackForwardsAnim;
public PlayableAsset divergentAnim;
public PlayableAsset convergentOverUnderAnim;
public PlayableAsset convergentUnderOverAnim;
We need to also access the playable director, so let’s link it.
// components
public PlayableDirector director;   // component used to play the PlayableAssets above
Finally, we create an instance (singleton) of the script so that we can access it easier later on.
// instance
public static PlateManager instance;

void Awake ()
{
    // set instance to this script
    instance = this;
}
Our first function is our largest and most important. “AssignPlateMovement” is a function which is called from the TouchManager. It sends over the plate to assign and a global movement direction.
// called after the user drags a direction for the plate to move in
public void AssignPlateMovement (Plate plate, Vector3 moveDirection)
{

}
First, we check if we’re currently animating. If so, we can’t assign anything so return. Then we check if this is the left plate we’re setting. Since the left plate is a rotated version of the right one, we need to flip the X axis of the move direction.
// if we're currently animating, don't allow for assigning plate movement
if (currentlyAnimating)
    return;

// invert moveDirection X axis if the plate is the left one
if (plate == leftPlate)
    moveDirection.x = -moveDirection.x;
Now we check the direction and assign the corresponding movement to the plate.
// did the user swipe FORWARDS?
if(moveDirection == Vector3.forward)
{
    plate.assignedMovement = PlateMovement.TransformForward;
}
// did the user swipe BACKWARDS?
else if(moveDirection == Vector3.back)
{
    plate.assignedMovement = PlateMovement.TransformBack;
}
// did the user swipe AWAY from the center?
else if (moveDirection == Vector3.right)
{
    plate.assignedMovement = PlateMovement.Divergent;
}
If you’re converging the plates, the one on top depends on the last plate you drag. So we need to check if the other plate’s assigned movement is convergent under. If so, then the current one is over. Otherwise, we just set it to converge under.
// did the user swipe TOWARDS the center?
else if(moveDirection == Vector3.left)
{
    // get the other plate
    Plate otherPlate = plate == leftPlate ? rightPlate : leftPlate;

    // if the other plate converges under, converge over
    if (otherPlate.assignedMovement == PlateMovement.ConvergentUnder)
        plate.assignedMovement = PlateMovement.ConvergentOver;
    // otherwise, just converge under
    else
        plate.assignedMovement = PlateMovement.ConvergentUnder;
}
Now we need to activate the arrow and rotate it to face the direction we dragged.
// set arrow visual
plate.arrowVisual.SetActive(true);

// rotate arrow depending on assigned movement
switch(plate.assignedMovement)
{
    case PlateMovement.TransformForward: plate.arrowVisual.transform.localEulerAngles = new Vector3(0, plate == leftPlate? 90 : -90, 0); break;
    case PlateMovement.TransformBack: plate.arrowVisual.transform.localEulerAngles = new Vector3(0, plate == leftPlate ? -90 : 90, 0); break;
    case PlateMovement.Divergent: plate.arrowVisual.transform.localEulerAngles = new Vector3(0, 0, 0); break;
    case PlateMovement.ConvergentOver: plate.arrowVisual.transform.localEulerAngles = new Vector3(0, 180, 0); break;
    case PlateMovement.ConvergentUnder: plate.arrowVisual.transform.localEulerAngles = new Vector3(0, 180, 0); break;
}
If we have an assigned movement on both plates, we check to see if the plates are compatible. If so, we call the “PlayAnimation” function, otherwise we call the “OnAnimationEnd” function.
// do both plates have an assigned movement?
if (leftPlate.assignedMovement != PlateMovement.Unassigned && rightPlate.assignedMovement != PlateMovement.Unassigned)
{
    // are the 2 assigned movements compatable with eachother?
    if (PlatesAreCompatable())
        Invoke("PlayAnimation", 0.5f);
    else
        Invoke("OnAnimationEnd", 0.35f);
}
That’s 3 functions right there that we haven’t made yet. Let’s start with “PlatesAreCompatible”.
This returns a bool. True being that the plates are compatible and false being that they aren’t.
It’s basically checking for all the possible plate combinations.
// returns true is both plates assigned movement are compatible
bool PlatesAreCompatible ()
{
    // plates are both transforming forwards
    if (leftPlate.assignedMovement == PlateMovement.TransformForward && rightPlate.assignedMovement == PlateMovement.TransformForward)
        return false;
    // plates are both transforming backwards
    else if (leftPlate.assignedMovement == PlateMovement.TransformBack && rightPlate.assignedMovement == PlateMovement.TransformBack)
        return false;
    // left plate is diverging but right plate is not
    else if (leftPlate.assignedMovement == PlateMovement.Divergent && rightPlate.assignedMovement != PlateMovement.Divergent)
        return false;
    // left plate is not diverging but right plate is
    else if (leftPlate.assignedMovement != PlateMovement.Divergent && rightPlate.assignedMovement == PlateMovement.Divergent)
        return false;
    // left plate is converging over but right plate is not converging under
    else if (leftPlate.assignedMovement == PlateMovement.ConvergentOver && rightPlate.assignedMovement != PlateMovement.ConvergentUnder)
        return false;
    // left plate is converging under but right plate is not converging over
    else if (leftPlate.assignedMovement == PlateMovement.ConvergentUnder && rightPlate.assignedMovement != PlateMovement.ConvergentOver)
        return false;
    else
        return true;
}
Now let’s create a function called “UnassignPlate”. This basically resets a plate’s assigned movement and disables the arrow visual.
// unassigns a plate's assigned movement and disables arrow
public void UnassignPlate (Plate plate)
{
    plate.assignedMovement = PlateMovement.Unassigned;
    StartCoroutine(DeactivateArrowVisual(plate));
}

// deactivates desired plate's arrow visual
IEnumerator DeactivateArrowVisual (Plate plate)
{
    plate.arrowAnimator.SetTrigger("Exit");
    yield return new WaitForSeconds(0.3f);
    plate.arrowVisual.SetActive(false);
}
“OnAnimationEnd” is a function that will be called after the animation has finished. This basically resets the plates. When the animation begins, this function gets invoked to be called after [timeline duration] seconds.
// called after the plate animation has ended
void OnAnimationEnd ()
{
    currentlyAnimating = false;
    UnassignPlate(leftPlate);
    UnassignPlate(rightPlate);
}
Now let’s create the “PlayAnimation” function.
// plays the assigned plate animation
void PlayAnimation ()
{

}
First, we deactivate the arrow visuals.
// disable arrows
StartCoroutine(DeactivateArrowVisual(leftPlate));
StartCoroutine(DeactivateArrowVisual(rightPlate));
Then we set the corresponding timeline to the director.
// assign the corresponding timeline to the director
switch (leftPlate.assignedMovement)
{
    case PlateMovement.TransformForward:
    {
        director.playableAsset = transformForwardsBackAnim;
        break;
    }
    case PlateMovement.TransformBack:
    {
        director.playableAsset = transformBackForwardsAnim;
        break;
    }
    case PlateMovement.Divergent:
    {
        director.playableAsset = divergentAnim;
        break;
    }
    case PlateMovement.ConvergentOver:
    {
        director.playableAsset = convergentOverUnderAnim;
        break;
    }
    case PlateMovement.ConvergentUnder:
    {
        director.playableAsset = convergentUnderOverAnim;
        break;
    }
}
Lastly, we play the animation and invoke “OnAnimationEnd” to be called in [timeline duration] seconds.
// play animation
currentlyAnimating = true;
director.Play();
Invoke("OnAnimationEnd", (float)director.playableAsset.duration);
The last function we call is “DoubleTapResetPlates”. This just resets everything when you double tap.
// called when the player double taps the screen, resets plates
public void DoubleTapResetPlates ()
{
    director.Stop();
    director.playableAsset = null;
    // --disable UI text
    currentlyAnimating = false;
    UnassignPlate(leftPlate);
    UnassignPlate(rightPlate);
}
Lava Visual
Something that adds to the visual element is a lava element.
Create a new Plane object (right click Hierarchy > 3D Object > Plane) and call it “Lava”. Set the material to “Lava”. Then, scale and position it so it leaks around the edges and just rises above the base. Finally, set it as a child of the “TectonicPlates” object.

We’re also going to add a slight animation which will “pulse” the intensity of the lava.
First, un-parent the lava object so it’s got no parent. We need to do this due to the original parent already having an animator component.
So, with the lava selected, go to the Animation window and create a new animation.
Here, I ping-ponged the scale and color.
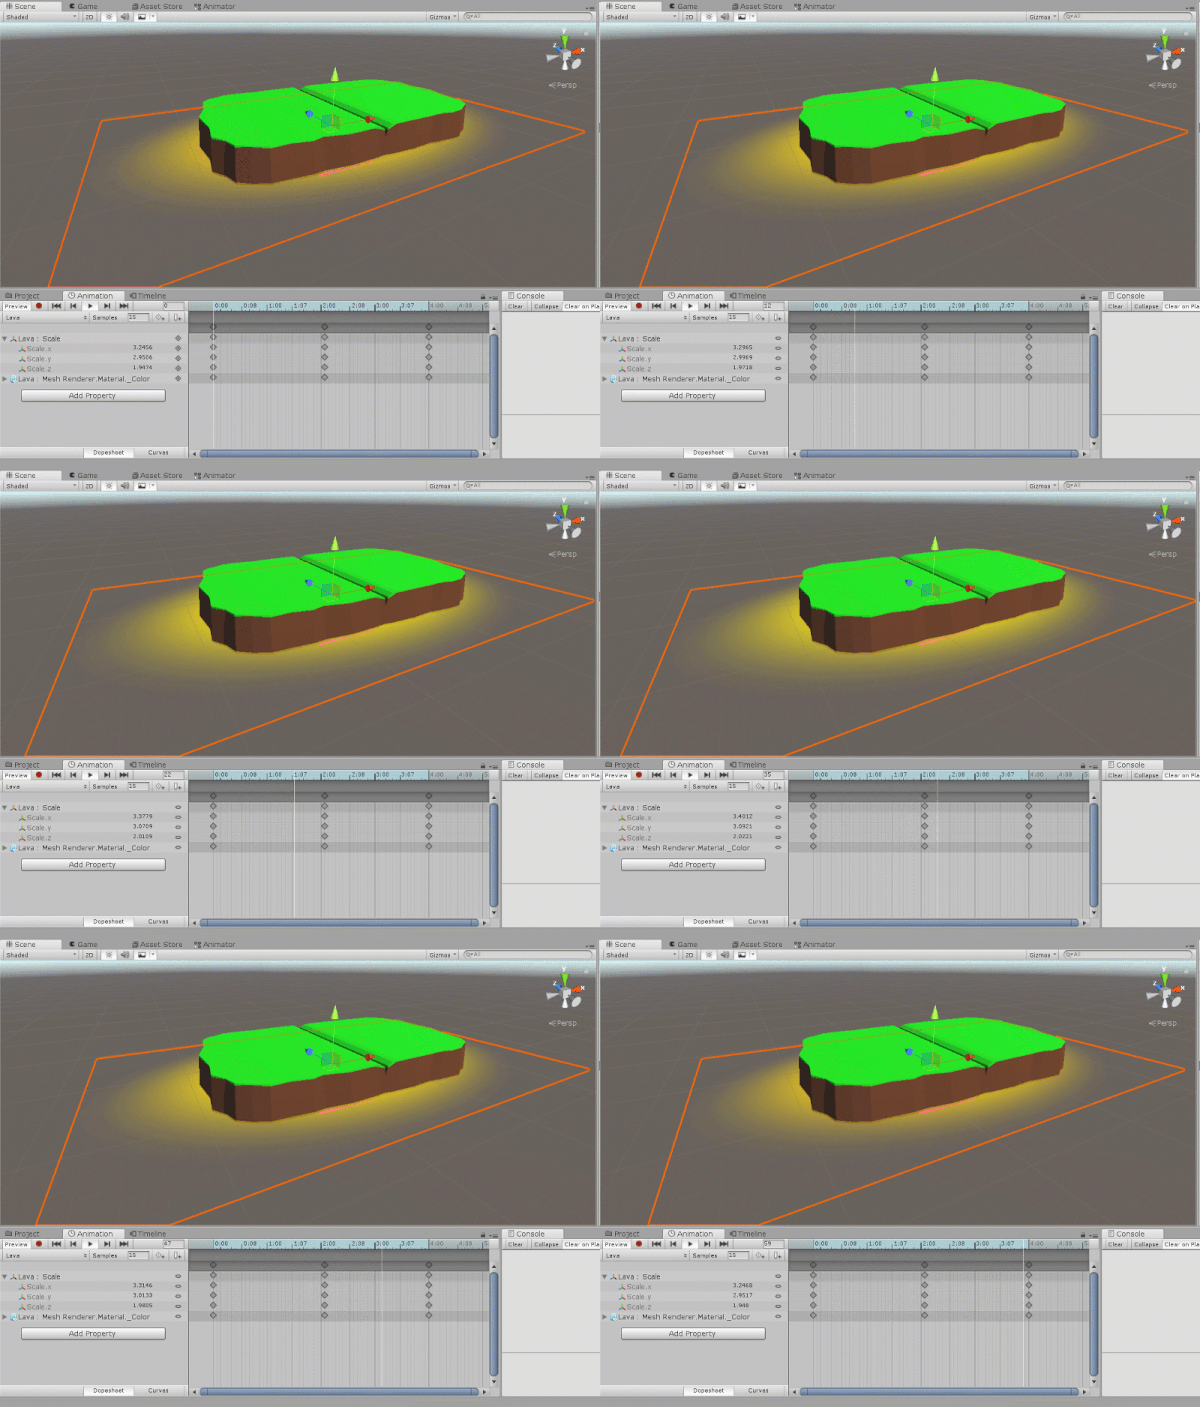
Once you’ve finished animating, you can make the “Lava” object a child of the “TectonicPlates” object.
Creating the UI Element
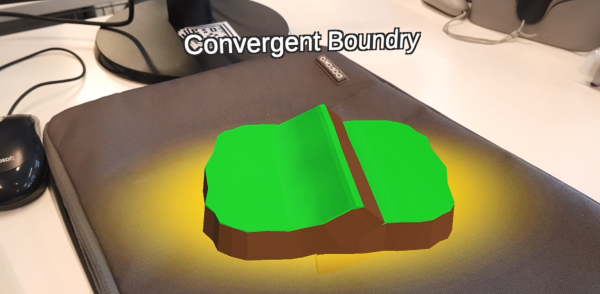
Since this app is aimed at education, it would be good to show the user what type of plate movement they just triggered.
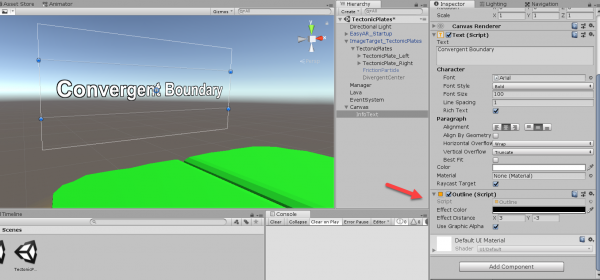
Create a new Canvas (right click Hierarchy > UI > Canvas). Set the “Render Mode” to World Space. Set the scale to 0.015, and position it behind the plates.
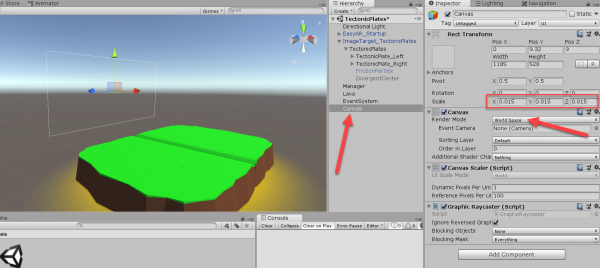
Add a new Text element to the canvas (right click Canvas > UI > Text). Resize it and edit the Text component to your liking. I added an Outline component to contrast any possible background.
Now create an animation called “InfoText_Entrance” that makes the text pop up and after a few seconds it disappears.
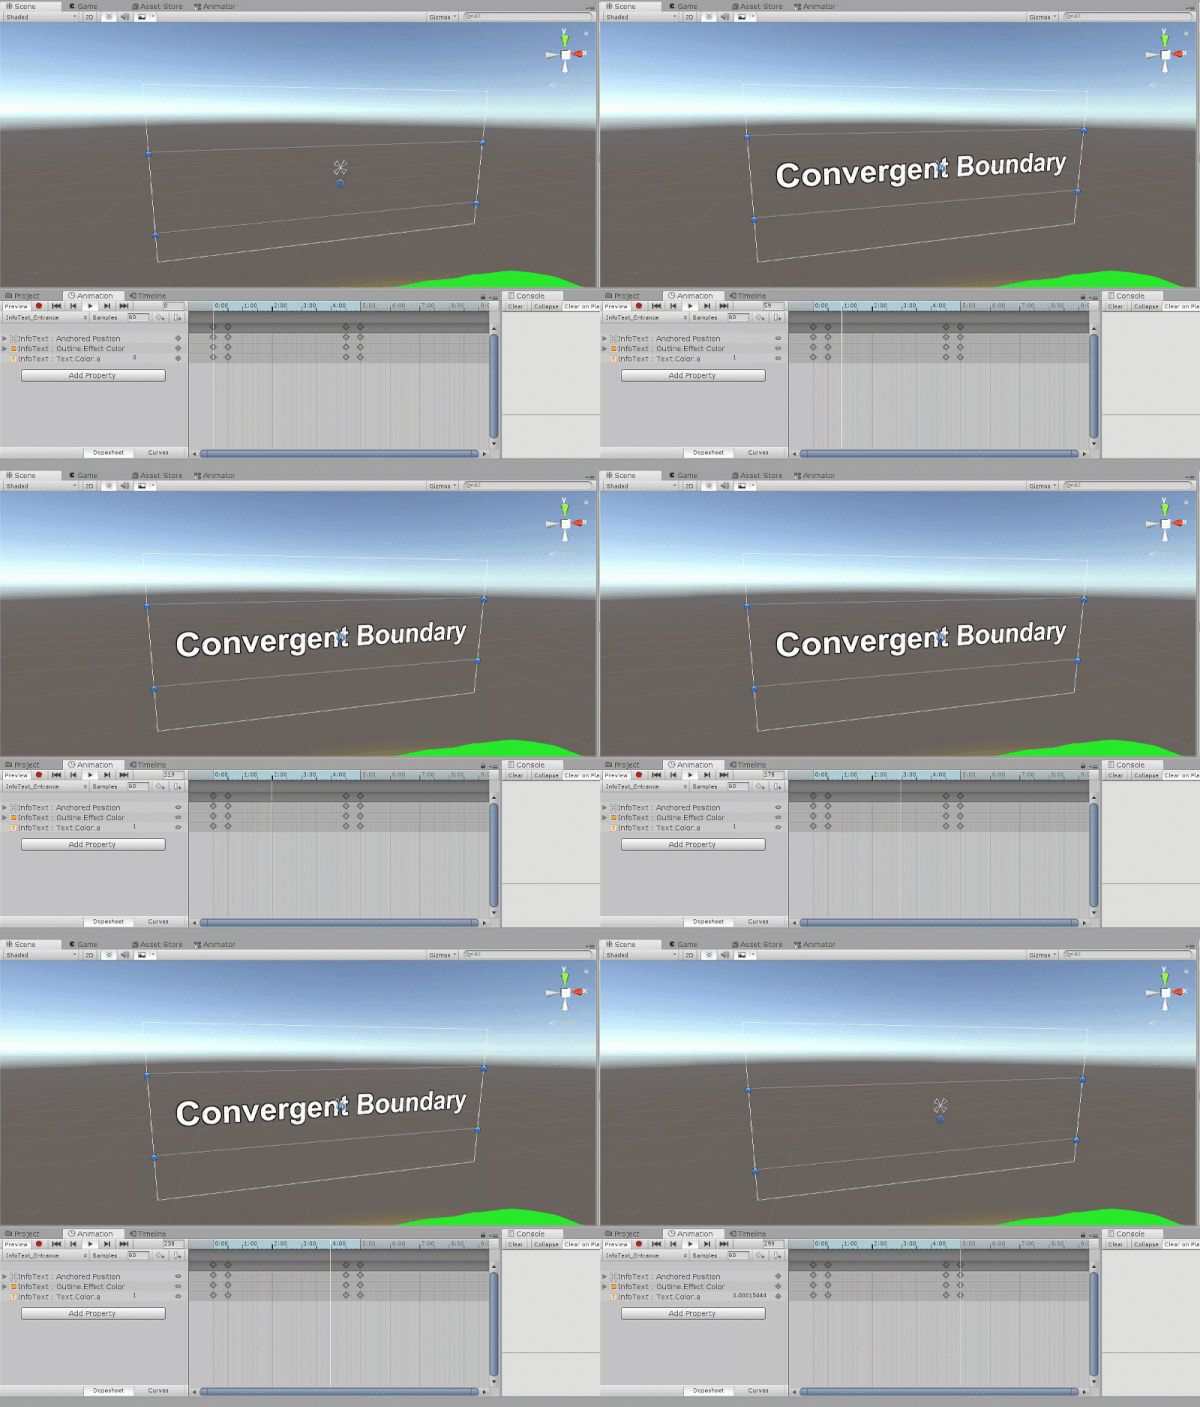
With the animation completed, let’s disable the text object and begin scripting.
Create a new C# script called “UI” and attach it to the “Manager” object.
Since we’re going to be using UI, we’ll need to reference Unity’s UI library.
using UnityEngine.UI;
Our 2 variables are the “infoText”, which is the actual text element we’re going to edit, and “infoTextAnim” is the Animator component attached to the text.
public Text infoText;
public Animator infoTextAnim;
We’re also going to include an instance (singleton) so that we can access this script easier later on.
// instance
public static UI instance;

void Awake ()
{
    // set instance to this script
    instance = this;
}
Our one and only function is “SetText”. This sets the text to display a certain string and plays the animation.
// sets the info text
public void SetText (string textToDisplay)
{
    infoText.gameObject.SetActive(true);
    infoText.text = textToDisplay;
    infoTextAnim.Play("InfoText_Entrance");
}
Connecting the Scripts
Now that we have all of our scripts, it’s time to connect them together.
First, let’s start with the TouchManager script.
Create a new function called “DoubleTapCheck”. This checks to see if the user has double tapped, and calls the corresponding function in the PlateManager script if so.
// checks for a double tap to reset the plates
void DoubleTapCheck ()
{
    if(Time.time - lastTapTime <= doubleTapMaxTime)
    {
        PlateManager.instance.DoubleTapResetPlates();
    }

    lastTapTime = Time.time;
}
We also need to call this function up in Update, where we check…
// did the touch START this frame?
if(Input.touches[0].phase == TouchPhase.Began)
{
    DoubleTapCheck();
    SetStartTouch(Input.touches[0].position);
}
Then, in the “CalculateDragDirectionOnPlate” function, we need to do 2 things.
First, where we check if the player tapped and didn’t drag, call the “UnassignPlate” function in the PlateManager script.
// was this not a drag but a tap? if so, unassign the plate
if(Vector3.Distance(touchStartWorldPos, touchEndWorldPos) < 3.0f && touchingPlate)
{
    PlateManager.instance.UnassignPlate(touchingPlate);
    return;
}
And right at the end of the function, assign the plate movement.
// assign the plate movement
PlateManager.instance.AssignPlateMovement(touchingPlate, plateDir);
Now for the PlateManager script.
In the “PlayAnimation” function, we need to call the “SetText” function in UI to display the current animation playing.
// assign the corresponding timeline to the director
// also set the UI text to display the movement type
switch (leftPlate.assignedMovement)
{
    case PlateMovement.TransformForward:
    {
        director.playableAsset = transformForwardsBackAnim;
        UI.instance.SetText("Transform Boundry");
        break;
    }
    case PlateMovement.TransformBack:
    {
        director.playableAsset = transformBackForwardsAnim;
        UI.instance.SetText("Transform Boundry");
        break;
    }
    case PlateMovement.Divergent:
    {
        director.playableAsset = divergentAnim;
        UI.instance.SetText("Divergent Boundry");
        break;
    }
    case PlateMovement.ConvergentOver:
    {
        director.playableAsset = convergentOverUnderAnim;
        UI.instance.SetText("Convergent Boundry");
        break;
    }
    case PlateMovement.ConvergentUnder:
    {
        director.playableAsset = convergentUnderOverAnim;
        UI.instance.SetText("Convergent Boundry");
        break;
    }
}
Finally, in the “DoubleTapResetPlates” function, we need to deactivate the text object.
FindObjectOfType<UI>().infoText.gameObject.SetActive(false);
Connecting Inspector Properties
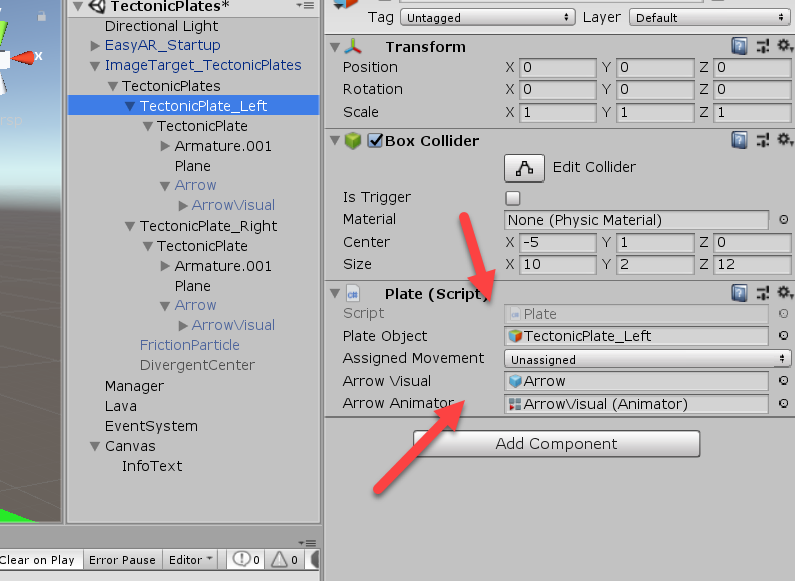
Make sure that each plate’s “Plate” script has the correct properties assigned to it.
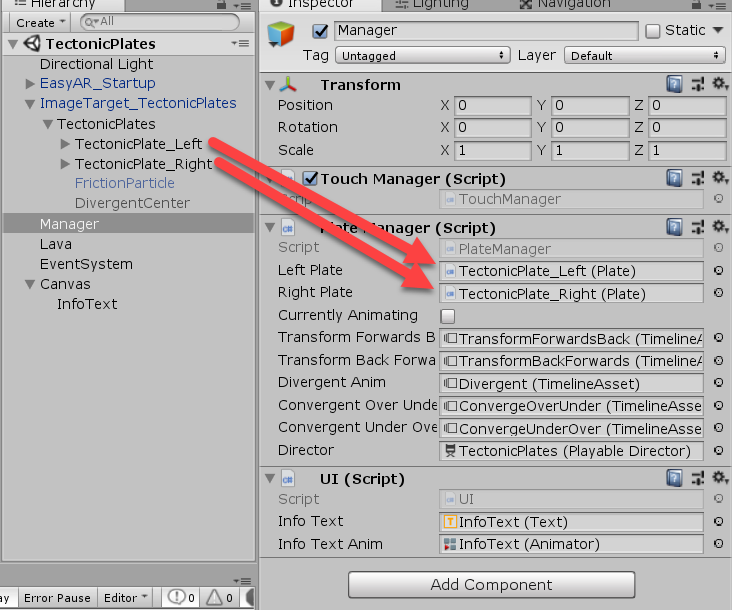
Do the same for the “Manager” object and its various scripts.
Testing in the Editor
You might want to test out the app in the editor before we build it to a device. There are three things we need to do:
- Add mouse input
- Disable EasyAR integration
- Add a camera to the scene
To add mouse input, go to the “TouchManager” script. In the “Update” function, add:
if (Input.GetMouseButtonDown(0))
{
    DoubleTapCheck();
    SetStartTouch(Input.mousePosition);
}
else if(Input.GetMouseButtonUp(0))
{
    if(touchingPlate != null)
        CalculateDragDirectionOnPlate(Input.mousePosition);
}
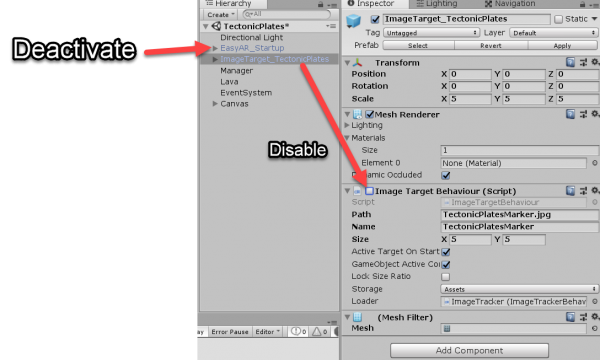
Back in the editor we need to disable the EasyAR components, so that they don’t try and run. Deactivate the “EasyAR_Startup” GameObject, and disable the Image Target Behaviour script on the “ImageTarget_TectonicPlate” GameObject.
Now we just need to add a new camera to the scene (right click Hierarchy > Camera). Set its tag as “MainCamera” and position it where you like.
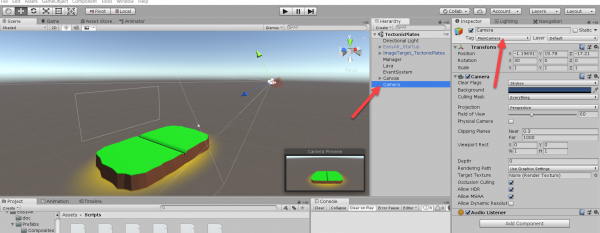
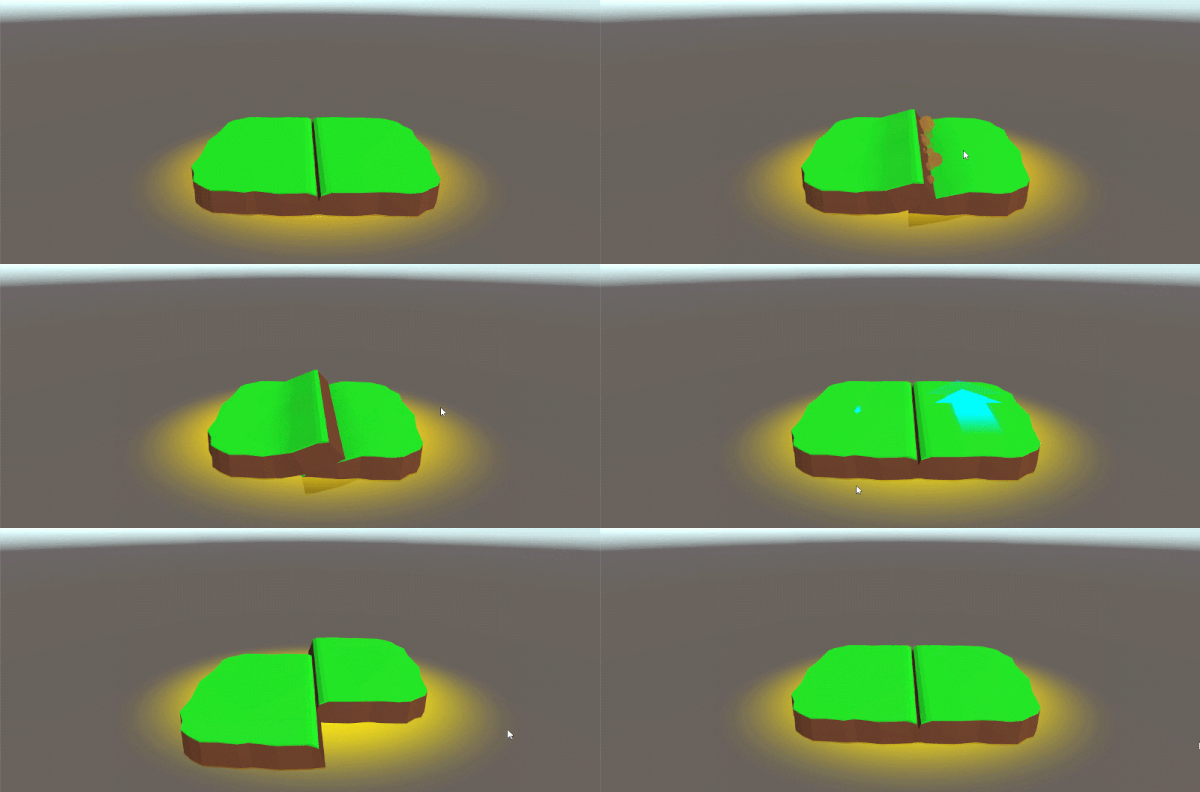
You should now be able to press play and test the app out in the editor!
Building
You can follow the last section of this tutorial on how to build to an Android device.
Conclusion
So we’ve made a working model of tectonic plates, with interactions to trigger certain plate interactions. If you want to use this in AR, you’ll need to print out the included image marker (located inside the StreamingAssets) folder. You can locate the project files here.
