Introducing Topcoat, the modern approach to prototyping and presenting your new idea!
Topcoat comes with a lot of great features and assets, including an Open Source font–“Source Sans Pro” and Open Source icons. Topcoat also provides PSD files for use with Adobe Photoshop, for your inner designer. To make things even easier– Topcoat makes use of the cdnjs Content Delivery Network, to serve out your assets in the most efficient way possible. Here are the links: Topcoat Library and
Topcoat Icons.
In this introduction to Topcoat, we will be working with the dark, mobile-minified css stylesheet, the “Source Sans Pro” font and some basic HTML5 markup to create a simple prototype application design.
You can download the tutorial source code here.
So, before we jump into some code, we should download the latest version of Topcoat (currently v0.8.0) and locate the css/ and demo/fonts/ directories inside the zip file.
Inside the css/ directory, we will be using the “topcoat-mobile-dark.min.css” stylesheet and inside the demo/fonts/ directory, we will be using the “sourcesanspro-regular-webfont.woff”. The font is of the “Web Open Font Format” and is currently supported by all major browsers, so we can safely use this font for our projects.
Before we get started, let’s create our directory structure and get ready to start coding!
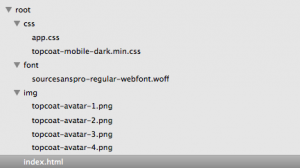
This is what our directory structure should look like:

As you can see, I have created an “index.html” file and a stylesheet– “app.css”. This stylesheet will be very simple, it’s main purpose is to use the
@font-face
rule, so we can use the “sourcesanspro-regular-webfont.woff” font. I have also copied the
“topcoat-mobile-dark.min.css” stylesheet and the “sourcesanspro-regular-webfont.woff” font into the css/ and font/ directories, respectively.
This is what our “app.css” should look like:
	@font-face{font-family: "Source Sans Pro", src: url("../font/sourcesanspro-regular-webfont.woff");}
	body{font-family: "Source Sans Pro", sans-serif;}
	img{display: block; margin: 0 auto;}
	strong{display: block; text-align: center;}
If you aren’t familiar with the @font-face rule, this is new in CSS3 and it allows us to specify a custom font file in our stylesheets and use this custom font in our web pages or applications built using HTML and CSS.
Please note that we don’t have to explicitly declare our “Source Sans Pro” font, as the “topcoat-mobile-dark.min.css” stylesheet already declares this font with the @font-face rule for us.
Now, for our markup, we will include our two stylesheets and use the
#wrapper
container for our content:
The #wrapper is essentially the container or parent element that we will be working with.
Inside our #wrapper, we will have a section and inside that section, we will have an unordered list with four list items– being our four contacts. We will also be making use of the new HTML5 tel anchor element’s href value, allowing the end user to click on the element and having the phone application of the device load, with the number specified in the href attribute’s tel value ready to call.
You will notice some semantics of the Topcoat framework, in terms of the naming convention used for the classes.
Our HTML markup should now look something similar to this:
Now, we want to add in our images, and surround each image with an anchor element, like so:
To finish off our little application prototype, let’s add in some names for our avatars, inside
tags, under the images in the list items and you will have something that looks like this:

You can download the tutorial source code here.
Learn Mobile HTML5 App Development
At ZENVA Academy we have two comprehensive mobile HTML5 courses, one of them uses Topcoat among with bleeding edge HTML5 API’s to create a beautiful app from scratch.


