You can access the full course here: Intro to ARCore
Table of contents
Part 1
ARCore SDK
What we want to do, first of all, is download the ARCore SDK. It can be found on GitHub here. Click Clone or download, then Download ZIP.
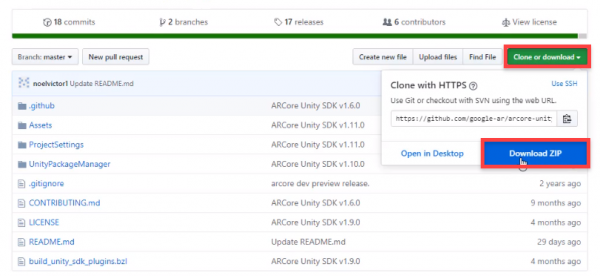
Inside of the .zip file, open up the master folder, then Assets. In here, we want to extract the GoogleARCore and PlayServiceResolver folders to a new Unity project.
Unity Setup
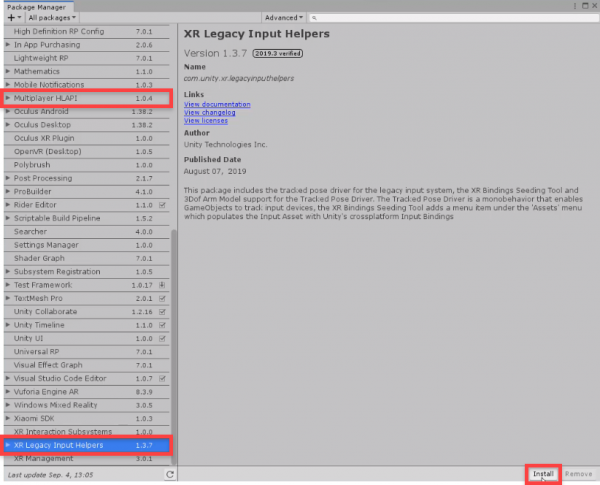
Now that we’ve got these folders imported, you might see that there are some errors. To fix this, let’s open up the Package Manager window (Window > Package Manager). Find the XR Legacy Input Helpers package and install it. Also, install Multiplayer HLAPI.
Scene Setup
Now let’s set up the scene so we can run AR. First, create a new empty GameObject and call it ARCore Device. Attach an AR Core Session component.
- Set the Session Config to Assets/GoogleARCore/Configurations/DefaultSessionConfig
- Set the Camera Config Filter to Assets/GoogleARCore/Configurations/DefaultCameraConfigFilter
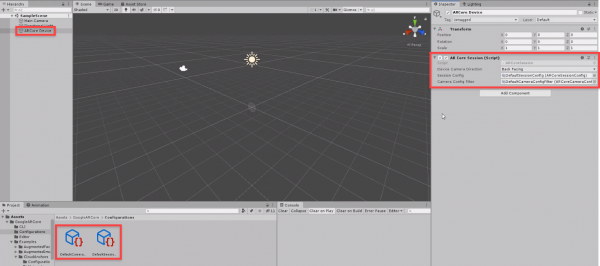
Select the MainCamera and drag it in as a child of the AR Core Device.
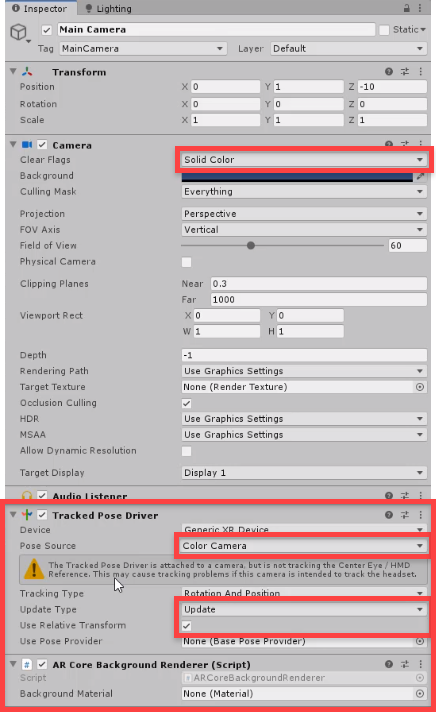
- Set the Clear Flags to Solid Color
Attach two new components: Tracked Pose Driver and AR Core Background Renderer.
- Set the Pose Source to Color Camera
- Set the Update Type to Update
- Enable Use Relative Transform
In the next lesson, we’ll be going over how to build our AR app to android.
Part 2
Building to Android
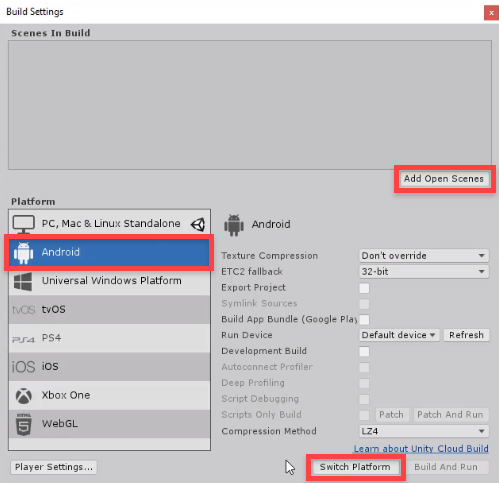
In this lesson, we’re going to be building the project to our Android device. Let’s start by converting the project to Android. Open the Build Settings window (File > Build Settings…). Select Android and click Switch Platform. Make sure that you have the Android module installed. Let’s also click Add Open Scenes to add the current scene to the build list.
Now that’s complete, let’s open the Player Settings window (Edit > Project Settings). Click on the Player tab to open the player settings tab.
- Set the Product Name to what you want the app icon’s text to display

Next, open Other Settings.
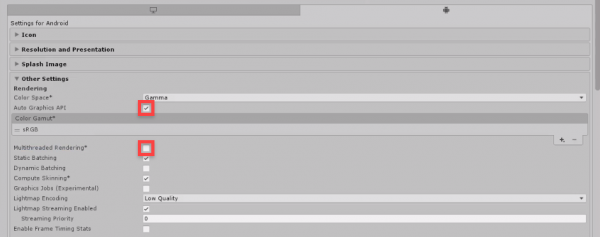
- Enable Auto Graphics API
- Disable Multithread Rendering
Scroll down a bit to Identification.
- Set the Package Name to a unique identifier for your app. Format: com.CompanyName.ProductName
- Set the Minimum API Level to Android 7.0 ‘Nougat’ (API level 24)

Finally, open the XR Settings tab and enable ARCore Supported.

Enabling USB Debugging
In order to build apps to our device, we need to enable USB debugging. On your device:
- Open the Settings app
- Click About Phone
- Click Software Information
- Tap the Build Number seven times
This will add a new screen to the Settings app called Developer Options. In there, enable USB Debugging.
Building to Android
Back in Unity, let’s go back to the Build Settings window and click Build and Run. Save the APK file anywhere on your computer. It’s not important where, as it will also be installed on your device (make sure it’s plugged in).
Transcript Part 1
Hey everyone, in this lesson, we are gonna go over how to actually set up ARCore on our new Unity project.
So, here I just have a brand new Unity project open, I got the sample scene here. So this is where we get the SDK from. This is on Google’s Github repo. There will be a link down the list, and a summary on how to get this. But all we need to do, is click on the clone a download button. We’ll download this here as a zip, and when this downloads, all we need to get from this, is not all the folders that we see here, instead let’s go onto assets, and we just need to drag in the Google ARCore, and play services resolver folders into our project.
So here we got the zip file. And all we need to do here is just open up this folder here, open up assets, extract those out to any place on your computer really. We can then exit out of this. And then what we want to do is drag them into our Unity project right here.
Okay, you may see that there are a few errors here, saying that some of the scripts don’t have certain things. Now, what we need to do also, is add in some of the Unity packages that we need in order to run this. So I’m gonna go up to window, package manager, and in here, what we want to do is scroll down to the bottom. We want to install XR Legacy input helpers, so we click install on this one, and this just allows us to basically detect the position and rotation of a certain device.
And we also want to install Multiplayer HLAPI, so click install on this one here as well. And this just allow us… This is the package we need in order for the ARCore cloud and gets to work. So we’ll install this one right here, and once that is complete, we should then be able to exit out of here, and the errors should be gone.
So there we go, it’s all working now. But we can’t build this to a device right now and run it because there is nothing really that is set up, to actually work for AR. We actually have to create a few game objects that will allow us to actually connect to the AR SDK, and start detecting plane, start creating feature points and all that stuff.
So, here inside of the hierarchy, let’s right-click and create a new empty object, and this object here is gonna be called ARCore device. As a trial… As, or in this object, we need to add two components, the first one is gonna be our ARCore session, and this just basically runs the entire sort of AR system in Unity here. Now, it’s asking us for, first of all, a device camera direction. We can choose the back facing or front-facing camera, let’s just stick it to back facing for now.
We can also give it then a session config and a camera config filter, now this, we need this in order to basically set up some of the configurations for the session and for the camera. Now if we go to Google ARCore here, and then go configurations, you’ll see that we have two configurations here already set up for us, we got the default camera config filter and the default session config. Let’s look at ARCore device and drag this into their perspective config slots. There we go, we got that set up and that is the ARCore device set up and ready to go.
Next, we need to drag the main camera in as a child of ARCore device and first of all, what we want to do on the camera, is set the clear flags to a solid color, and add in two components. The first one is going to be a TrackedPoseDriver right here. We just want to keep this on Generic XR Device. Center Eye, we wanna change this to color camera, and then we want to pretty much keep everything here the same except update type, we wanna change this to update, and yup, let’s also then disable use relative position and now we can add another component called the ARCore background renderer, and this is going to basically make it so that the background of this camera, what we can see with the camera is going to be what our camera sees.
So this background material here, we are just gonna set this here to be the AR background. There we go. And that is ARCore pretty much set up, that’s all the basic stuff we need in order to run, this AR app and have the systems working in place, now from here, we can add various different things such as the ability to visualize plains, the ability to interactive plains, and the ability to do many other things inside of ARCore, which we will be going over in the future lessons.
So I’ll see you then in the next lesson.
Transcript Part 2
Welcome back, everyone. In this lesson, we’re gonna go over how to actually set this up and build it to our Android device.
So here we are inside of our Unity project. And what we want to do first of all is switch over to the Android build platform because right now, as you can see here at the top of the screen, we are currently working on the PC, Mac, and Linux standalone build platform. So to switch over to Android, let’s go File, Build Settings and now when you installed your version of Unity, you would’ve had to then add in the Android module. This can be done by going to the Unity hub, finding your install of Unity, clicking on the three dots and then clicking Add Module and then adding the Android module that way.
So we’ll click on Android here. And then we’ll click on the Switch Platform button. Now it shouldn’t take too long to switch over to the platform and once we do that, you can see that at the top left here, it now says Android.
Okay, while we’re here as well in the build settings menu, let’s click on the Add Open Scenes button to add our currently opened scene to the Scenes In Build list. This is just a list of scenes that will be built for the final game. And of course, we need one scene here, at least, to boot into which is going to be this sample scene we’re currently working in.
All right, next up, let’s go to Player Settings right here. We’ll click on that. And this opens up a screen here with a bunch of stuff we can change. First of all, let’s change the product name to whatever we want to be displayed on screen for the app icon. This is what you’ll see for the app whenever you see on your device’s screen. So here, we’ll just call this one our Intro to ARCore. There we go. The rest of the stuff here can pretty much be left alone as it is.
Inside the Other Settings tab, we can open that up. First of all, we want to enable Auto Graphics API so they can automatically set-up the graphics APIs that we need. Then we can disable Multithreaded Rendering as it isn’t supported by ARCore.
And down here inside of the identification section here, we want to change this com.DefaultCompany.IntrotoARCore to pretty much a unique identifier for our app. This is what the package name is. And it’s just a way for your device to know that this is a unique app so the way we normally do it is by going com dot the name of your company dot the name of the product. Now this isn’t strict in anyway so you don’t have to enter in your actually company name or your actual product name. It’s really just a way to uniquely identify your app. So I’m just gonna go com.Zenva.IntrotoARcore.
All right, then after that, we want to change our minimum API level from the default 4.4 to Android 7.0 as that is the minimum API requirement for AR Core. Now scroll down a bit here and that is pretty much all we need for Other Settings. Finally, let’s open up XR Settings right here and just enable AR Core Supported. Okay, so we got that all done.
Now we should be good to actually build this to our device. But before we do that, we have to make sure that our device is actually able to have apps installed on it from our computer. By default this isn’t possible so we have to go into our device and enable developer options and enable USB debugging.
Okay, so what you wanna do is you, first of all, wanna go to your Settings on your mobile device. Then, you wanna scroll right down to the bottom to About Phone and then in here we wanna click on Software information. In here, what we wanna do then is just tap on our build number here seven times. So one, two, three, four, five, six, seven. And what this does is we then have to enter in our current pin. And then developer mode has been enabled.
So we can go back, back to our settings. And if we scroll right down to the bottom, you’ll see that we now have developer options enabled. We can open that up and in here what we want to do is scroll down to USB debugging here. We wanna enable that. And what this will allow us to do is connect our device up to our computer and it will allow us to build Unity games directly to our mobile and add that as an app. That’s pretty much all we have to do on our phone. Now, what we need to do is connect our device to our computer and make sure it is all set-up and ready to go.
Once that is done and your device connected, to make sure we can go Refresh here on Run Device. And then check to see if our device is here. If so, we can select it and then click Build and Run. This will ask us to save it to a certain location. I’m just gonna save it here by default to our actual project folder. And it’ll ask you to select, I mean, it’ll ask you to enter in a file name. Now this can be anything you want as this is the name of the APK and not the actual app that is going to be installed on your device. So I’m just gonna call this one App.
Click Enter and it will begin to build to our device. First of all, checking to see if we have any compatible devices. And then if so, it will begin to build and then after that is complete, the app should then automatically boot up on your device for you to test out. And when it does so, since we have nothing really in our project at the moment, you shouldn’t really see anything happen but all you really should see is your device’s camera. So if you open up the app and your device is pretty much just shown you what the camera sees, then so far it is working. So once you do that, we can continue on with learning AR Core in the future lessons.
Interested in continuing? Check out the full Intro to ARCore course, which is part of our Augmented Reality Mini-Degree.


