Table of contents
Intro
Once upon a time, kids used to play with real, “flesh and bone” animals like dogs, cats and hamsters. Today’s kids play with elaborated algorithms that simulate living beings and carry out actions such as eating, playing and even popping. We call these misguided inventions “virtual pets”.
I’m exaggerating. Kids still play with real animals and yes, they play with virtual pets too just like many grown ups do. And there is nothing wrong with that. Virtual pets are one more of the many types of video games you can find nowadays, and this tutorial is going to teach you how to make a simple virtual pet using which will run on any HTML5 supporting device.
HTML5 Game Development
One of the great things about HTML5 is that all you need to make games are a text editor, a web browser and of course a program to create the artwork. That part is not even necessary anymore with sites like OpenGameArt.org that provide awesome game artwork you can use for free.
We’ll be building this simple virtual pet game using a JS framework called LimeJS. You can download this framework and install it following the official guide at www.limejs.com.
The official guide provides you with a good starting point when it comes to the installation and usage of the framework. The community is also a great place to find information.
If you are looking for a guided and comprehensive alternative which teaches you all the basics of this great framework starting from scratch (well, assuming you have basic JS knowledge), I’ve prepared an online course titled HTML5 Mobile Game Development for Beginners, which you are welcome to check out (using the provided link will give you 30% off the course price).

Project Setup
After installing LimeJS as per the official guide or my online course, our next step will be to create the project. We are gonna open our terminal, cd to the limejs folder any type:
bin/lime.py create virtual_pet
This will create a folder called “virtual_pet” inside our limejs folder with some startup files. Let’s open virtual_pet.html and add some styling tags to the head section. This will give us a black background on the page and a little hack to fix an issue when changing scenes (we won’t use this in this tutorial, but it’s something I always add).
.lime-scene {display:block !important;}
   body {background-color:black;}
Open virtual_pet.js and replace it’s contents by the following:
 //set main namespace
  goog.provide('virtual_pet');

  //get requirements
  goog.require('lime.Director');
  goog.require('lime.Scene');
  goog.require('lime.Layer');

  // entrypoint
  virtual_pet.start = function(){
      //object to store game-level properties
      var gameObj = {
          width: 320,
          height: 480,
          renderer: lime.Renderer.CANVAS
      };

      var director = new lime.Director(document.body,gameObj.width,gameObj.height);
      var gameScene = new lime.Scene().setRenderer(gameObj.renderer)
      var gameLayer = new lime.Layer().setAnchorPoint(0,0);
      gameScene.appendChild(gameLayer);

      director.makeMobileWebAppCapable();
      director.replaceScene(gameScene);
  }

  //this is required for outside access after code is compiled in ADVANCED_COMPILATIONS mode
  goog.exportSymbol('virtual_pet.start', virtual_pet.start);
This will give us an object called “gameObj” that we’ll use to store game-level properties and the basic elements all LimeJS projects have, like a director, a scene and a layer. The director takes care of the big picture, just like in a movie. Things like telling the app what scene is currently being shown are carried out by the director (“replaceScene”). Layers are containers that allow us to place elements into. The elements are placed in the layer’s own coordinates.
The Pet
I’m sure you have a cute pet in mind, something like a cartoonish hamster or a dog. Maybe some of you are thinking of out of the ordinary virtual pets, like a politician or Psy. No worries, the pet we’ll be having is something much simpler: how about a circle?
Our pet (lets call it Zenvita) will have two numeric properties:
- Health. I thought it would be cool to have the circle grow in size as the pet gets healthier, and diminish if it becomes unhealthy (although with human beings it’s usually the opposite), until it reaches 0 and dies.
- Happiness The happier the pet, the greener the circle. If the pet goes sad it will become brownish, until it eventually becomes red and dies.
Lets create a new file called pet.js with the following content:
goog.provide('virtual_pet.Pet');
goog.require('lime.Circle');

virtual_pet.Pet = function(gameObj) {
  goog.base(this);

  this.gameObj = gameObj;
  this.happiness = 100;
  this.health = 100;

  this.setPosition(this.gameObj.width/2, this.gameObj.height/2);
  this.updateLook();
};

goog.inherits(virtual_pet.Pet,lime.Circle);

/**
 * update the pet's look according to it's happiness and health
 */
virtual_pet.Pet.prototype.updateLook = function() {
    //size of the pet according to the health
    var petSize = this.gameObj.maxPetSize * this.health/100;
    this.setSize(petSize, petSize);

    //color according to the happiness (between green and red)
    var redAmount = parseInt((100-this.happiness)/100*255); //255 if 0 health
    var greenAmount = parseInt((this.happiness)/100*255); //255 if 100 health
    this.setFill(redAmount,greenAmount, 0);
};
After adding a new file don’t forget to “require” this new object back in virtual_pet.js:
goog.require('virtual_pet.Pet');Add this to the gameObj object definition in virtual_pet.js:
maxPetSize: 200,
And run the following command on the terminal to update the project dependencies:
bin/lime.py update
Ok lets look into the pet.js file now. We are defining a new object called virtual_pet.Pet, which inherits from a Circle. LimeJS allows you to use the Google Closure inheritance capabilities. This basically means that a virtual_pet.Pet object will have the same properties and methods of lime.Circle, plus the new stuff we add in.
In the constructor we are passing it the gameObj object with game-level stuff so that it can be accessed or modified. We are giving the pet a default value of 100 for both happiness and health. The initial location of Zenvita will be the center of the screen. Finally, we are calling a method called updateLook(), which is defined further down.
updateLook() does the following:
- Calculate the pet’s current size based on the default maximum size and the pet’s current health.
- Setting this size to the pet, using setSize(), which is available on lime.Circle objects.
- Calculate the amount of green and red according to the pet’s happiness. RGB color definitions consist in three numbers that go from 0 to 255 and represent the amount of red, green and blue. Zenvita will have no blue, just red and green according to it’s happiness.
- Definite the filling of the circle as per the amount of each color.
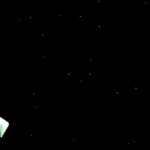
Let’s create the new pet in virtual_pet.js and see the result. Add the following after “gameScene.appendChild(gameLayer);”:
//create pet
var pet = new virtual_pet.Pet(gameObj, gameLayer);
gameLayer.appendChild(pet);
If you reload your browser you should see the pet with a black background. If you change the health and happiness of the pet and reload the page you should be seeing the increase in size and the color changes.

Game Over Conditions
Let’s make it so that if Zenvita reaches 0 health or 0 happiness, it dies. And let’s make it a very demanding pet that needs to be constantly entertained and fed. Zenvita will lose 1 unit of health and happiness per second, which means if you leave it still for 100 seconds it will die.
We’ll use the scheduler manager function to setup a timer, so that it’s executed every 0.1 seconds. Now why not every second? well, I’m planning on using this same timer later on for another feature which requires a shorter span, so 0.1 seconds will do for both.
In the virtual_pet.Pet constructor, add the following bellow “updateLook();”:
var dt = 100;
lime.scheduleManager.scheduleWithDelay(function() {
        this.happiness -= 0.1;
        this.health -= 0.1;

        //game over
        if(this.happiness <= 0 || this.health <= 0) {
            alert('Game over!');
            location.reload();
        }

        this.updateLook();
    }, this, dt);
What does piece of code does, it runs every 100 milliseconds, and on each run it diminishes the pet’s health and happiness and updates the pet’s look. If any of the properties reaches a value of 0 or lower, the game is over and the page is reloaded (you can replace that with a proper ending/sad screen).
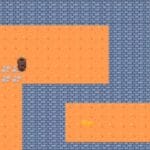
Background and Menu Area
Let’s add a background color to the game and a menu area. Add the following in virtual_pet.js after the gameLayer definition, which will give us basic rectangles to represent these areas:
var background = new lime.Sprite().setSize(gameObj.width,gameObj.height*4/5).
        setFill('#F3E2A9').setAnchorPoint(0,0).setPosition(0,0);

var menuArea = new lime.Sprite().setSize(gameObj.width,gameObj.height/5).
        setFill('#8B5A00').setPosition(gameObj.width/2,gameObj.height*9/10)

gameLayer.appendChild(background);
gameLayer.appendChild(menuArea);
After reloading, the game should be looking like this:

Pet Items
Ok so far there isn’t much going on except making our pet hungry and upset. We need items like apples, ice creams and toys to get this more interesting.
We’ll create a new file called item.js, don’t forget to add a “require” statement for it in virtual_pet.js and to run the LimeJS project update command that we ran before. Use the following for the file’s contents:
goog.provide('virtual_pet.Item');
goog.require('lime.Sprite');

virtual_pet.Item = function(happiness, health) {
    goog.base(this);

    this.happiness = happiness;
    this.health = health;
}

goog.inherits(virtual_pet.Item,lime.Sprite);
Things to keep in mind:
- Our item object inherits from lime.Sprite (used to create rectangles or images).
- When creating an item object, the happiness and health this item provides to the pet have to be given as parameters.
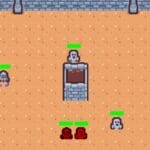
Now in our menu area we will be adding button to give the pet some items. In a more polished version there could be a screen to pick among hundreds of items with different features, you could have them loaded from the web and make the user buy them with real money :) .. in this demo we will take a much simpler approach and hard-code three items for the user to pick.
Let’s add the following code to virtual_pet.js, after the menu area was appended to the Layer:
var appleButton = new lime.Sprite().setSize(gameObj.height/10,gameObj.height/10).
        setPosition(gameObj.width/4,gameObj.height*9/10).setFill('images/apple.png');

    goog.events.listen(appleButton, ['touchstart', 'mousedown'], function(e) {
        e.stopPropagation();
        gameObj.currentItem = {
            width: gameObj.height/10,
            height: gameObj.height/10,
            fill: 'images/apple.png',
            happiness: -5,
            health: 20
        };
    });

    var icecreamButton = new lime.Sprite().setSize(gameObj.height/20,gameObj.height/10).
        setPosition(gameObj.width/2,gameObj.height*9/10).setFill('images/icecream.png');

    goog.events.listen(icecreamButton, ['touchstart', 'mousedown'], function(e) {
        e.stopPropagation();
        gameObj.currentItem = {
            width: gameObj.height/20,
            height: gameObj.height/10,
            fill: 'images/icecream.png',
            happiness: 20,
            health: -10
        };
    });

    var toyButton = new lime.Sprite().setSize(gameObj.height/15,gameObj.height/10).
        setPosition(gameObj.width*3/4,gameObj.height*9/10).setFill('images/toy.png');

    goog.events.listen(toyButton, ['touchstart', 'mousedown'], function(e) {
        e.stopPropagation();
        gameObj.currentItem = {
            width: gameObj.height/15,
            height: gameObj.height/10,
            fill: 'images/toy.png',
            happiness: 10,
            health: 0
        };
    });

    gameLayer.appendChild(appleButton);
    gameLayer.appendChild(icecreamButton);
gameLayer.appendChild(toyButton);Note: if you want to make this something more abstract instead of repeating the code like this, you can look at my farming game tutorial on Binpress for a more polished implementation of this feature.
What we are doing with the buttons is:
- Creating sprites with image backgrounds for each button (you can download all the code and images further down).
- Binding mouse clicks and touch events to each button so that a “currently selected item” is setup on each case.
See how the apple will add health but take happiness away (apples are a bit boring, lets face it), icecreams will bring happiness but make it sick, and toys will just add a bit of fun to Zenvita’s life.
Nom nom nom
Having given the user the ability to pick an item, we need now to give them the ability to place these items on the game background, so that Zenvita can come by and nom nom nom…
Firstly, let’s add another property to the gameObj object definition, which should look like this:
var gameObj = {
        width: 320,
        height: 480,
        renderer: lime.Renderer.DOM,
        maxPetSize: 200,
        items: []
    };
The items array will contain all the items that are dropped on the game background. Let’s add a click/touch event binding to the background, in virtual_pet.js, right after the background definition, so that new items are created when the user clicks on it:
goog.events.listen(background, ['touchstart', 'mousedown'], function(e) {
        if(gameObj.currentItem) {
            var pos = e.position;
            var newItem = new virtual_pet.Item(gameObj.currentItem.happiness,gameObj.currentItem.health)
                .setPosition(pos)
                .setSize(gameObj.currentItem.width, gameObj.currentItem.height)
                .setFill(gameObj.currentItem.fill);
            gameLayer.appendChild(newItem);
            gameObj.items.push(newItem);

            var movement = new lime.animation.MoveTo(e.position.x,e.position.y).setDuration(2);
            pet.runAction(movement);

            gameObj.currentItem = null;
        }
    });
This will create the item object and place it where we click (or touch). We are also creating an animated movement so that the pet goes to where the item has been dropped. The current item selection is cleared by setting this property to null.
In pet.js, inside our scheduler function, we will add collision detection so that items are consumed by the pet if they are occupying the same space (otherwise, the pet will go towards the food but it will not be eaten). The scheduler function will look like this:
var dt = 100;
var i, arrayLen, toRemove;
lime.scheduleManager.scheduleWithDelay(function() {
        this.happiness -= 0.1;
        this.health -= 0.1;

        //game over
        if(this.happiness <= 0 || this.health <= 0) {
            alert('Game over!');
            location.reload();
        }

        //check for collision with items
        toRemove = new Array();
        for(i = 0, arrayLen = this.gameObj.items.length; i<arrayLen; i++) {

  if(goog.math.Box.intersects(this.gameObj.items[i].getBoundingBox(), this.getBoundingBox())) {
                this.happiness = Math.min(this.happiness+this.gameObj.items[i].happiness,100);
                 this.health = Math.min(this.health+this.gameObj.items[i].health,100);
                 toRemove.push(i);
            }
        }

    //remove picked up items
    for(i = toRemove.length; i > 0; i--) {

            this.gameLayer.removeChild(this.gameObj.items[toRemove[i-1]]);
            this.gameObj.items.splice(toRemove[i-1],1);
        }
        this.updateLook();
    }, this, dt);
What’s going on here:
- We iterate through the placed items (array gameObj.items), if any of them collides with the pet, it is added to a “toRemove” array.
- Colliding elements add/subtract health and happiness to the pet.
- We remove all colliding items.
- The reason why I’m doing for(i = 0, arrayLen = this.gameObj.items.length; i<arrayLen; i++) instead of for(i = 0; i< this.gameObj.items.length; i++) is because getting an array’s length uses up resources, so it’s more efficient to carry out this operation just once instead of in each iteration.
Pets Like to be Petted
Let’s add one final thing to this game. Pets like to be petted, so how about we make it so that when the pet is dragged around it increases it’s happiness?
Add the following code to the constructor in pet.js, after the scheduler. Using “e.swallow” can be used in other events in LimeJS and it allows you to run code when the event is finished.
//drag it around to make it happier
    goog.events.listen(this,['mousedown','touchstart'],function(e){
        e.startDrag(true);

        var pet = this;
        e.swallow(['mouseup','touchend'],function(){
            this.happiness = Math.min(this.happiness+5,100);
        });
    });
Download the Files
You can download the code and images of this tutorial using this link.
Next Steps
There are many ways you could improve this game demo and turn it into a blockbuster hit:
- Add the ability to save/load the data from a server
- Instead of having a circle for a pet use a nice cute character, and animate it according to it’s health and happiness.
- Add countless items to buy, trade, etc.
- The pet could have random behaviors, like a rush of happiness or a panic attack.
I hope you enjoyed this tutorial and are eager to learn more on HTML5 app and game development. At Zenva, we have many courses on app and game development, feel free to check them out here.
And don’t forget that by using the following link, you get a nice discount on the course Mobile HTML5 Game Development for Beginners, which uses the LimeJS framework to create many cool game demos such as this one. The course will also guide you through the steps you need to go through in order to pack your HTML5 game into a native app for iOS and Android.