Table of contents
Intro
Over the last few years, HTML5 has come out as a great alternative to develop cross-platform app using a single code base. A HTML5 app can run on iOS, Android, Windows Mobile, Blackberry.. and of course good old Desktop.
For amateurs and professional developers it’s quite easy to get started with HTML5 (which comprises HTML, CSS and Javascript) as all you need is a text editor and a web browser.
In this tutorial you’ll learn the basics on how to create a simple farming game that emulates those big hits you’ve played on Facebook. We’ll be using an open source HTML5 game dev framework called LimeJS.

Tutorial requirements
- Basic HTML and Javascript knowledge
- Basic notions of Object Oriented Programming
- A text editor or IDE to create and edit code (I recommend Netbeans)
- A terminal to run commands
Farming Games?
Farming games are a big phenomena that knows no limits when it comes to nationalities and generations. Fortunes have been made around them and people have created variations from the original concept. It’s not strange to find medieval, tropical, futuristic, even zombie themed farming games in the various app stores out there.
What is the reason behind this success? do we miss plowing the land with out bare hands in this post-modern urban civilisation? is this related to the urban farms people now grow on their balconies? Well who knows! ..
I’m not gonna tell you what the reasons are for their success (not that I know them anyway) but I am, on the other hand, gonna teach you how to make a simple farming game using HTML5 and an open source JS framework called LimeJS.
LimeJS
LimeJS is a Javascript game development framework that allows you to create cross-platform HTML5 games that work well on most platforms (specially iOS and newer Android devices).
You can dowload LimeJS from their home page. Installation instructions and a good intro can be found in the Getting Started Guide.
If you want step by step, video-based instructions on how to install this framework in Mac, Windows or Ubuntu and get a good hold of the basics feel free to check my online course, which teaches you all the basics of game development using LimeJS and other free tools.

If you want more info about my courses ask me on the comments section or on Twitter (@ZenvaTweets).
Game Elements
Our game will have the following elements:
- Land
- Plowing the land
- A shop to get crops
- Planting crops
- Plants growing
- Harvesting!
In this tutorial we won’t get into making it social or pervasive, but it might be on the horizon for future tutorials :)
Game World
Time to stop talking and dip our hands into the code. Oh yes. Assuming you have successfully downloaded and installed LimeJS (you should be able to run the examples that come with it) we’ll create a new project:
bin/lime.py create farming
This will create a folder called “farming” inside of the folder where LimeJS was installed. If you installed LimeJS correctly you should be able to find a file called “farming.html. Open up the file and add the following below the script tag:
 <style>
 .lime-scene {display:block !important;}
 body {background-color:black;}
 </style>
All this is doing is setting the background to black and applying a little hack for a known bug on some devices. Now open farming.js and replace it’s contents with the following code:
//set main namespace
goog.provide('farming');
//get requirements
goog.require('lime.Director');
goog.require('lime.Scene');
goog.require('lime.Layer');

//entrypoint
farming.start = function(){

    //game object
    var gameObj = {
        width: 320,
        height: 480,
    }

    var director = new lime.Director(document.body,gameObj.width,gameObj.height);
    director.makeMobileWebAppCapable();
    director.setDisplayFPS(false);

    var gameScene = new lime.Scene().setRenderer(lime.Renderer.CANVAS);
    var landLayer = new lime.Layer().setAnchorPoint(0, 0);
    var controlsLayer = new lime.Layer().setAnchorPoint(0, 0);

    gameScene.appendChild(landLayer);
    gameScene.appendChild(controlsLayer);

    director.replaceScene(gameScene);
}
That is just a basic boilerplate (if you open farming.html you should see a black screen). Firstly, we are providing the namespace “farming” which is required to do when working in LimeJS. We are then including relevant framework modules. Our farming.start() is the first thing that is run when the game loads (see how this is being called in farming.html).
We can define an object called gameObj (or however you want) to store some game-level variables. We will be passing this object around to our game elements so that these properties can be accessed from everywhere.
In the next blocks we are defininig our “director” object which does a similar role as real life directiors: define which scenes are playing, etc. Our game will have two layers (which are areas where content will be placed). landLayer will host the land and the crops. controlsLayer will have the status area and the options for the user, which in this case is the button to enter the shop.
Controls area
Let’s include another file that provides a quick button:
goog.require('lime.GlossyButton');We can add more properties to our gameObj that will contain some dimensions. It is recommended to do it this way instead of putting “magic numbers” in the code. Some of the properties I’m adding now will only make sense later in the tutorial so don’t worry if you don’t see them in the code right away:
//game object
var gameObj = {
    width: 320,
    height: 480,
    tile_size: 64,
    num_tiles_x: 5,
    num_tiles_y: 6,
    landLayer_w: 64*5,
    landLayer_h: 64*6,
    controlsLayer_w: 64*5,
    controlsLayer_h: 64*1.5,
    costPlowing: 5,

    //shop
    shop_margin_x: 50,
    shop_margin_y: 20
}
Besides our game object, we also want to create an object for the player (just a design choice). The object will store the money and the currently selected crop (this will make sense later on). Add the following after the game object creation:
//player object
var playerObj = {
    money: 300,
    currentCrop: 0
}
Now add the following code below “gameScene.appendChild(controlsLayer);”:
//controls area
var controlArea = new lime.Sprite().setAnchorPoint(0,0)
.setPosition(0, gameObj.height-gameObj.controlsLayer_h)
.setSize(gameObj.controlsLayer_w, gameObj.controlsLayer_h)
.setFill('#0D0D0D')
controlsLayer.appendChild(controlArea);
//shop button
var shopButton = new lime.GlossyButton().setColor('#133242').setText('Shop')
.setPosition(60, gameObj.height-gameObj.controlsLayer_h/2)
.setSize(80, 40);
controlsLayer.appendChild(shopButton);
//money
var moneyLabel = new lime.Label().setText('$'+playerObj.money).setFontColor('#E8FC08')
.setPosition(gameObj.controlsLayer_w-50, gameObj.height-gameObj.controlsLayer_h/2);
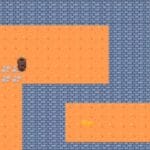
controlsLayer.appendChild(moneyLabel);What we just did was adding a grey container on the bottom, a button that says “Shop” and a text label showing the player’s current money. You should be seeing the following:

Game Tiles
The tiles used in this game have been adapted from Daneeklu’s artwork which has been released under the CC-BY-SA license, allowing us to use it for this purpose.
You can download all the game files from here.
Land
Back to work. To represent a unit of land we’ll create a new file called “land.js” and give it the following code:
goog.provide('farming.Land');
goog.require('lime.Sprite');

/**
 * Land elements
 *
 * @param {} gameObj
 */
farming.Land = function(gameObj, playerObj) {
    goog.base(this);
    this.setAnchorPoint(0, 0);
    this.setSize(gameObj.tile_size,gameObj.tile_size);
    this.setFill('images/bare_land.png');
}

goog.inherits(farming.Land,lime.Sprite);
What we are doing here is creating a new type of object as per the LimeJS specs. This object “inherits” from the lime.Sprite object, so it behaves like a sprite in all ways. See how we are providing the namespace like we did before. We are passing the game and the player objects in the constructor, and we are setting up some basic properties so that we don’t have to enter them each time we create a farming.Land object.
Every time you add a new file to the project you have to run this command for the framework to keep it all registered:
bin/lime.py update
In farming.js add the following to the “require’s” section:
goog.require('farming.Land');Now, we want to populate the land layer we created previously with our land lots. We’ll do that with an iteration and some of the game object properties that have been setup. Add the following under the money indicator definition:
//create land elements
    for(var i=0; i<gameObj.num_tiles_x; i++) {
        for(var j=0; j<gameObj.num_tiles_y; j++) {
            var landElement = new farming.Land(gameObj, playerObj).setPosition(i*gameObj.tile_size, j*gameObj.tile_size);
            landLayer.appendChild(landElement);
        }
    }
If you reload farming.html on your browser you should be getting this (provided you downloaded the images):

Land states
The first thing you do in a farming game is to plow the land so that it’s ready to receive the seeds. After you plant the seeds, they grow until ripe. We have then a total of 4 possible states for a lot of land (empty, plowed, growing and ripe). Let’s represent that by adding these states in our land.js file right after the “goog.inherits” part.
//states
farming.Land.prototype.EMPTY = 0;
farming.Land.prototype.PLOWED = 1;
farming.Land.prototype.GROWING = 2;
farming.Land.prototype.READY = 3;
And this line after “this.setFill” (inside farming.Land) to define the default state:
this.state = this.EMPTY;
Plowing
Every time the player clicks on a land element, we want it to be plowed (provided the land is “empty” and the user has enough money to pay for it). Let’s add an event listener inside the farming.Land function:
var land = this;
    goog.events.listen(this,['mousedown', 'touchstart'], function(e) {
        e.event.stopPropagation();
        if(land.state == land.EMPTY && playerObj.money >= gameObj.costPlowing) {
            //plow land
            land.setFill('images/plowed.png')
            land.state = land.PLOWED;

            //update player money
            playerObj.money -= gameObj.costPlowing;
            gameObj.updateMoney();
        }
    });
What this does is attach the events “mousedown” and “touchstart” to the statements inside the listener. See how easily LimeJS allows us to create something that works in both touch and non-touch devices from day one.
We then check the player’s money. If the “show me the money” is all good, we’ll plow the land, change it’s state and image. The cash is taken out of the player’s pockets and we update the money status, for which we need to add the following in farming.js, right after the moneyLabel definition:
//updating money indicator
gameObj.updateMoney = function() {
    moneyLabel.setText('$'+playerObj.money);
};
You should now be able to plow land and spend money:
 ;
;
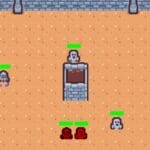
Shop
Ok plowing land can be fun, but to really make it as a farmer you need to buy seeds and grow your stuff. Lets start by putting all the crops in our game object. Add the following in farming.js after the player object definition. See how you can easily change the parameters and tweak it however you want.
gameObj.crops = [
    {
        name: 'tomato',
        cost: 10,
        revenue: 18,
        time_to_ripe: 10, //secods
        time_to_death: 30, //second from when it's ripe
        image: 'tomato.png'
    },
    {
        name: 'artichoke',
        cost: 20,
        revenue: 38,
        time_to_ripe: 60,
        time_to_death: 60,
        image: 'artichoke.png'
    },
    {
        name: 'lettuce',
        cost: 15,
        revenue: 26,
        time_to_ripe: 30,
        time_to_death: 60,
        image: 'lettuce.png'
    },
    {
        name: 'eggplant',
        cost: 30,
        revenue: 78,
        time_to_ripe: 120,
        time_to_death: 120,
        image: 'eggplant.png'
    },
    {
        name: 'peppers',
        cost: 40,
        revenue: 82,
        time_to_ripe: 180,
        time_to_death: 180,
        image: 'peppers.png'
    }
];
Each type of crop has then a name, a cost, a revenue that brings in when harvested, the time it takes it to be ready (in seconds), the time it takes it to die after it is ripe (in second), and an image file.
We’ll implement the shop as a new “scene” (think of the analogy of movie scenes). Add the following after the director.replace(…) part:
//shop
var shopScene = new lime.Scene().setRenderer(lime.Renderer.CANVAS);
var shopLayer = new lime.Layer().setAnchorPoint(0, 0);

var shopBackground = new lime.Sprite().setAnchorPoint(0,0).setPosition(0,0)
    .setSize(gameObj.width, gameObj.height).setFill('#0D0D0D');
shopLayer.appendChild(shopBackground);
shopScene.appendChild(shopLayer);

//close button
var closeButton = new lime.GlossyButton().setColor('#133242').setText('Back')
    .setPosition(gameObj.width/2, gameObj.height-25)
    .setSize(80, 40);
shopLayer.appendChild(closeButton);

//launch shop event
goog.events.listen(shopButton,['mousedown', 'touchstart'], function(e) {
    director.replaceScene(shopScene);
});

//close shop event
goog.events.listen(closeButton,['mousedown', 'touchstart'], function(e) {
    director.replaceScene(gameScene);
});
This creates a new scene for the shop, links our “Shop” button to the opening of this new scene. It also adds a “Close” button to the shop. You should now be able to open and close and empty shop.
The following code (which goes right after what we just added) will display the crops in our shop, and allow the player to pick one (that will be stored as a property of the player).
//shop items
for(var i=0; i<gameObj.crops.length; i++) {
    var item = new lime.Sprite().setAnchorPoint(0,0).setPosition(gameObj.shop_margin_x, gameObj.shop_margin_y + (gameObj.shop_margin_y + gameObj.tile_size)*i)
        .setFill('images/'+gameObj.crops[i].image).setSize(gameObj.tile_size, gameObj.tile_size);
    shopLayer.appendChild(item);

    var timeLabel = new lime.Label().setText(gameObj.crops[i].name+' ('+gameObj.crops[i].time_to_ripe+' days)').setFontColor('#E8FC08')
    .setPosition(gameObj.shop_margin_x+150, gameObj.shop_margin_y*1.5 + (gameObj.shop_margin_y + gameObj.tile_size)*i);
    shopLayer.appendChild(timeLabel);
    var costLabel = new lime.Label().setText('cost: $'+gameObj.crops[i].cost).setFontColor('#E8FC08')
    .setPosition(gameObj.shop_margin_x+150, gameObj.shop_margin_y*2.5 + (gameObj.shop_margin_y + gameObj.tile_size)*i);
    shopLayer.appendChild(costLabel);
    var label = new lime.Label().setText('revenue: $'+gameObj.crops[i].revenue).setFontColor('#E8FC08')
    .setPosition(gameObj.shop_margin_x+150, gameObj.shop_margin_y*3.4 + (gameObj.shop_margin_y + gameObj.tile_size)*i);
    shopLayer.appendChild(label);

    //pick crop
    (function(item, i) {
        goog.events.listen(item,['mousedown', 'touchstart'], function(e) {
            playerObj.currentCrop = i;
            director.replaceScene(gameScene);
        });
    })(item, i);
}
The only complicated part of the code above is the use of a closure (the function inside the brackets). This is a Javascript pattern that allows us to attach events inside a loop without the change of “i” affecting the event callback of the previous elements. You should now be able to open the shop and pick a crop by clicking on it’s image. See how we are calling “days” what in reality is just seconds.
Planting
Now that we’ve picked a crop, it’s time to plant it. Lets go back to land.js and add the following statement to the event listener that we use for plowing:
else if(land.state == land.PLOWED && playerObj.money >= gameObj.crops[playerObj.currentCrop].cost) {
        //plant
        land.setFill('images/growing.png');
        land.state = land.GROWING;

        //store crop and left time for it to be ready and to die
        land.crop = playerObj.currentCrop;
        land.ripeTime = gameObj.crops[playerObj.currentCrop].time_to_ripe * 1000;
        land.deathTime = gameObj.crops[playerObj.currentCrop].time_to_death * 1000;

        //update player money
        playerObj.money -= gameObj.crops[playerObj.currentCrop].cost;
        gameObj.updateMoney();
    }
We are checking that the land has been plowed and the player has enough cash. If so, we are planting our seeds, changing the state of the land element, storing the relevant times (in milliseconds) and updating the money. You can start plating now!
Plants growth and death
Each crop has their own time to maturity and time to death. We want to check that and replace the images and states of the land elements when these times are reached. When the crop is ready for harvest, we want it’s image to be that of the crop. When a crop dies, the land is set back to empty.
LimeJS comes with a scheduler helper that allows us to check for events every X number of milliseconds. The following code will take care of the growth and death of the plants, add it after the event listener in land.js.
//growing plants
dt = 1000;
lime.scheduleManager.scheduleWithDelay(function() {
    if(this.state == land.GROWING) {
        if(this.ripeTime <= 0) {
            this.state = land.READY;
            this.setFill('images/'+gameObj.crops[this.crop].image);
        }
        else {
            this.ripeTime -= dt;
        }
    }
    else if(this.state == land.READY) {
        if(this.deathTime <= 0) {
            this.state = land.EMPTY;
            this.setFill('images/bare_land.png');
        }
        else {
            this.deathTime -= dt;
        }
    }
}, this, dt);
You are now able to plant.. but you can’t harvest yet.
Harvest
Adding the harvesting part is very easy :) just add the following the our event listener in land.js:
else if(land.state == land.READY ) {
        //harvest
        land.setFill('images/bare_land.png');
        land.state = land.EMPTY;

        //update player money
        playerObj.money += gameObj.crops[land.crop].revenue;
        gameObj.updateMoney();
    }
The complete game
You can download the complete game from the here.
What’ next
I hope you’ve enjoyed making this simple farming game. Things that can be added to expand it further are progress saving, for which you can use something as simple as local storage, and of course social integration, so that you can share your farm on Facebook or Twitter.
I would like to encourage you to keep on learning HTML5 game development and to check out my game dev courses, which are designed for beginners and will save you hours of learning on your own.
HTML5 Mobile Game Development for Beginners
I’ve prepared a comprehensive online course which will guide you through the creation of HTML5 crossplatform games using LimeJS game development framework. The course is 100% video based so that you can see in real time how games are created from scratch. Each lesson comes with its own zip file with all the code so that you can have a play with the examples and used them as starters for your own games.
A lot of extra topics are covered in this course, such as adding animations, sound, 2D physics, using tile-based maps, and transforming your HTML5 game into a native app so you can make money with it.