AtlasTexture is a powerful feature within the Godot 4 engine that allows developers to use a portion of a larger texture, called an atlas. This not only optimizes video memory usage but can also decrease the number of render calls your game needs, which is essential for performance, especially on lower-end devices. If you’re looking to boost performance and make your game’s graphics more efficient, understanding how to use AtlasTexture is a must.
Table of contents
What is AtlasTexture?
An AtlasTexture is essentially a way to crop and utilize just a part of a larger texture, known as an atlas, in your Godot 4 projects. By defining a region within the atlas, you can draw only the portions you need without having to load multiple individual textures into memory.
What is it for?
Using an AtlasTexture allows you to:
– Group multiple images into a single file, reducing the number of image resources your game needs to load.
– Optimize performance due to fewer render calls and lower memory usage.
Why Should You Learn It?
For game developers, it’s crucial to maintain an optimal balance between visual quality and performance. AtlasTexture is one of those features in Godot 4 that helps you achieve just that. Learning how to use AtlasTexture could mean the difference between a game that runs smoothly on all platforms and one that suffers from lag and stuttering on lower-end devices. Plus, it’s a commonly used technique in 2D game art that is valuable to master for any aspiring game developer.

Download project files
You can download the project created as part of this tutorial here. The code has been tested on Godot version 4.2.
Creating AtlasTexture in Godot 4
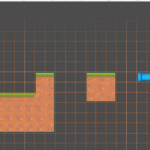
First, you need to create an atlas in Godot 4. This process compiles multiple textures into a single image that your game can reference. To test this out, we are going to setup a very simple 2D project in Godot consisting of:

- A Node2D
- A Camera2D
- Import a spritesheet file
- Attach a script to the Node2D and add the following code to _ready:
var atlas = AtlasTexture.new()
var atlas_image = Image.new()
atlas_image.load("res://path_to_your_atlas.png")
var atlas_texture = ImageTexture.create_from_image(atlas_image)
atlas.atlas = atlas_texture
Once the atlas is created, you can define a region of the texture to use for a particular sprite.
var region = Rect2(Vector2(0, 0), Vector2(64, 64))  # Specify the x, y, width, and height
atlas.region = region

var sprite = Sprite2D.new()
sprite.texture = atlas
add_child(sprite)

Setting Up Sprites with AtlasTexture
When you have multiple sprites that will use different parts of the same atlas, setting them up with AtlasTexture can be very efficient.
For example, if you have a character sprite sheet where each character frame is 64×64 pixels, you can set up each frame like this:
var frame_1 = atlas.duplicate()
frame_1.region = Rect2(Vector2(0, 0), Vector2(64, 64))

var frame_2 = atlas.duplicate()
frame_2.region = Rect2(Vector2(64, 0), Vector2(64, 64))

var frame_3 = atlas.duplicate()
frame_3.region = Rect2(Vector2(128, 0), Vector2(64, 64))
This process can be repeated for all the frames your character has on the sprite sheet. To actually display any of those frames on the screen you need to create the sprite like we did earlier:
var sprite_frame_1 = Sprite2D.new()
sprite_frame_1.texture = frame_1
add_child(sprite_frame_1)
Dynamically Changing Atlas Regions
In some cases, you might need to change the atlas region at runtime. Here’s an example of how to change the region based on user input, such as moving right or left:
func _input(event):
    if event is InputEventKey:
        if event.pressed and event.keycode == KEY_RIGHT:
            atlas.region = Rect2(Vector2(64, 0), Vector2(64, 64))
        if event.pressed and event.keycode == KEY_LEFT:
            atlas.region = Rect2(Vector2(128, 0), Vector2(64, 64))
Remember, each piece of code you write should call methods and assign variables according to your project’s actual structure. This ensures that the AtlasTexture and the regions you want to use are properly referred to and manipulated within your game’s codebase.AtlasTextures are extremely flexible and can be utilized in numerous ways within your Godot 4 projects. Below are additional ways to work with AtlasTexture, giving you a broader scope of their potential.
Full script code
This is the working code we’ve used in this tutorial, tested and working on Godot version 4.2. You can download the entire project here.
extends Node2D

var atlas : AtlasTexture

# Called when the node enters the scene tree for the first time.
func _ready():
    atlas = AtlasTexture.new()
    var atlas_image = Image.new()
    atlas_image.load("res://sheet.png")

    if atlas_image.load("res://sheet.png") != OK:
        print("Failed to load image.")
    else:
        print("Image loaded successfully.")

    var atlas_texture = ImageTexture.create_from_image(atlas_image)
    atlas.atlas = atlas_texture

    print(atlas_texture.get_format())

    if atlas_texture.get_width() > 0 and atlas_texture.get_height() > 0:
        print("Texture created successfully.")
    else:
        print("Failed to create texture from image.")


    var region = Rect2(Vector2(0, 0), Vector2(980, 100))
    atlas.region = region
    var sprite = Sprite2D.new()
    sprite.texture = atlas
    add_child(sprite)

    var frame_1 = atlas.duplicate()
    frame_1.region = Rect2(Vector2(0, 100), Vector2(64, 64))
    var sprite_frame_1 = Sprite2D.new()
    sprite_frame_1.texture = frame_1
    #add_child(sprite_frame_1)

    var frame_2 = atlas.duplicate()
    frame_2.region = Rect2(Vector2(64, 100), Vector2(64, 64))
    var frame_3 = atlas.duplicate()
    frame_3.region = Rect2(Vector2(128, 100), Vector2(64, 64))
    var sprite_frame_2 = Sprite2D.new()
    sprite_frame_2.texture = frame_2

func _input(event):
    if event is InputEventKey:
        if event.pressed and event.keycode == KEY_RIGHT:
            atlas.region = Rect2(Vector2(64, 0), Vector2(64, 64))
        if event.pressed and event.keycode == KEY_LEFT:
            atlas.region = Rect2(Vector2(128, 0), Vector2(64, 64))
Where to Go Next in Your Godot Journey
Understanding and implementing AtlasTexture in Godot 4 is just a small part of the vast world that game development encompasses. To continue expanding your knowledge and skills, we invite you to take the next step with us here at Zenva. Our Godot Game Development Mini-Degree provides a comprehensive journey through the ins and outs of game creation with Godot 4.
Whether you’re just starting or looking to level up your skills, our tailored courses will guide you through various aspects of Godot 4. You’ll work through creating diverse game types and master the engine’s capabilities. We’ll equip you with practical experience, constructing a portfolio of projects that showcase your talents.
For more focused learning paths and an extensive range of topics, explore our full collection of Godot courses. Dive into GDScript, gameplay mechanics, and more at your own pace, building a foundation that will support your goals whether you dream of making your game or advancing your career in the burgeoning games industry. Your future in game development awaits, and we at Zenva are excited to be a part of your journey.
Conclusion
Harnessing the power of AtlasTexture in Godot 4 can truly elevate your game development practice, offering efficiency and performance gains that are crucial in today’s competitive market. As you implement these techniques, you’ll notice how your projects become more streamlined and visually coherent. Remember, these are just the building blocks upon which you can construct complex and optimized gaming experiences.
We at Zenva understand that game development is a journey — one that is both challenging and deeply fulfilling. To continue learning and growing, we encourage you to check out our Godot Game Development Mini-Degree. Join us to unlock your potential and bring your most imaginative game ideas to life. Let’s code, create, and conquer the game dev world together!
Did you come across any errors in this tutorial? Please let us know by completing this form and we’ll look into it!

FINAL DAYS: Unlock coding courses in Unity, Godot, Unreal, Python and more.