You can access the full course here: Blender for Beginners – Craft Low-Poly Game Assets
Table of contents
Part 1
The editor in the video for this particular lesson has been updated, please see the lesson notes below for the corrected steps.
Setup
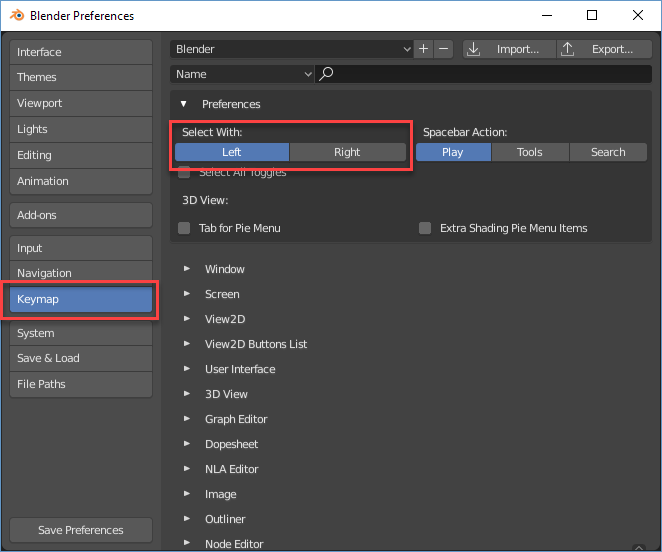
Let’s go over some settings in Blender which will make using it easier. First, navigate to the Blender Preferences window (Edit > Preferences). Here, let’s click on the Keymap tab and make sure that the select with is set to Left. This means we select objects with the left mouse button.
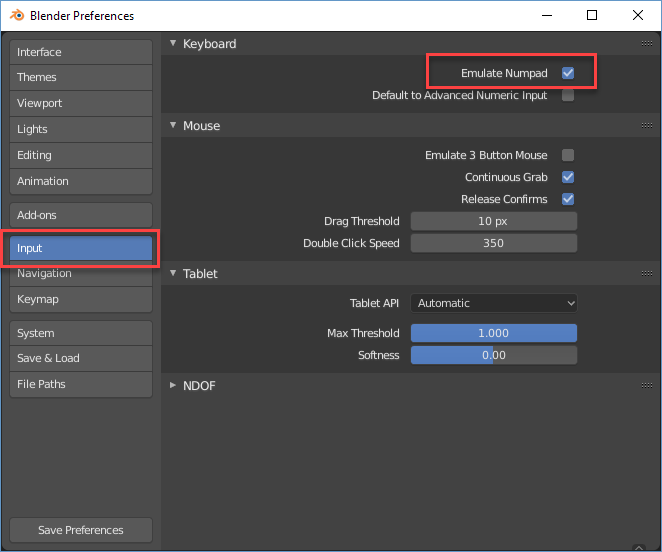
Now go to the Input tab and enable Emulate Numpad. What this does, is allow us to use our numpad to switch to different angles and perspectives.
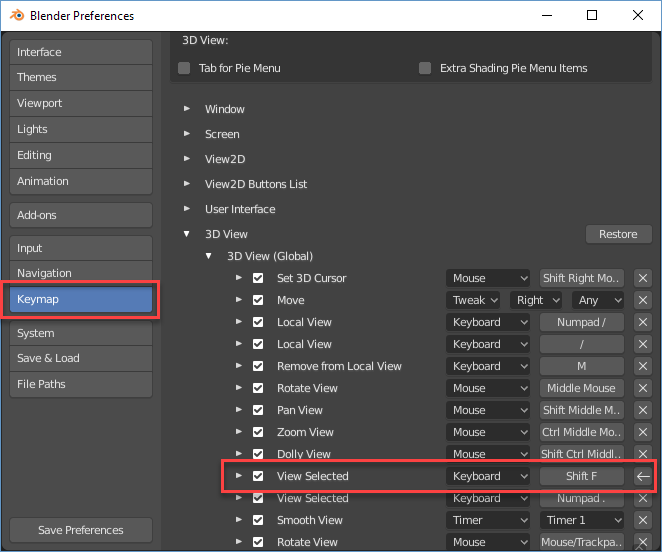
Finally, let’s go to the Keymap tab and change the View Selected key to Shift+F (3D View > 3D View (Global) > View Selected).
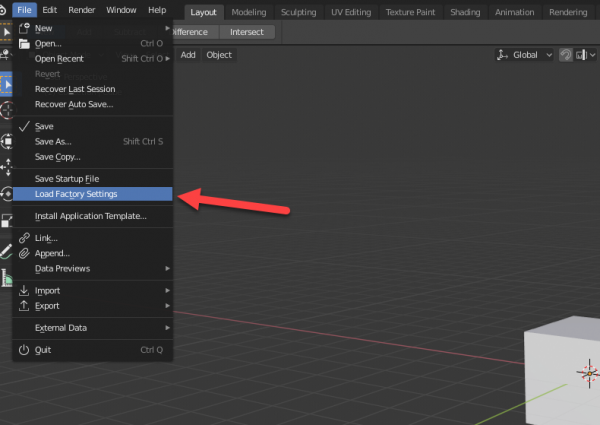
If at anytime you mess up a setting or want to reset to the factory settings, click File > Load Factory Settings.
Blender Camera Controls
Here are a few of the camera controls for Blender that will be of use:
- Orbit: Hold middle mouse and drag
- Pan: Hold middle mouse + Shift and drag
- Zoom: Middle mouse scroll
- Focus On Object: Shift + F
- Change Camera Orientation: numpad keys
- Perspective/Orthographic: numpad 5
Part 2
The editor in the video for this particular lesson has been updated, please see the lesson notes below for the corrected steps.
Object Movement
This lesson, we’re going to be mainly focusing on Object Mode. You can make sure that Object Mode is active by checking the top left of the screen.
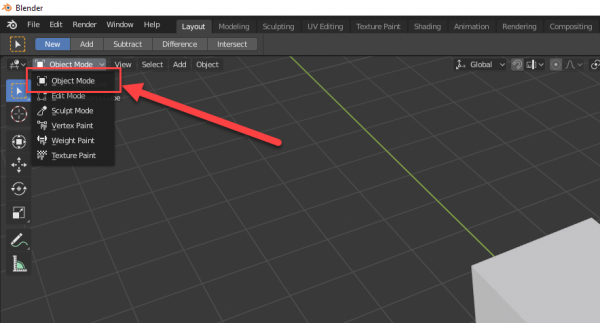
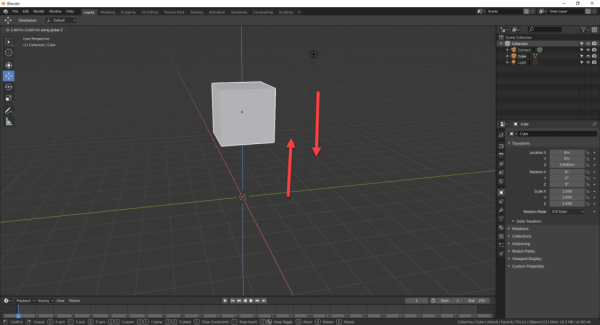
There are various different ways of moving an object around. One way is to press ‘G‘ which causes the object to follow the mouse cursor. Holding down the ‘X‘, ‘Y‘ or ‘Z‘ keys will snap that free movement to the respective axis (X, Y, Z).
Along with moving the object, we can press the ‘S‘ key to scale the object with our mouse. This logic also follows for rotation with the ‘R‘ key. If you ever with to retract a change made in Blender, you can press Ctrl + Z to undo.
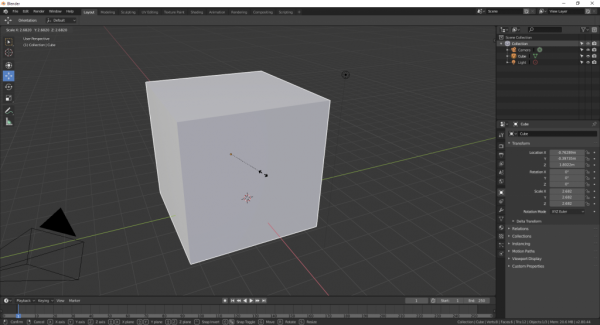
For more precise movement, rotation and scale, we can go over to the object properties screen to the bottom right of the screen. Here are fields that will allows us to enter in values for each of the 3 properties on the X, Y and Z axis.
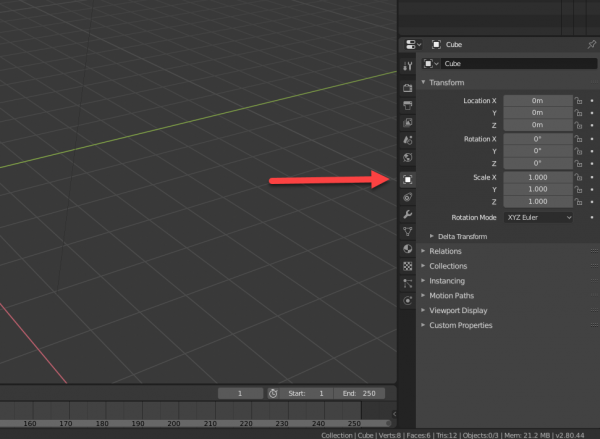
You can select objects by left clicking on them, or select all of the objects in your scene with the ‘A‘ key. To delete these objects, we can then press the ‘X‘ key and click on Delete. This will remove all the selected object from the scene.

Creating Objects
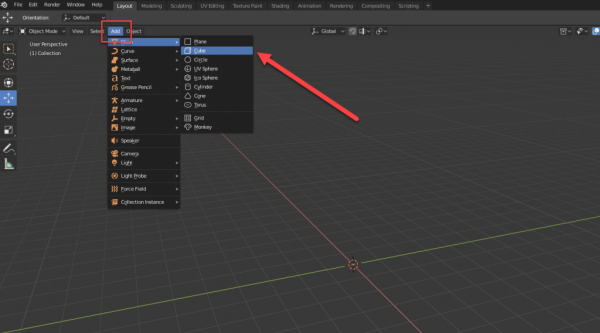
To create an object, click on the Add button at the top left of the screen. We’re going to create a cube to hover over the Mesh option and select Cube. This will create a new cube in the scene.
Part 3
The editor in the video for this particular lesson has been updated, please see the lesson notes below for the corrected steps.
Object Creation
Let’s start with a blank scene. Select all the objects with the ‘A‘ key and press ‘X‘. A prompt will pop up, press Delete.
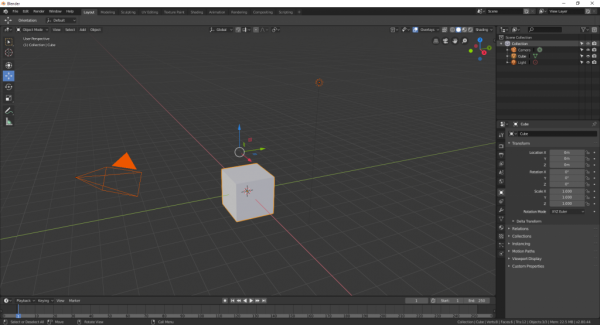
We’re going to be adding a sphere to our scene. Click on the Add button and select Mesh > UV Sphere.
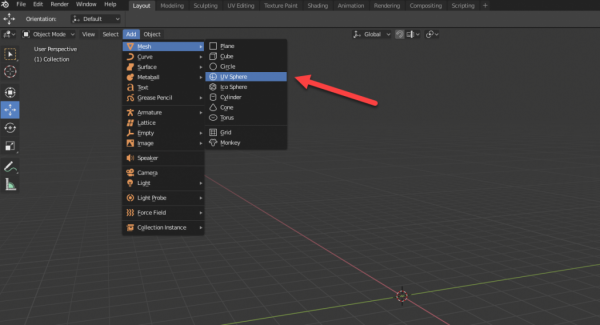
When we create a new object a selection will appear in the bottom left of the screen – for us it’s called Add UV Sphere. Click it to open up the object creation settings.
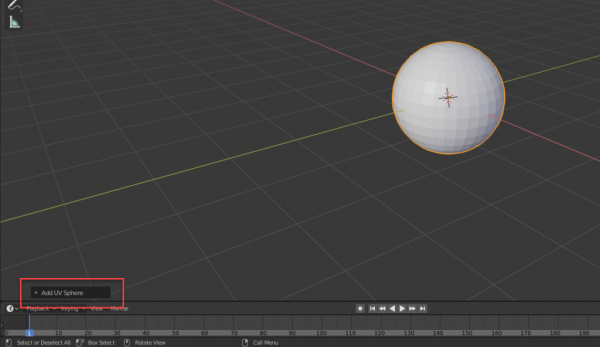
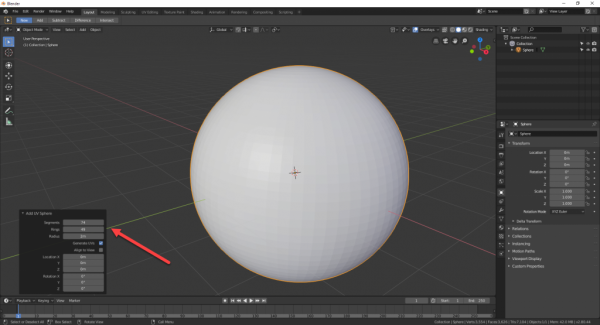
Here, we’re going to increase the Segments and Rings to make the sphere smoother.
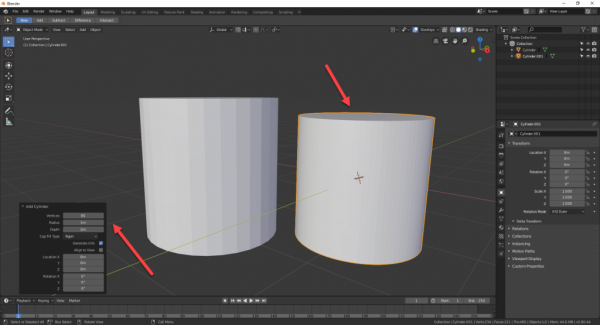
Now let’s create a 2 Cylinders. One of them I left as it was created, yet with the other one I increased the Vertices to make it smoother.
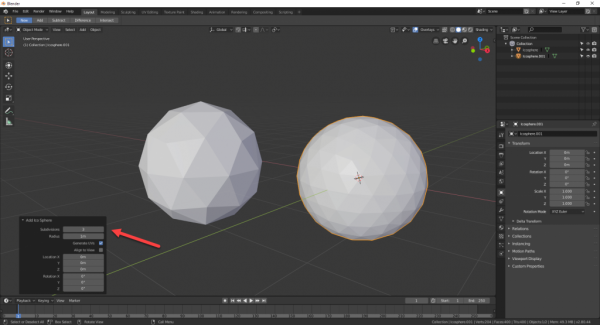
An alternative model to the UV Sphere, is the Ico Sphere. This is a sphere that’s not made up of squares, but triangles. In the example below, I have two Ico Spheres. One with 2 subdivisions and one with 3.
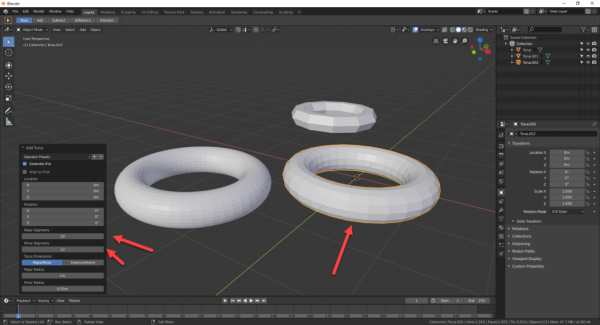
Torus‘ are ring shapes. You can modify both the major and minor segments of them. Here, I have various different Torus’ with different major and minor segments.
Part 4
The editor in the video for this particular lesson has been updated, please see the lesson notes below for the corrected steps.
Adding Materials to Objects
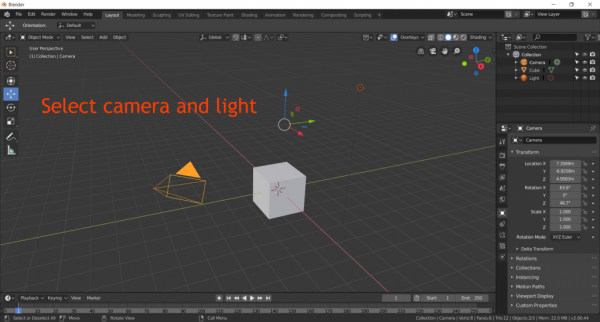
In this lesson, we’re going to be going over how to add materials to objects. First up, let’s remove the camera and light. You can select multiple objects by holding down ‘Shift‘ and then you can delete them with the ‘Delete‘ key.
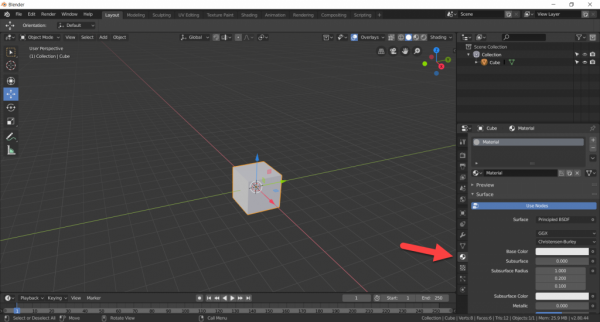
Now select the Cube and navigate to the Material tab in the properties menu.
A Material is basically how an object looks. What we’re going to do is create a new one. First, click on the ‘+‘ button – this will create a new Material Slot. From there, press the New button to set that as a new material.
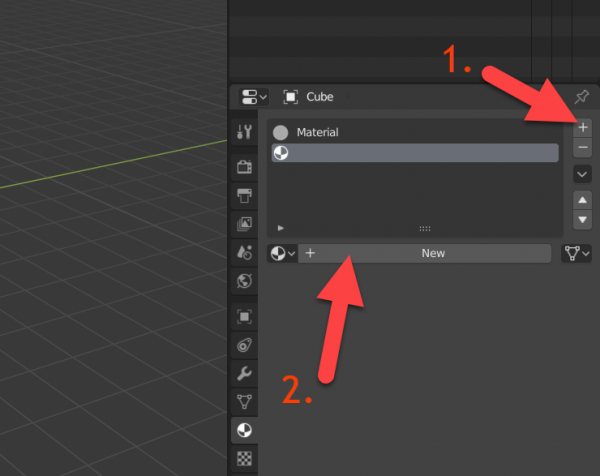
Since we have our new material, let’s remove our old one. Select it and press the ‘–‘ button.
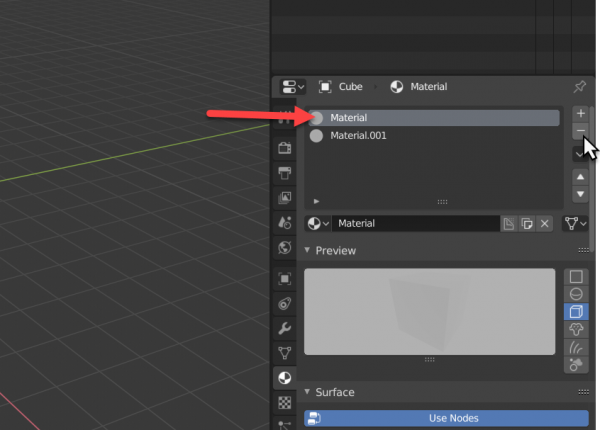
Let’s now rename the material. Double click the name and enter in “Red”.

Down in the Material properties, open up the Surface tab and set the Base Color to be red.
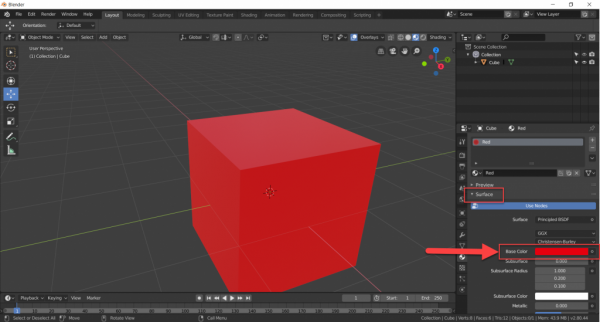
If you don’t see the red color appearing on the cube, change the Shading to Look Dev mode. This will render the object with the material on it.

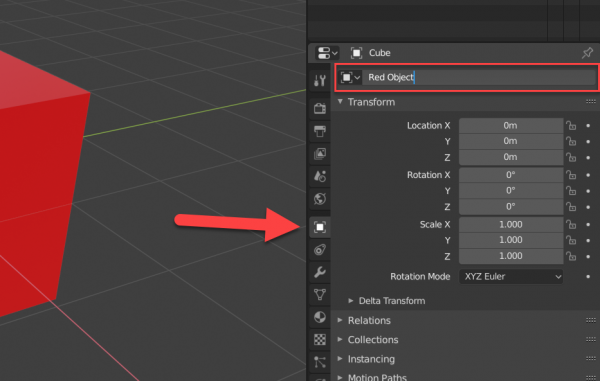
What we’re going to do now, is rename our actual object. Navigate back to the Object tab in the properties window and set the name to “Red Object”.
With the renamed object, let’s duplicate it. To do that, select the cube and press ‘Shift + D‘. This will create a new cube which you can then move with your mouse cursor and click to place it.
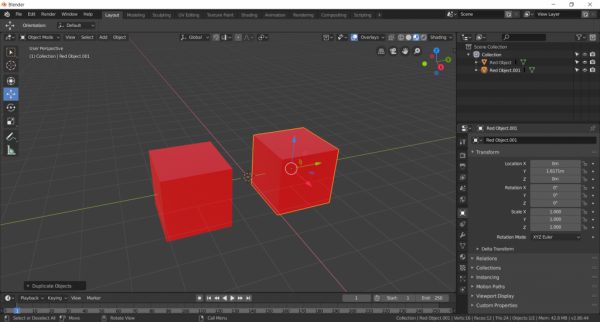
Let’s rename this duplicated object to “Green Object”. This is because we’ll be applying a new green material to it.
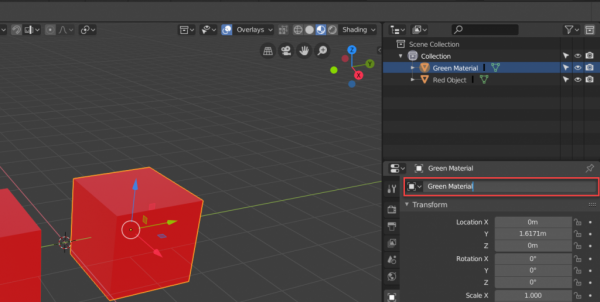
Now go to the Material tab and create a new material called “Green”. Set that Base Color to green.
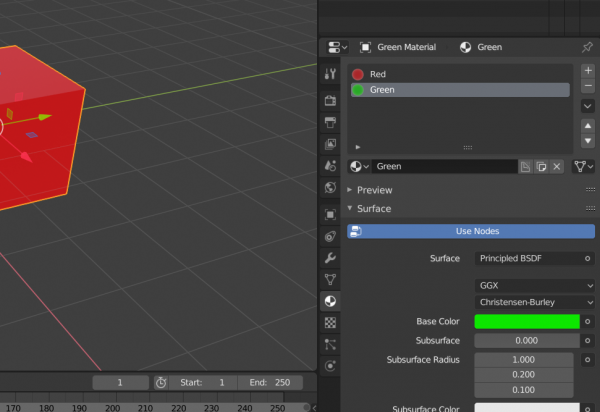
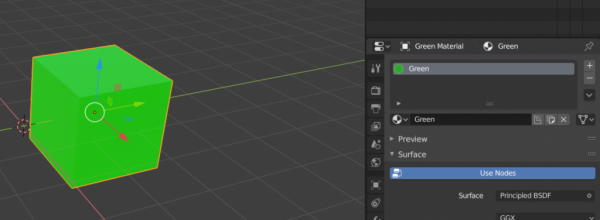
The reason why our new object isn’t appearing green, is because we still have the Red material applied. All we need to do is remove it by selecting the material and pressing the ‘–‘ button. Now the cube should appear green!
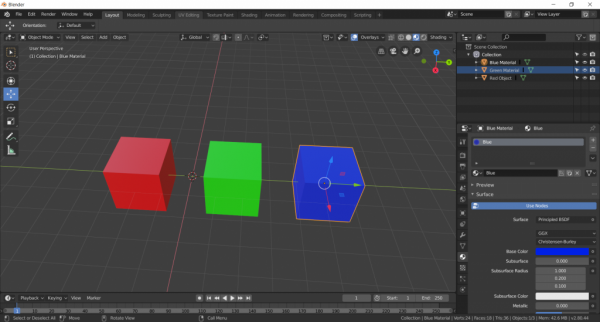
Now give it a go. Duplicate the cube and add a blue material to it.
Part 5
The editor in the video for this particular lesson has been updated, please see the lesson notes below for the corrected steps.
Movement Snapping
We already learned about moving objects around in Blender, but it’s hard to get very precise or consistent positioning just by dragging on the screen – that’s where snapping comes in. To enable it we can click on the magnet icon in the center top of the screen (shortcut = ‘Shift + Tab‘). Moving the object will cause it to snap its position to single units.
If you don’t have the move gizmo appearing over a selected object, you can select it on the left side of the screen (shortcut = ‘Shift + Spacebar‘ and select Move).
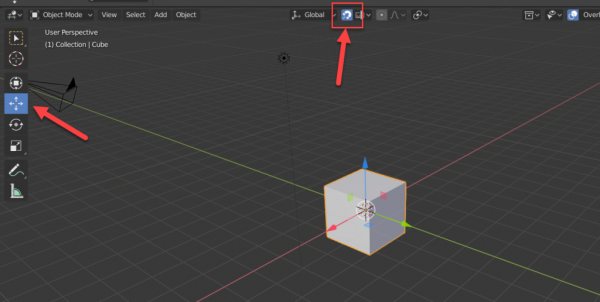
At the moment it’s moving in units of 1. This might be too big for your model or project. For smaller units, you can hold ‘Shift‘ when moving the object to snap it to units of 0.1.
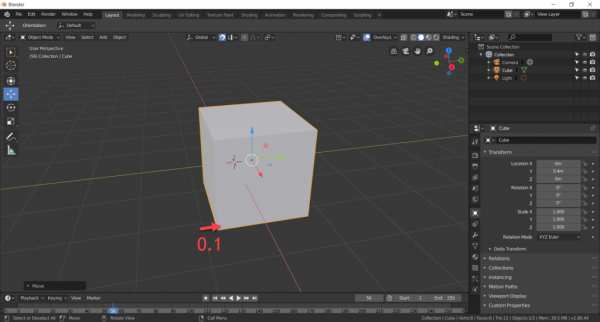
Snapping’s very useful if you want to align objects such as walls, blocks or other objects that need to be precisely positioned.
Part 6
The editor in the video for this particular lesson has been updated, please see the lesson notes below for the corrected steps.
Additional Snapmodes
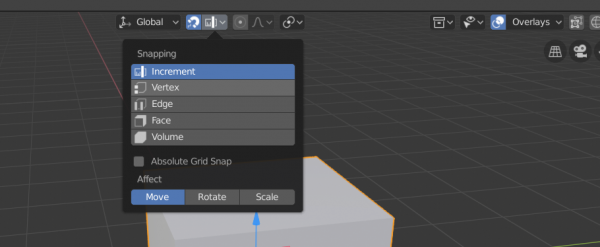
So far we’ve been been snapping the object’s position as we move it around. If we click on the ruler selection to the right of the Snap button – a drop down will appear with a number of selections.
- Increment snaps an object’s position when moving it
- Vertex snaps the selected vertex to others on the object when they get close
- Edge snaps the selected edge to others on the object when they get close
- Face snaps the selected face to others on the object when they get close
- Volume snaps the selected face to others on the object when they get close
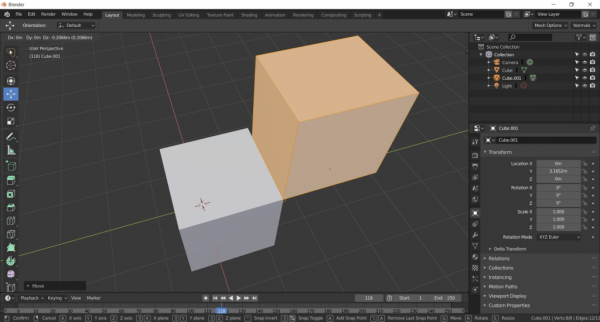
For example if we select Vertex and then go into edit mode (shortcut = ‘Tab‘), we can move the object and if we hover over another object’s vertex, ours will snap to that.
Part 7
Challenge!
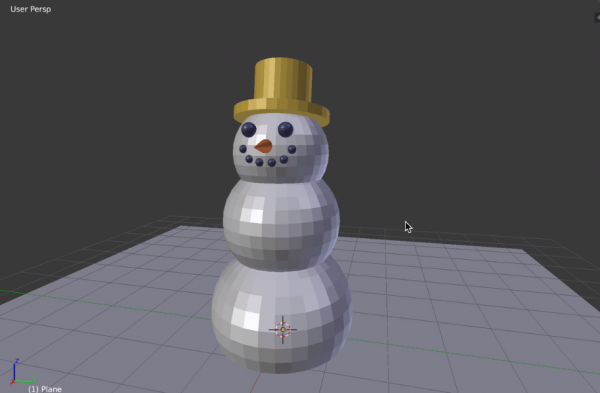
With the skills you’ve accumulated over the past six lessons, try to create something similar to the snowman below.
Transcript 1
Hello everyone. Welcome to the basic introduction into Blender. As you can see we are currently sitting in Blender.
Now, if you have zero knowledge as to what Blender is, Blender is a free to use 3D modeling software that is quite powerful when compared to something like Maya, which is mainly used in the 3D modeling industry and animation industries. Blender is just slightly a little bit weaker than Maya, but it is about 90, 95% as powerful. And, another thing is, it is free. Now, it is quite easily accessible. You can use it on PC, Windows OS, or Mac OS, and currently I am using Blender on a Mac.
Now, with all that said, let’s go ahead and tweak some of these settings, user settings, so that it will make it easier for us to work around in. Now, we’re just gonna go over to the file section, and we’re gonna scroll down to the user preferences right here. And you’re gonna click into that. Now as you can see, we have all these options. We’re gonna go to the input tab right here, and usually, I guess, most people click with their left click, or, left mouse button to select something, I don’t exactly know why the default selection for Blender is set to right. But I just usually set it to left click. And that just makes it easier to integrate yourself into Blender.
Now another thing, since I’m currently using a Macbook, my keyboard does not extend to a numpad, I’m just gonna turn on the emulate numpad over here, this little check box, turn that on. Now this numpad sort of makes it easier for us to select certain viewpoints; I will show you what that is later. And after that, I’m just gonna go over to this little option, there should be a 3D view, all these options right here, we’re gonna go 3D view, there is a view selected option right here.
As you can see the keys that it is binded to is Control + Numpad period, or Numpad period. Since we don’t have a numpad, I’m just gonna click on this piece right here, gonna click Shift + F, and this will basically make it easier for me to sort of zoom in onto an object. With that done we can just save the user settings and close this. Now if you kind of mess things up a little, we can just click on this restore button, and it should restore this section right here. It’s not gonna touch on these, but just on these sort of keys, now you’ve sort of binded. Shift+F. Save this again, just close this. And if you’ve truly messed up everything in your sort of settings, you can just simply go down to load factory settings, and it should reset everything back to zero.
Everything such as the mouse click buttons, and your emulate buttons. And, yeah, there you go. We have our settings set. Now we can sort of, play around with our camera movement.
Now, as you can see, we are staring currently at this box right here. Now if you want to rotate around, or orbit around this box, we can just click on our middle mouse button, and just sort of drag, move around, move your mouse around, and you can just sort of move your camera around this box. Now if you want to pan to the side, say a little bit over there, you can just hold down the shift button, and hold down your middle mouse button as well, and just move around. You’re just panning around the object. And, well, not exactly object but just around the space here. And, there we go, we have that done.
Now the key that I binded, Shift + F, makes it so that I can simply zoom into a selected object here. With that done, let’s go ahead and play around with the viewpoints. Now, remember the numpad part? With that binded to, well, emulating the numpad with our keyboard number section right here, you can just click on, say 1, you can go into the front view, or in this case, it’s the front or side, cause it’s a box. You can slightly move it downwards, move it to the side with 2 and 4. And we can click on 7 to go to the top view. We can click on 6 to slightly rotate things. Click 8 to move these. Move around, rotate around with the number pad.
Also, currently we are using the perspective view, It’s what our eyes usually see an object as. Now if you want things to be more 2D and flat, we can go to something called the orthographic view, which is what happens when you click on 5. Notice how all the spaces around, or the faces around the cube are shown to you. As you can see we are looking dead onto the object right here. If you click back into perspective mode, you can’t see the top anymore cus it’s sort of turned into this perspective view. Click on 5 again, we’re back in this flattened orthographic view. And, sometimes it’s just easier to move around, mess around with the object in orthographic view.
And, yeah, there you go. That’s pretty much it for the basic set up of Blender. We will continue on with more additional movement and or object making in the next video. Thanks for watching, and I’ll see you next time.
Transcript 2
Hello everyone, as you can see we are currently back in Blender.
We are going to be focusing on object mode. As you can see right here, it says object mode. There are a few other types of modes here such as edit mode, sculpt mode, vertex, paint, weight painting, and texture painting. We’re mainly just gonna be focusing on object mode here.
Now, as you can see our cube here in object mode, we can move this piece, rotate it, and scale it. Now, to move we can click on G, and just simply free drag it anywhere we want. We’re gonna click on Command + Z to undo that movement. Now, if you wanted to be specifically moved on, say, the X, Y, or Z axes, you can just simply click on these axes’ handles here. And you can move them Y, X, and Z. I’m gonna undo again, put it back in the area. Now, as you can see the axes point is right here, or general axes are here. If you were to flip, say, the scene upside down, you can kind of tell sometimes that something is upside down. Let’s just go back up here. Yeah, that’s pretty much it on how to transform.
Now, if you click on G, and click on, say, the Y axis, you’ll be moving the cube only in the Y axis here. You can also click on X, move on the X axis, Z, on the Z axis here. Undo, and yeah, that’s pretty much it with the movement of our, say, our shape right here, or our object. Now, if you want to scale it we can just simply click on S. S is to generally scale it all around. We can scale it on the X axis by clicking X, you know, to thin this down. Click Y, thin it this way, or let’s stretch it up, or flatten it down on the Z axis. Pretty simple, there you go, and then there is rotation. We can click on the R, and just rotate it freely. But that’s not really good, I’m just gonna click out, undo it, put it back in its area.
And we’re gonna rotate, say, on the X axis. As you can see, we can rotate it here. It’s a lot less messy here. You can rotate it on the Y axis. And we can rotate it on the Z axis. This rotates over here, this seems pretty good. And undo that, and yeah, there you go. That’s the general sort of transformation movement of our object.
Now, if you wanted to be more precise, we can go over into the object layer right here. As you can see right now, we’ve selected the cube. It has the name cube right here, and all our settings right here. We can, you know, manually type in wherever we want. This should be X axis, Y axis, then the Z axis. We can say like 10, it’ll move up 10 spaces on the Z axis. I’m just gonna return it back to zero. And as you can see, we’ve previously slightly scaled our cube here, so it says 1.025 in size. Slightly a little bit larger than the 1. If we want to set it back to 1, we can just click on 1, 1, and 1, enter. And there you go, we have our cube back to its general shape.
Now, if you wanted to be, say, like a huge shape here, you can type 10, 10, and 10. And there you go, precise scaling of our cube here. Just undo all of that, and there you go, we have our cube again. Again, that’s the precise sort of movement transformation of our object. It’s all here, really simple and easy, and there you go. Now, if you accidentally sort of went too far ahead, and sort of messed up your object, and you want to restart. That’s really simple just select everything, once selected everything just double-click A. It grabs everything in our scene. And since we don’t need the lights and cameras, we’re just gonna delete it with it, click on X, and delete.
And there you go, all our pieces are gone. If you want to recreate a new object, just click on the create menu here. And as you can see all of these different options, plane, cube, circle, UV sphere, Ico sphere, cylinder, cone, and torus. We’re just gonna click on cube, and it should generally create a default cube right here.
Yeah, that’s pretty much it. Thanks for watching, I’ll see you in the next video.
Transcript 3
Hello everyone, we’re back in Blender.
Now, previously, we were playing around with the basic movements of our object in our scene. Now, since you’ve gotten used to moving around your set object, we can move on to creating new objects for our scene. I’m just gonna click A to select everything in our scene. Sometimes you probably need to double-click A to deselect the previous object and then click X to delete. After you clicked X you should click on the Okay option. Previously, I’ve also kind of glossed over how you can just click on the Create menu here, and create a basic Primitive aka the Cube.
Now, if you click on the Cube, there should be additional options down below the sort of menu here. You can see Add Cube, there are these options here. Now, for every single object here, there should generally be the Location and Rotation options right off the bat. And you can generally just play around with these options, if you want. You don’t exactly need to do anything here. Radius, if you want to scale it right here, instead of scaling it down here, you can type in and say five scaled. If you want to slightly rotate this, let’s say 45 degrees, you can probably see how it rotates. As you can see like the green axis is Y, so we’re gonna rotate it this way over here. Just gonna click on Enter, and you’ll see it rotates on the Y-axis. And if I wanted to, I could also rotate on the X-axis or Z-axis, but I’m not gonna do that.
Let’s go ahead and delete this cube and show you the other types of objects. Say the UV sphere. I’m just gonna skip over the circle ’cause this is a flat piece, and it’s not as many options to go over. Let’s go, click on UV Sphere. Now, again, you can see the Location, Rotation of the object when it’s freshly made. And right now, we have a few different options here, such as Segments, Rings and Size.
Well, Size, it’s still the same thing. It’s basically the scale of our object, say five to scale this up again. It scales up to that much. Now, the Segments is the amount of sort of edges here. Each polygon or mesh has a bunch of edges to provide itself the shape. Let’s go into the top-view and orthographic, click five and seven. Yeah, and right here in the top, it will say Top Ortho. If we decrease the amount of, say, segments or drop the roundness, not roundness, the smoothness of our object here, we can clearly tell the flat surfaces of all these areas now, and if we were to, say, increase it to 50, it will look a lot rounder. So, generally, Segments just makes it look rounder.
Let’s go down here. We can increase the rings. Rings is basically the horizontal or edges over here that flow along our sphere. We can drop down like a lot too. Let’s go like 10. You can clearly tell from the side here, or let’s go to the front-view or right-view. You can tell that the rings right here has been cut down. If we increase this as well to, say, 50, our sphere is a lot smoother compared to before. Yeah, it’s generally the options for our sphere, and drop, delete this. Gonna create a cylinder now. Cylinder is basically the same thing.
There are these options. It’s closely resembling the UV Sphere. We can increase the Vertices, make this smoother, if you look at it from the top. We decrease it down, say, again, 16, type in. You can tell that it’s not as smooth anymore. We can jump this up to 50, super smooth. And there you go. Now, Radius, same thing, it just sort of makes it larger, say 50. That’s a little bit too big. You can drop it down to, like, 10 again. See, it just scales it out on the X- and the Y-axis. The depth is the up and down, so the Z-axis. We can jump it up to 10, and it just scales it up. We can scale this down again. Just put it down here, and there you go, yeah. Let’s delete this.
Let’s see, Ico Sphere is basically the same as a sphere, but instead of having rings, it has triangles here, so that creates subdivisions. So we can subdivide this or unsubdivide this and make it even less. Let’s go to one. You can clearly tell that the triangles of this object get larger. Increase this more and more and more, the triangles get smaller and smaller, but the smoothness of the sphere gets smoother, right here as you can see. Looks pretty cool, looks like a golf ball right now. I’m just gonna delete this. Let’s go down to the Cone. Basically same thing. We can increase the height. Can’t really see, if you can tell this thing is getting taller. Let’s say five. Yeah, Depth, Radius, increase the radius of the top. There’s Radius 1 and Radius 2, this is the bottom, top.
And Vertices, again, same thing, makes this smoother from the side, if you look at it from the top. And that is it for those options. We can delete this, go to Torus. We can increase the amount here. Let’s go, oh, no, I gotta use the presets. Major Segments, Minor Segments, it should be, these are the smoothness from here, if you look from the top. Oh, top-view, you can tell that there are an increase of edges around our torus right here. And also Minor Segments in the inner sort of rings, we can increase this to make this look a lot more smoother, an actual donut sort of shape. We can go, like, say 30, and as you can see, it looks a lot smoother. Now, that is basically it for our polygon-type of meshes.
I can create a grid too. Grid Plane, same thing, we can just delete that, but there should be some additional edges in here as a grid, if we go into Edit Mode, you can tell. I will talk about Edit Mode in a different video. For now, we just leave it here, and you can delete this. There is a sort of default monkey head that Blender has provided. It’s just there for fun, and it’s basically for, I guess, training purposes. If you wanna, you know, texture this, play around with it. They just left it there. I’m just gonna delete that.
But yeah, that’s pretty much it for our polygons, polygon shapes, and thanks for watching. I see you in the next video.
Transcript 4
Okay, now that we understand how to move and create objects, let’s move on to adding materials or colors onto our objects. It’s really simple.
First, delete the lights and cameras. I’m just gonna click on the object, here, hold Shift and click on this light right here to select both of these objects and we’re just gonna delete those. Now, the reason why I didn’t click on A to select everything here is because I still want my cube, here. Now, let’s click on our cube. We’re not gonna do any changes on it. Let’s just drag our menu, here, a little bit outwards so that we can reach the, sort of, Materials section.
Now, the Materials section is this circular, sort of, object right or this tab, right here. Gonna click on this and right here we get, what we call, the material, which is the color. Now, it is defaulted to just the base material, right here. I’m gonna create a new material and it’s create new, click on New. Now, to get here, again, simply click on the plus icon, right here.
We can delete this defaulted overall material. Just click on that, minus and we are going to apply this material onto … well, it’s already applied, right now, because it’s the only material on this object. Let’s call this “Red”. Just simply double-click and type in “Red”. Gonna go down to the Diffuse. Diffuse is the color of the material. Let’s just simply select a red. Something like this is good and there you go. We have a red cube, now. All we have to do, next, is to rename our object. Let’s just go over to our object menu, right here.
As you can see, we have all the options, here. All we wanna do is just simply type in, well, select “Cube” section, here, the name. Let’s call it, “Red “Object” and as you can see, in the layer over here, the overall layers, you can see that our object went from “Cube” and turned into “Red Object”. Now, let’s go ahead and duplicate this piece. I’m gonna move this to the side. To duplicate objects, it’s really simple. I’m just gonna click Shift + D ^and I’m gonna move it on the Y axis. There you go, we have two red objects, right now and as you can see, when you duplicate something it’s gonna be using the same name with an additional dot 001. Now, we don’t want this to also be a red object.
I’m just gonna grab this piece, grab the name right here in the Object menu, just call it the “Green “Object” and once you rename it, it should rename it over here in our layer, over here and let’s go over to the Materials. Gonna do the same thing. Create new. Click New. Add New and we are going to just call this “Green” and with that done, let’s just select, say, a green color, here. Now, nothing has changed, yet, don’t worry. I’m just gonna click on the “Red”, gonna click minus and it should apply it to the object, here. Let’s do it once more. Move this, duplicate it, move it on to the side of the Y axis. Let’s minus this. Create New. Let’s call this “Blue”. So, we get R-G-B. Let’s go, blue. Dark blue, rename the object to “Blue “Object” and there you go.
We have the basic understandings of how to add a color and organizing all your things, here, in the Material and the Object menu, here, and yeah, that’s really simple to add materials on to your objects to make them look pretty. That’s pretty much it. Thanks for watching. I’ll see you in the next video.
Transcript 5
Hello, everyone; welcome back into Blender.
Now previously we worked on how to, sort of, do the basic movements of our object in our scene. Now this time I’m gonna show you a more precise way of moving our object with something called snap mode. Now, as you can see, I’m gonna just drag our menu out a little. Let’s go over to the cube, our sort of object layer. Just click on this tab, and right here, as you can see, if we were to move our icon; no, not our icon, our object here on the Y axis, we can move it in increments that are like really tiny increments right here. If you don’t like it like so, we can, let’s click on zero, and put it back in the origin. Down here we can turn on something called snap.
Now this tiny icon, this magnet icon down here; you can turn that on. You can either click Shift + Tab or just, you know, directly click on the icon right here. It even tells you the shortcut, Shift + Tab. Now if we were to move our object on the Y axis again, it will snap on to the grid area here of increments of one. As you can see, one, two, three, four, five, six, seven, eight, zero, and so on. Now if you don’t like it, you know, snapping that large of a sort of range here, we can simply click on, well, you gotta click on the Y axis first, then you click on or click and hold Shift. Now, we’re just gonna move this down on the Y axis.
As you can see, it’s moving at increments of .1. .1,.4, .5, blah blah blah, and so on; and that’s pretty much it with snap mode. And it’s just really simple, makes life a lot easier, makes movement of certain objects little bit more cleaner. Yeah, thanks for watching; I’ll see you in the next video.
Transcript 6
Hello everyone, now that we’ve gotten used to playing around with the incremental movements in snapmode, we’re gonna also play around with the additionals, or settings that snapmode provides us with.
Now, again, I’m just gonna turn on snapmode, this icon here, the magnet icon. And we’re gonna click on this, sort of, icon right beside the magnet icon. As you can see if we click into it you’ll see these other additional settings, these snap elements as it’s called. The volume, face, edge, and vertex. Now, right now, our object is moving, say, in incrementals of a way. If we were to turn it to say vertex, it’s going to just, you know, snap to the vertexes of this cube. Now, since we have one cube here, I’m gonna duplicate it, so we can demonstrate what it looks like. I move this, click Shift + D to duplicate it, and move it on the Y axis, click on Y. Let’s move it down, say, here.
Now, I’m gonna describe what vertex, face, and edges are. If I were to click on something, say, the edit mode. I’m gonna click into edit mode, click Tab. This right now, let’s us go into this option where we can select individuals, or points right here. Now, a vertex is the singular point of our, say, our object right here. These points sort of shape up to make this cube. If we were to click on Control + Tab, we can go into something called a mesh selection mode. With that, we can select either edge, face, or vertex. Since we’re currently on vertex, we can go to edge, and play around with selecting the individual edges of our cube. And, or go to the face mode. Control + Tab, select face, and click each individual face around our cube.
Now, with that done, let’s go ahead and sort of move our object. Let’s go back in the object mode, simply click on Tab. And since we’re going to, let’s say test out vertex, we can snap this, say, onto these vertex points right here as you can see. You just select that, it will automatically snap to this object’s vertex. If I were to say, move on an X axis right now. You can click on these, move it down. This, maybe, move it again, snap it there. There, it snaps right to the vertex. It’s basically the same for the edges and faces. Say, look at the edge, and just snap to that edge right there. And it’ll snap our cube onto the other sort of object here.
Yeah, that’s pretty much it with the additional, sort of, settings of snapmode. If there are any issues, you can sort of just play around with it, get used to it. And it will come in handy in the future if you are, you know, wanting to snap an object to another object, sort of combining them together.
Yeah, thanks for watching, I’ll see you next time.
Transcript 7
At layer one, since you’ve gotten used to the basic movements and transformations of objects in Blender, let’s take those skills that you’ve learned out for a spin.
Now, as you can see, I’ve created this very simple, low poly character model or a snowman model right here just by using the basic skills of movement and scaling, rotation of objects to create ourselves this nice looking simple snowman. For you, this is going to be your challenge; just gonna do the same thing, use your skills that you’ve learned to create something similar or maybe even better than what I’ve made here. It depends on how much fun you’re gonna have, you know, making something simple like this.
In fact, you can maybe add on, like, additional arms, make this larger, make it look like a freaky looking, I don’t know, snowman or maybe a group of snowmen. It doesn’t really matter.
Yeah, it’s all up to you; this is your small challenge, and it shouldn’t take you that long. It should be quite simple; but, yeah, have fun and I’ll see you in the next video.
Interested in continuing? Check out the full Blender for Beginners – Craft Low-Poly Game Assets course, which is part of our Unity Game Development Mini-Degree.
