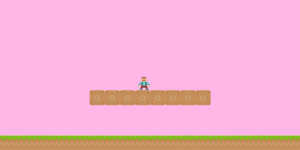
Suppose you’re building a platformer game, where the hero can walk, jump and attack. The hero can jump while standing or walking, but he can’t attack while jumping or walking. Also, the player can not jumping again while it is in the air (no double jumping).
We can start implementing the hero code as below. Depending on your coding experience, you may have noticed that this code is troublesome. To know if the player is jumping (and therefore, keeping it from attacking), we have to save its state in a variable, which says if the hero is jumping or not. Now, suppose we want the player to be able to block attacks, but only when he is standing without walking, jumping or attacking. We would have to add another variable to keep track of that. In addition, suppose we want to change the hero animation when it is jumping, blocking or attacking. You may already have noticed that it will be extremely difficult to manage this code as we increase the size of our game.
Hero = function (game_state, walking_speed, jumping_speed) {
    Phaser.Sprite.call(this);
    this.game_state = game_state;

    this.walking_speed = walking_speed;
    this.jumping_speed = jumping_speed;
    this.is_jumping = false;

    this.game_state.physics.arcade.enable(this);

    this.cursors = this.game_state.input.keyboard.createCursorKeys();
};

Hero.prototype = Object.create(<a class="wpil_keyword_link" href="https://gamedevacademy.org/what-is-phaser/" target="_blank" rel="noopener" title="Phaser" data-wpil-keyword-link="linked">Phaser</a>.Sprite.prototype);
Hero.prototype.constructor = Hero;

Hero.prototype.update = function () {
    if (this.cursors.left.isDown) {
        this.body.velocity.x = -this.walking_speed;
    } else if (this.cursors.right.isDown) {
        this.body.velocity.x = this.walking_speed;
    } else {
        this.body.velocity.x = 0;
    }

    if (this.cursors.up.isDown && !this.is_jumping) {
        this.body.velocity.y = -this.jumping_speed;
        this.is_jumping = true;
    }

    if (this.game_state.input.keyboard.isDown(Phaser.Keyboard.SPACEBAR) && !this.is_jumping) {
        this.attack();
    }
};
To handle such problem, there is a structure called state machine, which can efficiently model what we want in our game: an object that may assume different states during its life. In this tutorial, I will explain how to use a state machine to manage an object behavior and animations in your games.
First, I will explain the basics of state machines, for those not familiar with this concept. Then, I will show a possible code implementation, which will be used in a platformer demo.
To read this tutorial, it is important that you’re familiar with the following concepts:
- Javascript and object-oriented concepts.
- Basic Phaser concepts, such as: states, sprites, groups and arcade physics
- Creating maps using Tiled
Table of contents
Learn Phaser by building 15 games
If you want to master Phaser and learn how to publish Phaser games as native games for iOS and Android feel free to check Zenva‘s online course The Complete Mobile Game Development Course – Build 15 Games.
Source code files
You can download the tutorial source code files here.
What is a state machine?
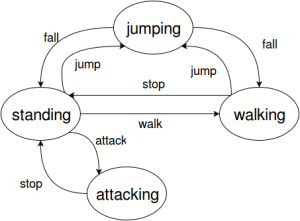
A state machine is a mathematical model used to represent states and transitions between those states. Besides the fancy name, state machines are simple things, and I will explain them using our hero example. The figure below shows the state machine that controls our hero. In this figure, the circles are the possible states that our hero can be, while the arrows represent transitions between them. The text over the arrows are the necessary input (in our case actions) to execute that state transition. And that is it, the hero must start in an initial state (for example, standing), and constantly verifies the input to execute any necessary transitions (such as walk and jump).
For example, if our hero is standing, and it receives a walk input, it should change to the walking state. On the other hand, if it is in the standing or walking states and receives a jump input, it must go to the jumping state. You may have noticed that the variables we used in the previous code to keep track of what the hero was doing (such as jumping or standing) were playing the role of the states. By using a state machine we can encapsulate all the hero behavior in their respective states, keeping the code cleaner and easier to manage.
The state machine code
Now that you know what is a state machine, it is time to write the code for ours. Remember that this is my suggestion of code, and you can implement yours the way you think it better fits your game.
Let’s start by writing the code for the StateMachine class, which is shown below. A state machine has a set of states, which can be added by the “add_state” method. Each state is identified by its name (for example: standing, walking, jumping and attacking), and we can set the initial state by the “set_initial_state” method. The “handle_input” method must be called every time a new input is available (represented by the “command” variable). The current state will handle this input and will return the next state. If the next state is different from the current one, we must exit the current state, and enter the new one.
var StateMachineExample = StateMachineExample || {};

StateMachineExample.StateMachine = function () {
    "use strict";
    this.states = {};
};

StateMachineExample.StateMachine.prototype.add_state = function (state_name, state) {
    "use strict";
    this.states[state_name] = state;
};

StateMachineExample.StateMachine.prototype.set_initial_state = function (state_name) {
    "use strict";
    this.current_state = this.states[state_name];
    this.current_state.enter();
};

StateMachineExample.StateMachine.prototype.handle_input = function (command) {
    "use strict";
    var next_state;
    next_state = this.current_state.handle_input(command);
    if (next_state && next_state !== this.current_state.name) {
        this.current_state.exit();
        this.current_state = this.states[next_state];
        this.current_state.enter();
    }
};
The State class code is shown below. By default, any state contains its name and does nothing in the “enter”, “exit” and “handle_input” methods. This is just the base class which will be extended by the states of our hero.
var StateMachineExample = StateMachineExample || {};

StateMachineExample.State = function (name, prefab) {
    "use strict";
    this.name = name;
    this.prefab = prefab;
};

StateMachineExample.State.prototype.enter = function () {
    "use strict";
};

StateMachineExample.State.prototype.exit = function () {
    "use strict";
};

StateMachineExample.State.prototype.handle_input = function (command) {
    "use strict";
    return this.name;
};
The Command class is shown below. It will simply be an object with a name to identify it and a set of properties. Those properties can be used to properly handle transitions. For example, our “walk” command can have the direction to where the hero is walking, so we can properly update its velocity.
var StateMachineExample = StateMachineExample || {};

StateMachineExample.Command = function (name, properties) {
    "use strict";
    var property;
    this.name = name;
    for (property in properties) {
        if (properties.hasOwnProperty(property)) {
            this[property] = properties[property];
        }
    }
};
Phaser states of our demo
We will save the level data of our demo in a JSON file, which will be read when it starts. The JSON file I’m going to use is shown below. Notice that we must define the assets, groups and map information.
{
    "assets": {
        "map_tileset": {"type": "image", "source": "assets/images/tiles_spritesheet.png"},
        "hero_spritesheet": { "type": "spritesheet", "source": "assets/images/player_spritesheet.png", "frame_width": 28, "frame_height": 30, "frames": 5, "margin": 1, "spacing": 1 },

        "level_tilemap": {"type": "tilemap", "source": "assets/maps/demo_map.json"}
    },
    "groups": [
        "heroes"
    ],
    "map": {
        "key": "level_tilemap",
        "tilesets": ["map_tileset"]
    }
}
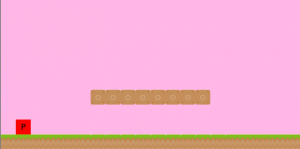
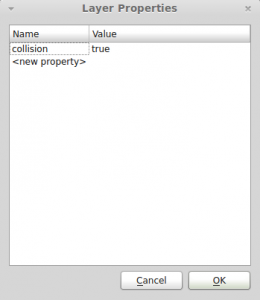
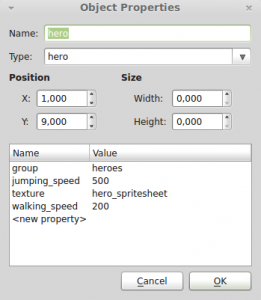
We’re going to use a map created using the Tiled level editor. If you’re not familiar with Tiled, you can check one of my previous tutorials, where I cover it with more details. This is the map I’m going to use. You can use this one, provided in the source code or create your own. However, if you create your own map, you must be careful of two things: 1) you must set a property named “collision” to be true to any layers that are collidable; 2) you must define the hero object properties as shown below.
Our demo will have three states: BootState, LoadingState and DemoState. The code for BootState and LoadingState is shown below. Both are responsible for reading the JSON level file and loading all assets, before calling DemoState.
var StateMachineExample = StateMachineExample || {};

StateMachineExample.BootState = function () {
    "use strict";
    Phaser.State.call(this);
};

StateMachineExample.BootState.prototype = Object.create(Phaser.State.prototype);
StateMachineExample.BootState.prototype.constructor = StateMachineExample.BootState;

StateMachineExample.BootState.prototype.init = function (level_file, next_state) {
    "use strict";
    this.level_file = level_file;
    this.next_state = next_state;
};

StateMachineExample.BootState.prototype.preload = function () {
    "use strict";
    this.load.text("level1", this.level_file);
};

StateMachineExample.BootState.prototype.create = function () {
    "use strict";
    var level_text, level_data;
    level_text = this.game.cache.getText("level1");
    level_data = JSON.parse(level_text);
    this.game.state.start("LoadingState", true, false, level_data, this.next_state);
};
var StateMachineExample = StateMachineExample || {};
StateMachineExample.LoadingState = function () {
"use strict";
Phaser.State.call(this);
};
StateMachineExample.LoadingState.prototype = Object.create(Phaser.State.prototype);
StateMachineExample.LoadingState.prototype.constructor = StateMachineExample.LoadingState;
StateMachineExample.LoadingState.prototype.init = function (level_data, next_state) {
"use strict";
this.level_data = level_data;
this.next_state = next_state;
};
StateMachineExample.LoadingState.prototype.preload = function () {
"use strict";
var assets, asset_loader, asset_key, asset;
assets = this.level_data.assets;
for (asset_key in assets) { // load assets according to asset key
if (assets.hasOwnProperty(asset_key)) {
asset = assets[asset_key];
switch (asset.type) {
case "image":
this.load.image(asset_key, asset.source);
break;
case "spritesheet":
this.load.spritesheet(asset_key, asset.source, asset.frame_width, asset.frame_height, asset.frames, asset.margin, asset.spacing);
break;
case "tilemap":
this.load.tilemap(asset_key, asset.source, null, Phaser.Tilemap.TILED_JSON);
break;
}
}
}
};
StateMachineExample.LoadingState.prototype.create = function () {
"use strict";
this.game.state.start(this.next_state, true, false, this.level_data);
};DemoState must load the map with all its prefabs. To do that, first it will initialize the map in the “init” method. Then, in the “create” method it will create all groups, map layers and prefabs. Notice that we use the “collision” property in the map layers to check if they are collidable. The “create_object” is used to create each prefab according to its type. The types are stored in the “prefab_classes” property, which is used to call the correct constructor. Notice that this is possible because all prefabs have the same constructor, as shown in the Prefab base class below.
var StateMachineExample = StateMachineExample || {};

StateMachineExample.DemoState = function () {
    "use strict";
    Phaser.State.call(this);

    this.prefab_classes = {
        "hero": StateMachineExample.Hero.prototype.constructor
    };
};

StateMachineExample.DemoState.prototype = Object.create(Phaser.State.prototype);
StateMachineExample.DemoState.prototype.constructor = StateMachineExample.DemoState;

StateMachineExample.DemoState.prototype.init = function (level_data) {
    "use strict";
    var tileset_index, tile_dimensions;
    this.level_data = this.level_data || level_data;

    this.scale.scaleMode = Phaser.ScaleManager.SHOW_ALL;
    this.scale.pageAlignHorizontally = true;
    this.scale.pageAlignVertically = true;

    // start physics system
    this.game.physics.startSystem(Phaser.Physics.ARCADE);
    this.game.physics.arcade.gravity.y = 1000;

    // create map and set tileset
    this.map = this.game.add.tilemap(this.level_data.map.key);
    tileset_index = 0;
    this.map.tilesets.forEach(function (tileset) {
        this.map.addTilesetImage(tileset.name, this.level_data.map.tilesets[tileset_index]);
        tileset_index += 1;
    }, this);
};

StateMachineExample.DemoState.prototype.create = function () {
    "use strict";
    var group_name, object_layer, collision_tiles;

    // create map layers
    this.layers = {};
    this.map.layers.forEach(function (layer) {
        this.layers[layer.name] = this.map.createLayer(layer.name);
        if (layer.properties.collision) { // collision layer
            collision_tiles = [];
            layer.data.forEach(function (data_row) { // find tiles used in the layer
                data_row.forEach(function (tile) {
                    // check if it's a valid tile index and isn't already in the list
                    if (tile.index > 0 && collision_tiles.indexOf(tile.index) === -1) {
                        collision_tiles.push(tile.index);
                    }
                }, this);
            }, this);
            this.map.setCollision(collision_tiles, true, layer.name);
        }
    }, this);
    // resize the world to be the size of the current layer
    this.layers[this.map.layer.name].resizeWorld();

    // create groups
    this.groups = {};
    this.level_data.groups.forEach(function (group_name) {
        this.groups[group_name] = this.game.add.group();
    }, this);

    this.prefabs = {};

    for (object_layer in this.map.objects) {
        if (this.map.objects.hasOwnProperty(object_layer)) {
            // create layer objects
            this.map.objects[object_layer].forEach(this.create_object, this);
        }
    }
};

StateMachineExample.DemoState.prototype.create_object = function (object) {
    "use strict";
    var object_y, position, prefab;
    // tiled coordinates starts in the bottom left corner
    object_y = (object.gid) ? object.y - (this.map.tileHeight / 2) : object.y + (object.height / 2);
    position = {"x": object.x + (this.map.tileHeight / 2), "y": object_y};
    // create object according to its type
    if (this.prefab_classes.hasOwnProperty(object.type)) {
        prefab = new this.prefab_classes[object.type](this, object.name, position, object.properties);
    }
    this.prefabs[object.name] = prefab;
};
var StateMachineExample = StateMachineExample || {};

StateMachineExample.Prefab = function (game_state, name, position, properties) {
    "use strict";
    Phaser.Sprite.call(this, game_state.game, position.x, position.y, properties.texture);

    this.game_state = game_state;

    this.name = name;

    this.game_state.groups[properties.group].add(this);
    this.frame = +properties.frame;

    if (properties.scale) {
        this.scale.setTo(properties.scale.x, properties.scale.y);
    }

    this.game_state.prefabs[name] = this;
};

StateMachineExample.Prefab.prototype = Object.create(Phaser.Sprite.prototype);
StateMachineExample.Prefab.prototype.constructor = StateMachineExample.Prefab;
Hero states
Now that we have our state machine implemented, we’re going to create the states of our hero. In this tutorial I’ll show the standing, walking and jumping states. I’ll leave the attacking state (and any other you may think of) as an exercise, since it’s similar to what we’re doing for the other states. All states will extend the State base class, and will implement the necessary methods.
For example, the code below shows the StandingState. In its enter method it must set the hero frame to the standing frame and the velocity to 0. In the “handle_input” method it checks for the “walk” and “jump” commands. Notice that the “walk” command has a “direction” property so we can know if the player is moving left or right.
var StateMachineExample = StateMachineExample || {};

StateMachineExample.StandingState = function (name, prefab, frame) {
    "use strict";
    StateMachineExample.State.call(this, name, prefab);
    this.frame = frame;
};

StateMachineExample.StandingState.prototype = Object.create(StateMachineExample.State.prototype);
StateMachineExample.StandingState.prototype.constructor = StateMachineExample.StandingState;

StateMachineExample.StandingState.prototype.enter = function () {
    "use strict";
    // set standing frame and velocity to 0
    this.prefab.frame = this.frame;
    this.prefab.body.velocity.x = 0;
};

StateMachineExample.StandingState.prototype.handle_input = function (command) {
    "use strict";
    switch (command.name) {
    case "walk":
        if (command.direction === "left") {
            return "walking_left";
        } else {
            return "walking_right";
        }
    case "jump":
        return "jumping";
    }
    StateMachineExample.State.prototype.handle_input.call(this, command);
};
The WalkingState contains the walking animation and walking speed, as shown below. In its “enter” method it will play the walking animation and set the hero velocity. In the “exit” method it will only stop the animation. We’re not going to set the velocity to 0 in the “exit” method so the player can keep moving when it goes from the walking state to the jumping state. Finally, in the “handle_input” method it checks for the “stop” and “jump” commands.
var StateMachineExample = StateMachineExample || {};

StateMachineExample.WalkingState = function (name, prefab, direction, walking_speed) {
    "use strict";
    StateMachineExample.State.call(this, name, prefab);

    this.walking_animation = this.prefab.animations.add("walking", [0, 1, 2, 1], 6, true);

    this.direction = direction;
    this.walking_speed = walking_speed;
};

StateMachineExample.WalkingState.prototype = Object.create(StateMachineExample.State.prototype);
StateMachineExample.WalkingState.prototype.constructor = StateMachineExample.WalkingState;

StateMachineExample.WalkingState.prototype.enter = function () {
    "use strict";
    // start animation and set velocity
    this.walking_animation.play();
    this.prefab.body.velocity.x = this.direction * this.walking_speed;

    if (this.direction === 1) {
        this.prefab.scale.setTo(-1, 1);
    } else {
        this.prefab.scale.setTo(1, 1);
    }
};

StateMachineExample.WalkingState.prototype.exit = function () {
    "use strict";
    // stop animation and set velocity to zero
    this.walking_animation.stop();
};

StateMachineExample.WalkingState.prototype.handle_input = function (command) {
    "use strict";
    switch (command.name) {
    case "stop":
        return "standing";
    case "jump":
        return "jumping";
    }
    StateMachineExample.State.prototype.handle_input.call(this, command);
};
Finally, JumpingState has the jumping speed, which is applied to the velocity in its “enter” method. The only command it checks in the “handle_input” method is the “fall” command.
var StateMachineExample = StateMachineExample || {};

StateMachineExample.JumpingState = function (name, prefab, jumping_speed) {
    "use strict";
    StateMachineExample.State.call(this, name, prefab);
    this.jumping_speed = jumping_speed;
};

StateMachineExample.JumpingState.prototype = Object.create(StateMachineExample.State.prototype);
StateMachineExample.JumpingState.prototype.constructor = StateMachineExample.JumpingState;

StateMachineExample.JumpingState.prototype.enter = function () {
    "use strict";
    // set vertical velocity
    this.prefab.body.velocity.y = -this.jumping_speed;
};

StateMachineExample.JumpingState.prototype.handle_input = function (command) {
    "use strict";
    switch (command.name) {
    case "fall":
        return "standing";
    }
    StateMachineExample.State.prototype.handle_input.call(this, command);
};
The hero prefab
Now that we have the hero states, we can create its prefab as shown below. In the constructor, we create the state machine, adding all its states and setting the initial state. We also add callbacks to the keyboard events “onDown” and “onUp”. These callbacks will be used to check user input and send commands to the state machine.
var StateMachineExample = StateMachineExample || {};

StateMachineExample.Hero = function (game_state, name, position, properties) {
    "use strict";
    StateMachineExample.Prefab.call(this, game_state, name, position, properties);

    this.anchor.setTo(0.5);

    this.walking_speed = +properties.walking_speed;
    this.jumping_speed = +properties.jumping_speed;

    this.game_state.game.physics.arcade.enable(this);
    this.body.collideWorldBounds = true;

    // create state machine and add states
    this.state_machine = new StateMachineExample.StateMachine();
    this.state_machine.add_state("standing", new StateMachineExample.StandingState("standing", this, 3));
    this.state_machine.add_state("walking_left", new StateMachineExample.WalkingState("walking_left", this, -1, this.walking_speed));
    this.state_machine.add_state("walking_right", new StateMachineExample.WalkingState("walking_left", this, 1, this.walking_speed));
    this.state_machine.add_state("jumping", new StateMachineExample.JumpingState("jumping", this, this.jumping_speed));
    this.state_machine.set_initial_state("standing");

    // add callbacks to keyboard events
    this.game_state.game.input.keyboard.addCallbacks(this, this.process_on_down_input, this.process_on_up_input, null);
};

StateMachineExample.Hero.prototype = Object.create(StateMachineExample.Prefab.prototype);
StateMachineExample.Hero.prototype.constructor = StateMachineExample.Hero;

StateMachineExample.Hero.prototype.update = function () {
    "use strict";
    this.game_state.game.physics.arcade.collide(this, this.game_state.layers.collision);

    // touching ground tile
    if (this.body.blocked.down) {
        this.state_machine.handle_input(new StateMachineExample.Command("fall", {}));
    }
};

StateMachineExample.Hero.prototype.process_on_down_input = function (event) {
    "use strict";
    switch (event.keyCode) {
    case Phaser.Keyboard.LEFT:
        // walk left
        this.state_machine.handle_input(new StateMachineExample.Command("walk", {direction: "left"}));
        break;
    case Phaser.Keyboard.RIGHT:
        // walk right
        this.state_machine.handle_input(new StateMachineExample.Command("walk", {direction: "right"}));
        break;
    case Phaser.Keyboard.UP:
        // jump
        this.state_machine.handle_input(new StateMachineExample.Command("jump", {}));
        break;
    }
};

StateMachineExample.Hero.prototype.process_on_up_input = function (event) {
    "use strict";
    switch (event.keyCode) {
    case Phaser.Keyboard.LEFT:
        this.state_machine.handle_input(new StateMachineExample.Command("stop", {}));
        break;
    case Phaser.Keyboard.RIGHT:
        this.state_machine.handle_input(new StateMachineExample.Command("stop", {}));
        break;
    }
};
The “process_on_down_input” and “process_on_up_input” show those callback functions. We use the keyCode to identify the user input and create the new command accordingly. Notice that when we issue the “walk” command we must specify the direction.
Finally, in the “update” method we check if the player is touching a ground tile and issue the “fall” command accordingly.
Now we can play our demo and move our hero using the state machine!
Possible extensions
Even though our demo is complete, there are several extensions you can make. First, you can improve our state machine to allow the hero to change direction while jumping or even double jump. You can also issue the commands in the “update” method by checking the keys that are pressed, to see the difference.
Try adding new states, like an invincible state when the hero gets a powerup item. Also, suppose that you want to create an item that changes the hero attack. You don’t want to check if the hero has collected this item every time in the attack state. So, you can create another state machine only to handle this new attack when it is available, and issue commands simultaneously for the two state machines. Therefore, there are endless possibilities.
Finally, the main limitation of state machines is that sometimes they are too simple, and may not be suitable for complex AI. In this case, you can try different models, such as pushdown automatas and behavior trees.
And that concludes our state machines tutorial. Tell me your opinion and questions in the comments section!

