Table of contents
Part 2: Finishing up the Dialogue Controller, using Scriptable Objects to hold the dialogue data, and setting up camera functionality.
This is the second part of the tutorial series where we use Unity’s Scriptable Object system to build a Pizzaria project. Please make sure you have completed the first part of this tutorial series to ensure that you are able to follow along effectively and continue building the project with part two. The link to the first part of the tutorial is here.
Source Code Files
You can download the tutorial source code files here. All the project files are located in the main folder. The asset folder contains additional intermediate files that were used during the process of creating the game sprites.
Did you come across any errors in this tutorial? Please let us know by completing this form and we’ll look into it!

FINAL DAYS: Unlock coding courses in Unity, Godot, Unreal, Python and more.
Customer Dialogue States
Open the Pizzaria project and navigate to the Scriptable Object folder in the project. Create a new script and name it “CustomerDialogueSO.” Open the script up in Visual Studio.
Remember that Scriptable Objects are not attached to any game objects in the scene. Scriptable Objects do not inherit from Monobehaviour, they inherit from ScriptableObject. The first thing that needs to be done with this script is to change “Monobehavior” to ScriptableObject, right after the colon. Delete the Start and Update functions, these are not needed in this script.
Create a string variable and name it “CustomerGreeting.” This needs to be serialized, so that it is visible in the inspector.
Now, in order for us to be able to create a Scriptable Object and add it to the project we need to add one more line to this script. Above the class declaration “CustomerDialogueSO : ScriptableObject” you must add this line: “[CreateAssetMenu(menuName = “CustomerDialogueSO”)]”
This line ensures that we are able to add a ScriptableObject to the project via the Unity Editor.
[CreateAssetMenu(menuName = "CustomerDialogueSO")]

[SerializeField]
string customerGreeting;
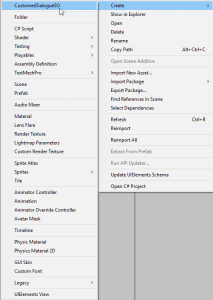
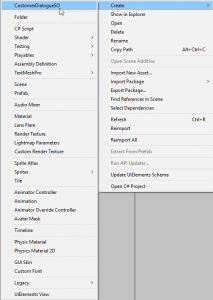
Save the script and go back to the Unity editor, you can now Right Click in the Scriptable Objects folder and Create>CustomerDialogueSO. This will add an .asset file to this folder.
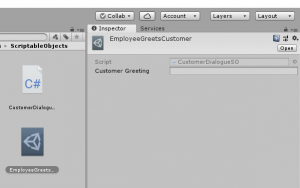
Name this new Scriptable Object “EmployeeGreetsCustomer”
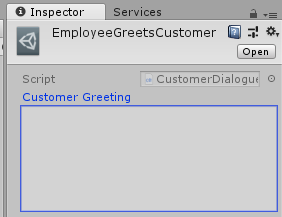
We need to add another attribute to the CustomerDialogueSO script. Open the script backup in Visual Studio and below the SerializeField attribute we need to add a TextArea attribute so that the field next to Customer Greeting is large enough for us to see effectively for ease of typing directly inside the Unity Editor. The text area attribute can be 8,8.
[TextArea(8,8)]
You will see that the text input field became much larger, and you shouldn’t have problems entering or seeing what is being typed inside that field now.
In the Customer Greeting field we are going to fill this value in via the inspector with what the Pizzaria Employee will say to the customer when they greet them. Enter the greeting inside the value in the inspector “Welcome to the Pizzaria, how may I help you?”
Getting our beginning customer greeting setup and functioning
Open the CustomerDialogueSO script and create a public function and name it “GetCustDialogue.” This function needs to return a string, that string it’s going to return the customerGreeting string we created earlier on.
public string GetCustDialgoue()
    {
        return customerGreeting;
    }
This function needed to be public so that we can access it outside the script.
In this same script create a CustomerDialogueSO variable that is serialized and name it startCustomerGreet. Save the script.
Now navigate back into the Unity Editor and with the DialogueController game object selected in the scene, look at the Inspector window and you will see under the Pizzaria Operation(Script) component the field called “Start Customer Greet” this is where we need to drag the scriptable object we created earlier called “EmployeeGreetsCustomer” to this field.
At this point we are going to need to know what part of the customer/employee interaction we are in. Create a variable called custEmployeeInteraction. Get reference from the CustomerDialogueSO script.
CustomerDialogueSO custEmployeeInteraction;
What were doing here is deriving from the class we created earlier called CustomerDialogueSO.
In the start function we need to set the custEmployeeInteraction to startCustomerGreet.
custEmployeeInteraction = startCustomerGreet;
Earlier we hooked up the startCustomerGreet because we dragged the scriptable object asset we created earlier into the field in the Unity Editor. That scriptable object had all beginning customer greeting info already in it.
We need to now call the public function we created earlier from the CustomerDialogueSO script. It was the public function named GetCustDialgoue().
We can do this where we originally had put the string “Placeholder” and replace that with custEmployeeInteraction.GetCustDialgoue();
The start function in the PizzaOperation script should now look like this:
 // Use this for initialization
    void Start() {

        custEmployeeInteraction = startCustomerGreet;
        txtComponent.text = custEmployeeInteraction.GetCustDialgoue();
    }
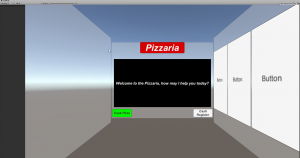
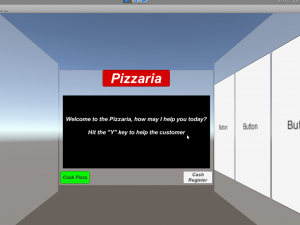
Save the script, navigate back to the Unity Editor and hit Play. The game scene should now look like this:
Navigate to the Scriptable Objects folder in the Unity Editor, it’s important we keep the project organized. Create a new folder and name it “EmployeeDialogueSO” we will be keeping all the Employee dialogue in this folder. Then create another new folder and name it “CustDialogueSO.” Drag the EmployeeGreetsCustomerSO into the EmployeeDialogueSO folder. Save the scene and project.
In order to advance through the employee to customer dialogue we will be using an array that is serialized and a public function that will return one of the variables in the created array.
Open the CustomerDialogueSO script and create a serialized array of type “CustomerDialogueSO” and name it “nextDialogue.” Then we need the public function called “GetNextDialogue” that will return nextDialogue.
[SerializeField]
    CustomerDialogueSO[] nextDialogue;

public CustomerDialogueSO[] GetNextDialogue()
    {
        return nextDialogue;
    }
What we have here is created a CustomerDialogueSO array called “nextDialogue” that is being returned when we will call the GetNextDialogue function via code. Save the script and navigate back into the Unity Editor.
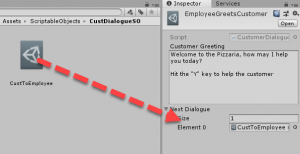
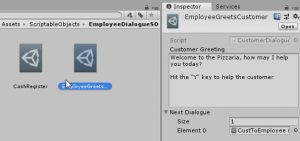
Click on the “EmployeeGreetsCustomer” scriptable object asset file. Look at the Inspector and you will see the Next Dialogue array value that is now visible in the Inspector. It has a drop down arrow next to it and you can click this. We will be adding the other scriptable object asset files to this array right here in the Inspector after we create them.
Because, we made the array serialized we can add the elements directly to it from the Inspector window just by dragging and dropping them onto the array that is visible in the Inspector. This is one of the beauties of using the SerializeField attribute within Unity.
The size value field will actually be the size of the array. The size of the array will adjust automatically as we add the scriptable object asset files to it. Just remember arrays start from “0” instead of “1.”
A quick tip that will come in handy with this tutorial as we work inside the Unity Editor; this will save you a lot of trouble as you will be clicking on multiple files and then dragging them into the Inspector onto the array field.
If you navigate into the Unity Editor and look up in the upper right hand corner of the Inspector you will see a little lock icon. If you click on this lock while you have a game object selected in the scene this lock will actually lock the Inspector window so that as you’re clicking on multiple files the Inspector window will stay focused on that game object you chose to “lock.”
Creating the first customer to employee scriptable object asset
Open up the CustDialogueSo folder. Create a CustomerDialogueSO asset. Do this just like how we created the first scriptable object earlier. Right Click>Create>CustomerDialogueSO in the menu.
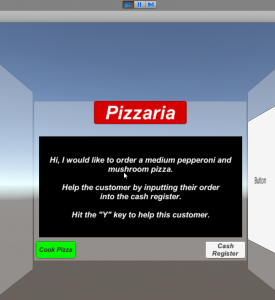
Now we need to fill in the Customer Greeting value field: “Hi, I would like to order a medium pepperoni and mushroom pizza. Help the customer by inputting their order into the cash register. Hit the “Y” key to help this customer.”
This is what the customer will respond to the pizzaria employee after they are greeted by the employee.
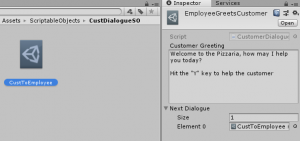
Now we need to hook this up properly in the Inspector so that the employee to customer dialogue goes in the correct order. Select the scriptable object asset called “EmployeeGreetsCustomer” use the tip you learned earlier about locking the Inspector by selecting the lock icon. Then navigate to the CustDialogueSo folder and drag the CustToEmployee scriptable object asset onto the array field in the Inspector.
Managing the dialogue parts
We now need a way to control the different states of the employee to customer dialogue and be able to control what the employee can do next after the customer has place an order with the Pizzaria.
Create a private function named “PizzaDialogueManagement” This function is going to cause the dialogue between the employee and customer to advance by detecting if the “Y” key has been pressed by the user. Then the text component on the Dialogue Controller needs to pull in the custEmployeeInteraction.GetCustDialgoue. Make sure to call the PizzaDialogueManagement function inside the Update function in the script. Save the script.
// Update is called once per frame
    void Update() {
        PizzaDialogueManagement();
    }

    private void PizzaDialogueManagement()
    {
        CustomerDialogueSO[] nextDialogue = custEmployeeInteraction.GetNextDialogue();
        if (Input.GetKeyDown(KeyCode.Y))
        {
            custEmployeeInteraction = nextDialogue[0];
        }

        txtComponent.text = custEmployeeInteraction.GetCustDialgoue();
    }
Hooking up the other scriptable object dialogue assets
A quick change needs to be made to the Customer Greeting field on the EmployeeGreetsCustomer scriptable object asset.
Add the text “Hit the “Y” key to help the customer” to the input field.
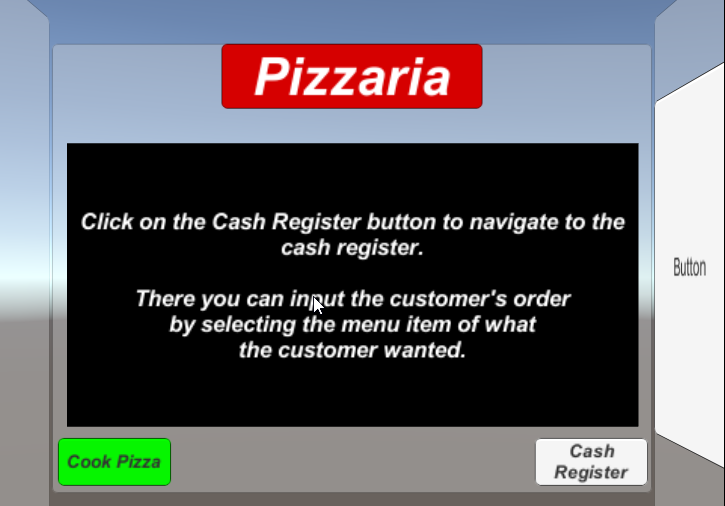
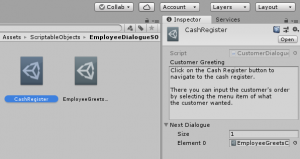
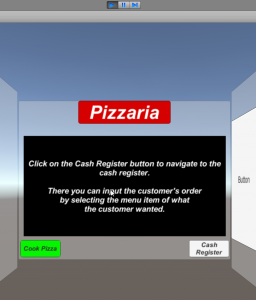
Create a new scriptable object called CashRegister, you can leave this asset in the EmployeeDialogueSO folder. Input the text “Click on the Cash Register button to navigate to the cash register. There you can input the customer’s order by selecting the menu item of what the customer wanted.”
Then drag the EmployeeGreetsCustomer scriptable object asset onto the array field of the CashRegister scriptable object in the Inspector.
It’s important to have all the array elements filled in inside the Inspector for the Next Dialogue array. You can double check that they are all hooked up properly by clicking on each scriptable object asset in the project and making sure they are hooked up according to the screenshots below:
Once you verified that all the scriptable objects are hooked up properly go ahead and save the scene and project. Hit the play button and test what we have so far. The screenshot below is how the game screen should appear once the Play button has been hit.
Follow along with the prompt, and the second part should look like this:
And finally the third part should display this:
Camera Functionality
Select the Main Camera in the scene. Reset the Transform component in the Inspector so that the Main Camera is now at the origin. Make sure the UI Container is positioned at the origin as well, if it is not just Reset it through the Inspector.
Select the MainPanel and navigate to the Rect Transform component in the Inspector. Change these values: Pos X = 0, Pos Y = 0, and Pos Z = 260.
We will be using a built in function that Unity has called “LookAt” we will be taking the Main Camera’s transform and then move the camera by using the “LookAt” function to get it to move to the other UI panels when the Cash Register or Cook Pizza buttons are clicked on by the user.
Create a new script and name it “MenuNavigation.” Open the script in Visual Studio, add a public function and name it “LookAtPanel” it’s going to accept two parameters: transform and panelTransform. Inside the function were going to get the Camera to lookAt the transfrom of the panelTransform.
 public void LookAtPanel(Transform panelTransform)
    {
        Camera.main.transform.LookAt(panelTransform.position);
    }
Save the script. Navigate back into the Unity Editor and make sure the Main Camera in the scene is tagged as “MainCamera.”
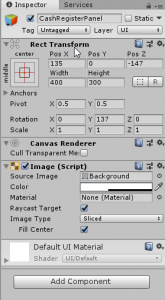
Select the CashRegisterPanel and adjust the Rect Transform to match the screenshot below:
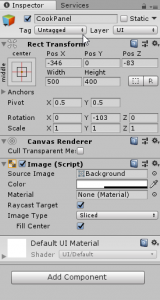
Now select the CookPanel and adjust its Rect Transform component to match the screenshot below:
Create an empty game object and rename it to “PanelMenus.” Attach the MenuNavigation script to this object in the scene.
Select the GoToCashRegisterBtn and add a n On Click () function to this button. Select the PanelMenus object, this game object has the script MenuNavigation attached to it that contains the public function LookAtPanel. Select the MenuNavigation>LookAtPanel (Transform) from the drop down menu.
The On Click function should look like this:
Save the scene and the project. Hit the play button, and then click on the white Cash Register button: the camera should now change its focus to the CashRegisterPanel. Stop Play mode and test out the Cook Pizza button, now the camera should focus on the CookPanel once that button is clicked.
That comfortably concludes this second part of the tutorial. We will be adding in some more buttons to each panel to navigate back to the MainPanel later on in Part 3 of the tutorial. See you then!
