You can access the full course here: Publishing and Optimizing Mobile Games
Table of contents
Light Baking
In this lesson, we’re going to go over the concept of actually baking your lighting inside of Unity. When it comes to performance impact, lighting is one of the major factors that contribute.
Types of Lighting
In Unity, there are three different types of lighting: Baked, Real-time, and Mixed.
| Light Modes | Description |
| Baked | Unity pre-calculates the illumination from baked lights before runtime and does not include them in any runtime lighting calculations. |
| Realtime | Unity calculates and updates the lighting of Realtime Lights every frame at runtime. Unity does not precompute any calculations. |
| Mixed | Unity performs some calculations for Mixed Lights in advance and some calculations at runtime. |
When baking lights, Unity will create a special type of texture called lightmap, which is basically like a blanket that is put over everything in the scene with all the lighting data and information already pre-applied. This can greatly reduce the rendering cost of shadows, as real-time lighting updates shadows and lighting every frame.
Setting up Baked Lighting
To start setting up baked lighting, we need to define which objects we want to include in the baking process. Let’s select all gameObjects that will remain static for the rest of the game:


We can then check these to be ‘Static‘; in other words, once this game is playing, we cannot move these objects around.

Once that’s done, we can select the light source (i.e. Directional Light):

… and change the Mode from ‘Realtime’ to ‘Baked’.

We can then click on the Auto-Generate Lighting button on the bottom left corner of the screen.

This is going to open up the Lighting window. And in here is where we can set up our baked lighting:

First of all, make sure that you have the lighting settings set up; if it doesn’t exist yet, you can create one by clicking on New Lighting Settings.

Then you can scroll down to set up the Lightmapping Settings, where we can select which processor to bake light with.
If you have a good graphics card, we recommend selecting Progressive GPU as this is going to greatly decrease the time it takes to bake the lighting.

When we are generating lightmaps, we need to take samples around the scene to determine how the light is going to behave, by looking at the samples’ light intensity, shadows, etc.
Increasing these values will make it take longer to render, but will result in a finer detail of lighting.

For more information about Lightmapping, refer to the official documentation: https://docs.unity3d.com/Manual/Lightmapping.html
Light Generation
Once you’ve finished configuring the lighting settings, you can click on Generate Lighting:

And you’ll now see a progress bar down at the bottom right going through each of the various different processes in order to bake the lighting.

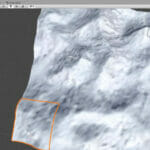
In exchange for greater performance, you may encounter some glitches, such as this banding artifact. Feel free to finetune your lightmap settings and re-generate lighting until you’re satisfied with the result.

Optimizing the UIs
In this lesson, we’re going to go over a few different ways you can optimize your user interfaces inside of Unity.
Removing Raycaster
Having multiple UIs on your screen at a time can slow down your performance. And one of the most performance impacting factors is Raycaster.
When a Graphic Raycaster is present and enabled inside of a Canvas, it will be used by the Event System to see if you are clicking on any of the UI elements. In other words, it will translate your input (touch or mouse click) into UI Events.

For optimized performance, you should minimize the number of Graphic Raycasters by removing them from non-interactive UI Canvases. You can remove the raycaster by Right-click > Remove Component.

Splitting Canvases
It’s recommended that you have multiple canvases with a single UI object rather than having a single canvas with multiple UI as child objects. This is because each time a canvas is active, it is going through every single child object checking to see if it needs to be rendered on screen, if it is active and enabled, etc.

So instead of having various elements in one canvas, you should split them up into different canvases.

Disabling Raycast Target
Inside of an image or a button, there is an Image component. You’ll see that inside the Image component is a Raycast Target checkbox. This will determine whether or not the image is going to be detecting Raycasts.

Having the Raycast Target enabled allows the image/button to be detecting touch or mouse clicks. This may also be enabled inside of a non-interactable object (e.g. Text).

For every element that doesn’t need to be interacted with the finger or the mouse click, you can basically disable Raycast Target.
Optimizing Scripts
In this lesson, we’re going to be going over scripting optimizations to help out with performance.
As you script your games and increase the number of scripts and complexity of them, it will potentially get to a point where the scripts are impacting their performance and this can be due to a number of different reasons.
First of all, let’s go over the concept of caching objects.
Caching Objects
Let’s say, you have a game where you want to change the ball’s color to a certain color every single frame.
void Update()
{
   GameObject.Find("Ball").GetComponent<MeshRenderer>().material.color = Color.blue;
}
In this example, we are finding the Ball object, then we’re getting the MeshRenderer component, and then changing its color to blue.
In fact, this line of code is very inefficient because:
- GameObject.Find is an expensive function to call, as it searches through the entire scene for an object called “Ball”.
- .GetComponent is also an expensive function to call, as it will return a specific component attached to the GameObject after looking up all components.
- This method allocates memory, and has a high lookup cost, and should be avoided inside a performance-critical context or risk per-frame allocations and poor performance.
We can fix it by caching the ball’s MeshRenderer component. Since we’re calling it every single frame, it is helpful to cache this to a variable.
private MeshRenderer ballMeshRenderer;

void Awake()
{
   //  get the ball's mesh renderer
   ballMeshRenderer = GameObject.Find("Ball").GetComponent<MeshRenderer>();
}

void Update()
{
   ballMeshRenderer.material.color = Color.blue;
}
As you see here, we’ve created a private MeshRenderer variable called “ballMeshRenderer“. And we’re only calling GameObject.Find and .GetComponent “once” in the entire game (inside of the Awake function).
The following functions are expensive and should not be called inside of the Update function.
- GameObject.Find
- GameObject.FindObjectOfType
- GameObject.FindObjectWithTag
- GameObject.GetComponent
- Camera.main (= same as GameObject.FindObjectWithTag)
Reducing Function Calls
Similarly, you can reduce the number of function calls inside of the Update function. Let’s take a look at this example:
void Update()
{
    ExpensiveFunction();
}

void ExpensiveFunction()
{
    //This will be called approx. 60 times a second - inefficient!
}
There will be certain functions that can be called every 0.1 or 0.2 seconds, instead of every single frame. For example, you could be constantly checking to see if the player has reached a certain score. If the functions aren’t directly tied to player inputs, such as looking, shooting, jumping, etc. you can actually give it a delay as following:
private float lastCallTime;

void Update()
{
    // call the function every 0.2 seconds.
    if(Time.time - lastCallTime >= 0.2f)
       ExpensiveFunction();
}

void ExpensiveFunction()
{
    //This will be called approx. 5 times a second - great!
}
Other Optimizations
- Reduce Debug.Log calls
- Reduce frequency of Raycasts
- Do not use Loops in the Update function
- If you’re instantiating lots of the same object, use Object Pooling
When a Debug.Log() is called, it can affect performance and also clog up your console for other important messages.
If you’re looping through many elements in the Update function, keep in mind how many things you are looping through every frame as it can greatly slow down performance.
If you’re instantiating particle effects or bullets, try using Object Pooling.
Object Pooling
Object pooling is where you pre-instantiate all the objects you’ll need at any specific moment before gameplay — for instance, during a loading screen.
Instead of creating new objects and destroying old ones during gameplay, your game reuses objects from a “pool” by enabling/disabling them.
For more information, refer to the official guide: https://learn.unity.com/tutorial/introduction-to-object-pooling
Transcript
Light Baking
Hey, everyone. In this lesson, we are gonna go over the concept of actually baking your lighting inside of Unity.
Now, when it comes to performance impacts inside of Unity, especially in 3D games, lighting is one of the major factors that contribute. And when it comes down to lighting, you have two choices. You have real-time lighting and you have baked lighting.
Real-time lighting is what is enabled by default, and this basically means that the lighting is calculated every single frame. So, if you have an object moving around it will have a shadow that is tracking it around and every other object is gonna have its shadows, its lighting, the intensity, and all of that calculated every single frame. Now that’s really great if you wanna have waving trees, if you wanna have players that can run around and have their shadows being displayed.
But when it comes to having more complex lighting, such as having lighting bouncing off various different objects and having a better performance, that is where baked lighting comes in. And baked lighting is lighting that is calculated by us, the developers, before people play the game. And it bakes it into the textures known as a lightmap, which is basically a blanket that is put over everything in the scene with all the lighting data and information already pre-applied. So realistically, it’s just rendering a texture when we play the game rather than calculating and displaying the lighting every frame.
And baking your real-time lighting can actually have the biggest performance increase if you are using a 3D scene, and the more complex your 3D scene is, the more performance you should see from baking your lighting.
Now baked lighting isn’t good in all circumstances. Again, if you do want your shadows to be updated as you’re running around, real-time lighting may be better for that. So in that case, you can use something such as a mixed light, for example, so you can bake your buildings, your terrain, you can bake your trees and all that. All the objects that aren’t gonna move in your scene, you can have baked lighting for that and have real-time lighting for stuff such as the players, the enemies and everything that is gonna be moving around and dynamic.
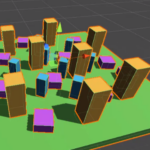
So how do we go about actually setting up baked lighting? Well, if we select our directional light here and this is just a basic scene that I created just to demonstrate this. On our directional light you’ll see that where it says mode it is currently set to real-time. If we select this, we can choose between real-time, which is updating the shadows and lighting every frame, mixed which is a mix of both real-time and baked, and baked being it’s going to generate the lightmap and then apply it to our scene when we play the game.
So the lighting is pre-calculated, okay? So right now in real-time lighting, now, let’s just say we want to go ahead and start baking this lighting. Well, the first thing we need to do is not switch it over to baked. Instead we need to define which objects we want to include in the baking process.
So here I have a dropdown of all the various game objects just stored under a empty game object right here. And what I’m gonna do is I’m gonna select all of the game objects I want to include in the baking, so the ground and all these other cubes here. And inside of the inspector, you’ll see that we have a checkbox here for whether or not this object is going to be static. So let’s enable that right there.
And what static means is basically once this game is playing we cannot move these objects around. They are static, they are built into the scene and pretty much we can’t rotate them, move them, or scale them, okay? Okay, so now that we’ve made these objects static we can actually begin the process of baking our lighting.
So I’m gonna select our directional light right here and I’m gonna change the mode from real time to baked. Nothing has really happened, we don’t really have anything happening right now. So what we need to do is go to the lighting settings window. And to do that we can go down to the bottom right corner of our screen and click on this auto-generate lighting button down here. This is gonna open up the lighting window and in here is where we can set up our baked lighting.
So, first of all, if you don’t have a lighting settings here set, you can click on it, new lighting settings that’s gonna generate a new lighting settings asset for you, and then you can start editing it here. So the first thing we want to do is scroll down to where we have the light mapping settings as this is where we are going to define all the various different settings and options when it comes to light baking.
First of all we have the light mapper, and this is basically how we are going to generate our light maps. Now, by default, this is on progressive CPU, meaning that the light baking is gonna take place over on your processor. And then we also have progressive GPU. Now, if you do have a pretty good graphics card, I recommend selecting progressive GPU as this is gonna greatly decrease the time it takes the bake as the larger your scene is, the longer it’s gonna take to actually bake the lighting. And it can take some time. So I’m gonna personally select progressive GPU.
Now, if you are on a fairly low end computer then you probably should select a progressive CPU. Although if you do know that you have a pretty good GPU, if you’re on a gaming computer for example, then select progressive GPU.
Okay? Now down here, we have direct samples, indirect samples and environment samples. What these are are basically when we are generating our light map, we need to take samples around the scene to figure out the intensity of the lighting, the shadows, pretty much everything in order to determine how the light is going to behave. Because with light it comes out from the light source, such as our directional light here, and it can bounce off objects.
So if we have a light bouncing off the green floor, for example, it can then reflect up onto one of the pillars right here and leave a little bit of green lighting on it when it bounces off. This is what we can do with baked lighting. And with real-time lighting, light bouncing isn’t really possible.
So, direct samples, indirect samples, and environment samples. The higher these numbers are, then the better your actual light map will look. Although when you do increase these values it does take longer to render as it does need to do more samples. So I recommend just keep it on the default for now. If you do create a much larger scene and you do wanna get more in-depth into light baking, then you can of course do much more research on what each of these individual aspects are and tweak them to your liking. As when it comes down to lighting, there is no one solution for all projects as each scene has its own specific lighting settings which looks best for it, okay?
Apart from the these, we can go down to where it says bounces. This basically determines how many light bounces each ray is going to do. I’m just gonna keep it on two for now. Light map resolution, this is gonna be how many tech cells per unit. So every Unity unit, what is the resolution going to be? Okay, think of it as pixels on an image, think of this how many sort of pixels of lighting we’re gonna have. So how high resolution do you want the lighting to be, the shadows to be.
We’re gonna keep it on 40 for now, which is the default. Max light map size, it’s gonna be 1,024. Again, if you do want to increase the resolution and the complexity of your light map, you can increase this number, although we’re gonna keep this at the defaults. And ambient occlusion, which is basically adding in tiny little micro shadows, where two objects intersect. In real life, if you do look at objects that are sitting on top of each other, you can see a slight little shadow where they intersect or where they touch. So we can select that if we do want to have ambient occlusion included.
And apart from that, we can just go ahead and click the generate lighting button down here. I’m gonna dock my lighting window over in the inspector here. And down at the bottom right you can see we have a bar that is gonna begin going through each of the various processes in order to bake the lighting. And in our scene view here, you can also see it is going ahead, it’s doing all the calculations.
And depending on the size and complexity of your scene, it can take some time. Although since this is quite a basic scene, we are pretty much complete right now.
And here we go, this is our baked scene, and it looks very similar to the previous one where we had real-time lighting. Although if we look around, you’ll see that you do have some sort of artifacts and sort of low resolution looks to this. And this is just due to the fact that we have a lower lightmap resolution that can be increased. We can increase the direct samples, the indirect samples to get rid of this.
Although when it does come down to generating light maps you will always have these sort of artifacts compared to real-time lighting. Although on the pros side thing, you do now have much greater performance. And it also allows for light bounces and more complex lighting setups.
So that was a basic overview of Unity’s light mapping in baking systems. Of course, you can go into much more depth into each of these various different options, tweaking them. So I recommend if this is something that interests you and it is something that you are thinking of using for your future projects, do more research into this, as there are many different avenues you can go down when it comes to lighting inside of Unity. So thank you for watching.
Optimizing the UIs
Hey everyone, in this lesson we’re gonna be going over a few different ways you can optimize your user interfaces inside of Unity. And this will help for both mobile, and for pretty much every other single game you create.
Now here in my game that I have just for this course, there isn’t a lot of UI. We have our canvas over here, and inside the canvas, we have a button and an end screen, which just has a button and text on it.
So when it comes to optimization, this isn’t necessary for this type of game, but let’s just say you have a game where you have maybe hundreds of buttons, hundreds of text elements, and it’s maybe a UI-focused game. Well, in that case, having the UI have that many elements, it can slow down performance for a number of different reasons.
First of all, one of the most performance impacting factors when it comes to UI is the Raycaster. So if I select the canvas right here and go over to the Inspector, you’ll see that we have a number of different components on our canvas.
We have our Rect Transform, which is basically a transform component for UI elements. We then have Canvas, which is in charge of rendering the elements to the canvas and just the overall management of the canvas. The Canvas Scaler is in charge of changing the aspect ratio and resolution of the canvas, and the Graphics Raycaster here, which is in charge of detecting inputs from our finger or our mouse when we are clicking on various different UI elements.
And this Game UI script down here is just part of the game, so we can ignore that. Now inside of Unity, let’s just say you have a canvas which has text only. Maybe you have a canvas that is just there to display the player scores, or just to display the players’ HUD elements, and there are no interactions on that canvas. Well, in that case, a Graphics Raycaster would be not necessary. You don’t need to click on anything.
And in that case, you should actually remove this component. And the reason why is because even if you don’t have any buttons on the screen, this Graphics Raycaster is still going to be using up part of your CPU, checking to see if you are clicking on any of the UI elements. So what we can do is just right click and go Remove Component. I’m not going to do that since I do need the Graphics Raycaster for my buttons on the end screen and the next play button right here. But if you do have a canvas that is lacking in buttons, or is just there to display information, then you should remove the Graphics Raycaster.
Now, when it comes to canvases, generally when creating your first game, you only really have one canvas. Although as you do later on expand your games and increase the UI in those games, it’s recommended that you actually have multiple canvases because, think about it, each time a canvas is active or enabled, in this case, it is going to be going through every single child object, checking to see if it needs to be rendered on screen, checking to see if it is active, disabled, and various other things based on how it should show that object.
Now let’s just say you have a game which has the players’ HUD, the menu, the scoreboard, various different elements in a single canvas. Well, every single frame it’s gonna be going through and checking to see each of those if they need to be rendered, it will then render them. Now the problem with that is if you do have various things, such as the scoreboard or pause menu not always active, then it’s quite unnecessary to have that in an activated canvas.
So instead of having like a pause menu and a score board or a setting screen or a menu screen inside a single canvas along with every other thing in your game, you should split them up into different canvases. So have a canvas for the players’ HUD that’s always gonna be active, have a canvas for the pause menu, have a canvas for the settings menu, try and segmentate all your various different UI sort of sections into various diffferent canvases, so you can disable and enable the canvases rather than the specific UI elements. And that will increase performance in the long run depending on how large your project actually is.
So we’ve gone over canvases. Now, one more thing to do with the Graphics Raycaster is if we select the button right here, for example, and we go down to the image component, you’ll see that there is a Raycast Target Boolean right here which we can enable or disable. And this is going to determine whether or not this object right here, this component is going to be detecting raycasts.
Now, since this is a button, we do need to have this enabled in order to actually detect clicks. But if I open up my end screen, for example, here and we go to one of the text elements here, I’m using TextMeshPro, you’ll see that if we click on the extra settings here, Raycast Target is also enabled.
Now, when working with text elements, that is not necessary. So I can just disable that on all of my text elements right here, disable Raycast Target, as well as on any, pretty much every single UI element that doesn’t need to be interacted with the finger or the mouse click, you can basically disable Raycast target. So it would take that out of the pool of possibilities that the Graphic Raycaster has to go through in order to determine if it’s being clicked.
So these are just a few small things that can help you out with optimizing a UI as when it comes down to mobile game development, any sort of performance increase is really great. And eventually, you may have a game which is very UI heavy, has lots of UI elements, and in that case, optimizing a UI may be necessary in order to get the performance that you wish. So thank you for watching.
Optimizing Scripts
Hey everyone. in this lesson we are gonna go over a few scripting optimizations to help out with performance. As you create your games, and increase the number of scripts and complexity of them, it will potentially get to a point where the scripts are impacting the performance, and this can be due to a number of different reasons.
First of all, let’s go over the concept of caching objects. So, let’s just say, for example, you have a game where you want to change the ball’s color to a certain color every single frame. Now, in this example, inside of the Update function, we are finding the Ball object, then we are getting the MeshRenderer component and changing its color to blue. Now, this isn’t really a proper game. This is just an example to show off how we can improve this line of code.
So, we’ve got this and in fact this line of code is very inefficient for a number of reasons. First of all, GameObject.Find is a very expensive function to call. This basically searches through the entire scene for an object called Ball, and then .GetComponent is also expensive function to call as well. And doing this every single frame, will definitely impact performance if we do this quite a lot.
So, how do we fix it? Well, we can fix it by caching the ballMeshRenderer component, since we are calling this every single frame, it is helpful to cache this to a variable. So as you can see, I’ve created a private MeshRenderer variable called ballMeshRenderer, and inside of the Awake function, we are setting this to be equal to the GameObject.FindBall.GetComponentMeshRenderer. We are only calling GameObject.Find and GetComponent once in the entire game.
Compared to before, we’d be calling it potentially 60 times a second. Okay, so that’s gonna greatly increase the performance of this set code, and down in the Update function, we had just getting the color of our variable and changing it to blue, which is gonna greatly improve our performance as well doing it that way.
Now, inside of UNC, there are a number of helpful functions such as GameObject.Find, which finds an object in the scene. FindObjectOfType, which finds an object with a specified component. FindObjectWithTag, finds an object of a certain tag, GetComponent, and Camera.main. These function calls are expensive, and they should not really ever been done inside of the Update function. They should really only be code once if you can help it define a single object, then cache that object and just use that variable, refer to that variable whenever you need to access it then.
Camera.main especially behind the scenes, that’s basically just GameObject.FindObjectWithTag, it’s basically calling that upon the scenes. And generally when looking at tutorials, or I had to do something you would always see Camera.main being used, and if you’re calling that every single frame, especially for if you want to track the camera to the player, calling that every frame, it is very good if you cache that Camera.main into its own variable.
Another thing that can help greatly on our performance, is reducing function calls, okay. ‘Cause generally inside of the Update function, you’ll be wanting to run certain things, such as movement, turning, and all of that, yet it should be done every frame, but there are often things as well that you can call, not every single frame. Maybe you want to be constantly checking to see if the play has reached a certain score, or if the player has gone somewhere or reach some sort of objective.
In that case, you don’t want to be calling it every single frame. Instead you want to be calling it every 0.2 or 0.1 seconds. If it’s not something that is directly tied to the play inputs, such as moving, looking, shooting, jumping, or anything like that, then you can actually give it a delay. So instead of calling it 60 times a second, you can call it five times a second. And again, if it’s not an input, this difference is not really going to be noticeable.
Some other optimizations are reducing Debug.Log calls. And know when you wanna test out certain things, test us on functions, if statements, you’ll be chucking in Debug.Log calls constantly, and the problem with that is Debug.Log is actually quite expensive as well. So I recommend that once you have finished testing it out, that you just remove that from the card because as well as impacting performance, it also clogs up your console for other important messages.
Reducing the frequency of Raycasts is also an important factor as you could imagine, Raycasts are quite expensive, as well as using loops in the Update function. You’re going to be very careful of this one. If you’re looping through maybe four elements or five elements, that’s fine. But if you’re going up to maybe hundreds of things, you’re looping through every single frame that can greatly impact your performance. So do keep in mind how many things you want to loop through every frame. And if you can help it try and refer back to reducing these function calls here, but only calling it a certain amount of times a second, compared to every single frame, okay.
And finally, if you’re instantiating lots of the same object such as bullets or particle effects use object polling. Now, object pooling is basically the idea of reusing game objects that are all the same. So again, for bullets or for particle effects or for something where you have lots and lots of exact same object that you want to instantiate and then destroy, you can use object pooling. Because traditionally instantiating and destroying, they can be quite expensive if you’re doing consistently over a very high frequency.
So object pooling, basically, at the start of the game, you instantiate a large number of these objects. So you have a big performance impact for the first frame or so, but apart from that, it should be smooth. And then pretty much instead of instantiating and destroying these game objects, you enable or disable them when you need them and when you don’t. Now, there are many methods and systems online and on the asset store that handle object polling, or you go ahead and create your own system. So I recommend that you do your research and see what the best method for you will be.
See yep, that is just a few different ways that you can help increase performance with your scripting and optimize our various different aspects. So I hope you learned something new and I’ll see you all in the next lesson.
Interested in continuing? Check out the full Publishing and Optimizing Mobile Games course, which is part of our Mobile Game Development Mini-Degree.