In this post, we’re going to learn all about Google’s design philosophy dubbed Material Design. We’re going to cover some of the fundamental concepts behind Material Design and will later learn how to realized our design. We’ll be discussing just some of the basics behind the essence of Material Design, like elevation, colors, and layouts. Note that we’ll only be covering a very small amount of what Material Design actually is so if you want to learn more, check the link at the bottom of the post for more information on Google’s Material Design.
In most development settings, we have both developers and designers. The designer’s purpose is to think about how the user can get the best experience on a product or service. They do market research on other products, mockups, and even focus groups. One of the most important thing designers are responsible for are the wireframe mockups and workflow diagrams. They define our application’s entire purpose and give the developers a bird’s eye view on all of the screens and elements they’ll have to deal with. When thinking about an app idea, they come up with flows for different scenarios or use-cases. For example, think about a note-taking app and let’s explore one such use-case. Suppose we have our character, let’s call him Jim, talking with his boss at work. His boss mentions that Jim needs to file reports to him by 3:00PM on Friday and that they must be filed in alphabetical order as well. Jim opens up our note-taking app on his phone and puts all of that information in there, including the due date and the notes. This may seem like a silly example, but it’s a perfectly valid use-case. From this, we know that our note-taking app should have a way to quickly enter in notes so the user doesn’t spend too much time trying to figure out how to work with the app. In other words, we also want to make our app as intuitive as possible. Furthermore, we want our user to feel comfortable in our app, regardless of the platform he or she is using it on, i.e. phone, tablet, desktop.
Although there are variations in intuitiveness, Google’s Material Design aims to provide a combined user experience across all sorts of devices. If you see a particular icon on a phone app, you can be pretty certain that it’ll mean the same thing on the desktop app and the web app. By unifying the experience across all devices, this allows users to be more familiar with an app and spend less time trying to figure it out. Material Design provides a clean interface that users can intuitively interact with and expect that same level of interaction on all of their different devices. As developers, we also need to have an appreciation for this design as well as the knowledge on how to implement or realize it. Let’s get right to some of the key topics in Material Design!

(Source: Google’s Material Design website)
One of the most important facets of Material Design is the fact that we have three axes we can work with instead of two! We have our fundamental plane that is the phone’s screen, but Material Design adds the z-axis to be increasing as the element moves “above” the screen. When we have material that is “above”, we can denote this by having a shadow that gives the impression that a particular element is at a different elevation than those around it. Take the floating action button (or FAB for short) for example. Note that it has a noticeable drop shadow around it and it gives the impression that it is “above” the rest of the screen.

We define different elevations for different UI elements based on importance. For example, the FAB’s resting elevation is 6dp. In addition to a resting elevation, we have a raised elevation that is activated when a UI element is pressed. This signifies to the user that there’s interaction happening. The raised elevation of the FAB is 12dp. It gives the impression that the FAB is “rising” to meet the user. As mentioned before however, the system can do most of this for us, particularly rendering the drop shadows. These numbers come in handy because in our views, we have that elevation attribute that we will assign appropriate elevations too. Not everything in material design has an elevation!
The next aspect of Material Design is the bright and bold color scheme. Google has provided us with a giant list of different colors and shades that we can use right here. There are several colors that we need to pick, particularly a primary and accent color. The primary color is intended to be the 500 value of a particular color. The status bar has to be a darker shade of the particular color, the 700 value of our primary color. In addition, we can define an accent color. Notice that the colors have a bottom section that starts with A###. For the accent color, we’ll use the A200 value of a complimentary color with a good contrast from our primary color. The accent color will be used for things like EditText underlines and other subtile places to add the bold color signature that is Material Design. This is why it needs to have a good contrast, so that we can overlay it on top of the primary color and users will be able to see the difference instead of the text being difficult to read.
It’s helpful to place these hexadecimal values in a file called colors.xml. The default colors.xml file when we create a project looks like the following.
<?xml version="1.0" encoding="utf-8"?>
<resources>
    <color name="colorPrimary">#3F51B5</color>
    <color name="colorPrimaryDark">#303F9F</color>
    <color name="colorAccent">#FF4081</color>
</resources>
Notice that we have a primary color (the 500 value), a dark primary color (the 700 value), and an accent color (the A200 value of a different, complimentary color). The hex values can either be in uppercase or lowercase. If we wanted to change our colors, we can just copy-and-paste values from the above webpage. Overall, colors help to better define our brand and promote our product. Take Evernote for example. When we see the icon and the green background, our mind immediately associates this with being Evernote. As another example, take Apple. We immediately recognize the brand by the white icon that looks like an apple with a bite taken out and a leaf. Hopefully these examples illustrate the power of branding our product/service.
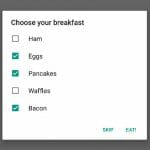
We’re going to shift our design perspective a bit towards development and talk about keylines. We can think of all Android layouts to conform to a baseline grid of density-independent pixels which scale based on the actual density of the device our app runs on (hence the density-independent part). Keylines are critical margins that we have to consider when we’re building a layout. For example, take the below app.

Notice that our app has margins to the left and the right, as well as between the circular ImageView and the TextView to its right. The magic number of the first keyline is 16dp. This means that all UI elements, except the status bar and toolbar of course, start at 16dps from the left and right side of the screen. This prevents text from being placed at the edge of the screen, which makes it difficult to read. We followed this keyline in the above app. The magic number of the second keyline is 72dp. This is where, in a list or navigation drawer, we can start the text if there’s an icon or checkbox to the left of it. This gives us enough space between the icon/checkbox that the user can accurately touch the icon/checkbox and we can provide a touch event. For example, in the Messager app, when we touch on an icon, we bring up that contact’s info; however, if we tap on the list item, we bring up the text messages between us and that contact. This also prevents us from cramming the text right up against the icon/checkbox.
There are also other considerations when regarding lists and spacing, in general. For example, the main toolbar usually has a height of 56dp (as opposed to 48dp back in Android 4.0). In some of the other posts, you’ll notice that we set the minimum height of the toolbar to be the system’s height of the toolbar. This is the reason why: if the height changes in the next Android release, we can be future-proof. Also, the toolbar can change depending on the screen size or orientation. We also do the same for ListView rows/items. Depending on their content, we can query the system for the best height using the listPreferredItemHeight or listPreferredItemHeightLarge attributes. In our case, ListView items have a height of 72dps. This makes them easy to tap on and the user doesn’t have to pinpoint his or her finger to touch the right ListView item.
We’ve only covered just a little bit of Material Design. In fact, Google has a great website that covers many more aspects about Material Design that you can look at here. If you need some inspiration, just look at some of the apps on the Google Play Store already! Most of the major applications, by the time of this writing, have already redesigned their apps to support Material Design. Take a look at them for some great examples of Material Design in action.
We only scratched the surface of Material Design in this post. We hit some key points about Google’s new Material Design approach. We talked about the purpose of Material Design and why it was instated. We also discussed topics that we need to be mindful of, like elevation, color, and layout. We finally learned about some great resources that we can refer to for guidance.