Links to the Editor tool in this tutorial are affiliate link which help Zenva fund the creation of new courses and tutorials
In this tutorial, we create a simple platformer demo with Phaser Editor (an IDE made especially for boost Phaser games development). We focus here on the assets management and the built-in visual scene builder.
We split the tutorial into sections and every section has a link to the source code used in it, this allows you to mess with the code of a section but start with a ready project on the next section.
To learn how to import a project open the Help → Help Contents and navigate to the Workbench User Guide → Tasks → Importing → Importing existing projects. Very important! When importing a project by default it just links to the original project, but for this tutorial force it to copy the content of the projects: set ON the Copy projects into workspace option.
We are not going to explain in depth the API and concepts of Phaser, so it requires that you first get some basic acknowledgment about Phaser states and Arcade physics. Check some resources to learn Phaser:
- Official: Platform Game Tutorial (Ride on Platforms) We recommend this tutorial to understand the Phaser concepts used in this article.
- Official: Phaser Coding Tips
- Zenva: The Complete Mobile Game Development Course
- Zenva: Advanced Game Development with Phaser
- Zenva: List of Phaser tutorials in GameDev Academy
UPDATED November 21, 2017.
Compatible with Phaser Editor v1.4.3 and Phaser v2.6.2
Table of contents
Table of contents
- Create the project
- Create the Level state
- Load the assets
- Create the scene
- Add the physics
- Add the player controls
- Add the player animations
- Add coins
- Conclusions
Create the project
First thing is to create the project of our game. In Phaser Editor there are two ways of creating a project: the Phaser Project wizard and the Phaser Example Project wizard. In this article we are going to use the Phaser Project wizard, the one is recommended to create real games. The Phaser Example Project wizard is better to test/modify Phaser and Phaser Editor examples.
To create the project click on File → New → Phaser Project, set the name of the game and press Finish (in this tutorial we use the default values of the options provided by this wizard, but for larger projects you can click the Next button and set options like the project structure or the language).
Learn more about the first steps
By default, the wizard creates a project with a single state and an empty assets pack:
WebContent/index.html | The start point, like in any other web application. |
WebContent/lib/phaser.js | The Phaser framework. |
WebContent/js/Main.js | The booting script, where the game instance is created. |
WebContent/assets/pack.json | A manifest of the game assets. |
WebContent/assets/canvas/Level.canvas | An empty Level scene (Phaser State) file. |
WebContent/assets/canvas/Level.js | The compiled Level scene. |
Design/ | A folder where you can place resources that are not part of the game, like SVG files or the source images of a textures map. |
By default, the Level.canvas file is opened in the scene editor (Canvas Editor).
In Phaser Editor, the scenes are compiled into a readable JavaScript code with high-level Phaser API calls. This generated code can be edited by the user to initialize Phaser systems, create other kinds of objects or add event listeners. If you run the project (Alt+F5) you will see an empty screen with a hello world! message. This message object was added directly to the code, open the Level.js file and you will see it:
Level.prototype.addHelloWorldText = function() {
	this.add.text(100, 100, "hello world!");
};
(Import the project Step_01 to see the final result)
Load the assets
(You can start with the project Step_01)
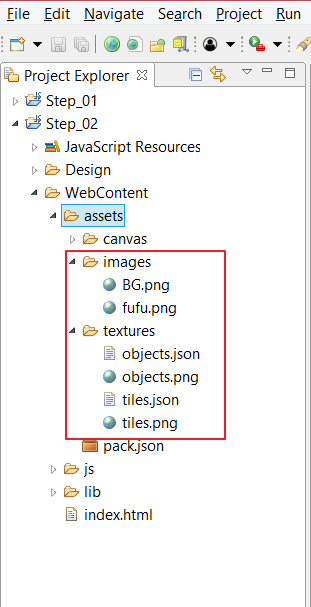
In the source code repo of this article, there is an Assets folder with all the images we are going to use. Please copy the content of that folder and paste it in the WebContent/assets folder of the game project. It should look like this:
In Phaser there are two main ways to load the assets, by loading every asset in the preload method, using a specific loader method (like game.load.image, game.load.spritesheet, etc…), or by declaring all the assets in a manifest file (the Asset Pack file) and load it in the preload method with a game.load.pack call.
In Phaser Editor, we encourage to use the second way, we provide several tools that are integrated with the Asset Pack, like the Asset Pack editor, the Assets explorer, Preview windows, JavaScript editor, the visual level editor… almost everything.
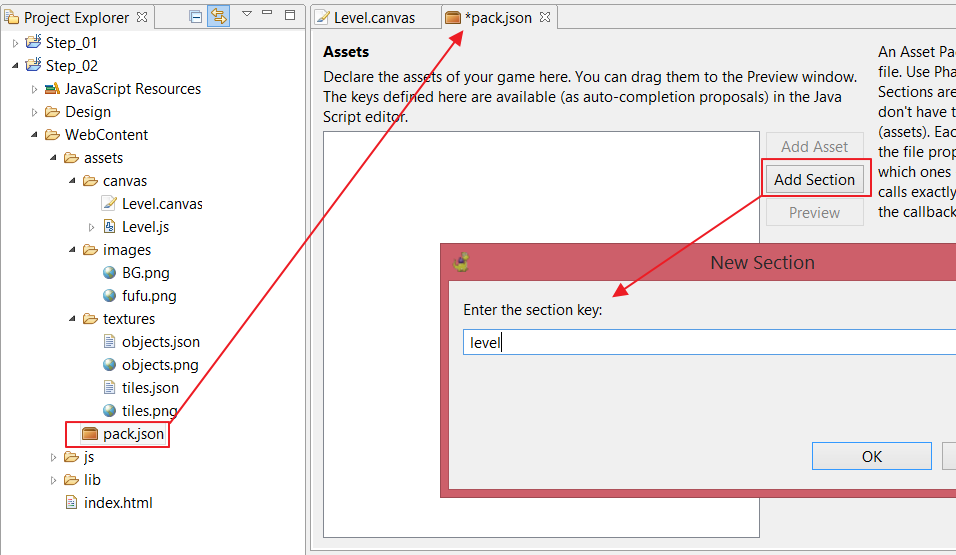
To declare the assets in the pack, open the WebContent/assets/pack.json file, it opens the Asset Pack editor. The editor has two panels, the left panel shows a tree with the sections, asset types, and assets. The right panel shows the details of the selected object in the left panel. If it is a section, you can change the name, if it is an asset, it shows the asset’s properties, like the key, textureUrl… it depends on the asset type.
Learn more about the Asset Pack editor.
So let’s add the assets of our demo to the pack. Check the assets folder we have the following files:
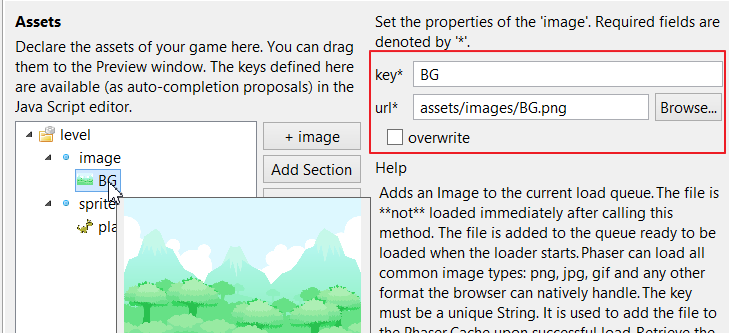
images/BG.png | The level background. |
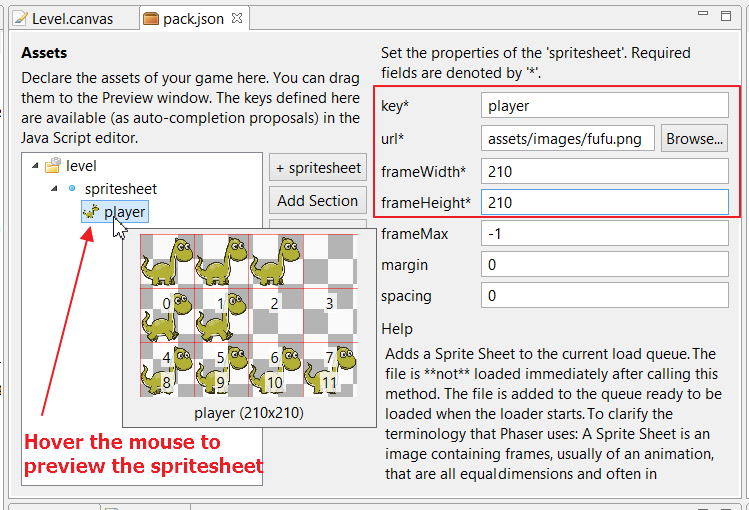
images/fufu.png | A sprite-sheet of our player, a dino called Fufu. The frames have a 210×210 size. |
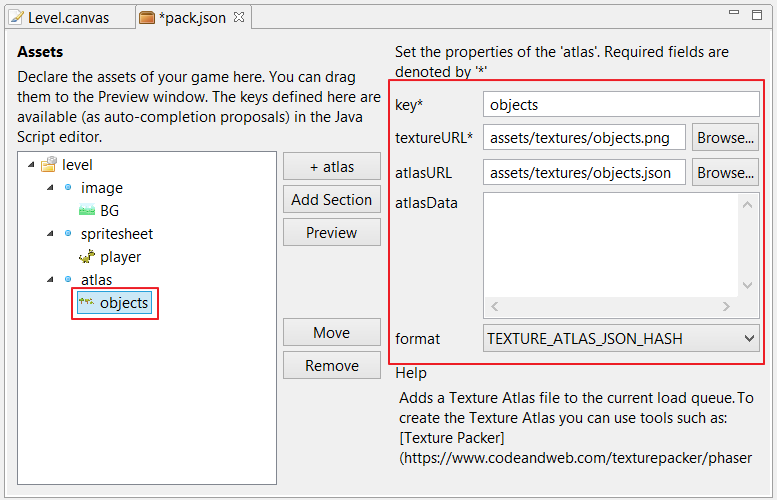
textures/objects.png | The textures atlas containing the level items (tree, bush, fruit, etc…) |
textures/tiles.png | The textures atlas containing the level tiles (ground, grass, water, etc…) |
In the Asset Pack editor, click on the Add Section button and write the name level in the input dialog. A section is a way to split the assets so in a Phaser state, so you can load just a subset of the assets in a specific moment. In our demo, we just use one section called level.
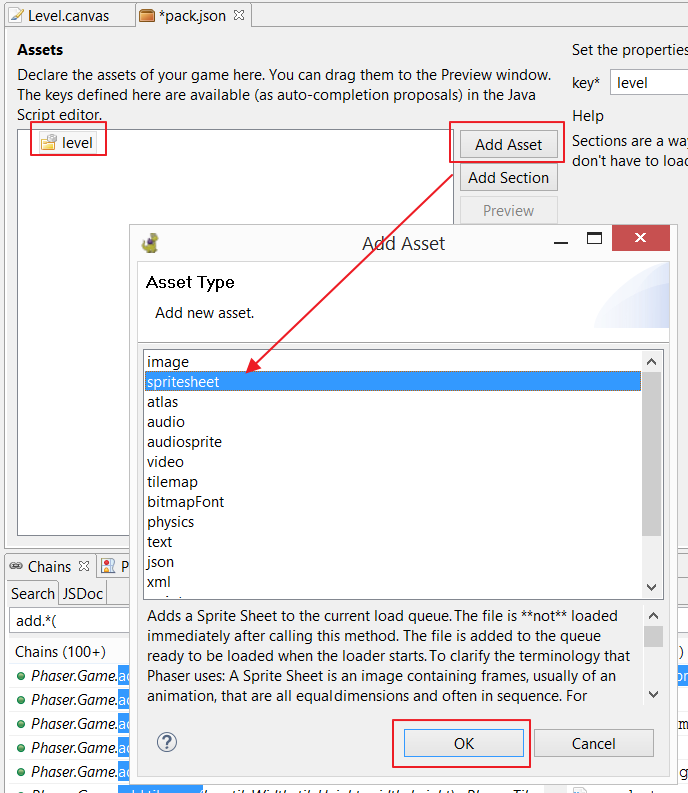
In the left panel select the recently created section and press the Add Asset button. It opens a dialog with the type of assets we can add to the section:
We want to add the Dino sprite-sheet, so select the spritesheet type and press OK. It adds a new sprite-sheet under the level section and the right panel shows the details. By default, it looks for a not used image and set it as the url value. We should change it to use the right fufu.png image: in the url field click the Browse button and it opens a dialog to select an image from the assets folder. In that dialog select assets/images/fufu.png.
You should set the right values for the rest of the required fields (key, url, frameWidth, frameHeight) and save the changes (Ctrl+S):
To add the BG.png image, select the level section, press Add Asset and select the type image. It adds a new image (like in game.load.image). In the details pane, set the key, the url, and save.
To add the objects.png texture atlas, select the level section, press the Add Asset button, select the atlas type and press OK. It adds a new atlas asset, set the right values on it, like in game.load.atlas. Below the fields, there is the Phaser doc related to the asset type.
Note you only need to set the key, textureURL and atlasURL.
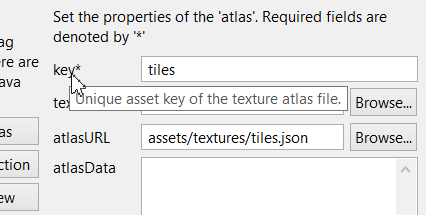
Repeat the same steps for the tiles.png texture, and save the pack file. Remember the textures maps need the image file and the map file (a JSON file in this case). You can hover the mouse on top of any field, it shows a tool-tip with the corresponding Phaser documentation. This documentation is extracted from the Phaser source, so it will be always synchronized with the Phaser version supported by the editor.
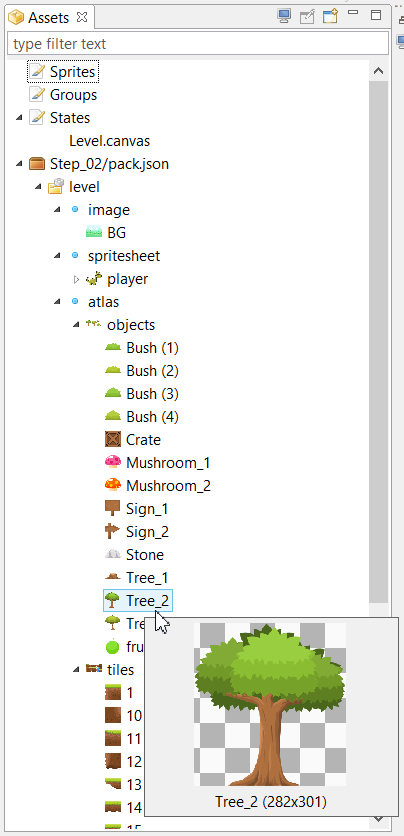
To check that all the assets are defined well, save the pack file and look into the Assets explorer, it should show all the assets, including the sprite-sheets frames and the texture sprites. Hover the mouse on top of them to get a preview.
Something great in Phaser Editor is that it is made by using the Phaser standards. We do not add extra plugins or custom patterns. A prove of that is the assets management that we already explained here, you can use it in any Phaser game. In a completely “handmade” game or in a game that uses an external tool like Tiled, but at the same time, it integrates tightly with the Phaser Editor scene maker.
(Import the project Step_02 to see the final result)
Create the scene
(You can start with the project Step_02)
As we mentioned before, the default project created by Phaser Editor includes a Level scene or Phaser State, that is loaded in the index.html file and added to the game in the Main.js file. This is the only scene we are going to use in this tutorial, if you want to add more scenes or prefabs you can create them in File → New → State File| Sprite Prefab | Group Prefab, and load them by adding script assets to the pack.json file.
Learn more about the scene editor
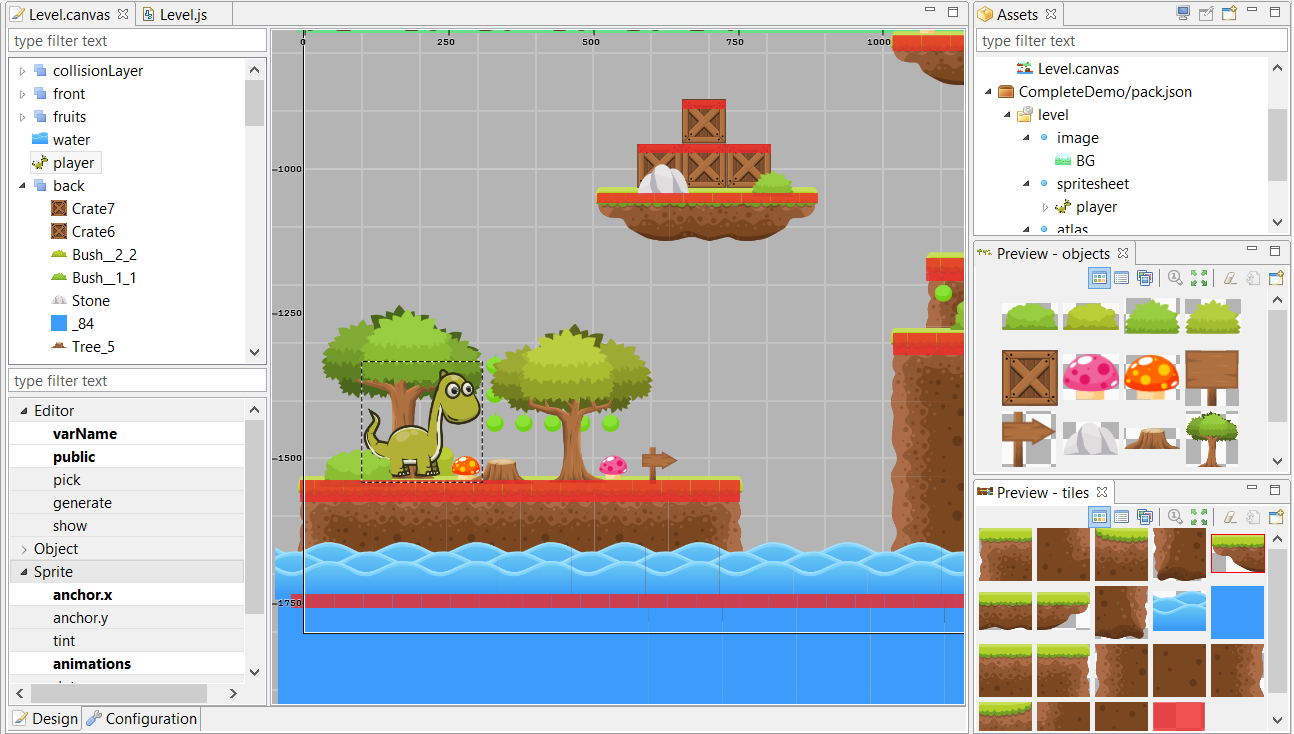
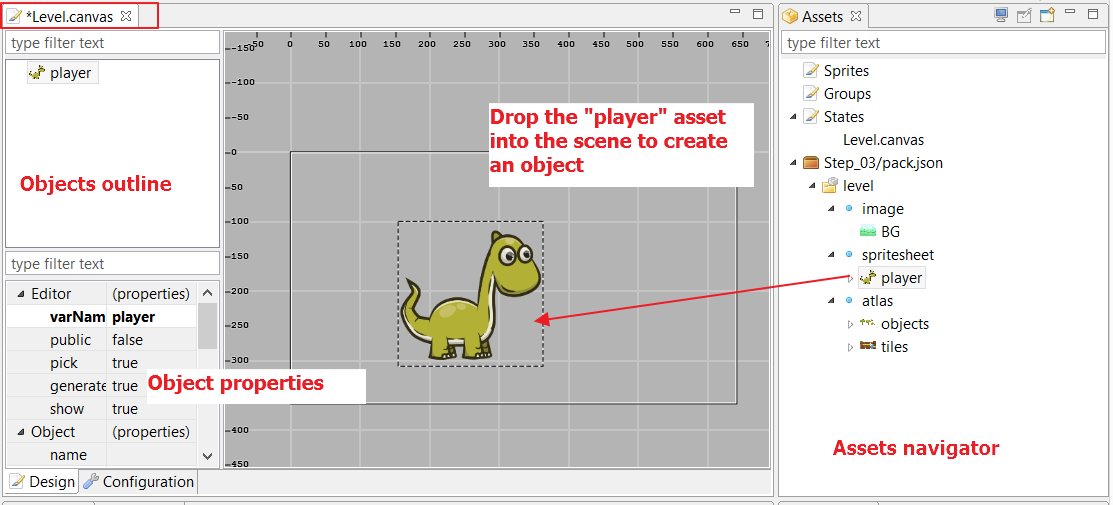
Let’s add some objects to the scene. First, double-click on the Level.canvas file, to opens the scene in the Canvas Editor. In the Assets navigator, drag the player asset and drop it into the scene. It creates a player object, based on the sprite-sheet declared in the Asset Pack.
In the previous illustration it shows the Properties Grid, where you can edit the properties of the selected object, and the Outline window, that shows the hierarchy of the scene’s objects.
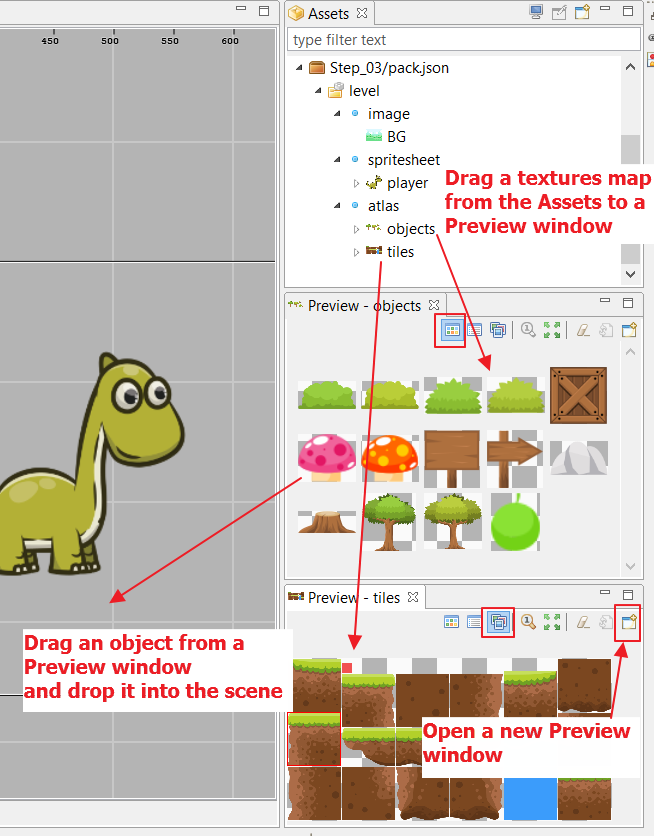
We saw that to add an object you should drop an asset in the scene. This asset can be taken from the Assets explorer but also from the Preview window or the Palette. We like to use the Preview windows to get the assets, just drag an asset from the Assets explorer and drop it in a Preview window. For this demo we can use this layout:
Warning, you cannot drag the assets defined in a project and drop them in the scene of another project. It is a common mistake to keep in the Preview windows the assets of another project.
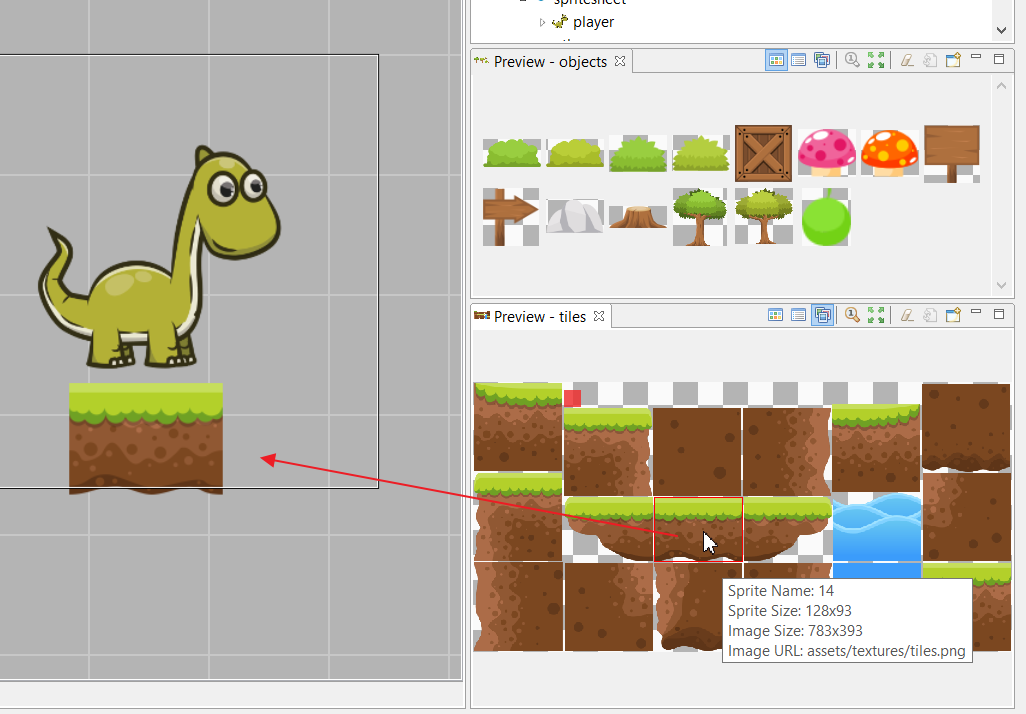
Let’s add some ground to the scene. From the textures-map tiles drop the frame 14 and drop it in the scene. (By the way, with the middle button you can zoom in/out and scroll the scene).
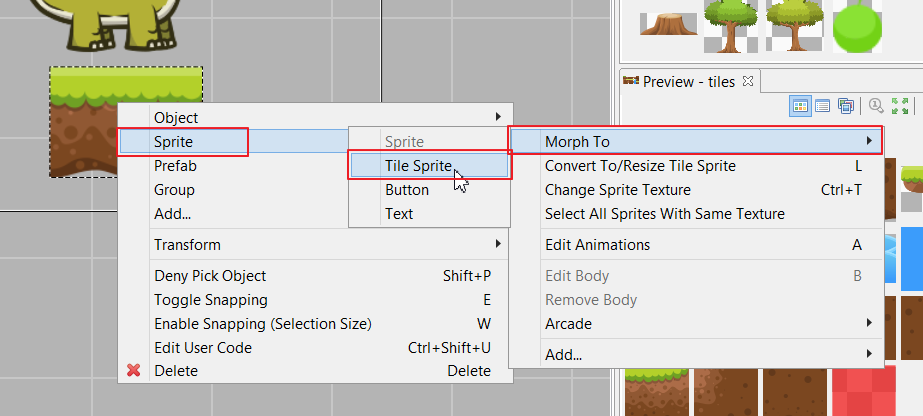
That object is too small to make a ground with it, to make it larger we need to morph it into a tile sprite. By default, when you drop the assets in the scene, a regular sprite is created (like in game.add.sprite), but there are other types of objects like buttons and tile sprites. For platformer games, tile sprites are very important, with those objects you can create the ground, water, walls, etc.
Right-click on the ground object and select Sprite → Morph To → Tile Sprite.
It converts the simple sprite into a tile sprite (like in game.add.tileSprite). Note in the Properties Grid you can edit the Tile Sprite properties:
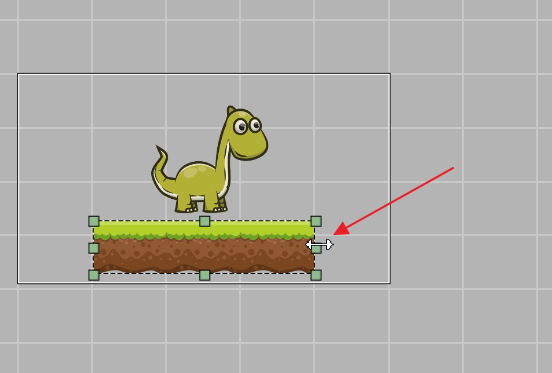
To resize the sprite you can change the width and height properties, or you can resize it visually. Right-click on the object and select Sprite → Convert To/Resize Tile Sprite (or just press the L key, actually, you can use this shortcut to morph an object into a tile at the same time you resize it).
It shows visual handlers that allow you to change the size of the object. Make it wider by dragging the horizontal little boxes.
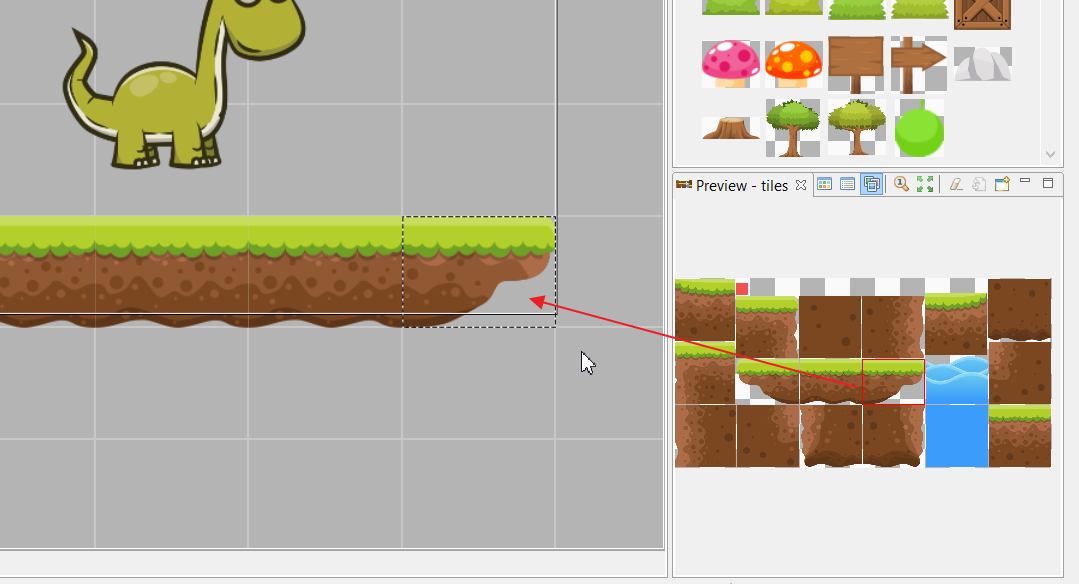
Now add two more objects to complete the edges of the platform.
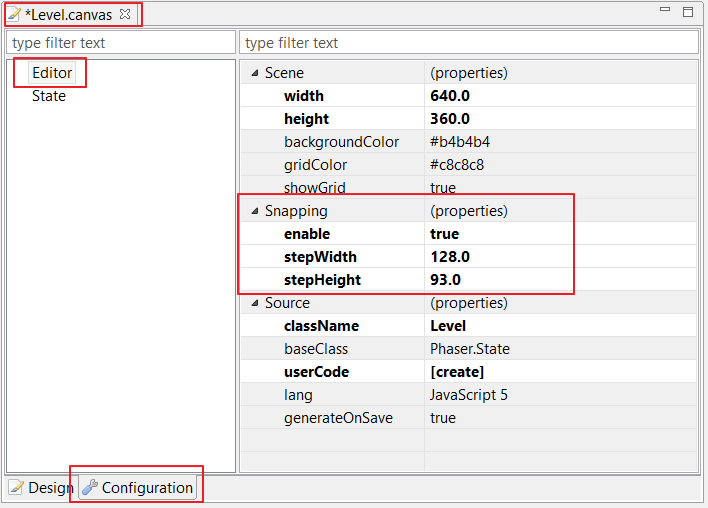
To make the objects to match one with the others, you can enable the snapping mode and set the right step size. Select a ground tile and press W, that is the shortcut to the Enable Snapping (Selection Size) command. You can change the step size manually in the Configurations tab of the editor, in the Editor → Snapping section. To turn the snapping ON and OFF you can press the E key.
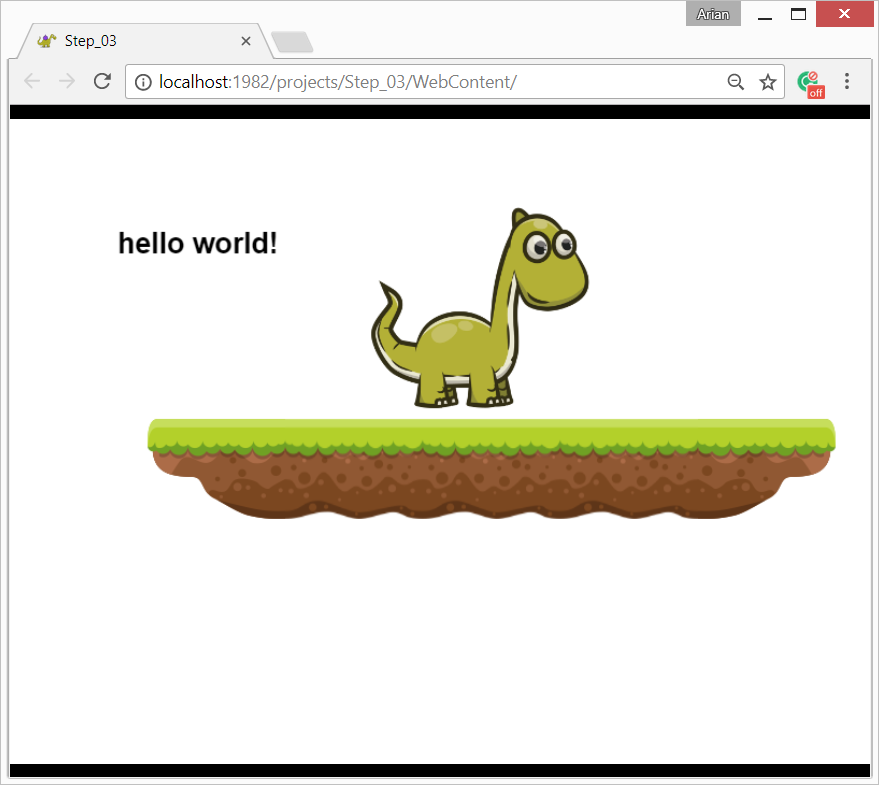
Is time to run the game and see what we made. To run the project press the Ctrl+Alt+F5 shortcut. That command starts a local web server and launches the default browser with the game URL as argument:
Learn more about how to run the games
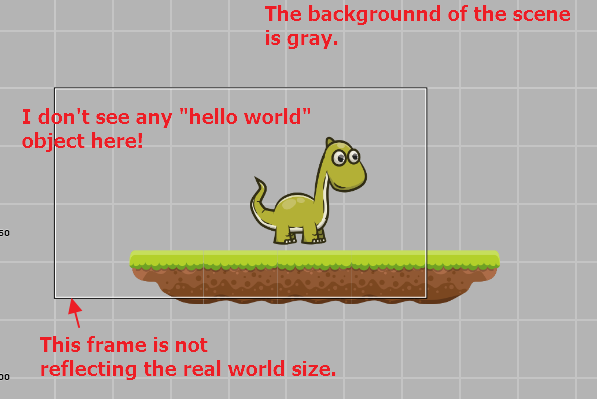
There are some details that need to be explained. First, a magic “hello world!” message appears in the game, the background is white and the dimensions are not the same of the frame shown in the scene editor:
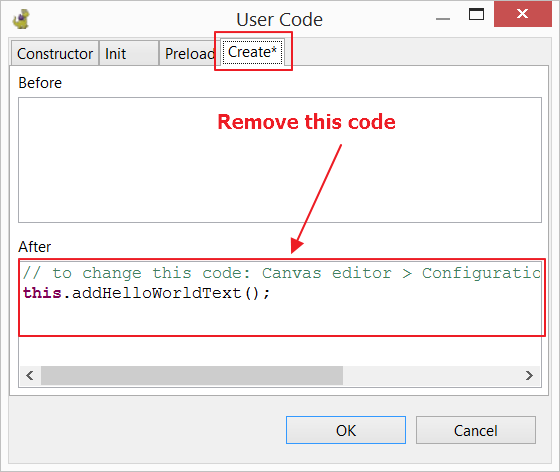
The “hello world!” message was generated by the project wizard, but not as a scene object else as Phaser code. Press Ctrl+Shift+U to open the User Code dialog and remove the code in the Create tab:
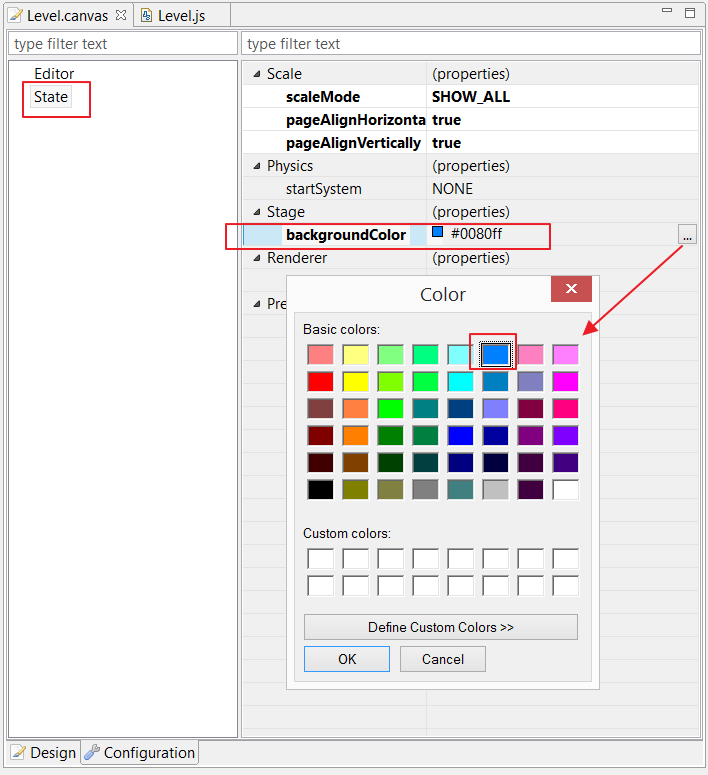
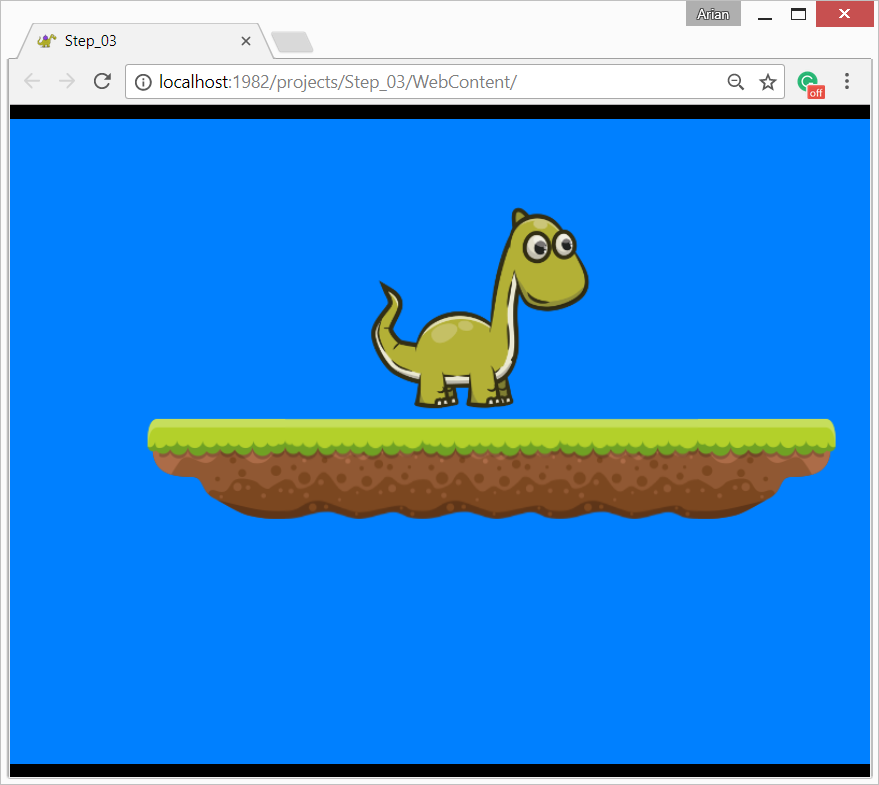
The background of the scene in the editor is not the same of the background of the game. This is an intentional decision, to help the user to create the scene with a more creation-friendly background. To change the background of the game go to the Configurations tab, State → Stage section and change the backgroundColor property. For example set it to blue blue:
In the Editor node, in the Scene section, set the width and height to 800×600, that is the game resolution set to the game. Note there is an Editor and State settings. The Editor is related only to the scene editor, to the design-time, and does not affect the game. The State settings are related to the game, those are Phaser properties. We split both settings for convenience.
Now run the game Ctrl+Alt+F5 again and check the changes.
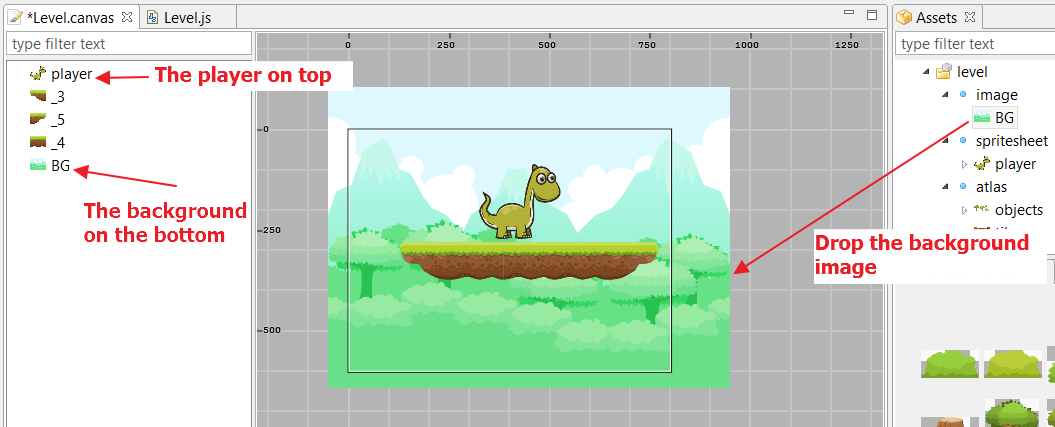
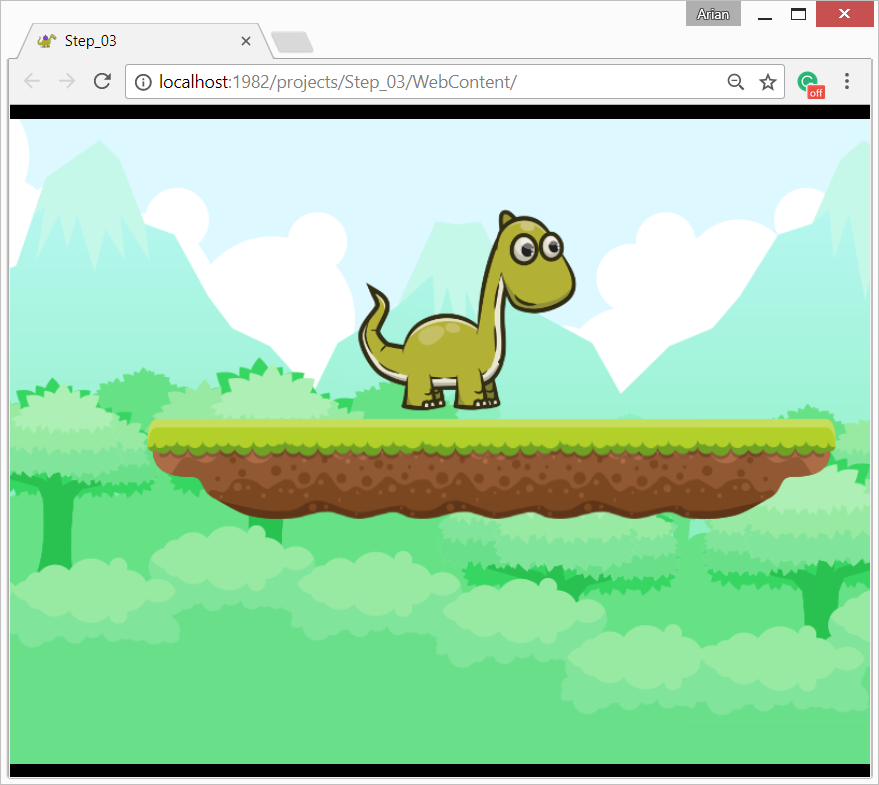
But better than a solid color is to add a background to the game. Drag the BG image from the Asset view and drop it on the scene. The image will get all the space and hide the other objects, to send it to the background select it and press PageDown. Make sure the player is in the front of all the objects, so select it and press PageUp. The scene should look like following. Run the game (or refresh the browser) to see the changes.
(Import the project Step_03 to see the final result)
Add the physics
(You can start with the project Step_03 )
What we want is to make the player (Dino) walk and jump on top of the platforms. To do this we need to set the physics of the player and the physics of the platforms. We are going to use the Arcade physics, it is the simplest physics system in Phaser and it is the one is fully supported by Phaser Editor (it does not mean that you cannot use other physics systems like P2 or Box2D, you can, but the editor is not going to bring special features around it -it will do, eventually-.
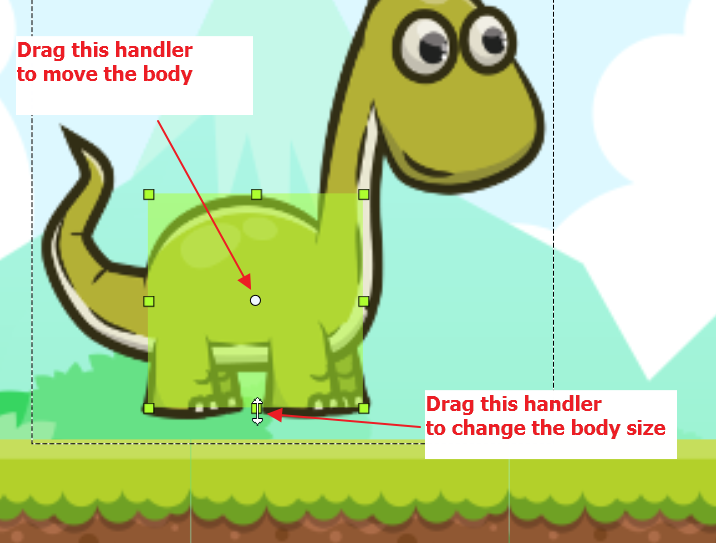
To enable the player physics, right-click on it and select Sprite → Arcade → Set Arcade Body (Rectangular). It adds a rectangular body to the object and shows the body boundaries with a green transparent area. You can move the body handlers to change the position and size.
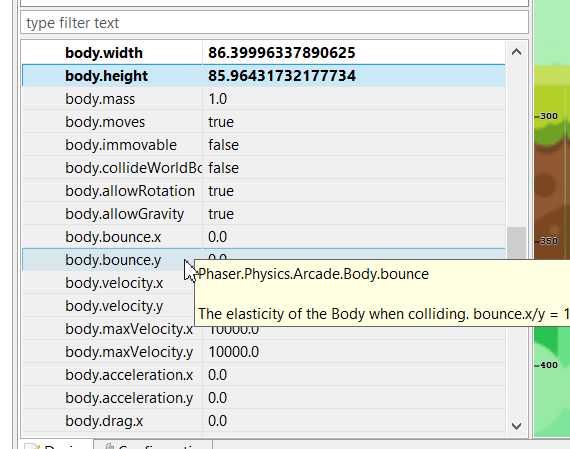
Now that the player has an Arcade body, you can change many of its settings in the Properties Grid, just look into the Arcade section. Note that you will get properties tool-tips with the Phaser doc.
Remember always to save all the changes in the scene, to re-generate the code. In addition to the objects set-up, you need to do some global physics initialization in your Level state. But wait, is not the code generated each time we modified the scene? Yes, but look there are parts of the code that are preserved from generation to generation. Note at the end of the file there is a text:
/** --- end generated code --- */
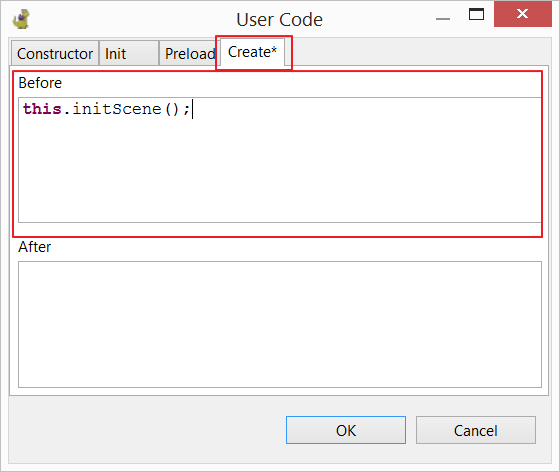
All the code written below that line will be preserved by the scene compiler. At the same time, you can insert code between the generated methods via configuration. As we saw before, there is the User Code dialog where you can write your own code at the start or end of each method. If you like to do some initialization before the objects are added to the scene, you can add code to the Before section of the Create method.
So, let’s initialize the physics. Press Ctrl+Shift+U in the scene, in the Create tab, write this.initScene(); on the Before text box:
The initScene method is not defined yet, we have to write it. Save the scene and open the Level.js file. At the end of the file add the initScene method:
Level.prototype.initScene = function () {
    // start the Arcade system
    this.game.physics.startSystem(Phaser.Physics.ARCADE);

    // set the global gravity
    this.game.physics.arcade.gravity.y = 800;
};
Note there is an addHelloWorldText method at the end of the file, you can delete it, it was generated by the project wizard and is not used in this game.
Save and refresh the game in the browser, you will see how the Dino player is going to fall down. It happens because we set a global gravity but the Dino is not colliding with the platform.
In Phaser, it is a common practice to use groups (Phaser.Group) to set the physics properties of the platforms. You put all the platforms in a single group and collide it with the player. We are going to follow the same pattern, but with a small difference, we are not going to group all the platforms, else a set of hidden objects that will make part of an invisible collision layer.
In the tiles texture, there is a small red box, with the physics name, it is the one we are going to use to create the collision layer. So get the physics asset and drop it in the scene. Morph it to a Tile Sprite (press L) and re-size it to fill the platform width.
To create the collision layer, right-click on the red sprite and select Group → Group Selection (or just press G). In the property grid set the name collisionLayer and in the Group section set physicsGroup to true.
The physicsGroup property indicates that the group will be created with the game.add.physicsGroup method, in this way, you do not have to enable physics bodies in all the children, it will be done automatically by Phaser.
Learn more about the Group properties included in the Property Grid
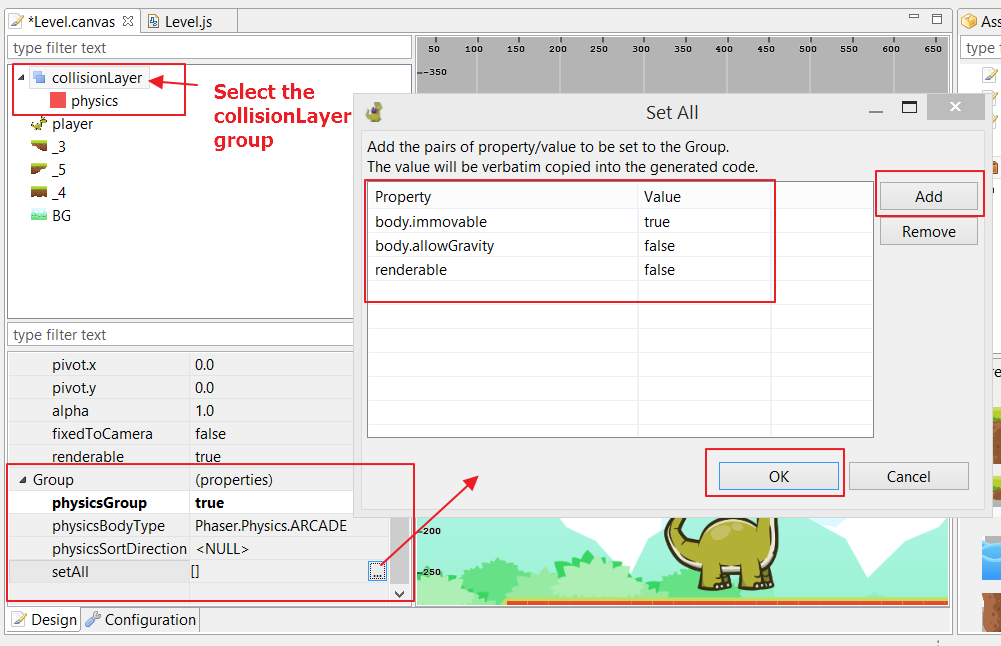
To set the physics properties to the objects in the layer, we use the setAll parameter of the group. Really, setAll is a method of the Phaser.Group class, used to modify the properties of all the children. In the Property Grid it is shown as a property and you can list all the properties and values you want to update.
So let’s click on the setAll property, in the Property Grid, and add these values:
Learn more about the Set All property
Set true the body.immovable property, to make the object not movable by collisions. Set false the body.allowGravity property, to make the object static. Set false the renderable property to hide the object but keep the physics properties.
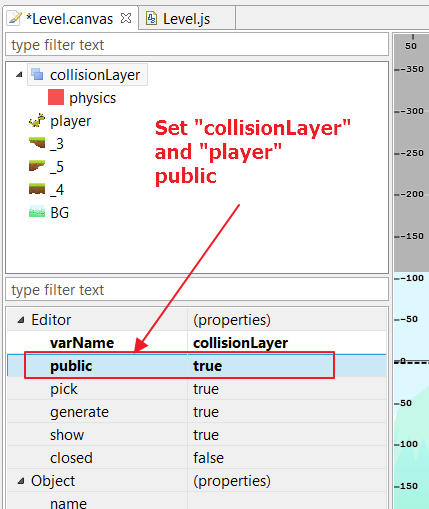
Now we need to make the player to collides with the collision layer. By the way, you should make public the player and the collision layer, it indicates to the compiler to generate a fPlayer and fCollisionLayer field that can be used outside the create method.
Learn more about design-time/editor object properties
To make the player to collide with the collision layer, add an update method at the end of the Level.js file with this code:
Level.prototype.update = function () {
    this.physics.arcade.collide(this.fPlayer, this.fCollisionLayer);
};
And now run the game (Ctrl+Alt+F5), the Dino should stay on the platform.
(Import the project Step_04 to see the final result)
Add the player controls
(You can start with the project Step_04)
In Phaser, it is very easy to add movements controls. In the initScene method created before, add this code at the end of the method:
// create the cursors
this.cursors = this.input.keyboard.createCursorKeys();
The cursors var references an object with the the left.isDown, right.isDown and up.isDown properties, that we can test in the update method to change the player velocity. Add this code to the update method:
Level.prototype.update = function() {
    this.physics.arcade.collide(this.fPlayer, this.fCollisionLayer);

    if (this.cursors.left.isDown) {
        // move to the left
        this.fPlayer.body.velocity.x = -200;
    } else if (this.cursors.right.isDown) {
        // move to the right
        this.fPlayer.body.velocity.x = 200;
    } else {
        // dont move in the horizontal
        this.fPlayer.body.velocity.x = 0;
    }

    // a flag to know if the player is (down) touching the platforms
    var touching = this.fPlayer.body.touching.down;
    if (touching && this.cursors.up.isDown) {
        // jump if the player is on top of a platform
        // and the up key is pressed
        this.fPlayer.body.velocity.y = -600;
    }
};
Refresh the game in your browser, you will be able to move the player with the arrow keys.
(Import the project Step_05 to see the final result)
Add the player animations
(You can start with the project Step_05)
Our player walks and jumps and we want to add some animations to that actions.
Learn more about the animations editor
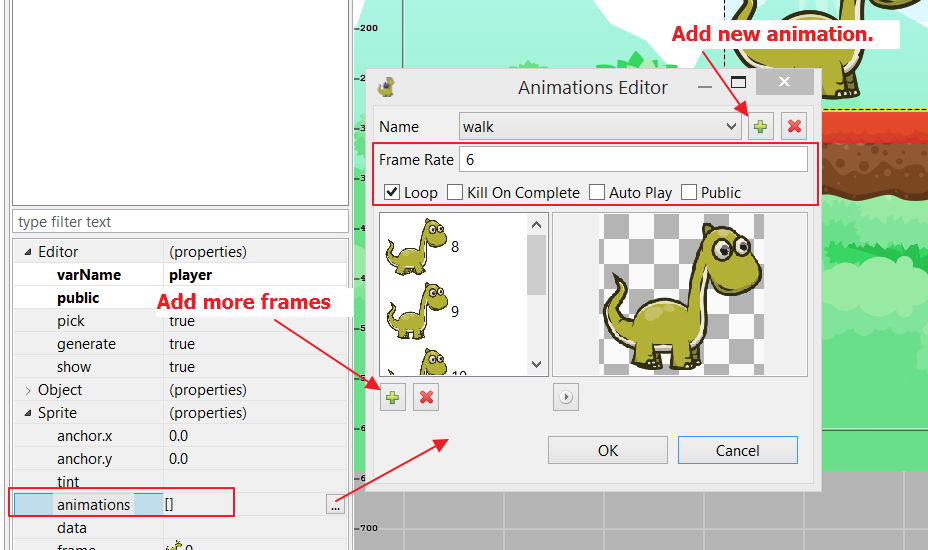
Phaser Editor has a simple animations editor that is very easy to use (like in sprite.animations.add), just select the player and, in the Property Grid, click on the animations field. It opens the animations dialog.
Create three animations, walk, jump, and idle. The walk animation has the frames 8, 9, 10, 11, and it loops at a rate of 6 FPS. The jump has the frames 4, 5, and loops at a rate of 6 FPS. And the idle animation has the frames 0, 1, 2 and loops at a rate of 4 FPS.
Now let’s improve the update method to play the animations at the right moment. Add the following code at the end:
if (touching) {
    if (this.fPlayer.body.velocity.x == 0) {
        // if it is not moving horizontally play the idle
        this.fPlayer.play("idle");
    } else {
        // if it is moving play the walk
        this.fPlayer.play("walk");
    }
} else {
    // it is not touching the platforms so it means it is jumping.
    this.fPlayer.play("jump");
}
Yet there is a detail. When the player is moved to the left it actually moves to the left, but it does not face to the left. We need to flip the player when it is moving to the left. To do this we have to update the scale (a scale.x of -1 flips the texture). Add this code at the end of the update method:
// update the facing of the player
if (this.cursors.left.isDown) {
    // face left
    this.scene.fPlayer.scale.x = -1;
} else if (this.cursors.right.isDown) {
   // face right
   this.scene.fPlayer.scale.x = 1;
}
But wait, you also have to change the anchors of the player, to make it to “turn in the place”. Go to the scene, select the player and in the property grid set the anchor.x property to 0.5. Save and refresh the game in the browser.
(Import the project Step_06 to see the final result)
Add coins
(You can start with the project Step_06)
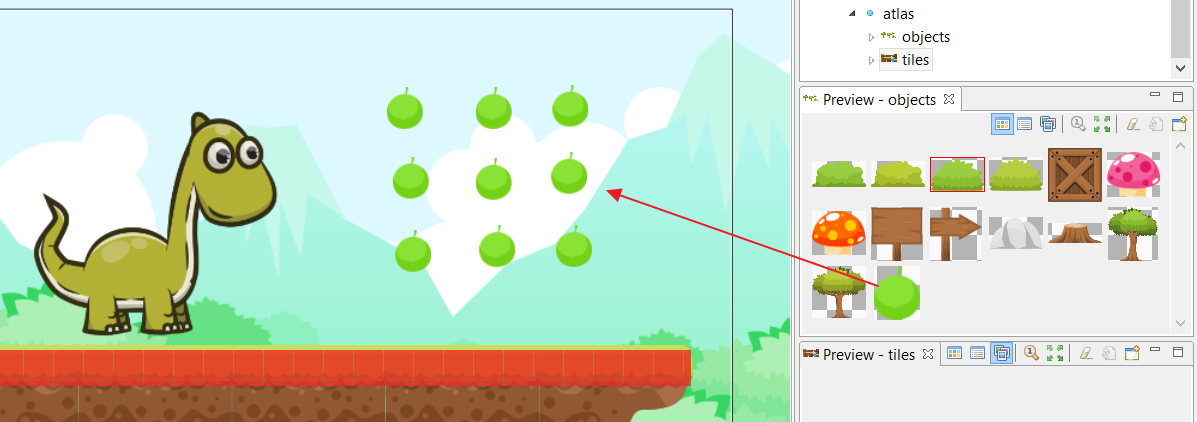
Let’s call it coins but in this demo they are fruits. Fruits that Dino will take when touching them. Look at the texture-map objects, there is the fruit sprite. Drop some of them in the scene.
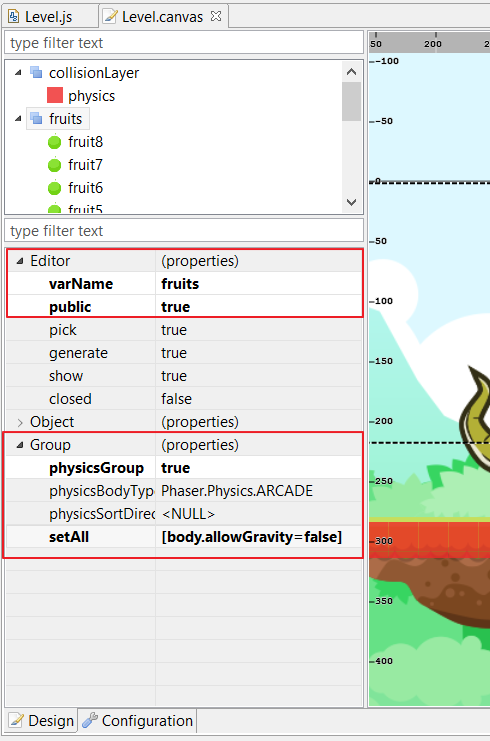
Select all the fruits and create a group with them, by pressing G. Set the name of the group to fruits and make it public. Because the player has to collide with the fruits, let’s make this group as physicsGroup in the same way we did with the collision layer, and in the setAll property set body.allowGravity to false. Save, a new fFruits var will be generated.
Ok, now we need the player to get the fruits. In the update method add this code at the end:
// catch when the player overlaps with a fruit
this.physics.arcade.overlap(this.fPlayer, this.fFruits,
    this.playerVsFruit, null, this);
Look we use there a function playerVsFruit that is not defined yet, so let’s add it to the Level prototype, at the end of the file:
/**
 * @param {Phaser.Sprite} player
 * @param {Phaser.Sprite} fruit
 */
Level.prototype.playerVsFruit = function(player, fruit) {
    // when the player overlaps with a fruit
    // just remove the fruit from the game,
    // you can add a better effect later
    fruit.kill();
};
In that method, we “kill” the fruit to make it go away from the game. Note we added some documentation to the method. The @param tag allows us to “declare” the type of the parameters, it helps the type inference machine to provide a better code auto-completion.
Run the game, now the player will get the fruits.
(Import the project Step_07 to see the final result)
Conclusions
In this article, we covered some basic aspects to create a level of a platformer game. There are other details like a bigger world, camera setup, ambient elements like grass, trees, parallax effect and maybe other stuff that you can check in the CompleteDemo project. Don’t hesitate to run the final demo and look into the code.
We encourage you to check the Phaser Editor templates provided in the Phaser Example Project wizard, there you will find multi-level and prefabs based demos. In the next tutorial, we are going to introduce these concepts.
Art assets used in this article
