Common UI elements are often taken for granted in software design, as they are almost always provided for us to easily integrate straight into out applications. The exception to this rule of course is when we get into game development and we take over things like input and rendering from the platform we are working on.
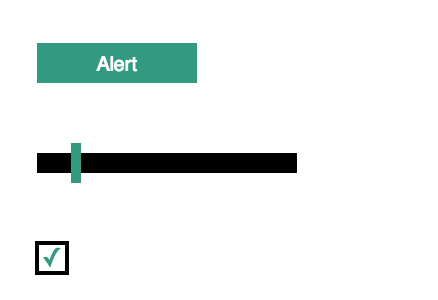
In this article we will be taking a look at what it takes to recreate three common UI elements: a button, a slider, and a checkbox. We will be using an HTML5 canvas and handle things like mouse tracking, collision detection and event handling.
Table of contents
Tutorial Source Code
You can download the source code of this tutorial here.
Did you come across any errors in this tutorial? Please let us know by completing this form and we’ll look into it!

FINAL DAYS: Unlock coding courses in Unity, Godot, Unreal, Python and more.
The Setup
The actual HTML required is going to be quite minimal, we are basically just going to have a single canvas element to do all the drawing on, I will also be including the underscore.js library to help with some common tasks, and I split up the different JS components we will be building into their own files for the sake of keeping things neat, however you can write all the code in the one HTML file if you prefer. Here is the initial layout of our demo:
Game Menu //
When creating a canvas element you will want to set both the width and height properties of the element itself as-well as the same CSS properties. The element properties set the internal elements width and height for drawing, which is almost like the resolution, as apposed to the CSS properties which set the actual display size of the canvas on the page.
The first step to getting this working is creating a basic game loop. We don’t need anything fancy just the standard update and draw functions, and we would like it to run at a fairly consistent FPS.
Game Engine
Our game engine won’t have any audio support or things like that, but what we do need is to be able to accurately detect the mouse’s position and it’s button state checking whether the user is currently clicking on something or not.
Let’s start with a simple constructor function which will accept the HTML canvas element and the desired frames per second. This code should go in the js/game_engine.js file:
var GameEngine = function(canvas, FPS) {
    this.FPS = 1000 / FPS;
    this.canvas = canvas;
    this.context2D = canvas.getContext("2d");
    this.gameObjects = [];
    this.setupCanvas();
}
We set the interval between loops in milliseconds, and create an empty object to store the game objects for later. If you are new to using a canvas element for drawing, then the context2D line might seem a bit bizarre, basically the HTML5 2D drawing API has to be “chosen” and extracted like this, configuring the canvas to be a 2D canvas as apposed to say one using the 3D API for example.
The last line in the constructor calls a setupCanvas method which we will now use to setup all the event handlers needed to track the mouse.
There are basically three handlers we will want to create handlers for:
- The mouse move event
- The mouse down event
- The mouse up event
With the mouse move event we will be able to get the mouse’s position on the canvas as well as detect if the left mouse button is currently being clicked. Now this is really all the info we need, but this alone won’t create a very tolerant UX; the user can for instance click the mouse without moving it, and in such a case our engine wouldn’t pick it up, so we will also be tapping into the other two events to pick up the extra data. Here is the complete setup event:
GameEngine.prototype.setupCanvas = function() {
    this.context2D.textBaseline = "top";
    this.context2D.mouse = {
        x: 0,
        y: 0,
        clicked: false,
        down: false
    };

    var engine = this;

    this.canvas.addEventListener("mousemove", function(e) {
        engine.context2D.mouse.x = e.offsetX;
        engine.context2D.mouse.y = e.offsetY;
        engine.context2D.mouse.clicked = (e.which == 1 && !engine.context2D.mouse.down);
        engine.context2D.mouse.down = (e.which == 1);
    });

    this.canvas.addEventListener("mousedown", function(e) {
        engine.context2D.mouse.clicked = !engine.context2D.mouse.down;
        engine.context2D.mouse.down = true;
    });

    this.canvas.addEventListener("mouseup", function(e) {
        engine.context2D.mouse.down = false;
        engine.context2D.mouse.clicked = false;
    });
}
As you can see, I added a mouse object on the 2d context so our game objects can access this information and then I registered the three event handlers we just mentioned.
I created a variable to store both the state of the button (like if it is currently down) but also another variable to store if it has just been clicked, which will only be true once per mouse down.
Next we will need the actual game loop:
GameEngine.prototype.run = function() {
    var desiredTime = Date.now() + this.FPS;

    this.update();
    this.draw();

    var interval = Math.max(0, desiredTime-Date.now());
    setTimeout(_.bind(this.run, this), interval);
}
You could have used the setInterval function, but depending on whether you may be using async code in your engine, or whether you may have a very intensive application, I rather it miss a few frames, then get backed up on the event queue. But this is really a personal preference and there really shouldn’t be too much of a difference between both methods for our use case.
Since we will be manually setting the time between calls we want to track the start time, so regardless of how much time the update and draw stages took, we should get a steady FPS. The last line also uses underscore to bind the object’s context to the setTimeout callback.
The last thing we need to add to our game engine is the draw and update loops, these are really simple as they essentially just loop through the game objects and call their own specific update & draw handlers, passing through the 2D context, so they can get at the mouse info and draw to the screen:
GameEngine.prototype.update = function() {
    _.each(this.gameObjects, function(obj) {
        obj.update(this.context2D);
    }, this);
}

GameEngine.prototype.draw = function() {
    this.context2D.clearRect(0, 0, 600, 400);
    _.each(this.gameObjects, function(obj) {
        obj.draw(this.context2D);
    }, this);
}
_.each is an underscore function which will iterate over a list, and it accepts the handlers context as a third parameter. Both these functions are almost identical except the draw function also clears the screen for the next draw cycle.
A UI Object
At this stage we have our game loop, and we have all the mouse info calculated for the canvas as a whole. What we still need to do is calculate all the interactions between the mouse data and the individual game objects. Since this code will be required for all the UI elements, let’s create a “parent” class which our other elements will extend from.
We will need to know two things: one, is the mouse hovering over an object and two is the mouse being clicked on an object. In both these situations we will set the hover and clicked property on each object individually, which it can then take advantage of in its update and draw processes (This should go in the js/ui_base.js file).
var UIObject = {
    intersects: function(obj, mouse) {
        var t = 5; //tolerance
        var xIntersect = (mouse.x + t) /> obj.x && (mouse.x - t)  obj.y && (mouse.y - t) < obj.y + obj.height;
        return  xIntersect && yIntersect;
    },
    updateStats: function(canvas){
        if (this.intersects(this, canvas.mouse)) {
            this.hovered = true;
            if (canvas.mouse.clicked) {
                this.clicked = true;
            }
        } else {
            this.hovered = false;
        }

        if (!canvas.mouse.down) {
            this.clicked = false;
        }
    }
};
To check whether the mouse intersects with the objects (i.e. hovers over them) I am using standard box collision detection, and as the mouse doesn’t have a width or height I added it as a form of tolerance. The rest is pretty standard logic. If the mouse is intersecting the object set the hover status to true, and if the user has also clicked the button set the clicked property to true.
The hovering property becomes false when the mouse moves off the object, whereas the clicked property stops being true when the user let’s go of the button (on mouse up). Now let’s create our first element, the button.
The Button
The button is probably the simplest of the ui objects to create, as it has no state. It’s simply a box that when clicked triggers an event. Let’s start with the constructor in the js/button.js file:
var Button = function(text, x, y, width, height) {
    this.x = x;
    this.y = y;
    this.width = width;
    this.height = height;
    this.clicked = false;
    this.hovered = false;
    this.text = text;
}

Button.prototype = _.extend(Button.prototype, UIObject);
This constructor accepts as parameters the object’s text and dimensions, and then set’s the mouse properties we just used in the “parent” class. The last line uses underscore to extend all the methods from the UIObject we just created.
Next – as we saw in the engine code – we need to add an update and draw function, which will get called on each iteration of the game loop:
Button.prototype.update = function(canvas) {
    var wasNotClicked = !this.clicked;
    this.updateStats(canvas);

    if (this.clicked && wasNotClicked) {
        if (!_.isUndefined(this.handler)) {
            this.handler();
        }
    }
}
We store the previous button state, and then update the mouse properties with the parent function from above. Next if the button has just been pressed (i.e. it was not pressed in the last update loop), then run the objects handler if setup. Thats really all there is to it.
Next let’s look at the draw method:
Button.prototype.draw = function(canvas) {
    //set color
    if (this.hovered) {
        canvas.setFillColor(0.3, 0.7, 0.6, 1.0);
    } else {
        canvas.setFillColor(0.2, 0.6, 0.5, 1.0);
    }

    //draw button
    canvas.fillRect(this.x, this.y, this.width, this.height);

    //text options
    var fontSize = 20;
    canvas.setFillColor(1, 1, 1, 1.0);
    canvas.font = fontSize + "px sans-serif";

    //text position
    var textSize = canvas.measureText(this.text);
    var textX = this.x + (this.width/2) - (textSize.width / 2);
    var textY = this.y + (this.height/2) - (fontSize/2);

    //draw the text
    canvas.fillText(this.text, textX, textY);
}
Not very complicated, albeit a bit long. The first section set’s the background colour depending whether or not the button is currently being hovered over. Next we draw the actual button to the screen with the fillRect command.
fillRect is a 2D context method, which draws a rectangle with the specified dimensions using the current fill colour (which we set above).
The rest of the function calculates the width of the text and based on the size figures out the x & y coordinates for which to draw the text to.
Now the moment we have all been waiting for let’s see if it worked, to test it we will need to create an instance of our engine and add a button object to it back inside of our main HTML file:
var engine = new GameEngine(canvasElement, 30);

var alertButton = new Button("Alert", 45, 50, 160, 40);
alertButton.timesClicked = 0;
alertButton.handler = function(){
    this.timesClicked++;
    alert("This button has been clicked " + this.timesClicked + " time(s)!");
};

engine.gameObjects.push(alertButton);

engine.run();
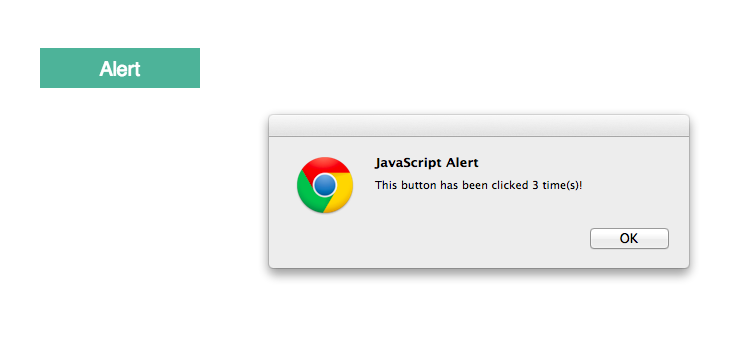
If all went well you should see the button on the screen, and clicking on it a few times should get you something that looks like the following:
The Slider
A slider is a pretty common game UI element, used almost exclusively in game menus when adjusting settings granularly. Like with the button class we just made, we need to create a constructor and inherit the functions to handle the mouse interactions (inside the js/slider.js file):
var Slider = function(x, y, width, min, max) {
    this.x = x;
    this.y = y;
    this.width = width;
    this.height = 40;
    this.value = min;
    this.min = min;
    this.max = max;
    this.clicked = false;
    this.hovered = false;
}


Slider.prototype = _.extend(Slider.prototype, UIObject);
Here besides the objects dimensions we want to store the current value of the slider, and the min / max value that the slider can represent.
In the update method we don’t really care if this is the first loop being clicked like with the button, here we need to process all the iterations where the mouse is still down, to get the sliding effect:
Slider.prototype.update = function(canvas) {
    this.updateStats(canvas);

    if (this.clicked) {
        var pos = canvas.mouse.x;

        pos = Math.max(pos, this.x);
        pos = Math.min(pos, this.x + this.width);

        var range = this.max - this.min;
        var percent = (pos - this.x) / this.width;

        this.value = Math.round(this.min + (percent * range));

        if (!_.isUndefined(this.handler)) {
            this.handler(this.value);
        }
    }
}
If the slider has been clicked we want to get the mouse’s x position (and constrain it to the slider’s length and position). We then multiply the ratio of the slider max position to the mouse’s position to get the “percentage” of the slider and we multiply that by the entire range in order to get the current value.
If we new all sliders were from 0–100 for instance we could easily just multiply the percent ratio by 100, but this code allows us to have a slider between any range (for example 5–15) and really customise it for the specific use case.
Besides for that we are also just calling a handler method (if one was set) and we pass in the current value. Next let’s take a look at the draw:
Slider.prototype.draw = function(canvas) {
    //draw the bar
    canvas.setFillColor(0, 0, 0, 1.0);
    canvas.fillRect(this.x, this.y + (this.height/4), this.width, this.height/2);

    //set color
    if (this.hovered) {
        canvas.setFillColor(0.3, 0.7, 0.6, 1.0);
    } else {
        canvas.setFillColor(0.2, 0.6, 0.5, 1.0);
    }

    //draw the slider handle
    var range = this.max - this.min;
    var percent = (this.value - this.min) / range;
    var pos = this.x + (this.width*percent);
    canvas.fillRect(pos-5, this.y, 10, this.height);
}
The first section draws the bar, which will show the full width of the slider at all times, whereas the rest of the code is for calculating the position and drawing the actual slider handle.
It is pretty similar to the code in the update method for calculating the current value, except here we are calculating the x coordinate.
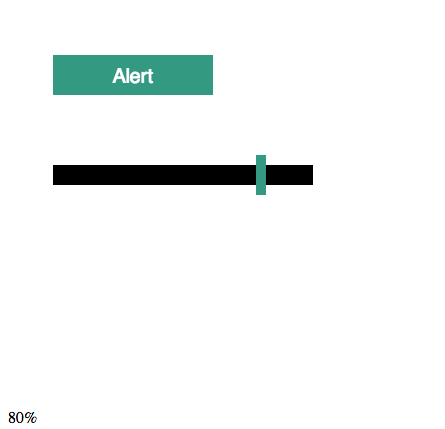
And now to test it back in our HTML file:
var percentDiv = document.getElementById(“percentBox”);
var DOMSlider = new Slider(45, 150, 260, 0, 100);
DOMSlider.handler = function(value) {
var text = value + “%”;
percentDiv.innerHTML = text;
}
engine.gameObjects.push(DOMSlider);
For this handler I also needed to add a div below the canvas to show the current value in:
A Checkbox
The last class I want to go through is one for a checkbox, but this code should seem pretty familiar to you, as we are basically replicating the button class except with an extra state variable which we can toggle. The difference in the constructor is we don’t have any text attached (not to mention I left the size of the checkbox static), this code should go inside our last file js/checkbox.js:
var CheckBox = function(x, y) {
    this.x = x;
    this.y = y;
    this.width = 30;
    this.height = 30;
    this.checked = false;
    this.clicked = false;
    this.hovered = false;
}

CheckBox.prototype = _.extend(CheckBox.prototype, UIObject);
The checked property is the variable we will be toggling on every click event. The update method is also almost identical to the button class, except here I toggle the checked state and pass it as a parameter to the setup handler:
CheckBox.prototype.update = function(canvas) {
    var wasNotClicked = !this.clicked;
    this.updateStats(canvas);

    if (this.clicked && wasNotClicked) {
        this.checked = !this.checked;

        if (!_.isUndefined(this.handler)) {
            this.handler(this.checked);
        }
    }
}
And the draw function displays a check or x depending on it’s current state:
CheckBox.prototype.draw = function(canvas) {
    //draw outer box
    canvas.setStrokeColor(0, 0, 0, 1.0);
    canvas.setLineWidth(4);
    canvas.strokeRect(this.x, this.y, this.width, this.height);

    //draw check or x
    canvas.font = "26px sans-serif";
    if (this.checked) {
        canvas.setFillColor(0.2, 0.6, 0.5, 1.0);
        canvas.fillText("\u2713", this.x+5, this.y);
    } else {
        canvas.setFillColor(0.6, 0.2, 0.2, 1.0);
        canvas.fillText("\u2715", this.x+5, this.y);
    }
}
Again let’s add a checkbox to the screen in our HTML file to try it all out:
var backCheckBox = new CheckBox(45, 250);
backCheckBox.checked = true;
backCheckBox.handler = function(checked){
    var color = (checked) ? "#FFF" : "#E8B70C";
    document.body.style.backgroundColor = color;
}

engine.gameObjects.push(backCheckBox);
Grab de Source Code
You can grab the source code of the tutorial here.
Conclusion
I hope this article gave you a little insight into the process of creating your own UI elements in a game project. On the one hand you have to take care of some lower level tasks like mouse intersections with objects, but on the flip side you have full control over how you want your elements to behave granting you a much larger level of flexibility.


