You can access the full course here: C++ Programming for Beginners
Table of contents
Installation
To write and run C++ code, we will use the IDE Visual Studio Code (VSC). It’s a fantastic IDE with thousands of plugins to help you write code in dozens of different languages. It also looks great and is easy to use. The best part? It’s free! Also, the process of installing VSC and the necessary plugins are pretty much identical between Mac and PC so both types of users can follow the same instructions. We’ll hop on over to this website here:
https://code.visualstudio.com/download
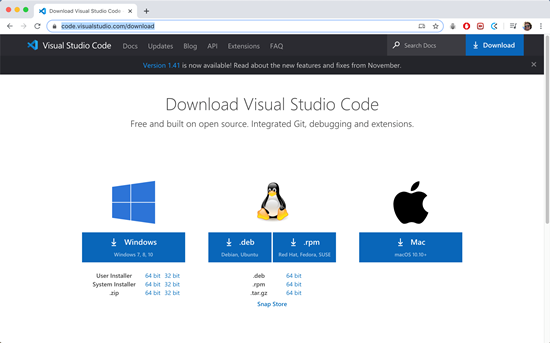
It’s the official download page for visual studio code. Select your operating system and download the appropriate file. Follow the instructions in the installer. Once that’s done, go ahead and open VSC to find a welcome screen that looks something like this:
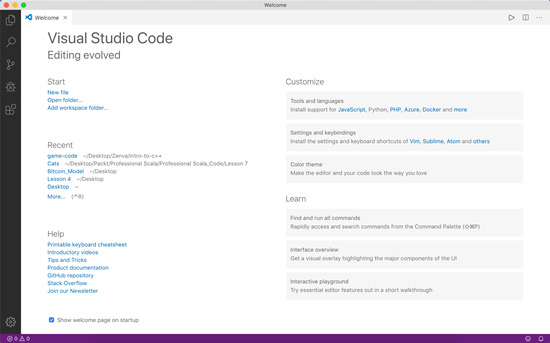
This screenshot is from version 1.41 so if you have a later version, things may look slightly different. VSC doesn’t come packaged with the necessary plugins automatically so we will need to install one to allow us to write C++ code and another to help us compile and run it.
C++ Plugins
The first plugin can be found by opening up the Extensions window (click on the Extensions button at the bottom of the leftmost panel) and searching for “C++” (in the search bar at the top). The one we want is an official Microsoft plugin and looks like this:
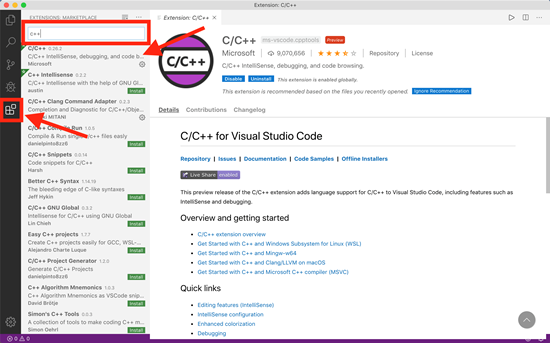
As you can see, this package has already been installed but where is says “uninstall” above, it should say “install” for you. Go ahead and press that to install it. Don’t worry, it’s free too! You may have to restart VSC to apply the plugin.
Next, we want a way to run the code in VSC, as the plugin we just installed only lets us write C++ code. To avoid the long, roundabout way of installing the platform specific compiler and linking it to VSC, we can use the plugin “Code Runner”. Once again, it’s free to install. In the same extensions window, search for “Code Runner” in the search bar. It should look like this:
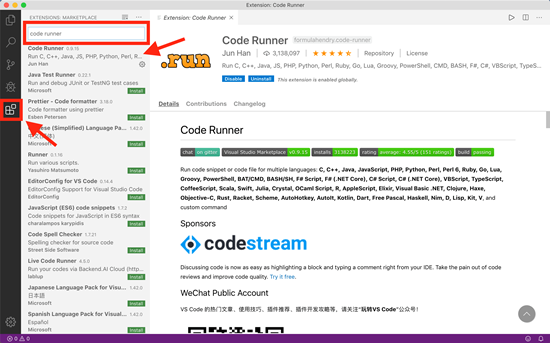
Just like before, press the install button and that’s it! You can now write and run C++ code!
Now that we have everything we need, we should give VSC a test run with our new plugins. VSC works best with project folders so open Finder (for Mac) or File Explorer (for PC) and create a new folder somewhere. It doesn’t really matter where for now as this is just going to be used for testing purposes so somewhere like the Desktop is fine. Once you have created a new folder (it should be empty), open it with VSC. Click on the “Explorer” button on the left panel at the top and click on the “Open Folder” button:
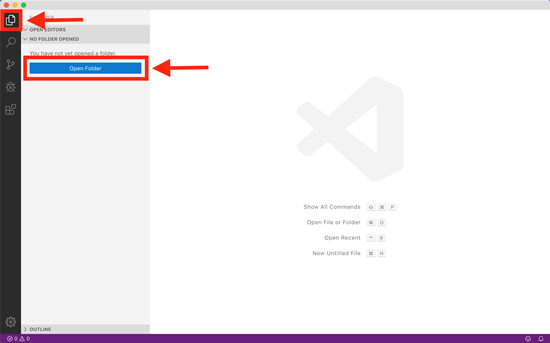
Select the folder you just created. This should display the welcome screen again but you just click out of that. Now we need a file to contain our code. We very often call the entry point into a program “main” so you may as well do the same. Create a new file by selecting “File” (in the main menu at the top) and selecting “New File”. You can also create a new file by pressing cmd + N for Mac users or ctrl + N for PC users. Save the file by selecting “File” and selecting “Save As…”. You can also save the file by pressing cmd + s for Mac users or ctrl + s for PC users. Make sure it’s in the folder you just created and call it “main.cpp”. Your configuration should look something like this:
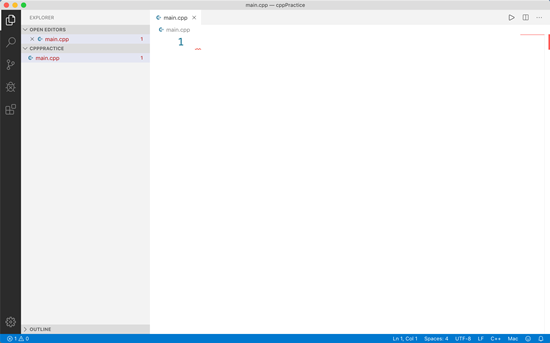
Now we need to write some code to run so copy and paste the following code:
#include <iostream>

int main()
{
	std::cout << “Hello World!”;
}
Don’t worry, we’ll explore the syntax in greater detail later. You will probably notice that the #include <iostream> line has a red squiggly line underneath it. That’s because we haven’t set the compiler path and is, unfortunately, something we have to do with every project. To do so, bring up the browse window by pressing cmd + shift + p (for Mac) or ctrl + shift + p (for PC). Search for “C/C++: Edit Configurations (UI)” and open the window. It should look like this:
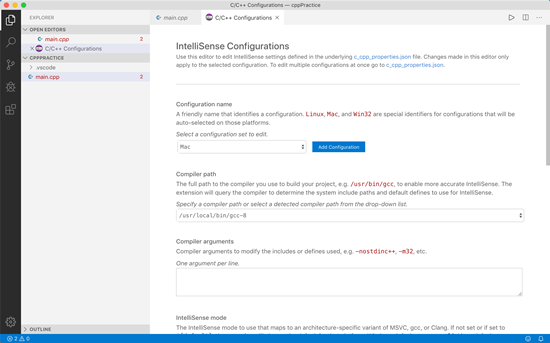
Although a few of the variables in the windows may be different, it should look generally the same. Under the “Compiler path” subheading, click on the dropdown button and select “/usr/bin/clang”. Give the file a save and close it. When you go back to main.cpp, the red squiggly line should be gone! Now make sure you save main.cpp. In the upper right corner of VSC, you should see a play button. Go ahead and press it to run the code. Be aware that it will run only the highlighted code if you have code highlighted or will try to run the current file you’re in so make sure you’re in main.cpp every time.
This will run the code in main.cpp (all the code is doing is getting the program to print out “Hello World!”) so you should see the terminal window open at the bottom and some output similar to this:
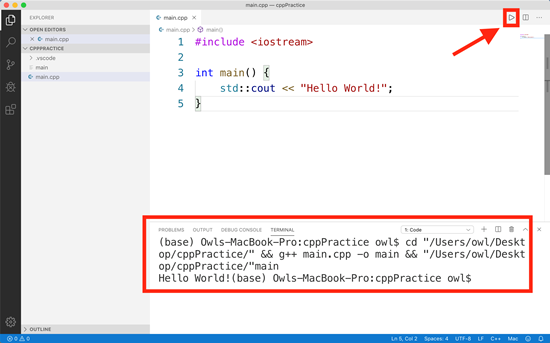
The exact text you see will differ based on where your files are saved but you should see Hello World! In there somewhere. My editor text is also much bigger than the default for your easy viewing. Congratulations! You have successfully built and run your very first C++ program!
Project and File Structure
Before we jump into learning the language, let’s talk about how C++ programs and files are structured so that we can understand what’s going on above. C++ programs are started using a main function. This is declared with the int main() {} code above and for now, we want all of our code between the {} otherwise we won’t be able to run it. Our main function is simple because we aren’t passing in any arguments and are running things with a fairly sophisticated compiler in VSC. More rudimentary C++ programs sometimes have a “makefile” which is a way of compiling all of the files at once without running them. A compiler takes code that we can read and write and turns it into machine instructions that the computer can understand and execute. We won’t worry about that here; the key takeaway is that the main function marks the start of a C++ program and when that function finishes running, the program terminates.
Now it’s bad practice to put all of our code in one file so generally we create separate files for related functionality. For example, different game components such as characters, items, rooms, etc. will all have their own separate files. However, we often need to reference other files and libraries in order to get access to the goodies inside. This is done through #include statements. The #include <iostream> above includes the input-output library so gives us access to the std::cout function. Go ahead and delete the #include <iostream> statement and you’ll notice that you immediately get an error with the std::cout code. Most functionality that isn’t declared in the current file and is not part of the basic C++ library will likely need to be imported.
One final thing to note about files in C++ programs is that we very often divide our functionality into .h and .cpp files. The .h files are header files that basically act as blueprints telling the program what variables, functions, etc. that part of the program needs to finish setting up. The .cpp files are C++ files that contain the fully set up variables, functions, etc. that the .h files say they should have. These are the files that contain the code and are actually run. For example, if we needed a bunch of variables and functions in main.cpp, we could create a main.h file, fill it with templates for the variables and functions, and then actually add the body of those variables and functions in main.cpp. Just make sure to #include the .h files in the corresponding .cpp files, otherwise you won’t get access to anything you wrote in the .h file. This may seem redundant but it’s considered best practice and will help you to organize your project. Your coworkers will greatly appreciate it!
Transcript
What’s up, guys? Welcome to the first tutorial in our Learn C++ course. This will be on installation and project setup. We’ve got two very easy tasks ahead of us. What we’ll do here is download and install Visual Studio Code, and then I’m gonna really quickly show you how to start a project, we’ll just become a bit more familiar with the IDE and the whole process.
So, let’s head on over to a browser first. Because of course, we need to download it. And we’re going to search for download Visual Studio Code. So I have Chrome open here, although any browser should work. We’re gonna go to this second link, code.visualstudio.com/download. This will take us right to the downloads page. Now, I’m using a Mac, so obviously it makes sense for me to download the Mac installer. But if you’re using Windows or Ubuntu, please download your respective installers. I’m gonna go ahead and click on that, and it should take you to the get started page and start the download as well.
Now, just a heads up, I am recording on a Mac, so everything I do will be from a Mac standpoint. However, once we have everything installed and the plugins in place, everything will be exactly the same between Mac and PC. I’m not a 100% hundred percent sure about Ubuntu ’cause I personally don’t really work with Ubuntu very much. So I recommend you go with either Mac or PC, but there we go.
So, now that this is downloaded, we’re gonna go ahead and open it up. I’ll really quickly show you what it looks like from a Mac standpoint, and then I’ll talk you through the process of if you’re downloading it using a PC. Okay, so you can see that this downloads the the ZIP file. I open up the ZIP file there, and it shows me this Visual Studio Code.app. If you’re using a Mac, all you need to do is drag and drop this into your applications folder and you’re good to go. That’s it. The Visual Studio Code is downloaded and you can open it up and use it.
Now, if you’re using Windows, likely this will open up the installation wizard. I think one of the first steps is just to click next, and then say read and accept the license, and then it will give you a few different screens that ask you to set up various variables, and also to set up stuff like the path, exactly where you want to save it, and so on and so forth. You can actually just use the default values for all of those. So don’t mess around with them at all, just use the default values, click next right the way through. It will give you the installation process, it will show you that installation bar, and then it should be good to go. You’ll have Visual Studio Code installed. So again, just use all the default settings for now. We’ll mess around with things a little bit in the next tutorial.
Okay, so once you have those in place. I’m just gonna go ahead and delete my Visual Studio Code app in the installer there, because I actually already have it right here. Okay, so once that’s done, we’ll go ahead and open up Visual Studio Code for the first time. This isn’t the first time for me, obviously. I wouldn’t be very good at making this course if it was. And this will show us the welcome window here. Okay, so there’s lots to take in here. You can customize the appearance, tools, languages, et cetera. You can find some tutorials here. There’s a bit of help. Gives you recent projects. You probably won’t have anything in here. But it also gives you the option to start new files and projects, et cetera.
So this right here is the file window. Any files that you have open will be displayed here in a tab-like structure. So if you have many files open, you select one at a time and it opens it up. Just a heads-up, likely you won’t have this little play button here just yet. I’ll show you how to get that in the next section. Now, we’re interested in two pieces of this whole screen here.
First it’s gonna be the file explorer up at the top. This is a way to view all of the project files that we have open. Now, we actually don’t have a project open. This is just the main IDE. So that’s why we don’t have anything exciting to see here.
The second is gonna be our extensions button. So we click on this extensions button and it gives us a way to browse for various different plugins. We’ll install two specific plugins in the next section. But for now, just know that it exists. We’ll come back to that later. I do think that this looks a little bit different in Windows, a slightly different symbol, although it does exactly the same thing.
So, before we go any further, all I want to do here is show you how to set up a new project. It’s very, very easy. All we need to do is go to our finder or file explorer, choose the location you wanna save it on. I’m probably gonna go with desktop, just ’cause that’s easy for me to access. I’m gonna create a new folder. So I’m doing Command + Shift + N. I think for you Windows users it’s probably Control + N or Control + Shift + N.
And I’m just going to call this something like C++ Practice. So we recommend you do the same. The name isn’t too, too important, because we’re just going to be using this to test out our language basics. When we go to build our actual project we’ll call this something a bit more significant.
So now that we have the folder created, we don’t need anything in it just yet, we’re gonna go back to our file explorer here, we’re gonna go to open a folder, and we’ll go ahead and find where we saved that folder. It should be on desktop, C++ Practice, down at the bottom. We’ll go ahead and open that guy up. So once again it will show us the welcome window. If we don’t want that we can just exit out. We don’t have any files in this project, which is why there’s nothing here. If we did it would show you all of the files here. It would show you any open files under open editors there. But otherwise, that is it.
So, I just wanted to show you how to download and install Visual Studio Code, how to open up a new instance of it where the couple things that we’ll need are, and finally, how to start a new project. If you do wanna start a new file, then you can go to file, new file here, although I don’t recommend you do so just yet because we haven’t added the C++ extensions that we’ll need. So that’s what we’ll do in this next section coming up, stay tuned for that. Thanks for watching, I will see you guys in the next one.
What is up everyone, welcome to the second tutorial in our learn C++ course. Here we’ll be completing a setup by adding our C++ compiler. This is an essential component for what’s called building and running the C++ code.
So we’ll need two plugins. The first will be the C++ coding tools. I think this is IntelliSense. It’s actually a direct Microsoft plugin and then we’re going to install the C++ compiler. That will be a plugin called Code Run or Code Runner I believe it’s called and will allow us to easily compile and run C++ code.
So lets head on over to Visual Studio Code now and we’re just going to start by going to our plugins or our extensions, this window here and then we go and search for first our C/C++ extension. Okay so it should be this very first one. This C/C++ IntelliSense, debugging, code browsing, etc. So as you can see I already have this installed because my only options are disable and uninstall although your options should be install if you don’t already have it. Go ahead and click on the install button.
Don’t worry it’s totally free and is necessary to build and run our code. You can see it’s got over 9,000,000 downloads at this time so it must be fairly well trusted.
Okay so this may prompt you to restart Visual Studio Code. If it does then please do so open up your project folder and we can go ahead and install the other one. Okay so I’m assuming that you have that installed and we can install the second plugin. If not then you’ll probably want to pause this video, make sure that’s good to go and then come back.
Now the second one that we’ll want to install is going to be our code runner. So we go and search for Code Runner here. Okay it should have this .run, it’s called Code Runner and it’s got over 3,000,000 downloads so quite well trusted and allows you to run all of these languages and more. We’re only really interested in C++ but I found this is by far one of the best extensions to allow us to do so. So we’re gonna go ahead and once again install that. Make sure it’s good to go and again these plugins should only take a couple of minutes to install at most. If you need to restart Visual Studio Code please go ahead and do so and then come back.
We’ll need to preform a little bit more setup. Okay so I’m assuming that’s good to go. Now what we’ll want to do is show all commands. Now I actually can’t press Command + Shift + P because that pauses my recording so we’re going to go to settings here and we’re going to go to the command palette. It’s exactly the same thing. Okay so what we’ll want to do is go to CC++ edit configurations, so CC++ and we go and search for edit configurations and we don’t really want the JSON we want the UI it’s just a little bit more user friendly.
Okay and this will open up this window here. So this is the IntelliSense configurations. We need this because we need to essentially specify our compiler. If we don’t specify the compiler then we’re not going to be able to actually compile and run our code. Okay so usually this actually filled in but for whatever reason it isn’t. We’re going to go ahead and add a configuration. We can just call this the configuration name Mac for me is fine although you’ll maybe want to do Window or something like that if you are using a PC.
Okay the next thing we’ll want to do is select our compiler path. Now most operating systems actually come with some sort of compiler already installed. For Mac we’re going to want to chose the clang compiler not the clang++. Make sure it is the /user/bin/clang. So you want to go ahead and make sure you have that. Windows I think they actually recommend a MinGW compiler. I don’t have this because again this inst a PC this is a Mac so the clang is the one I’ll want to go for.
Windows users again that’s going to be the MinGW. If you don’t have the MinGW compiler you can actually find this just by opening up a new window, we go and search for MinGW okay and we’re going to go to mingw.org and this will kind of allow you to search for the most recent downloads. Make sure that you get the most recent version of MinGW and get that installed so you can just kind of download and install it there.
Once that’s done you should be able to add that to your list of compilers there or rather specify your compiler path from that. Okay so from there you’ll want to make sure everything looks the same. You’ll want your workspace folders. The default here you’ll want clang x64 or MinGW if you have that option for Windows otherwise everything is looking pretty much good to go. So we can go ahead and give this a save. I’m just pressing Command + S here. Window users that Control + S or you can just go to file, save okay? We’re gonna go ahead and close that up and we should be good to go.
So if we go back to the file explorer and start opening up and creating C++ programs we should be able to actually compile and run them. We’re not going to do that just yet, we’re actually gonna save that for the next section though because we just want to get everything setup here. Okay so that’s it for now. Like I said when we come back we’ll be writing our very first C++ program to explore kind of how files and projects are structured. So thanks for watching I’ll see you guys in the next one.
What is up everyone? Welcome to the third tutorial in our Learn C++ course. Here we’re just gonna take a few minutes to talk about the C++ file structure. So it goes a bit beyond that, we’ll actually start by covering how C++ programs in general are structured. Then we’ll talk about the files specifically, how they’re structured, we’ll get into the main function and header files, we likely won’t create any header files here just ’cause we really don’t need them. But then we’ll talk about what the purpose of those is and how to include them under the include headers as well. We’ll also toss a name space in, but likely these words won’t mean a whole lot until we actually get to those topics.
So let’s head on over to Visual Studio Code again. And probably the first thing we want to do is actually start by creating a file of our own. So we’ve got all of the compilers and everything set up, we should just be able to create a new file here. We can actually go to file, create a new file. We should probably save this file right away. Make sure it’s a C++ extension. You need to go down here and select a C++, or you can actually just save it as a .cpp file. So we’re going to make sure that we’re saving it under CPP practice, in the same project folder. And I’m just gonna call this main.cpp.
Okay, so that’s C-plus-plus, because we can’t include that actual plus symbol in the file extension. Okay, so this may give you a red squiggly right off the bat saying that there’s basically nothing in this file to run. In this case it seems to be doing okay. So, we’re going to start just by creating this function called main, and actually we should specify int, main like this, and then we’re just going to put into the curly braces, it doesn’t matter whether down here or up here, it really doesn’t matter.
Okay so the reason I created this function before talking about anything else, is because main plays an integral part in the overall C++ program structure. Now, we’re not gonna be building something super, super complex, with dozens and dozens of files, we’ll probably end up with maybe about a dozen files or so. So it’s not gonna be too too crazy, and all those files are gonna be either C++ files or header files.
Now the C++ files contain the code that is actually run. So this means if we’re building this function here, this int main function, then this is going to contain the code that will actually run. The header files, on the other hand, are just a way to set up a template. So, if we had a header, and a C++ file, so main.h, that would be a header file, then essentially that would be used to say that we’re going to have a main function, but we’re not gonna fill in the body of it. So here we can fill in the body of the main function, but the header file is just used to say that our main.cpp file should have a main function. But we’re going to let the main.cpp actually implement that function, or actually provide the body of that function.
Same goes with any variables that we might declare. We might actually declare some variables in the header file, the .h file, but we’ll actually implement them. We’ll give them values in the .cpp file. Okay, so just keep that in mind as we go. The .cpp files are used to actually run code, and the header files, or the .h files, are generally just used to say what should be in the .cpp files. Okay, generally speaking for each of the .cpps we’ll have a header file to go along with it. In this case, because the main is a very special file, we won’t really need one.
Okay so, then that comes to the purpose of this main function. Now the main function itself is kind of the entry point into the program. This is going to be the very, very first thing that’s run in our program, even if we had a hundred other files, we’re going to run our main function first. This is the entry point, and so it needs to be performing all of the setup, or at least calling functions and files that will help to perform the setup. So this will be kind of the entry point into the code, that’s why I said main.cpp is generally a very special file.
So that’s for the most part what we need to know about program structure, we’ll have a main file, that will be the one that runs first, and for each of the other files, generally speaking, we have header, and then we have CPP files that kind of correspond with each other.
Okay, so next up will get into the meat of a file itself. Now we’re not really gonna differentiate too much between the header and the CPP files, just ’cause we don’t have a header file here. But generally speaking, we’ll start with some include statements. Now an include statement will be like this, #include. And is a way to include any other libraries or any other files that we might need. So if we did need a header file, we would include it up here. Same with if we needed any other libraries or anything in this file, any other functions that we needed access to that weren’t declared in this particular file, we need to include them all.
So very often you’ll see lots of these include statements. In this case we’re actually going to include just the one, that’s gonna be iostream, like this. So note, there’s no need for quotes or anything like that. Sometimes you will see some quotes if we’re including a header file, we generally wrap them in quotes like that. So generally speaking, if we’re including files we wrap them in these double quotes. If we are including libraries, like iostream is a library, that means it contains a bunch of functions and stuff, then for that we don’t actually need the quotes here, we’re fine with just the angular brackets.
Okay, we’ll talk more about the main function in just a second. One other thing I want to point out before moving forward is these double forward slashes. This represents a comment, so anything we put here will be completely ignored by the compiler. Now this is clearly nonsense, it doesn’t do anything. If I were to get rid of that then we’d have an issue here, you can see it right away there’s an issue. But the double forward slash makes it a comment. So basically, the compiler ignores all comments, they are really just there for the coders to read.
So let’s say that I was building my main function, and I realized that there is a weird bug. So it’s producing some output I don’t expect, or it’s not quite working, then I can make a comment saying “Main function is not working properly.” Maybe give a more detailed description of the issue, and then kind of put like a “TODO fix this function”, or something like that. It doesn’t even have to be an error, it could just be describing how the function works so that anyone reading your code can just look at the comments and quickly say “Okay, this function does this, I can ignore this. “Well, this function does this, “I need to pay attention to it.”
Okay, so we talked about the headers, we talked a little bit about main function, we talked about how projects and files are structured. One thing to note actually, with regards to Visual Studio Code specifically, because we’re using a special kind of a compiler we don’t need what’s called a makefile. Now some kinds of C++ compilers will need a file that’s called a makefile, which basically helps to build or compile the files. So in that you’d put all the files that need to be compiled and then that would kind of take care of that for us.
That’s not really something we have to worry about, just because we’re using Visual Studio Code and the specific plug-in. So okay, so just be aware of that if you are developing in a very basic environment, so just like a tech set as you’re in Terminal, you will likely need a makefile as well. It’s a bit beyond this course, so we’ll not worry about that for now.
Okay, so last thing I want to talk about here before we fix this issue that’s clearly something wrong, is gonna be that all of the code that we’ll write, at least for now, and over the next several tutorials, is gonna be inside of this main function. So we will put all of the code in these brackets here, and we won’t put any of that code outside of the brackets. So before or after the main function. And that’s because all of the code in C++ programs needs to be actually run within functions. We can kind of set things up and declare things outside of functions, but as soon as we want something to run then we need to put it inside of a function somehow.
Okay, so just be sure to not write any code outside of main, other than comments, comments are fine, again, because they’re not really run, they’re just kind of ignored. Okay, so finally let’s just go ahead and see what this issue is, it’s probably something to do with the compiler path. Thought we fixed that issue, but let’s see if we can figure out what’s going on there. So let’s go take a look in our command pallet, we’ll go into edit configurations and see if that is an issue.
So for whatever reason the compiler path has defaulted back to GCC, pretty sure we said that to C-lang, but that’s okay. And, so, that should be good. Okay, so once we get that done, this issue should go away. And it has indeed, because we’ve gotten rid of that red squiggly. Again, if you’re using Windows, probably you’ll do min-gW instead of the C-lang. Just make sure it is switched to a compiler that actually works, and doesn’t give you that red squiggly line.
Okay, last thing we’ll do here is just run this program. Now, it’s really not gonna do anything. Don’t worry about that, in fact, let’s actually just do this. We’ll do standard, we’ll do c-out, and actually it should be this, c-out, and we’ll just Hello World! Just the classic, I’m sure you guys have all seen Hello World! at some point in your lives. So don’t worry about exactly what this means, essentially this is just outputting this value here. We’ll talk more about that in the next section. So we just wanna go ahead and run that code.
Okay, we can see if we run this we’re not getting any output, and that’s because we haven’t saved the file. So we need to make sure that this is saving everything before we run it, the compiler is a little finicky like that. If you see this black dot inside of an X, that means you need to save the file. So we’ll go ahead and give that a rerun. And you can clearly see that Hello World! is printed there.
Okay, so that’s all we want to cover here. We talked about the file and the project structure of C++ programs. When we come back will be focusing more on this stuff which is input, output, so stay tuned for that. Thanks for watching, see you guys in the next one.
Interested in continuing? Check out the full C++ Programming for Beginners course, which is part of our C++ Programming Bundle.


