In this tutorial, we will be exploring how to create enemy animations in Unreal Engine using animation blueprints and state machines. We will implement animations for idle, running, attacking, and dying states, along with setting up transitions and conditions for smooth and realistic animations. This tutorial is ideal for those who have a basic understanding of Unreal Engine and are familiar with creating blueprints and working with animations.
Table of contents
Project Files
To follow along with this tutorial, you can download the project files containing the necessary animations and assets:
Download Project Files Here
Enemy Animations – Part 1
Unreal 5 Loop Setup
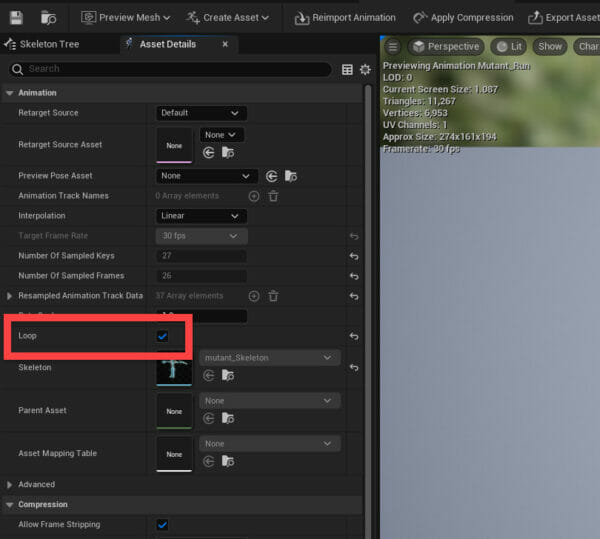
If you are following along with Unreal 5, there is something we have to do with all of our looping animation assets.
Go to the animation folder and for each animation that will need to loop (movement), double click to open the asset up in the animation window.
Here, go to the Asset Details panel and enable Loop.
Do this for every looping animation (we only have one in this course) and make sure to save all changes.
Animation Blueprint
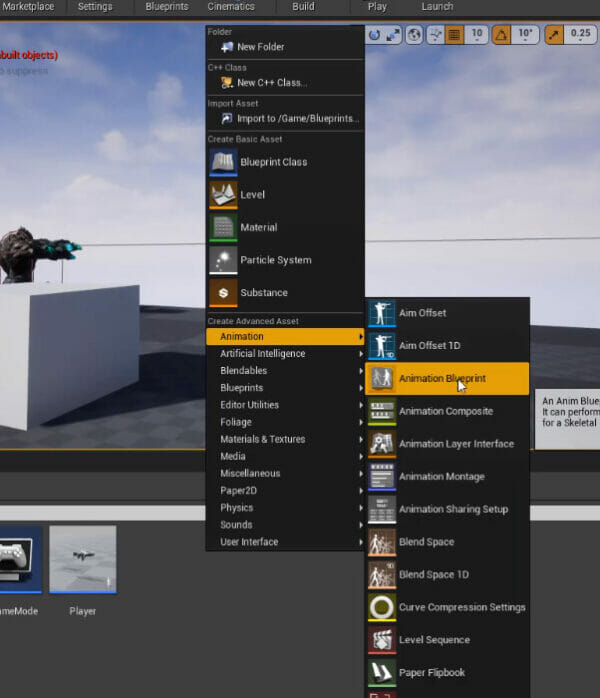
In this lesson, we’re going to be creating our enemy animations. In the Blueprint folder, right click and select Animation > Animation Blueprint and call it EnemyAnimation. It will ask you to choose a skeleton to link it to. Select the mutant_Skeleton.
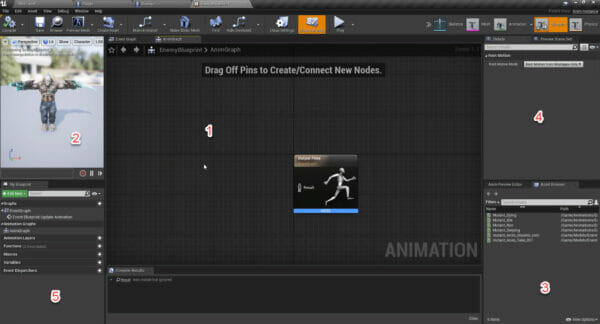
Double click to open up the animation editor.
- Viewport – displays the graphs, state machines, etc.
- Preview – previews the current animation.
- Asset Browser – list of all the animations for this skeleton.
- Details – same as blueprint editor.
- My Blueprint – same as blueprint editor.
You’ll see we have a single node called Output Pose. This is the final result of our animation blueprint where the animation to play will be sent.
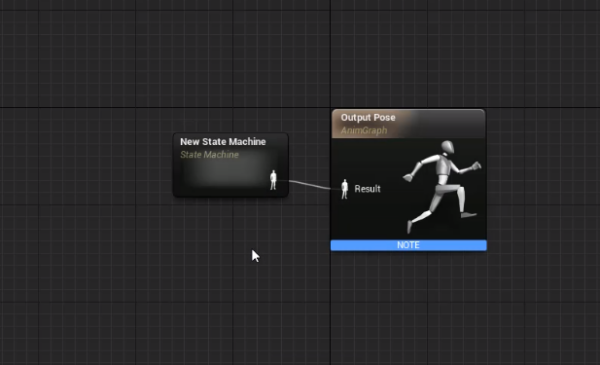
To determine which animation to play, we need to create a state machine. Right click and search for state machine. Connect that to the output pose.
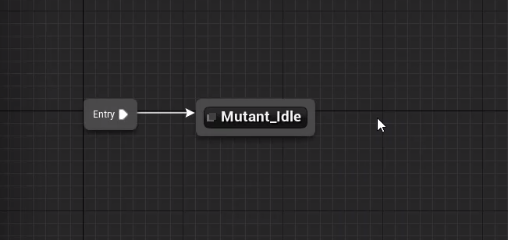
We can then double click the state machine to open it up. There will be an entry node which is the starting point for our state machine.
What is a State Machine?
A state machine consists of animations and transitions. To play a certain animation, we need to get there through a transition and each of them have a certain condition that needs to be met. Is the player moving? Are they attacking?
With a state machine we create a web of animations and transitions to determine which animation to play at the current time.
Setting it Up
To begin, let’s go to the Asset Browser panel and drag in the Mutant_Idle animation. Connect the entry node to that.
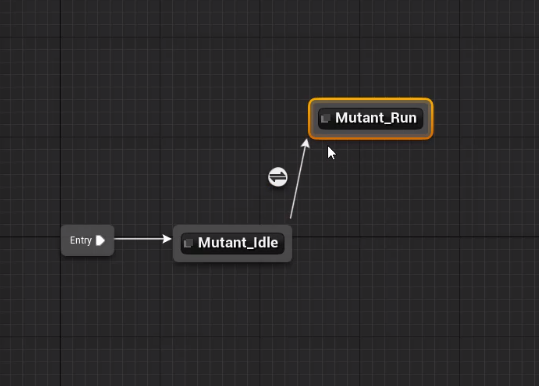
Next, let’s drag in the Mutant_Run animation and create a transition from idle to run. Right now, once the idle animation plays, run will play straight away. This is because there’s no condition.
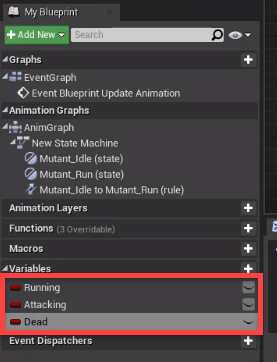
To setup our transition conditions, we’re going to need a few variables.
- Running (boolean)
- Attacking (boolean)
- Dead (boolean)
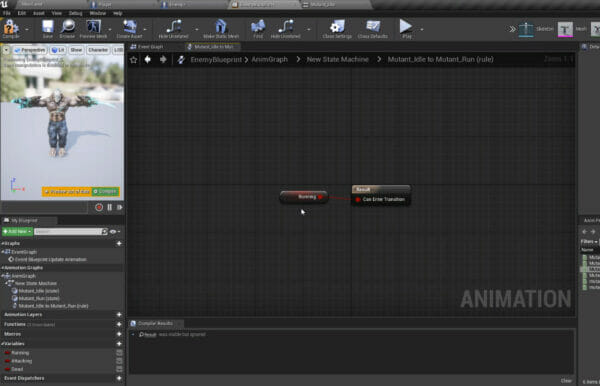
You’ll see that the transition we made has a white circle in the middle. Double click on that to open up the condition graph. Here we can setup a condition for whether or not the transition can be made.
For the animation to switch from idle to run, the enemy must be moving. So let’s check to see if the running boolean is true.
You can click on the New State Machine tab at the top of the graph to go back to the state machine.
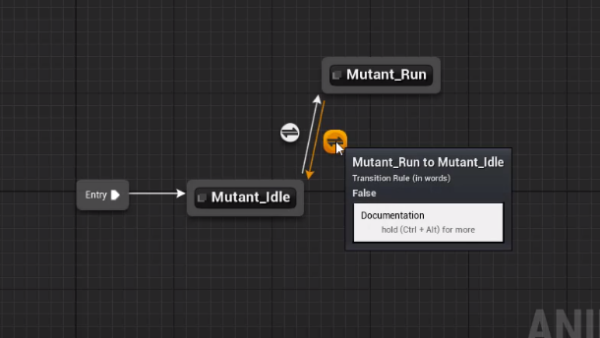
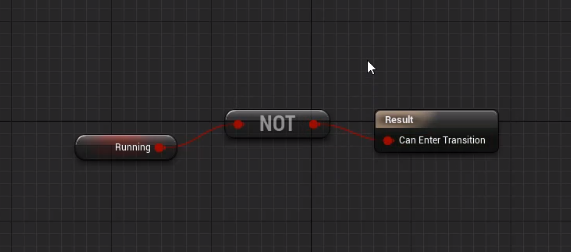
Now we can create another transition from run to idle.
The condition for this is going to be not running.
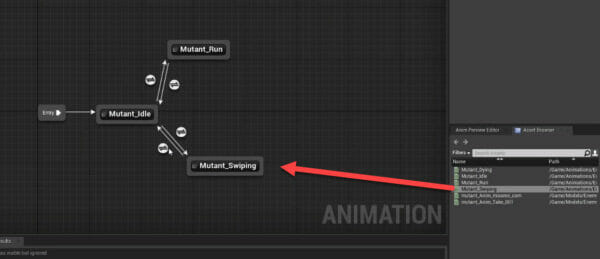
We can then drag in the swiping animation and connect it like so.
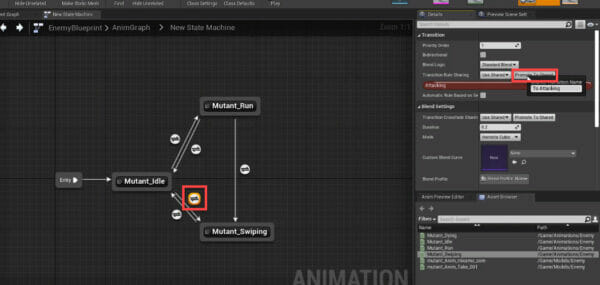
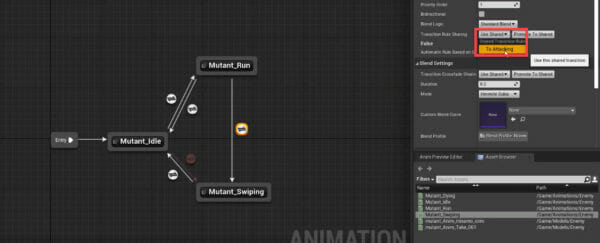
The transitions are going to be similar to the run ones, but with the attacking variable. We can then create a transition from run to swiping also. But this transition will have the same condition as idle to swiping. To skip over creating duplicate conditions, we can create a shared transition rule.
Select the idle to swiping transition, and in the details panel, select Promote To Shared. Call it To Attacking.
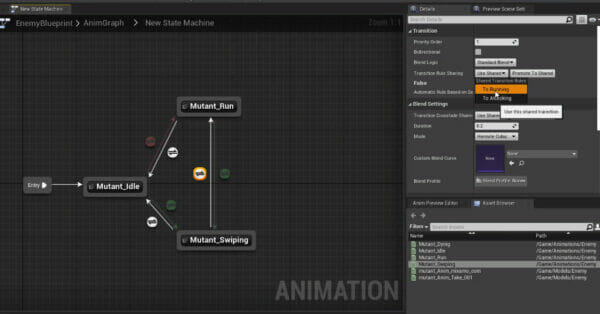
It will make it a new color. We can then select the run to swiping animation and set it to use the new transition rule.
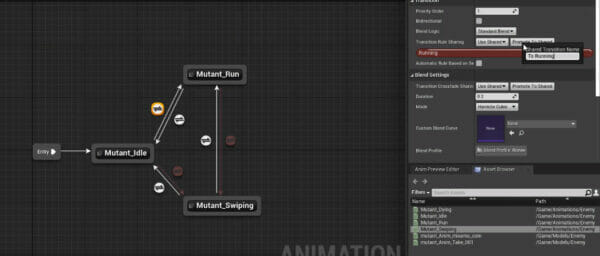
This makes it more convenient and easy to see what transitions are where. Let’s also create a transition rule for the idle to run transition.
Create a transition from swiping to run and use that new rule.
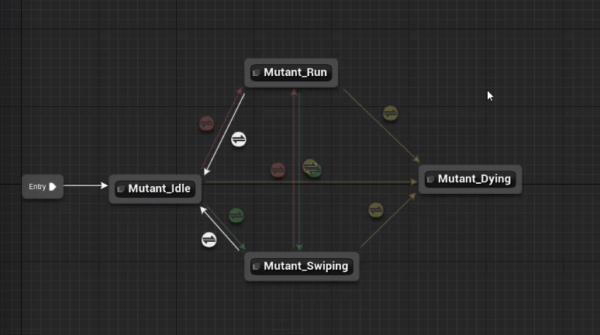
Finally, we have the dying animation. This is only going to have transitions to it and not out since once the enemy is dead, nothing else should ever happen.
The transition condition is just going to be if the dead boolean is true.
In the next lesson, we’ll work on setting our three variables and connecting it to our enemy blueprint.
Enemy Animations – Part 2
Enemy Animation Event Graph
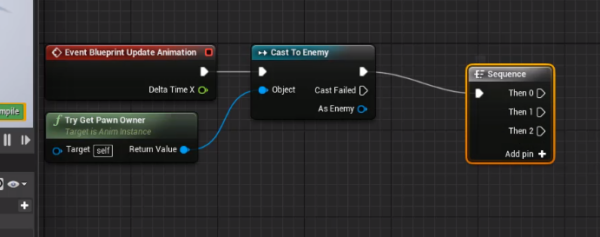
In the enemy animation blueprint, click on the Event Graph tab. What we want to do is each frame, set the three booleans based on the enemy properties.
First, we’ll convert the pawn owner to an enemy blueprint and plug that into a sequence node.
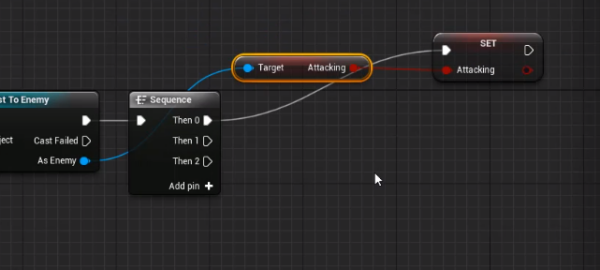
First, we’ll check if the enemy is currently attacking.
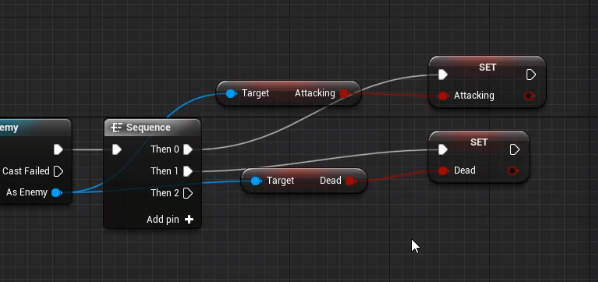
Then for if the enemy is dead.
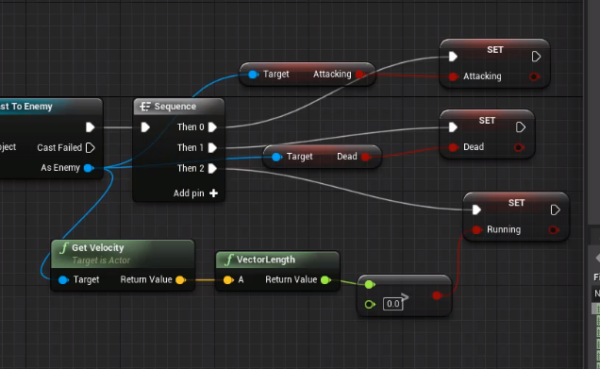
Finally, we’ll get the velocity to determine if the enemy is currently moving.
Click compile, save and then go back to the Enemy blueprint.
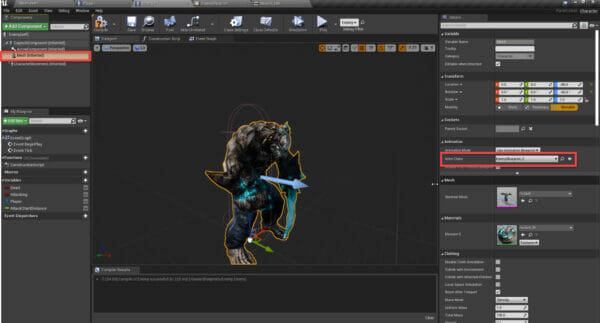
- Select the Mesh
- Set the Anim Class to EnemyAnimation
Compile and you should now see the animation playing.
Now we can press play and see the animations in action!
Setting up the Attack Animation
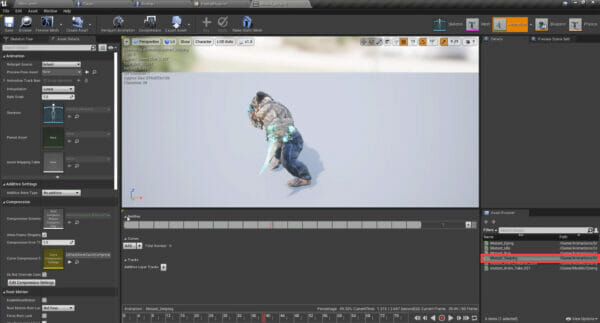
Now what we can do is call an event when the enemy “attacks” the player through the animation. In the EnemyAnimation blueprint, double click on the Mutant_Swiping animation.
This will open up a new editor.
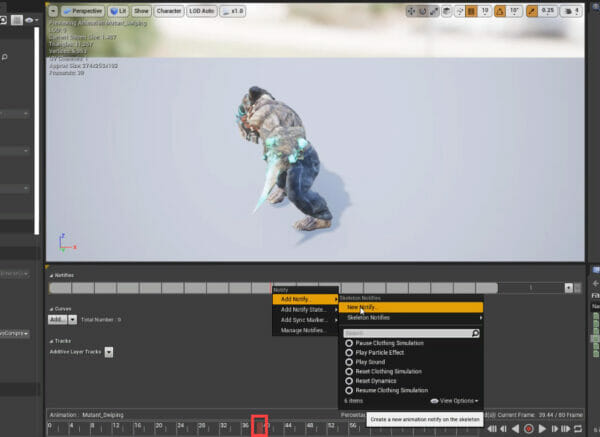
What we want to do here, is create a notify. A notify is an event call at a certain point in the animation timeline.
Drag the timeline to the frame you want to damage the player. In the notify bar, right click and select Add Notify… > New Notify… Call it Hit.
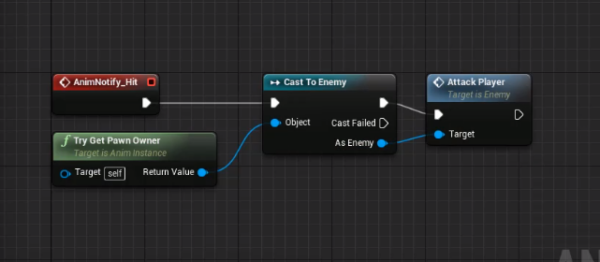
Back in the EnemyAnimation blueprint, we can right click and select the AnimNotify_Hit node.
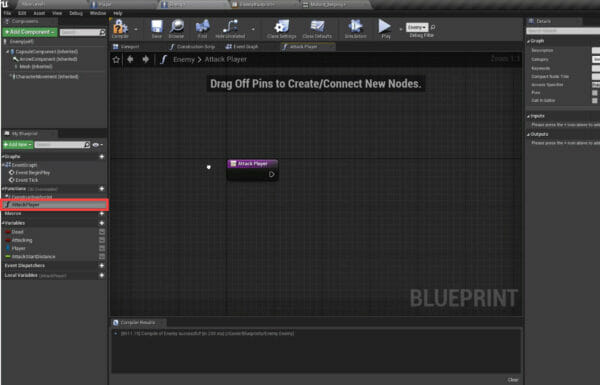
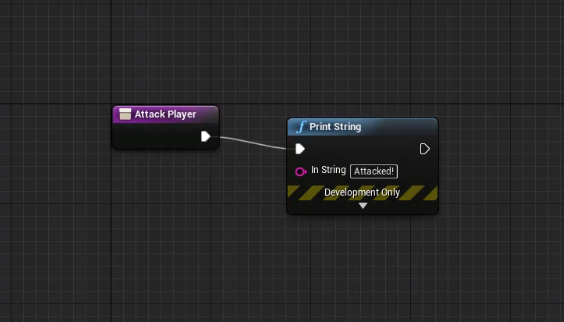
Over in the Enemy blueprint, let’s create a new function called AttackPlayer. This will be called when the animation hit notify is triggered.
In here, we can just print something to the screen for now.
So now back in the animation blueprint, we can call this function when the notify is triggered.
Press play and you should see the print node being called when the enemy attacks us.
Conclusion
Great job! Now you have successfully created enemy animations in Unreal Engine using animation blueprints and state machines. By implementing idle, running, attacking, and dying animations we have created a more realistic and engaging game experience. You can now apply these concepts to create more advanced animations in your projects, or experiment with other characters and objects in your game world.
Feel free to dive deeper into Unreal Engine concepts and explore more tutorials and courses available on Zenva Academy. Develop your game development skills further and bring your creative ideas to life!
We hope you’ve enjoyed this tutorial, and we wish you the best of luck with your future game projects!
Want to learn more? Try our complete DEVELOP A FIRST-PERSON SHOOTER IN UNREAL ENGINE course.
Did you come across any errors in this tutorial? Please let us know by completing this form and we’ll look into it!
FINAL DAYS: Unlock coding courses in Unity, Godot, Unreal, Python and more.


