In the last tutorial we finished adding the single player features of our Bomberman game. Now, we are going to make it a multiplayer game, using Unity’s multiplayer support.
In order to follow this tutorial, you are expected to be familiar with the following concepts:
- C# programming
- Basic Unity concepts, such as importing assets, creating prefabs and adding components
- Basic Tiled map creation, such as adding a tileset and creating tile layers
Did you come across any errors in this tutorial? Please let us know by completing this form and we’ll look into it!

FINAL DAYS: Unlock coding courses in Unity, Godot, Unreal, Python and more.
Table of contents
Assets copyright
The assets used in this tutorial were created by Cem Kalyoncu/cemkalyoncu and Matt Hackett/richtaur and made available by “usr_share” through the creative commons license, wich allows commercial use under attribution. You can download them in http://opengameart.org/content/bomb-party-the-complete-set or by downloading the source code.
Source code files
You can download the tutorial source code files here.
Did you come across any errors in this tutorial? Please let us know by completing this form and we’ll look into it!

FINAL DAYS: Unlock coding courses in Unity, Godot, Unreal, Python and more.
Network manager
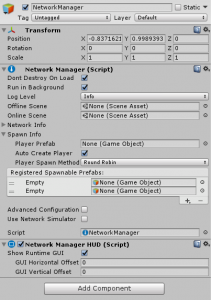
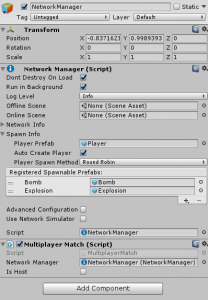
In order to build a multiplayer game in Unity we need an object with the Network Manager component. So, create an empty object in the Title Scene and add the Network Manager component to it.
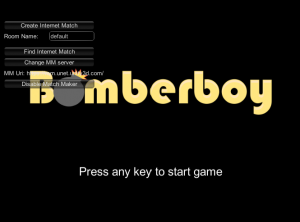
You can also add the Network Manager HUD component. This will show a simple HUD in the game that we can use to start multiplayer games. Later on we are going to create our own HUD buttons, but for now the Network Manager HUD will be enough.
By now, you can try playing the game and it should show the Network Manager HUD in the title screen. The next step is making this NetworkManager to create the multiple players in the game.
Creating the players
The NetworkManager component allows us to define what is the Player prefab in our game. This Player prefab will be created automatically by the manager every time a match starts. But before setting our Player prefab in the NetworkManager, we need to update some stuff in the Player prefab itself.
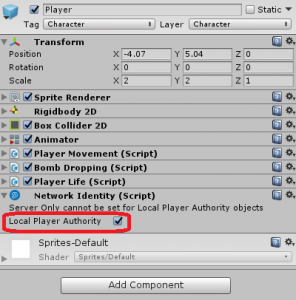
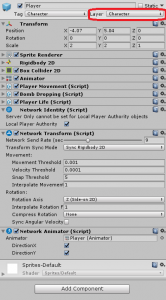
A prefab can be instantiated by a NetworkManager only if it has a NetworkIdentity component attached to it. So, let’s add one to our Player prefab. Also, the Player object should be controlled by the local players and not by the server, so we need to check the Local Player Authority box.
Now, let’s test our game and see if multiple instances of the Player are being created. But first, I’m going to explain how multiplayer works in Unity.
In Unity, there is no dedicated server for the matches. That’s because one of the players in a match acts as the server (besides being a client itself). The player that acts as both server and client is called a host in Unity. In order to play a multiplayer match, one of the players must start the match as the host, while the others join the match as clients. All game objects are replicated in all game instances (servers and clients), and all scripts are executed in all instances.
However, we can not open two instances of our game in the Unity editor. So, what we need to do is build an executable of our game and open it separately. You can do that by selecting File -> Build & Run in the editor. Then, we can start the other instance from the Unity editor.
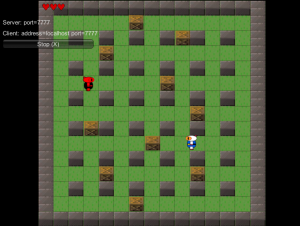
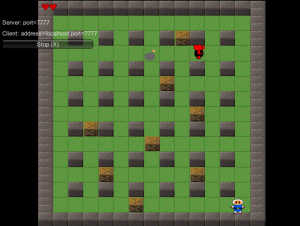
Try opening two instances of the game. In one of them click on the LAN Host button of the Network Manager HUD. In the other one click on the LAN Client button. This should start the game in both instances, with two player objects.
However, there are a couple of problems we still need to address:
- Both players are being created in the center of the screen. We want them to be created in predefined positions.
- If we try moving the player in one client, both players are moved, and the movement is not propagated to the other clients.
- Players should not collide among each others.
What we are going to do now is addressing all those issues.
Synchronizing player movement
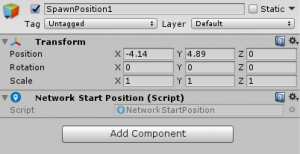
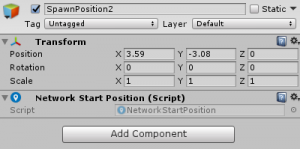
Let’s start by making the players to spawn in predefined positions. We can do that by creating objects with the NetworkStartPosition in the Battle Scene. So, let’s create two of them (we want a battle with two players). Put them in the positions where you want the players to spawn.
Now, the Player Spawn Method attribute of the NetworkManager defines how it will choose the positions to spawn the players. There are two policies:
- Random: the starting position of each player will be randomly determined based on the available ones.
- Round-robin: given an order of the starting positions, the first player will be created in the first position. Then, the second player will be created in the second one and so on in a circular fashion.
In our case, we are going to use the Round-robin policy.
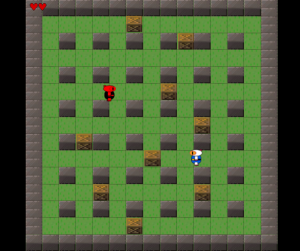
Now, you can try playing the game again, and the players should be created in the desired positions.
What we are going to do now is making sure each client can only move its own player, and that the movement is propagated through all clients.
We can make sure each client moves its own player by changing the PlayerMovement script. First of all, we are going to do something that will be necessary for every script that will use multiplayer features: we need to use the UnityEngine.Networking namespace and we need to make the script inherits NetworkBehaviour, instead of MonoBehaviour.
Then, we are going to change the script so that it looks like below. In the beginning of the FixedUpdate method (which controls the player movement), we are going to add an if clause that checks if this is the local player. This condition will be true for only one of the clients (the one that controls the player) and false for all the other ones. This way we can make sure that only one client will control each player.
Another thing we are going to add is implementing the OnStartLocalPlayer method. This method is similar to OnStart from the MonoBehaviour, but it will be called only for the local player. In this method we are going to set the color of the Player sprite to be red, so that each client can identify its own player.
using System.Collections;
using System.Collections.Generic;
using UnityEngine;
using UnityEngine.Networking;

public class PlayerMovement : NetworkBehaviour {

	[SerializeField]
	private float speed;

	[SerializeField]
	private Animator animator;

	public override void OnStartLocalPlayer() {
		GetComponent<SpriteRenderer> ().color = Color.red;
	}

	void FixedUpdate () {
		if (this.isLocalPlayer) {
			float moveHorizontal = Input.GetAxis ("Horizontal");
			float moveVertical = Input.GetAxis ("Vertical");

			Vector2 currentVelocity = gameObject.GetComponent<Rigidbody2D> ().velocity;

			float newVelocityX = 0f;
			if (moveHorizontal < 0 && currentVelocity.x <= 0) {
				newVelocityX = -speed;
				animator.SetInteger ("DirectionX", -1);
			} else if (moveHorizontal > 0 && currentVelocity.x >= 0) {
				newVelocityX = speed;
				animator.SetInteger ("DirectionX", 1);
			} else {
				animator.SetInteger ("DirectionX", 0);
			}

			float newVelocityY = 0f;
			if (moveVertical < 0 && currentVelocity.y <= 0) {
				newVelocityY = -speed;
				animator.SetInteger ("DirectionY", -1);
			} else if (moveVertical > 0 && currentVelocity.y >= 0) {
				newVelocityY = speed;
				animator.SetInteger ("DirectionY", 1);
			} else {
				animator.SetInteger ("DirectionY", 0);
			}

			gameObject.GetComponent<Rigidbody2D> ().velocity = new Vector2 (newVelocityX, newVelocityY);
		}
	}
}
You can try playing the game now, and each client will be able only to move one player. However, the movement is still not being propagated to the other client. We can do that by adding two components to the Player prefab: NetworkTransform and NetworkAnimator. The first component will send the Player position all clients according to the Network Send Rate attribute. The second one will synchronize the animations among all clients (you only need to set the animator of the object). Now, if you try playing the game, the movement should be synchronized correctly.
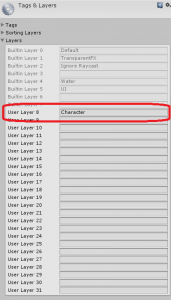
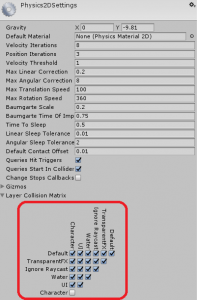
Finally, what we are going to do is making players to not collide with each other. We can do that by setting a Layer to the Player prefab and changing the Physics settings to disable collisions among objects of this Layer. You can create a new Layer by clicking on Add Layer on the object inspector. You can edit the Physics settings by clicking on Edit -> Project Settings -> Physics 2D Settings.
With that we have finished addressing the player movement issues. Now we are going to synchronize the creation of other objects, such as bombs and explosions.
Synchronizing bombs
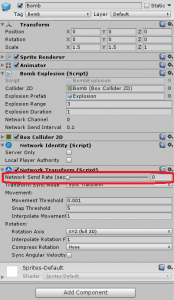
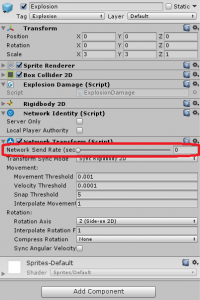
The first thing we need to do in order to create Bombs and Explosions is adding the NetworkIdentity and NetworkTransform components to their prefabs, as we did with the Player. However, after those objects are created, they do not move around the screen. So, we can set the Network Send Rate of both of them to 0, in order to reduce the network traffic.
Now, we need to change the BombDropping and BombExplosion scripts to work in a multiplayer scenario.
Let’s start by the BombDropping script. We want clients to drop bombs only from their own palyers, so we are going to check again if it is the local player before dropping the bomb.
Also, here we are going to make use of a new Unity multiplayer concept, called Command. A Command in Unity is a method that is always executed in the server. If it is called from a client, the client will send a message to the server asking it to execute the method. In order to turn a method into a command we must add a [Command] tag before the method, and the name of the method must start with Cmd.
The last thing we need to change here, is spawning the bomb in all clients after we instantiate it. We can do that using the NetworkServer.Spawn method. This method receives as parameter an object and creates a copy of this object in all clients. Notice that this method can only be called from the server (which is fine because we are calling it inside a Command). However, we still need to check if the NetworkServer is active before doing so. Finally, the BombDropping script should look like below.
public class BombDropping : NetworkBehaviour {

	[SerializeField]
	private GameObject bombPrefab;

	// Update is called once per frame
	void Update () {
		if (this.isLocalPlayer && Input.GetKeyDown ("space")) {
			CmdDropBomb ();
		}
	}

	[Command]
	void CmdDropBomb() {
		if (NetworkServer.active) {
			GameObject bomb = Instantiate (bombPrefab, this.gameObject.transform.position, Quaternion.identity) as GameObject;
			NetworkServer.Spawn (bomb);
		}
	}
}
Now, let’s update the BombExplosion script. Here, the only things we need to change is turning the methods into Commands and propagating the objects creation and destructions. So, turn the Explode and CreateExplosions methods into Commands (by adding the [Command] tag and changing their names). After instantiating each explosion object we need to call the NetworkServer.Spawn method, as we did with the bombs. Also, when destroying blocks (when an explosion hits a block), we need to call the NetworkServer.Destroy method, in order to propagate the object destruction among all clients.
public class BombExplosion : NetworkBehaviour {

	[SerializeField]
	private BoxCollider2D collider2D;

	[SerializeField]
	private GameObject explosionPrefab;

	[SerializeField]
	private int explosionRange;

	[SerializeField]
	private float explosionDuration;

	void OnTriggerExit2D(Collider2D other) {
		this.collider2D.isTrigger = false;
	}

	[Command]
	public void CmdExplode() {
		if (NetworkServer.active) {
			GameObject explosion = Instantiate (explosionPrefab, this.gameObject.transform.position, Quaternion.identity) as GameObject;
			NetworkServer.Spawn (explosion);
			Destroy(explosion, this.explosionDuration);
			CmdCreateExplosions (Vector2.left);
			CmdCreateExplosions (Vector2.right);
			CmdCreateExplosions (Vector2.up);
			CmdCreateExplosions (Vector2.down);
			NetworkServer.Destroy (this.gameObject);
		}
	}

	[Command]
	private void CmdCreateExplosions(Vector2 direction) {
		ContactFilter2D contactFilter = new ContactFilter2D ();

		Vector2 explosionDimensions = explosionPrefab.GetComponent<SpriteRenderer> ().bounds.size;
		Vector2 explosionPosition = (Vector2)this.gameObject.transform.position + (explosionDimensions.x * direction);
		for (int explosionIndex = 1; explosionIndex < explosionRange; explosionIndex++) {
			Collider2D[] colliders = new Collider2D[4];
			Physics2D.OverlapBox (explosionPosition, explosionDimensions, 0.0f, contactFilter, colliders);
			bool foundBlockOrWall = false;
			foreach (Collider2D collider in colliders) {
				if (collider) {
					foundBlockOrWall = collider.tag == "Wall" || collider.tag == "Block";
					if (collider.tag == "Block") {
						NetworkServer.Destroy(collider.gameObject);
					}
					if (foundBlockOrWall) {
						break;
					}
				}
			}
			if (foundBlockOrWall) {
				break;
			}
			GameObject explosion = Instantiate (explosionPrefab, explosionPosition, Quaternion.identity) as GameObject;
			NetworkServer.Spawn (explosion);
			Destroy(explosion, this.explosionDuration);
			explosionPosition += (explosionDimensions.x * direction);
		}
	}
}
Finally, since we turned the Explode method into a Command, we need to update the ExplosionDamage script accordingly.
public class ExplosionDamage : MonoBehaviour {

	void OnTriggerEnter2D(Collider2D collider) {
		if (collider.tag == "Character") {
			collider.gameObject.GetComponent<PlayerLife> ().LoseLife ();
		} else if (collider.tag == "Bomb") {
			collider.gameObject.GetComponent<BombExplosion> ().CmdExplode ();
		}
	}
}
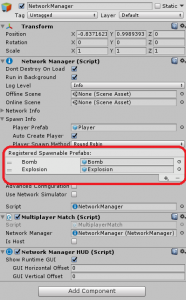
The last thing we need to do is setting the Bomb and the Explosion prefabs as Spawnable Prefabs in the NetworkManager. We can do that by adding them to the Spawnable Prefabs list of the component.
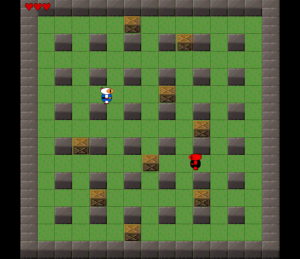
By now, you can try playing the game and creating bombs. Bombs should be synchronized among all clients, as well as their explosions.
Controlling player life
Until now, the lives of both players are being incremented in both clients. We want each client to show only its lives. We can do that by changing the PlayerLife script as follows. We need to add an if clause in the beginning of the Start method to check if this is the local player.
Since the lifeImages List is local for each client, we need the LoseLife method to execute only for the local players as well. Also, when the number of lives reach 0, we are not going to show a game over screen anymore, we are simply going to respawn the player to its initial position. The respawn method will also rebuild the lifeImages List. Notice that, in order to respawn the player, we need to save its initial position and initial number of lives in the Start method.
public class PlayerLife : NetworkBehaviour {

	[SerializeField]
	private int numberOfLives = 3;

	[SerializeField]
	private float invulnerabilityDuration = 2;

	private bool isInvulnerable = false;

	[SerializeField]
	private GameObject playerLifeImage;

	private List<GameObject> lifeImages;

	private GameObject gameOverPanel;

	private Vector2 initialPosition;
	private int initialNumberOfLives;

	void Start() {
		if (this.isLocalPlayer) {
			this.initialPosition = this.transform.position;
			this.initialNumberOfLives = this.numberOfLives;

			this.gameOverPanel = GameObject.Find ("GameOverPanel");
			this.gameOverPanel.SetActive (false);

			GameObject playerLivesGrid = GameObject.Find ("PlayerLivesGrid");

			this.lifeImages = new List<GameObject> ();
			for (int lifeIndex = 0; lifeIndex < this.numberOfLives; ++lifeIndex) {
				GameObject lifeImage = Instantiate (playerLifeImage, playerLivesGrid.transform) as GameObject;
				this.lifeImages.Add (lifeImage);
			}
		}
	}

	public void LoseLife() {
		if (!this.isInvulnerable && this.isLocalPlayer) {
			this.numberOfLives--;
			GameObject lifeImage = this.lifeImages [this.lifeImages.Count - 1];
			Destroy (lifeImage);
			this.lifeImages.RemoveAt (this.lifeImages.Count - 1);
			if (this.numberOfLives == 0) {
				Respawn ();
			}
			this.isInvulnerable = true;
			Invoke ("BecomeVulnerable", this.invulnerabilityDuration);
		}
	}

	private void BecomeVulnerable() {
		this.isInvulnerable = false;
	}

	void Respawn() {
		this.numberOfLives = this.initialNumberOfLives;

		GameObject playerLivesGrid = GameObject.Find ("PlayerLivesGrid");

		this.lifeImages = new List<GameObject> ();
		for (int lifeIndex = 0; lifeIndex < this.numberOfLives; ++lifeIndex) {
			GameObject lifeImage = Instantiate (playerLifeImage, playerLivesGrid.transform) as GameObject;
			this.lifeImages.Add (lifeImage);
		}

		this.transform.position = this.initialPosition;
	}

}
If you try playing now, each Client should show only the number of lives of its local player. As a challenge, you can try showing a message with the winner player when a player dies.
Creating matches
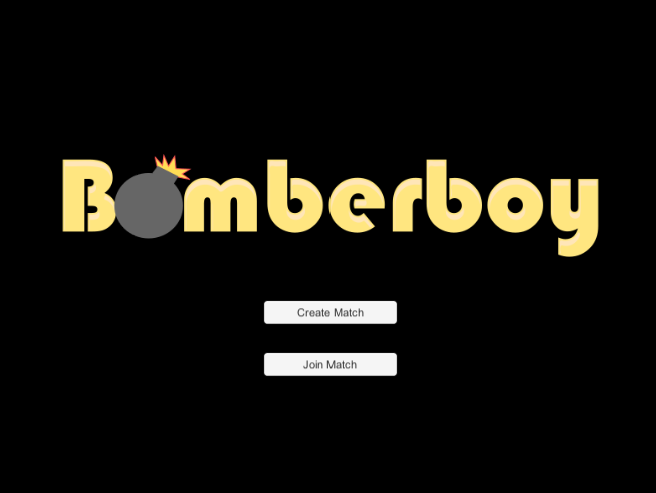
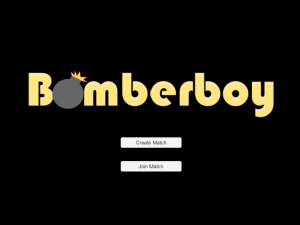
Until now we are using the Network Manager HUD to star the host and the match. What we are going to do now is removing this HUD and creating our own buttons to create and join matches.
First, remove the NetworkManagerHUD Component from the NetworkManager. Also, remove the StartGameText, since we are going to replace it by the buttons.
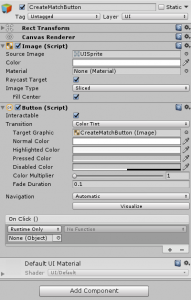
Now, create a new button (UI -> Button) called CreateMatchButton as a child of the TitleCanvas.
Now, we are going to create a new script called MultiplayerMatch and add it to the NetworkManager object. This script will be used to create and join matches, which we are going to do now.
First, let’s create the methods to create a match. The MultiplayerMatch script will have as an attribute the NetworkManager, in order to access its method. Then, in the Start we are going to call the StartMatchMaker method from the NetworkManager. This method will enable the match maker methods, used to create and join matches.
Then, we are going to add a CreateMatch method which will be called by the CreateMatchButton when it is clicked. This method will call the CreateMatch method from the match maker. The parameters are: the match name, the maximum number of players per match, a boolean that makes the match to be listed, and other parameters such as password an minimum elo, that we are not going to use. The last parameter is the callback, which will be called once the match has been created. In our case we are going to call a OnCreateMatch method.
The OnCreateMatch method will simply set the client as the host and load the Battle Scene. We still need to start the game as a Host, but we are going to do that after creating the button to join matches.
public class MultiplayerMatch : MonoBehaviour {

	[SerializeField]
	private NetworkManager networkManager;

	public bool isHost = false;

	// Use this for initialization
	void Start () {
		networkManager.StartMatchMaker ();
	}

	public void CreateMatch() {
		networkManager.matchMaker.CreateMatch ("match", 2, true, string.Empty, string.Empty, string.Empty, 0, 0, OnMatchCreate);
	}

	void OnMatchCreate(bool success, string extendedInfo, MatchInfo matchInfo) {
		this.isHost = true;
		SceneManager.LoadScene ("Battle");
	}

}
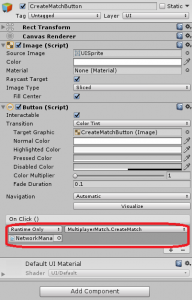
Finally, set the CreateMatch method as the callback of the CreateMatchButton.
Joining matches
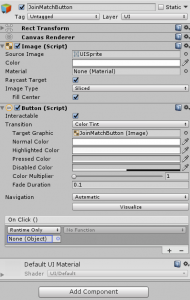
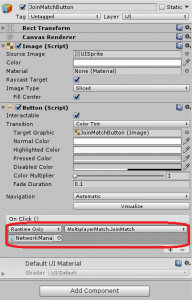
The first thing we need to do to allow players to join matches is creating a button for that. So, similarly to what we did for creating matches, create a button called JoinMatchButton.
Now, let’s create the necessary methods in the MultiplayerMatch script. First, create a JoinMatch function, which will be called by the JoinMatchButton. This method will call the ListMatches method from the match maker. The parameters of this method are: the matches page (in our case it is the first page), the number of matches (we only need one match), some filters and the last parameter is the callback (similarly to the CreateMatch method).
Now the callback will be the OnMatchList method. This method will actually call another method from the match maker: JoinMatch. The only important parameters here are the first and the last one. The first one is the match id, which we can get from the listed results. The last parameter is the callback again.
Finally, the last callback (OnMatchJoined) will simply load the Battle Scene. Now, to start the host and the client when the Battle Scene starts, we need two things:
- Making the NetworkManager persistent, which means it won’t be destroyed when loading a new scene.
- Adding a callback when a new scene is loaded, so that we can start the host and client when that happens.
The first thing is already done by the NetworkManager script, so we don’t need to worry about that. The second thing we are going to do in the Start method. This is done by adding a callback to the sceneLoaded event. The callback (OnSceneLoaded) will only do something when the Battle Scene is loaded. In this case, it removes the callback and checks if this is the host. If so, it starts a new game as the host. Otherwise it starts a new game as the client.
        void Start () {
		SceneManager.sceneLoaded += OnSceneLoaded;

		networkManager.StartMatchMaker ();
	}

	private void OnSceneLoaded(Scene scene, LoadSceneMode mode) {
		if (scene.name == "Battle") {
			SceneManager.sceneLoaded -= OnSceneLoaded;
			if (this.isHost) {
				networkManager.StartHost ();
			} else {
				networkManager.StartClient ();
			}
		}
	}

	public void JoinMatch() {
		networkManager.matchMaker.ListMatches (0, 1, string.Empty, true, 0, 0, OnMatchList);
	}

	void OnMatchList(bool success, string extendedInfo, List<MatchInfoSnapshot> matches) {
		networkManager.matchMaker.JoinMatch (matches [0].networkId, string.Empty, string.Empty, string.Empty, 0, 0, OnMatchJoined);
	}

	void OnMatchJoined(bool success, string extendedInfo, MatchInfo matchInfo) {
		SceneManager.LoadScene ("Battle");
	}
Finally, set the JoinMatch method as the callback of the JoinMatchButton.
By now, you can try playing the game with the Title Screen buttons, and it should still work as with the Network Manager HUD. You can also try using the other parameters of the match maker, such as creating matches with password, using an elo system or listing more matches so that the player can choose one.
And this concludes this multiplayer Bomberman tutorial. To learn more about game development Phaser, please support our work by checking out our Phaser Mini-Degree.
