Hello and welcome to the Lesson 2 – Operator, Variables and Data Types on our tutorial series Learning C# with Zenva.
Tutorial Source Code
All of the source code for this tutorial can be downloaded here.
In this lesson, we are going to see two most used types of operators: arithmetic and logical/relational. In addition, we are going to learn about some data types in C# and what is and how to declare a variable. Last but not least, we are going to work with the data type string.
OPERATORS
Let’s see how Logical/Relational operators work, considering A = 5 and B = 10
Now, considering A = 2 and B = 5
A + B = 7;
A – B = -3;
A * B = 10;
B / A = 2;
B % A = 1;
++A = 3;
– –B = 4;
DATA TYPES
A data type is a group of data with predefined characteristics in its value. Some example of these values are found on the table below:
Source: https://gamedevacademy.org/zero-day-java-guide-1-installation-and-hello-variables/
VARIABLES
A variable is a name given to a storage area that our programs can manipulate. It can be local or attribute of a class. To declare a variable, we need to specify its type and name (<data_type> <variable_name>). In addition, there are some access modifiers we are going to learn in this lesson that are not so important now.
Each programming language has its own rules for naming variables. Here we have rules for giving a name to a variable in C#.
- Variable names must begin with a letter of the alphabet;
- Variables may contain letters and the digits 0 to 9. Not allowed: space or special characters, for instance ? ! @ # + – % ^ & *() [] {}.’;:”/ and \.
- Variable names cannot be a Keywords belonging to C#. Example: continue, checked, public, return, etc;
- C# is case sensitive, it means that var1 != Var1. (!= means different).
It is time to write some code using what we have learned so far. We are going to write examples using the Arithmetic Operator. Logical and Relational operators will be used as examples in lesson 4.
Open Visual Studio Community 2015, go to File -> New -> Project.
Installed -> Templates -> Visual C# -> Windows –> Console Application.
Name: Operators;
Location: Choose a location to save your project;
Solution name: Operators. Click OK.
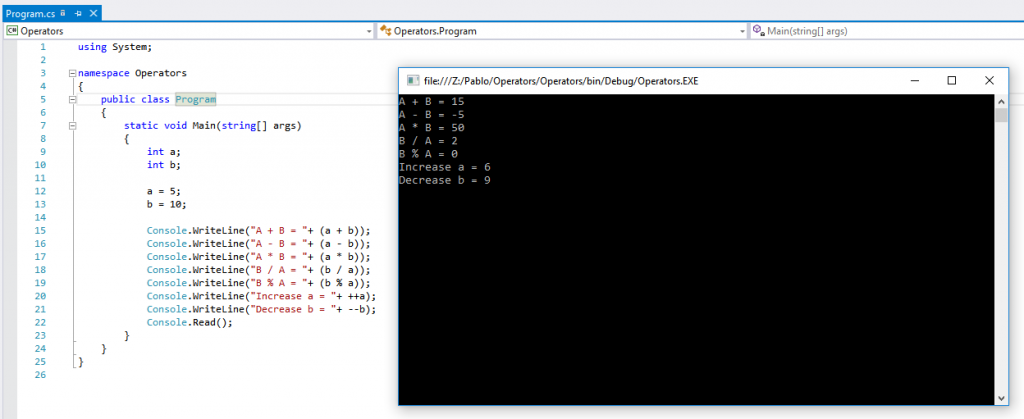
Write or copy and paste the code below into Visual Studio code area.
using System;

namespace Operators
{
    public class Program
    {
        static void Main(string[] args)
        {
            int a;
            int b;

            a = 5;
            b = 10;

            Console.WriteLine("A + B = "+ (a + b));
            Console.WriteLine("A - B = "+ (a - b));
            Console.WriteLine("A * B = "+ (a * b));
            Console.WriteLine("B / A = "+ (b / a));
            Console.WriteLine("B % A = "+ (b % a));
            Console.WriteLine("Increase a = "+ ++a);
            Console.WriteLine("Decrease b = "+ --b);
            Console.Read();
        }
    }
}
Understanding new code:
int a; int b; = declaring a variable of type Integer.
a = 5; b = 10; = initializing variables.
Console.Writeln(“A + B”+ (a+b)); = after the string “A+B” we add the “+” (plus) to concatenate to a variable. Also, we wrote (a+b) inside a parentheses to indicate that this action performs first, and then we concatenate with the string. If we had writing (“A + B ”+ a+b), the results would be “ A + B = 510 ”. The program would concatenate a and b, not sum them.
Console.WriteLine(“Increase a = ” + ++a); = increasing variable “a”.
Console.WriteLine(“Decrease b = ” + –b); = decreasing variable “b”.
To save our application, click on Save Program or press Ctrl+ S.
To run the application we simple click on Start or press F5. Let’s run our application: F5

STRINGS
The data type string is so powerful that has its own class and also has some methods. In Lesson 5 we are going to learn more about classes and how to work with methods. We will have a preview of these contents here, but it is not our focus now. So, let’s begin!
String Properties
As I mentioned above, the class string holds methods and properties. When we declare a string, we can have access to its properties by pressing dot and our IDE will show us what methods and properties are accessible to use.
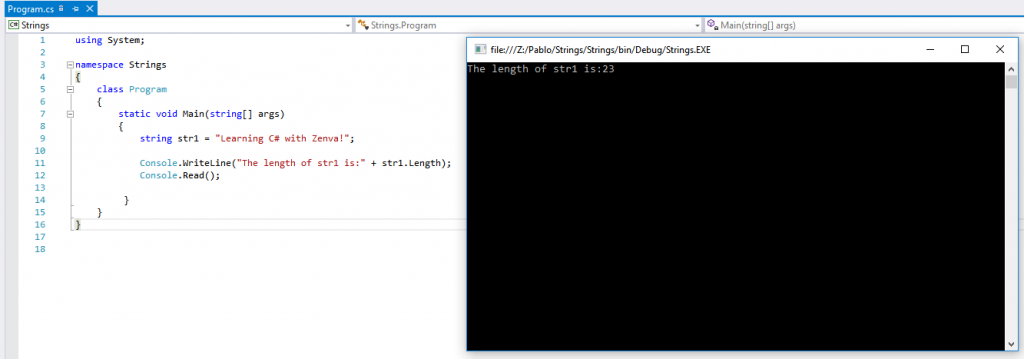
In the example below, we have chosen to use the property Length. This property gets the number of characters in the current string, including spaces.
Let’s write some code. Start a new project, name it Strings and write or copy and paste the code below.
using System;

namespace Strings
{
    class Program
    {
        static void Main(string[] args)
        {
            string str1 = "Learning C# with Zenva!";

            Console.WriteLine("The length of str1 is:" + str1.Length);
            Console.Read();
         }
    }
}
In this example, I declared a str1 type string and initialized its value with a string, because it will only accept strings. Press F5 to run our application.

Note that to access the properties from the variable, in this case, string type, after the name of the variable, we put a dot(.) to see its properties and methods. In our example, we access the property “Length”.
String methods
Below we have a few methods that we can use with the String class. Some of these methods, we are going to write a the code for them using the structure conditional ‘IF’. This structure we are going to learn in Lesson 3 which wraps the flow control in C#.
Compare: This method compares two strings if they are equals or not and return 0 if it is true, else 1 if it is false.
Concat: This method concatenate two strings and return as resulst both strings together.
Contains: This method verify if there is a(some) word(s) in the current string I passed.
Replace: This method substitute a string to another.
ToUpper: This method gets the string I am calling this method from and return the same string but now in uppercase.
ToLower: This method gets the string I am calling this method from and return the same string but now in lowercase.
Trim: Removes the space of a string.
The table below show us some examples using these methods we learnt above.
Let’s consider we have two variables type string: str1 = “Learning C# with” and str2 = “ Zenva.”;
Every method has a return. In italic is what the method returns and this returns will be explained in Lesson 5 – Methods, Exception Treatments, Classes and Object-Oriented
These are just a few examples of string methods. When writing code with the IDE Visual Studio, it shows us tips and how some methods, for example, work. Get used to started learning with Visual Studio too.
This is the end of this tutorial. I hope you have enjoyed and I see you in the next lesson!
Thank you!


