You can access the full course here: Intro to Game Development with Unity
Table of contents
Part 1
What is a Material?
- Materials define how an object looks in-game.
- Texture, transparency, color, reflectiveness, etc.
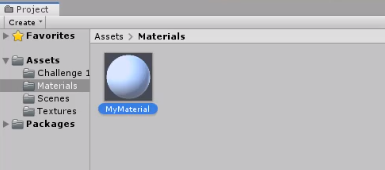
In the editor, let’s create a new Material (right click Project window > Create > Material) and call it MyMaterial.
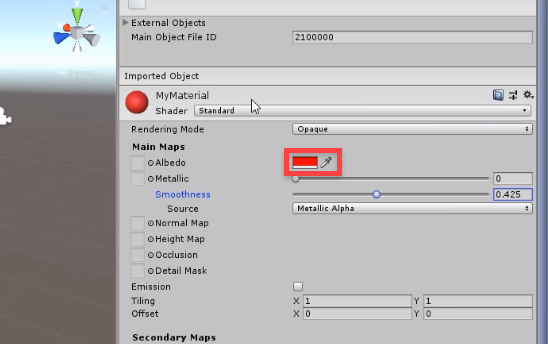
When we select the material, it’s properties open up in the Inspector. There’s a lot of properties to change, so for now let’s select the color box and change that to red.
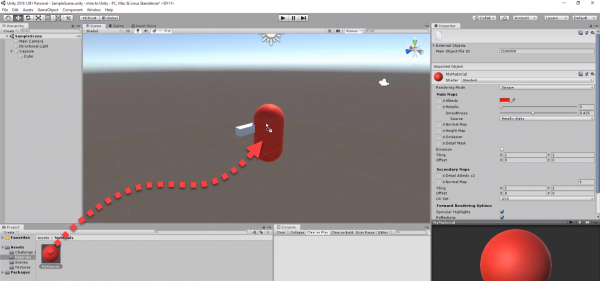
To apply a material to a model, simply drag and drop it on.
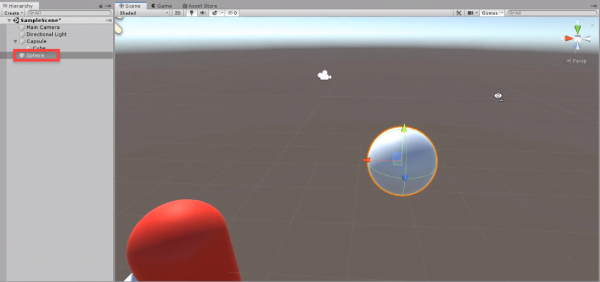
Create a new sphere object (right click Hierarchy > 3D Object > Sphere).
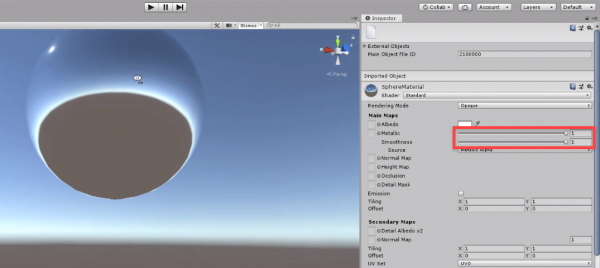
Then create a new material called SphereMaterial and assign it to the sphere. If you set both the Metallic and Smoothness sliders to 1, the sphere will turn into a mirror.
Next, create a new plane object and set its scale to 3.
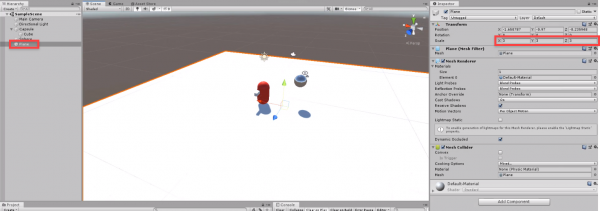
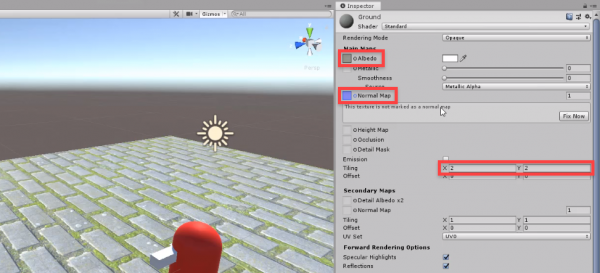
Create a new material called Ground and assign it to the play.
- Set the Albedo texture to the stone tiles texture
- Set the Normal Map texture to the stone tiles normal texture
- Set the Tiling to 2, 2
Part 2
Creating More Materials
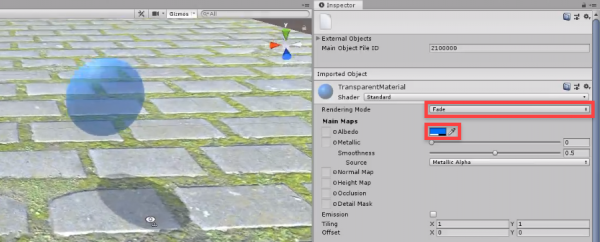
Let’s now look at transparency. Duplicate the sphere, then create a new material called TransparentMaterial and assign it to the new sphere.
- Set the Rendering Mode to Fade
- Set the Color to blue
- With an Alpha of 50%
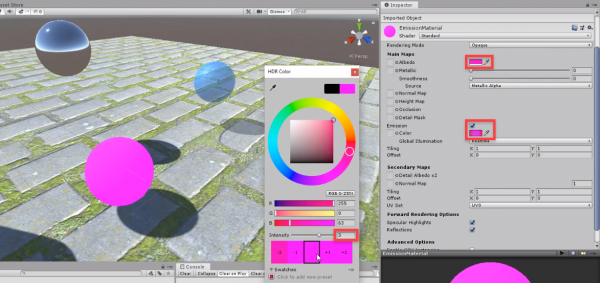
Let’s now look at emission. Duplicate the sphere, then create a new material called EmissionMaterial and assign it to the sphere.
- Set the Color to pink
- Enable Emission
- Set the Emission Color to pink
- With an Intensity of 3
Challenge!
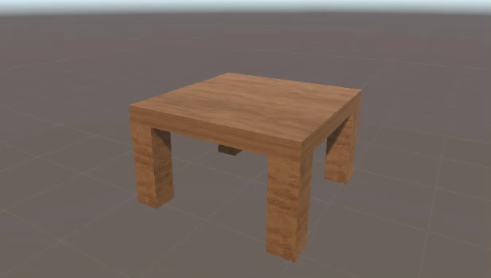
- Create a table using cubes.
- Then create a wood material and apply it to the table.
- Hint: you may want to create 2 materials as the legs will have a warped texture.
Completing the Challenge
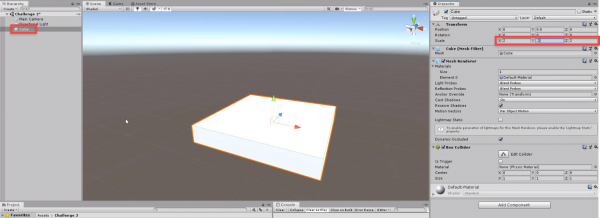
In the Challenge 2 scene, create a new cube.
- Set the Scale to 2, 0.3, 2
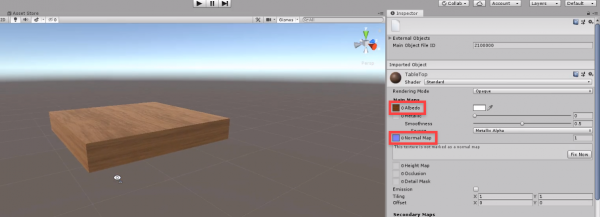
Create a new material called TableTop and assign it to the cube.
- Set the Albedo texture to the wood texture
- Set the Normal Map texture to the wood normal texture
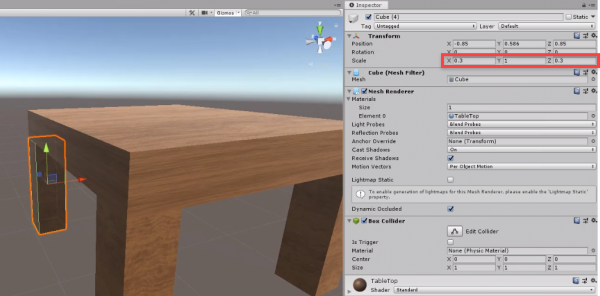
Now duplicate the table top 4 times for each table leg.
- Set the Scale to 0.3, 1.0, 0.3
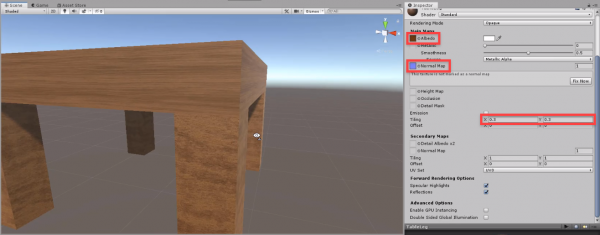
Create a new material called TableLeg and assign it to all of the legs.
- Set the Albedo texture to the wood texture
- Set the Normal Map texture to the wood normal texture
- Set the Emission to 0.3, 0.3
Transcript 1
Welcome back everyone. In this lesson we are going to be going over materials inside of Unity.
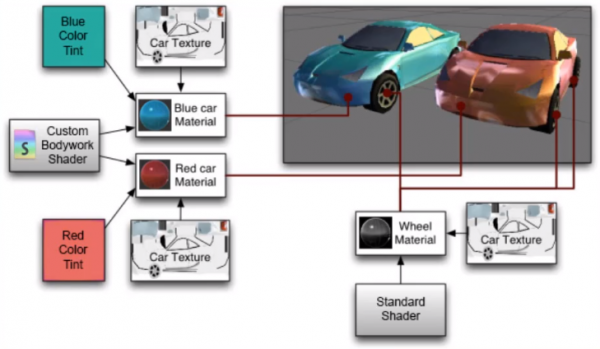
Materials define how an object looks in the game. They can define the texture of the object, the color, the reflectiveness, how transparent it is. In the example to the right, what we have is three different three different materials.
Now, a material in Unity is in asset that takes on the properties of something called a Shader. A Shader is a bunch of code that you can write which defines how the game engine renders an object on your screen. It takes into consideration the viewing angle, the lighting and a bunch of other properties such as color, texture. Runs that object through a specific shade and presents what it looks like to your screen. Unity has their own standard shader, which is what we’ll be using and that allows us to change many different things. We can add textures, color, transparency, emission a bunch of other features that is included on Unity’s standard shader.
On the example to the right here, we have three different materials that are being used to create the cars. We have the wheel material which is using a the Unity Standard Shader and a car texture. Then we have the blue car material which is using another car texture, a blue color tint and a custom bodywork shader that they have created. And yeah let’s hop into Unity now and create our first material.
Okay, so what we wanna do is go to the assets folder here and I’m gonna right-click and create a new folder. So, I’m going to right-click, go Create folder and I’m gonna call this folder, Materials. We can double click to open that folder and inside here, I am going to right-click, go Create and I can then select Material to create a brand new material. For this material, I’m just gonna call it, My Material and we have this material created now.
And on the right hand side, inside of this inspector we can see all of the properties that we can change. You can change the color by selecting this little color box here. You can change what the material looks like. And as you can see down here is a preview. We can click and drag this up to have a look at the preview here. So, we can change the color, we can change how metallic it is, you can change the smoothness, we can change the many things, we apply textures, emission. If you have a texture you can then do tiling and offset of that texture and a bunch of other stuff as well.
Now, if we look up here where it says, shader. We can select which shader we want to use on this material. So, I can select shader here and you can see there is a bunch. Unity, does come with a bunch of different shaders that we can use. Most of the shaders are specific for one certain aspect like shades for particles, for UI, for sky boxes, for sprites. So, we can go through maybe select one. Let’s go unlit and color. And this will create a solid color that we can choose right here. We don’t want this so let’s actually switch back to the standard shader by clicking right here.
And now how do we apply a shader to a model? Well, to do that I’m just gonna first of all change the color here to red and then we can drag this material this material asset on to whatever model we want in the scene. So, I can click. I can let go and as you can see this capsule now has the material. If you don’t wanna drag and drop materials on we can actually select the model and in the inspector under the mesh renderer component here we can open up the little materials tab and just set this material here. By clicking on the circle and selecting whatever sort of material we want from here.
So, we have material applied now. Let’s actually look through how these materials work and how we can change them to make them look like whatever we want.
So, first of all I’m gonna right-click here. I’m going to create a new 3D sphere. I can probably move it over here and now let’s create a another new material. So, I’m gonna right-click, go Create, I’m gonna go Material and I’m just gonna call this one our Sphere Material. Then I can drop and drag it on to here. We can’t see it yet because it is what it is the exact same as the default shader but if we change the albedo color here to let’s just say a yellow or a green, we’ll change it to a green. You can see that it looks green.
Let’s begin with the metallic slider. This determines how metallic the object looks like. How sort of metally it looks like. If we increase it more you can see that it’s starting to look more like a metal green ball. We can make that really less metallic or more.
The smoothness determines, when light hits this object how much reflection is there. If the smoothness is on zero then the light will hit it and there won’t really be any reflections applied to this. If we bring the smoothness up and more you can see that it starts to actually reflect the skybox, outside surrounding it. We can zoom in. We can see that, yes. This is the skybox because the light from the sky is bouncing on this sphere here and reflecting off. We can increase the metallic level then to make it even more prominent and so this kind of looks like a very metallic mirror ball almost. And if we change the color to white you can see that this does indeed start to look very very reflective.
Well, let’s just say you want a texture on something. Well, what I’m gonna do here is I’m gonna right-click, I’m gonna go 3D object and I’m gonna create a plane. Now, a plane is basically just one big flat model here. It’s just one flat face. We can maybe bring this down here maybe make it a bit bigger less at the scale to maybe three by three by three. So, it’s pretty large and what I’m gonna do is I’m going to right-click here, go Create, New Material and I’m gonna call this material our Ground.
Now, if you downloaded the included project files then you should be able to drag in a folder called Textures and inside of this folder here we have a stone texture as you can see here and we also have a normal map. And this sort of determines how light behaves when it hits it. It can add more depth and make it seem like the object is actually there interacting with your world.
So, what we’re gonna do is I’m gonna go back to my assets folder here, go Materials, click on my Ground and I’m gonna drag and drop it like so. To add a texture to a material. Where it says Albedo, I can click on the little circle to the left and I’m gonna select our stone underscore textures texture like so. And as you can see we now have that texture applied fairly quickly. I’m gonna bring the smoothness right down to zero so it looks a bit more like stone.
And we can actually set then the tiling as well. So, down here in tiling an offset I can increase the X to basically add more tiles and the Y as well to increase more along the Y. I’m gonna probably set this the two by two just so if there’s a couple more bricks there and the offset pretty much just offsets the texture. So, if you do want some sort of scrolling textures you can affect this in script but for us we’ll just keep it at zero for now.
We can also apply a normal map. These aren’t necessary but if you do want to make your textures look a bit better you can do so. So, we can click on little circle here next to normal map and I’m gonna select this stones underscore normal. It will sort of reload and as you can see these stones now look like they have a bit more depth and sort of reflect with the light a bit better. You might see that says, this texture is not marked as a normal map and that is because when you import a normal map you kinda do have to mark it as a normal map so it knows. So, we can just simply click on Fix Now and it will be fixed like so.
So, there we go we have our ground material, we have a metal sphere here. In the next lesson we’ll continue on with currents and materials. We’ll be looking at transparency and emission. So, I’ll see you in the next lesson.
Transcript 2
Welcome back everyone. In this lesson we are gonna continue on with learning materials inside of Unity. In the previous lesson, we created a red material for our little play here. We then created a metallic sphere, which reflects the environment. And we also created a plane here with a texture and normal map on it.
So, in this lesson, we are gonna be going over emission and transparency. Let’s start with transparency.
So first of all, I’m gonna select this sphere here, and press Ctrl + D to duplicate it, and I’m just gonna move it off to the side here. Maybe move it down a bit as well. And what I’m gonna do then is create a brand new material here, so I’m gonna right-click in the project window. Go to create, material, and I’m gonna call this one our ‘TransparentMaterial’. I can tell drag and drop that on, and first of all what I’m gonna do is change the rendering mode of the material.
As you can see right now, it is set to opaque. So this means pretty much we can’t see through the object, it is a solid object. We can click opaque, and we can change this to transparent. Nothing has changed yet, because we actually haven’t changed the alpha value, which determines how transparent it is. So we can click on the albedo color here, and just change the alpha value. At the moment, it’s at 100, so it’s 100% visible, but we can then move that down, and as you can see, we can slowly begin to look through our object. If we that to zero, then it’s not at exactly invisible, and that is because the transparent rendering mode is a bit different than what you might want.
And what you might want is actually the fade mode which we can select here. And that means that if it’s at 0%, it’s totally invisible, yet at 100% it’s totally visible. So we can put that probably about maybe 50, we can put it about there. And what we can do then is, let’s also change the color to something, we’ll make that maybe a blue, and yeah. As you can see we have our transparent object. We can see through it, we look at different things. And also, the shadow is transparent as well, or translucent actually. It’s less bright than the opaque objects.
Now, let’s create an object with something called emission. Inside of Unity, lighting is basically what illuminates the world, and right now we have our directional light up here. So it is here emitting light. Now, this directional light isn’t based on this position here. In fact the directional light, doesn’t matter where we move it, it doesn’t change. That is because, unlike a normal light, which when you move it, it changes basically what it’s looking at, this directional light acts as if it’s the Sun, so it comes from one direction, and the only way we can change the angle of the shadows, is by changing the rotation.
As you can see, it changes, objects get darker the higher up the Sun gets. When it gets down, it’s get dark. Now, Unity standard shader interacts with the light. It checks where it’s coming from, and where your viewing angle is to pretty much calculate what the object will look like, how much it will reflect. Is it darker on this side because it’s not in direct view of the light? Whereas over here, it is in direct view of the light, so it is brighter. And of course, there are shadows created. Now what emission does is make it so that an object looks as if it is glowing, looks as if it is emitting light, when in reality it’s not.
So what we can do, let’s duplicate this sphere here again. Move it over here, you can duplicate it with Ctrl + D. And what we’re gonna do is create a new material, so right click, create, material, and I’m gonna call this one our ‘EmissionMaterial’. I’m gonna drag and drop it on. Set smoothness down to zero, and I’m gonna set the albedo color to, let’s just say, a purple, and then we can scroll down, and here where it says emission, we can tick that, and it will open up with this here, a new color. Let’s click on the HDR, and I’m gonna change this color to something like so. Maybe make it a purple-pinky again.
And then we can do is increase the intensity here, So I’m gonna click the +1, maybe +2, and as you can see, this object is now illuminating light. Now it’s not really illuminating light. It just visibly looks like it’s illuminating light. If you wanted to create, for example, a light bulb, you would have a light bulb object, and you would have a emission on that, so it looks bright, no matter of the environmental lighting, and then you probably have a light component attached to it.
So, let’s actually go to our directional light, and disable it. You can disable or re-enable objects by clicking on the little tick right here, next to the name of the object, so if I click that, the directional is disabled. All the other objects here, they look much darker, because there is no light on them, whereas our emission material object here, it looks exactly the same. You see, we can toggle on and off the directional light, and nothing is changing for that. That is because this emission here does not really care what the outside light is doing to it. It is emitting its own light on the material, irrelevant to whether or not there is light on it, whether or not it is in shadow, or anything like that.
OK, now let’s have a challenge. I want you to create a table using cubes, and then create a wood material, and apply it to the table, with the included wooden texture.
So, if you go to the asset window. You should, if you download the included project files, have a folder called ‘Challenge 2’. Just drag that into the project window here, and inside we have a ‘Challenge 2’ scene, we can open that up, and we have a wood texture, and wood normal map. So, create a table with four legs, and apply these materials to the table. So check back in once that’s done.
OK, hope you gave that a shot.
Now, what I’m gonna do is show how to do it. First of all, here in the hierarchy, I’m gonna right-click, go create 3D object, cube. I’m gonna set the cube’s position to zero, zero, zero, maybe 0.5 on the Y. I’m gonna set the scale now to maybe two by 0.5 by two. Actually, we’ll set that to 0.3 on the Y, so it’s a bit thinner. And down here in the project window, I’m gonna right-click, go create, material, and I’m gonna call this one ‘Wood’. Actually I’m gonna call this one our ‘TableTop’.
We can then drag this ‘TableTop’ onto the table there, and I can tell drag in our wood texture to the albedo little box here. Drag the normal map into the little normal map box here, and there we go. We got our table material here all set up. I can actually set the smoothness right to zero if we wish. I’ll keep it there, 0.5.
Now, for the legs, I’m just move this up a bit. I’m gonna go Ctrl + D on this top here, and for the scale, I’m gonna set this to 0.3 by 1 by 0.3. We could also use, to move it around, we can just do it like this, or we could use vertex snapping. So I’m gonna press V, go to the top right corner here, click, drag and, actually no, top left here. Click, drag ’till it snaps to there. Ctrl + D, do the same, like so. Ctrl + D, press V to go to vertex snapping. Move it over there, and do the exact same over here as well, whoops. And do the exact same here as well.
So there we go, we got our table, but you might notice that the legs look a bit weird, and that is because if you use a single material on an object that has, on multiple objects that have different scales, then the material can be warped. So if I press R for example, and move this, you can see that this material stretches.
Now, let’s just say we’re back here. We can actually create another material, so we’ll go create, material, and I’ll call this one our ‘TableLeg’. We can drag in our wood texture, again to the albedo, normal map into the normal map, and drag this into our legs. Now, at the moment it’s the exact same. It’s not gonna look too different right now. We can drag it in like so. But we can do is down to our tiling here, and reduce the X of it, ’cause right now we’re having the entire texture spread across the face of the model here. So we can reduce this down a bit, so it looks a bit move like the wood, maybe about 0.3, and then on the Y, we’ll also put that at 0.3. So as you can see, these legs now have a bit more of a uniform shape to the texture.
It’s not squished any more, and we have our wooden table complete and ready to go. In the next lesson, we are going to actually make a start on programming inside of Unity. Learning the C# programming language, and get in to actually start scripting. I’ll see you all then, in the next lesson.
Interested in continuing? Check out the full Intro to Game Development with Unity course, which is part of our Unity Game Development Mini-Degree.
