You can access the full course here: Develop a Puzzle Platformer Game
In this lesson you will learn how to set up the character controller by importing the Standard Assets that Unity provides and use it in a simple scene with a ground object.
Table of contents
Creating the Project
You will want to create a new project. If you are using the latest updates, this will be in Unity Hub 2.0, with Unity version 2019.2.0a11 or the beta version 2019.2.0b3. You should be able to do this with an earlier version as well, but it is always recommended to use the latest versions.
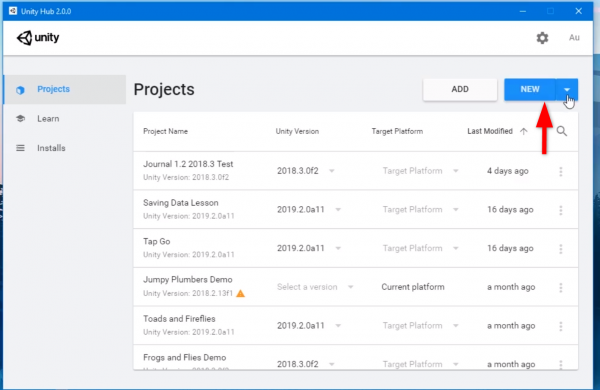
Click on the New button in Unity Hub.
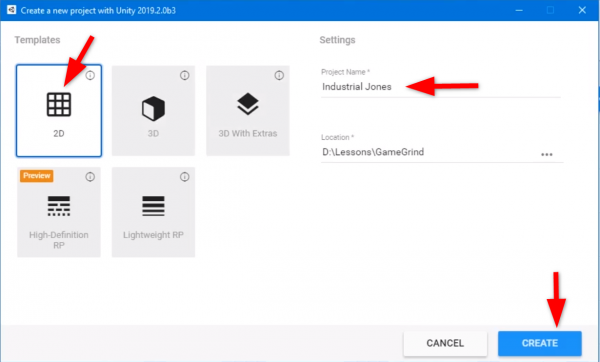
Set a name for the project. This course will be using “Industrial Jones” but this doesn’t affect anything. Select the 2D option. This will have Unity set up the project with some 2D settings, though this can be changed later on. Then click on the Create button.
Importing the Standard Assets
In the Unity editor, you should see three windows in the middle, Scene, Game, and Asset Store. You’ll need to add the Standards Assets to this game, so go to the Asset Store window. In the search menu, type in “standard asset”, then select the first option. It will look like this:
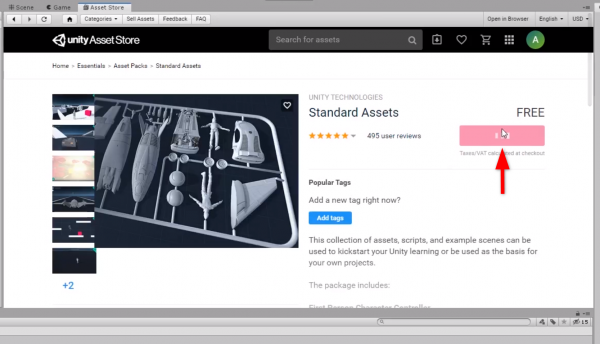
Click on the button that says Import and wait for the download. This will include a number of different packages. You are only going to need the 2D character controller for this game.
When it has finished downloading, a new window will pop up to allow you to select what you want. Uncheck the SampleScenes box at the top, and then check uncheck everything except 2D, CrossPlatform, and the CrossPlatformInput of the Editor section.
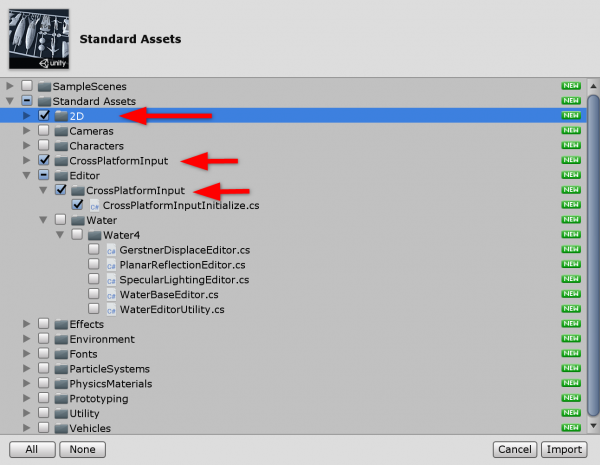
Click on the Import button when you have the right things selected. You’ll get a few errors in the Console, but these can be ignored.
Adding the Ground
In the Hierarchy panel, on the left side of the screen, right click and select 2D Object and then Sprite.
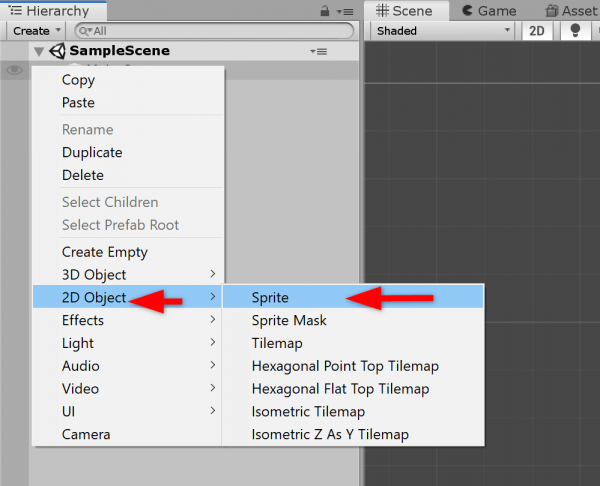
This will add a New Sprite object in the Hierarchy. Change the name to Ground. This can be done in the Inspector or by pressing F2 when the object is highlighted.
In the Inspector, select the small circle by the Sprite field to change the sprite. This will open a new menu where you can select a sprite. Choose PlatformWhiteSprite.
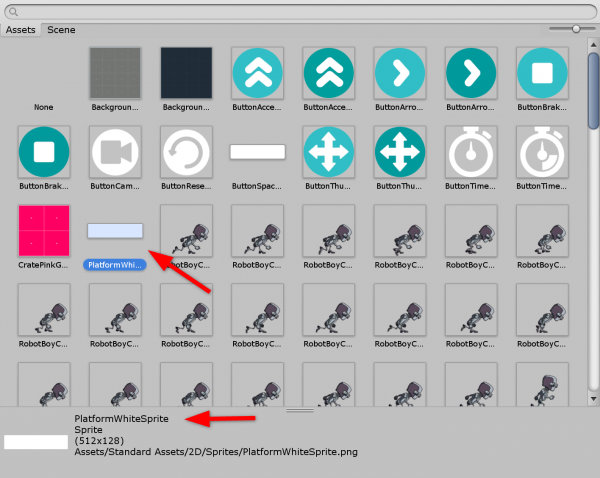
Click on this sprite, then press the T key to get the Rect Tool. You should now have 4 small blue circles on the corners. Use these to resize the platform, making it longer and fairly narrow. Or you can change the Scale in the Inspector. Either option works fine.
Now you’ll want to add a new component. In the Inspector, click on the Add Component button and type in Box then select BoxCollider2D.
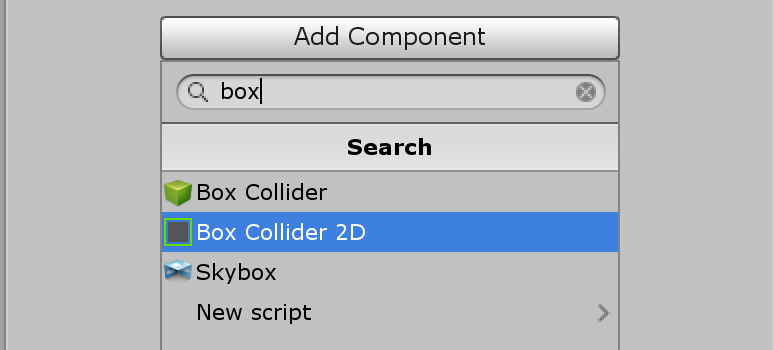
This will allow the platform to collide with the player.
Adding the Player
Now that you have the ground set up, you can add the player to the game. Go to the Standard Assets folder, then to 2D, then to Prefabs. Select the CharacterRobotBoy and drag it into your scene.
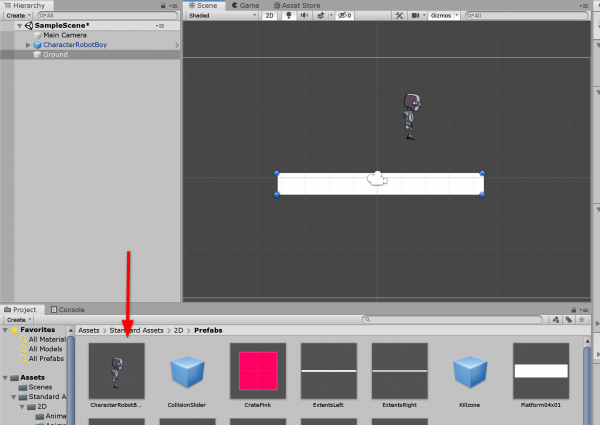
Change the name of this object to Player.
The next step is to make a new folder. Right click in the Project window while in the main Assets folder, go to Create, and then select Folder. Name this folder Prefabs. Then drag the Player object into this folder. You will get a prompt asking if you want to create a new Prefab or a variant. Choose Original Prefab.
Now if you click the Play button, your character should fall to the platform and you should be able to move around with the WASD or arrow keys and space will jump.
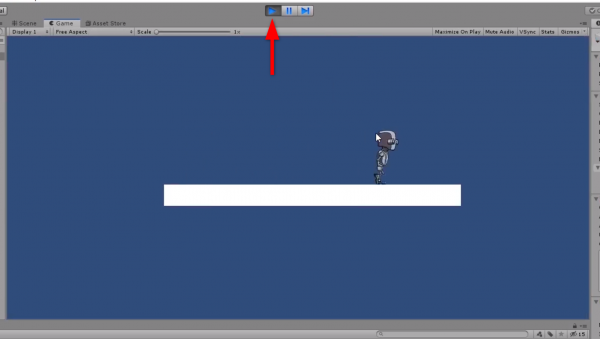
You now have a playable character in your scene. Feel free to add some more objects if you want to do more. In the next lesson you will be creating the first level.
Make sure to save your scene before moving on.
Transcript
Hey guys! In this first lesson, we’re going to set up our character controller – which is going to require that we import the Standard Assets that Unity provides for us to use that platform character controller. And we’re going to get it set up in our scene with a simple little ground object just so we can get our player up and running so we can get started making our game.
We’re going to start from a blank project here. I am In Unity Hub 2.0, which looks a little different than 1.9 and back, but overall it’s just the same process here, I’m gonna create a new project and I’m gonna create it in the latest beta version available to me which is 2019.2. And I’m going to create a project called Industrial Jones, and it’s gonna be a 2D project. Now this doesn’t necessarily matter here, but it’s just gonna set up our project with some 2D settings that we can change ourselves if we wanted to later on. Then click create project.
So in our blank project, I’m just gonna make sure I’m on the same layout by going up to Layout and going to Default so we have the exact same set up here, and what I want to do is go over to the Asset Store tab. And we’re going to find the Standard Assets that Unity provides by just saying standard asset. And we’re going to download and import these into our project.
Now this includes a few different packages that we do not need. We only want the 2D character controller that gets our platformer up and running very quickly. So what I’m gonna do is I am going to go through them. I don’t think I need any of these scenes, so I’m just gonna turn off sample scenes entirely.
And in Standard Assets I do not care about let’s just collapse all of this here, I don’t want vehicles, utility, prototyping, physics materials, particle systems, fonts, environment. And in the editor, I do not want the water – I do want the cross-platform input though. We do not need the characters folder, it’s just 3D stuff. So we’ll import the entire 2D folder, cross-platform input, and the editor for cross-platform input.
Now we get an error for that, but that’s fine. We can just clear that out and right click and create a 2D object sprite. It’s just gonna be our ground object for now something for us to walk on. So I’m just gonna change the sprite to let’s see, we’ll just make it, doesn’t really matter just a platform just like that, and we’ll just stretch this out here. Just something to walk around on for now. In the next lesson, we will create an entire level based on tiles.
I wanna add a component to this that is going to be a Box Collider 2D. So we can collide with the platform with our player. And speaking of our player, let’s go into our 2D Standard Assets folder here, and I wanna go to Prefabs. And we have some stuff in here, but all I care about is breaking out my character controller and dropping him right inside my scene. And I wanna name this guy Player. Just like that.
And what I, in fact, wanna do, is I wanna create a new folder in my assets folder here, and I wanna call it Prefabs. I wanna have my own separate prefabs from the Standard Assets, and I’m just gonna take my player drag it into Prefabs. And I wanna create an original prefab. Now we could create a prefab variant, which means the base changes of our original prefab would still affect this guy, but we could add changes on top of that. But I just wanna create an entirely new prefab that I have complete control over just like that.
And now watch it happen here – if I were to click play my guy should fall and land on the platform. There we go, and I can just use my WASD or my arrow keys or a controller to move this guy around and Space to jump. Now it’s a very floaty jump and we can get into tweaking all that later on, but for now our guy is running around in our scene. Pretty cool.
So in the next lesson, guys, we’re going to start building our first level. It’s gonna be a very simple level with just some ground tiles and some wall tiles and then, later on, we’ll add in hazards. And then we’ll add in enemies and we’ll add in keys and doors and just all kinds of really fun stuff. So my name is Austin, and I will see you in the next lesson.
Interested in continuing? Check out the full Develop a Puzzle Platformer Game course, which is part of our Unity Game Development Mini-Degree.
