You can access the full course here: Turn-Based Game – Multiplayer Projects
Table of contents
Part 1
Folder Structure
In the Unity project, let’s setup our folders in the Project window. Create the following folders:
- Resources
- Sprites
- Scenes (if you don’t have it)
- Tilemap
Scenes
Now we need to create our two scenes: Menu and Game. In both scenes, we need to change the camera from a 3D one, to a 2D one.
- Set the Projection to Orthographic
- Set the Clear Flags to Solid Color
- [Game scene camera] Set the Size to 4 (not seen in image)
- [Menu scene camera] Set the Background color to a muddy-green (not seen in image)

Tilemap
In the Game scene, we want to setup a tilemap in order to create our background. Right click the Hierarchy and select 2D Object > Tilemap. You should now see a grid appear in the scene view.

In order to paint on the tilemap, we need to open the Tile Palette window (Window > 2D > Tile Palette). Then click on Create New Palette and call it whatever you want.

With that created, we can now drag in the grass sprite. It will ask you to save the asset.

Now we can select the paint brush icon and the grass sprite and begin to paint. Cover the bounds of the camera with tiles.

In order to create an actual “grid” appearance, we’re going to change the size of the grass sprite. Select the sprite and set the Pixels Per Unit to 66.

We can then change the Background color of the camera to whatever the grid lines should be. I’m going to choose a dark green so that it blends in with the background but still stands out.

Sorting Layers
Let’s now create some sorting layers as we are working with 2D. Click on the Layers dropdown in top right corner of the screen and select Edit Layers… Here, we want to add 3 sorting layers.
- Background
- Unit
- UI
Select the Tilemap object (child of Grid) and set the Sorting Layer to Background.

Part 2
Remote Procedure Call (RPC)
A Remote Procedure Call (also known as an RPC), allows you to call functions on other player’s computers. If you shoot a player on your computer, you would send them an RPC, telling them that you hit them. You can tag a function as receiving RPC’s, by adding the [PunRPC] attribute. As well as being able to send an RPC directly to a specific, you can also send these to a group or types of players in different ways. These are known as RpcTargets.
- All sends the RPC to everyone in the room, calling it instantly on the sender’s computer.
- AllViaServer is the same as All, but doesn’t call it instantly on the sender’s computer.
- Others sends the RPC to everyone but the sender.
- MasterClient sends the RPC to the master client.
- AllBuffered is the same as All but caches the call for new players who join the room.
- AllBufferedViaServer is the same as AllViaServer but caches the call for new players who join the room.
- OthersBuffered is the same as Others but caches the call for new players who join the room.
PhotonView
A PhotonView, is a component which identifies an object across the network. How does Photon know which objects are the same thing across different player’s computers? GameObjects have an instance ID, but these are randomly generated and will be different on other computers. So a PhotonView, makes a connection to the network and is also required in order to receive RPC’s. Things like the network manager, players, units, game manager, etc. Anything that interacts with the network, needs a PhotonView.
Transcript 1
Welcome, everyone. My name is Daniel Buckley, and I’ll be your instructor for this course. Let’s have a look at what we’ll be making.
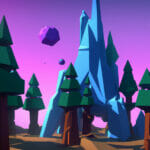
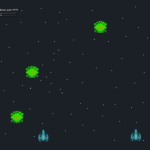
We are going to be creating a 2D top-down turn-based strategy game using Unity. This, of course, is going to be multi-player, as well, and it is going to be a one V one game. As you can see here each player can take their turn to move their units and, in a turn, each unit can either move or attack. Each unit also has a set movement distance and a set attack range which is the maximum for that unit. And also when you click on a unit you can see its statistics and as you can see in here the movement the units are moving towards each other and where they will begin to attack. Okay.
Now let’s have a look at how we’ll be creating this. We will be using the Photon Unity Networking framework. This is a free multi-player framework for Unity, and since Unit is now deprecated, this is probably the number one solution. We’ll be creating some units. Each unit will be able to move and attack and each unit also has a max movement and attack distance and they can choose to either move or attack each turn. And as you can see here we have two types of units and really all this involves in creating two types of units is just to change the properties inside of the inspector, just changing the sprites and changing the values for the movement, attack, and speeds and such.
In order for two players to get together to play a game, we will be creating a lobby system. This will involve the player entering in a name and then clicking play game, and what this will do is it’ll either create or join a room. If there are no rooms available, the player will create a room and wait for another player to join. If there is a room available, it’ll pick a random room and join that one.
This will all be done using Unity’s UI system. We’ll be working with canvases, text elements, buttons, input fields, and more. As you can see here, we have quite a few different UI elements, and we’ll be going over each of them explaining how they work, how we can change them, how we can connect them up to a script, and also with anchoring and positioning on the screen.
Zenva is an online learning academy of over 400,000 students. We feature a wide range of courses for people who are just starting out or for someone who just wants to learn something new. The courses are also very versatile. You can choose to follow along with the included project files or even follow along with the included lesson summaries. So you can choose to watch lessons, read them, follow along, or really whatever you want.
Thank you very much for watching. Now let’s get started on our project.
Transcript 2
Welcome back, everyone. In this lesson we are going to be setting up our project.
First of all, let’s set up our actual project folder structure. So down here in our project window, what we want to do is create a new folder, and this folder here is going to be called our Sprites. And this, of course, is gonna hold all of the sprites for our game. Now, we can also create another folder, and this folder is going to be called Tilemap. Because for the background of the map, we are just gonna be using Unity’s Tilemap tools to do that.
And what else we need is one more folder called Resources. And Resources is where we’re gonna be storing all of our Prefabs that we’re gonna spawn in. And the reason why we don’t- not resource, resources – and the reason why we don’t put this in a Prefabs folder is because Resources is a folder that Unity can actually identify and access. And the reason why we need that is because Photon to instantiate an object, you don’t actually instantiate it by a Prefab, you instantiate it by Prefab path, in the Resources folder. So everything that you want to instantiate over the network, you need to put in the Resources folder. So that’s what we’re doing there. Okay.
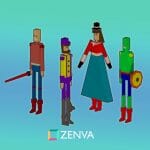
Now let’s go inside of our Sprites window here, in our Sprites folder. And what we need to do is import a few of our Sprites. The first one is going to be our cursor selector. This is gonna be what appears on the grid to show you which tile you’re selecting. We also need our- we also need our soldiers. This is gonna be one of our units. And then we also need our tanks. This is gonna be our other unit.
We also then need our tile, which is going to be the grass tile that we’re gonna be using. You can choose to use whatever tiles you want. And finally we need a white square, and this is gonna be for the health bar. Now with these five assets here, these are actually using free artwork by Ken, who actually has a wide range of free assets on his website. There will be a link down in the lesson summary to that.
Okay, so first of all what we need to do is actually convert these sprites into something we can use. ‘Cause right now, they are actually set as material. Not materials, but actually as normal textures. But we wanna convert these to Sprites. So let’s select all of these here, and up here in texture type, we want to change this from default to Sprite 2D and UI. Now you can click on the apply button and you should see they now fit to their proper aspect ratios.
Okay, but there are a few things we also need to do, and that is changing the pixel ratio. For the tile grass one here, what we need to do is change the pixels per unit here to 64. And that is because there is 64 pixels horizontally and vertically here. And what we’re gonna do is we wanna make it pretty simple, we wanna make it so that this tile here is one by one unit’s large. Just makes it much easier to work with. So we’ll click apply.
And we actually wanna do the same thing for the soldier and the tanks. So we’ll select all those, change their pixels per unit to 64. Hit apply as well. And for our cursor selected, what we want to do is also do this for 64 as well. Because as you can see down here, this is also a 64 by 64 image, so we’ll do that too. Hit apply. And that should pretty much be it.
Now what we can do is actually go create our scenes. So in our scenes folder here, it should be already pre-built by Unity. We can click the sample scene here. And create a new scene and we’ll call this one Menu. And then we can also create another scene and this one we’ll call Game. Now let’s open up the Game scene. I don’t save the Sample scene. And inside of here what we want to do is create our Tilemap. So, to create a Tile map inside of Unity, which is basically just a bunch of tiles that Unity meshes together in one large sprite.
Actually first of all what we want to do is change our main camera and put it into more of a 2D mode, ‘Cause right now this camera is set for 3D. So what we can do is select the camera and change the projection here from perspective over to orthographic. And what this is, this basically is the difference between capturing depth with perspective, which is what you’d use for 3D. Objects that are further away become smaller. Where as we want orthographic, which means that no matter the distance away the object is, it maintains the same size.
With that then we can also change the clear flags from Skybox to Solid Color. And this makes it so the background is a solid color. We’ll be getting into this a bit more detail later on when we actually get our tile set up, but for now we’ll just leave it for this blue here. And everything should be all right.
So, to create our tiles what we want to do is right-click on hierarchy, go 2D object, Tilemap. Now if we go to the Scene view now you’ll see if we click on this 2D icon up here, this will take us into 2D mode. We should see that if we clicked our grid, we now have a bunch of little squares that we can draw into. But in order to draw in these squares, we need to open up the Tile Palette window.
So let’s go to Window, let’s then go down to 2D, Tile Palette. And this will open up this window here which allows us to create a new palette. Let’s actually do that now. So click on Create New Palette. And we’ll call this one here TurnBasedBackground. Let’s click Create. It’ll ask us to save it somewhere, and we want to save this inside of our Tilemap folder here. Select that folder, and it’ll create it.
Now in order to actually add tiles, let’s go our Sprites folder, and drag in the Tile grass one. It’ll ask us to create it as an asset. We’ll go back to our Tilemap folder and just click save. And there we go. We now have this tile that we can draw with. So if we go into the Scene view here, we can begin to actually draw. If you have this brush here selected, this is the brush tool, we can then start painting.
But you might notice that this is fairly large, and we actually wanna reduce the size of this, of the map. Just so it’s a lot smaller. You can choose of course to make it larger. We’re gonna make it a bit smaller now, so it’s a lot more concise and we can get into battle quicker.
So we’re gonna click on the main camera, and change its size from five down to four. The orthographic size is basically how much, how many units are from the center of the camera to the top and bottom of the frame. So you can see they’re right now four tiles from the top to bottom. So it’s eight in total in the height. And what I want to do is select our grid again, and let’s just fill this in with the green tiles. There we go, it’s finished. I had to put the tile out here a bit more, since they did kinda cut over the edge of the camera.
And also with this game, we are gonna be making it for a 16 by nine aspect ratio. You can, of course, choose to make it whatever aspect ratio you want, but 16 by nine, that’s good for 1080p screens. Pretty much any sort of monitor will be able to run this in 16 by nine.
And yeah, so if we go into Game view now, we can see that our scene is filled with these green tiles, and we’re ready then to start making our game.
Apart from this though, what we need to do is we can close this Tilemap, Tile Palette window off now. And what we want to do is actually go to our Menu scene, and we’re just gonna set that up for 2D as well.
So, we’ll save the Game scene. Go to the Menu scene. And if you look in the Game view, you can see that once again this camera is still built for 3D mode. So let’s change that from perspective to orthographic. Skybox to Solid Color. And let’s exchange this background color to something, we’ll change this to like a green. To show that it’s sort of part of this military sort of themed turn-based game.
And speaking of backgrounds, let’s actually go back to our Game scene. And you might want to notice that there is no grid, because in this sort of game that’s grid-based, you might want a grid here that actually divides the tiles up so you can see exactly how many tiles away you are from something. And to do that what we’re gonna do is click on, not our grid here, let’s go to our Sprites. And what we can do is actually change this pixels per unit here from 64 over to something for example 65. Click apply. And it makes the Sprite slightly smaller, to show that it’s visible like that. Let’s actually change this from 65 to 66, opps 66, just so the lines are a bit more bold like that. There we go.
And what we can do now is actually change the main camera background from blue to whatever color you want the lines to be. You can have them black or white, but for us I think we’re gonna go for a dark green. So it still sorta blends in with the environment, but it’s still easy to tell where those lines are. Yeah, something like that I reckon.
Something else we need to do is also add in some sorting layers. ‘Cause since we’re working with 2D Sprites, we need to tell Unity which Sprites should be rendered over specific other Sprites. Now to do that let’s go up to the Layers button up here and click Edit Layers. Now in here we can open up the Sorting Layers window here, and we can start adding in some sorting layers.
So we can click on the plus here, and we’re gonna enter in UI. We’re gonna add another one, we’re gonna add in Background. Then we’re gonna add in Unit. And let’s rearrange these now so they are actually in the correct order. So we’ll have UI right the front, and then we’ll have Background at the back, and Unit here.
Okay. So with that done we can now actually set our grid to have the background Sprite, have the background sorting list so we can click on the Tilemap here, and then we can go to where it says Sorting Layer, and we’ll change that to Background.
Okay so that’s pretty much it for setting up our project. We’ve imported all the Sprites we need. We’ve got our Menu scene and our Game scene set up and ready to go to start creating our turn-based game. See ya, I’ll see ya’ll in the next lesson where we start to create our network manager.
Transcript 3
Hey everyone, in this lesson we are going to go over two important concepts before we continue on with our project. And these two different concepts are going to be very important in actually being able to relay information over from one computer to another inside of Photon.
The first is Remote Procedure Calls, or RPCs. RPCs allow you to call functions on other player’s computers. So just like on your computer, when typing code you would just go FunctionName, and then brackets. That is how you will call a function, for example.
But let’s just say you wanted to call a function, for example, you have an enemy and you wanna damage them and you wanna call the take damage function on them. Well, normally you would just call their take damage function, but in order for that player to actually have that function be called on their computer, you need to do something. You need to call an RPC, and here is how we can do it.
There’s two different ways to do an RPC. The first one is you go PhotonView, we’ll get to that soon. Dot RPC, and then in brackets, you have the name of the function as a string, and then comma, and then you enter in the player you wanna do, you want to send it to. And this is a Photon player. Remember where you had the player class, which is the Photon Player? And that is the person we want to send this to. And then you can have some parameters there if you do have parameters.
The other way, though, is sending it to an RPC target, and this is not extending it to an individual person, but sending it to a group of people or a specific group of people in a certain way. Here are all the different RPC targets. We have All Via Server, Others, Master Client. All Buffered, All Buffered Via Server, and Others Buffered.
All executes the function instantly on your computer and sends that function out to everybody else inside your room to call that function on their computer. All Via Server sends that function call up the server, and then from the server it tells everybody, including you, to call that function. Others sends that function to everybody else but you.
Master Client sends that function to the Master Client. And then we go into the buffered. Now, what buffered means is that it will actually cache that function call, so what it means is that, let’s just say you call the change color function, for example, just a hypothetical function, and it changes your color to blue. You could call that with All, for example, but what if somebody was to then join the game after you call that? You join the game and, for them, for you everyone’s blue, yet for them nobody’s blue.
The way to have a function call for them that has already been called is to set it in All Buffered. And what this does is cache that function for when new people join the room – it will call that function on their computer. So you’ve got All Buffered, and then you’ve got All Buffered Via Server, and then you’ve got Others Buffered, okay?
So that’s pretty much the gist of RPCs. We’ll get into those in more detail when we start actually using them. But for now, this is just a brief overview on what they do and how we are going to used them in the project. And we are going to use them quite a lot in the project.
Okay, so let’s move on to our next concept, which is the PhotonView. Now a PhotonView is a component which identifies an object across the network. This, if you want to call an RPC to an object, that object needs a PhotonView. Because in Unity, at the moment, how does Photon know which objects are the same across the network?
Each game object does have its own instance ID for the game object, but that is randomly generated and it is actually different, of example, if you had two instances of the game launched, and you had to spawn in an object, that object would have a different instance ID from the other. So at the moment, there is no real way for Photon to know which objects are the exact same across different players’ computers.
And the way you do that is with a PhotonView component, and more specifically, the View ID of that Photon View. So each object inside the world has a unique UID, each player, the network manager, the game manager, the menu, all that sort of stuff, each has its own unique UID. So that Photon, when you send an RPC to that object from across the network, it knows exactly where to send it.
And there’s also different types of PhotonView extension components, for example. You can see that there is an observed components list that you can add stuff to, and what we’re going to be doing is, for our units, we want to be able to actually sync the position of these units across the server.
So when you click on a unit and move them, we want that movement to not only, you know, of course, it’s gonna be moving on your screen, but how are we gonna tell other computers, other people in the room to move that object, as well? We are going to be using something called a Photon Transform View, and what this does is, if you attach it to an object, that means that whenever that object moves, that position, or rotation, or scale will be updated across everyone’s computers automatically, instantly. And it also adds some smoothing, as well, so it’s not jittery.
That just prevents – that just doesn’t require us to do lots of code where we’ve gotta send the new position, receive it, and then serialize, not serialize it, but actually then lure it between your position and the new position. That’s what you used to have to do with networking, but now there’s that component, which makes it much easier. And we’ll get into that in more detail, of course, later on when we get to it. And of course, when we start using our PhotonViews, we’ll get into that in more detail, as well.
So for now, that’s just the brief overview of what an RPC and a PhotonView is. For sure we’ll be using these quite a lot throughout the project, as they are really the core of making a multiplayer game inside of Unity and being able to actually transmit information and Sync up value between computers. So yeah, I’ll see y’all in the next lesson when we actually begin on using these PhotonViews and RPCs.
Interested in continuing? Check out the full Turn-Based Game – Multiplayer Projects course, which is part of our Multiplayer Game Development Mini-Degree.