You can access the full course here: RPG – Multiplayer Projects
Table of contents
Part 1
Setting up the Project
Before we begin, let’s first set up our folders and scenes. In the Scenes folder, delete the default SampleScene. Then create 2 new scenes: Menu and Game. While we’re at it, let’s also add these to our Build Settings screen (File > Build Settings).

Let’s now create the rest of our folders. Create the following:
- Animations
- Prefabs
- Resources
- Scripts
- Sprites
All the sprite sheets are included in the project files. If you wish to download some other free sprite sheets though, you can do that here: https://kenney.nl/assets?q=2d
Scene Setup
Let’s now go to our game scene and select the camera. We need to change it from a 3D camera, into a 2D one.
- Set the Projection to Orthographic
- Set the Clear Flags to Solid Color
Now we can go to the menu scene and do the same thing. This time though, let’s change the background color.
- Set the Background color to green/blue
Tags and Sorting Layers
At the top right of the screen, select the Layers drop down and click on Edit Layers…

Create the following tags and sorting layers:
Tags
- Enemy
Sorting Layers
- BG
- Pickup
- Enemy
- Player
- UI
In the next lesson we’ll used Tiled to create our tilemap and import it into Unity.
Part 2
Tiled
Tiled is a free software which allows us to easily create tilemaps. Go to https://thorbjorn.itch.io/tiled and download the Tiled Map Editor.

Once you download and install it, you should be able to launch the program. Select New Map…

Set the Width and Height to 30, then click Save As…, create a new folder in the project called Tilemap and save it there
When in the editor, we need to import a tile set. Click on the New Tileset… button.
- Set the Width and Height to 32
- Set the Source to the background image in the project

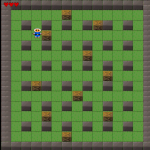
We now need to create 2 layers. One for the Background (tiles that we can walk on) and one for Collision (tiles that we collide with).

Now just create any sort of map you wish.

Now export both the map and tileset into the Tilemap folder.
SuperTiled2Unity
SuperTiled2Unity is a free Unity asset which converts Tiled maps into the tilemap format Unity uses. Download it from https://seanba.itch.io/supertiled2unity
This will download a .unitypackage file which you can just drag into the project window and import the asset.
Select our .tmx tilemap and:
- Set Pixels Per Unit to 32
- Enable Tiles as Objects (not see in image)
Click Apply. Do the same for the tileset.

Now we can drag in the .tmx tilemap file into the scene.
- Set the Position to -15, 15, 0

Next, select all of the collision tiles and add a Box Collider 2D component to them.

Transcript 1
Hello, everyone. My name is Daniel Buckley, and I’ll be your instructor for this course. Let’s have a look at what we’ll be making.
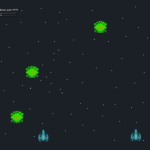
We are gonna be making a multiplayer RPG game inside of Unity. As you can see, we have a lobby system, and then when the two players spawn inside the game, you can see that they both sync their positions up. We also have a chat box that the two players are typing in right now. And outside here, there are enemies that do spawn by spawners. You can defeat them, and there is gold to pick up after defeating them. So, let’s see all the different types of things that we are gonna learn in order to create this game.
First of all, we are gonna be using the Photon Unity Networking Multiplayer framework. This is a free multiplayer framework available from Unity. And since the deprecation of Unit, this is pretty much the most popular and main networking solution that most people use inside of Unity.
We’re gonna be creating a player controller. The player will be able to move, attack, pick up gold, heal, and, when they die, will wait a few seconds and then they’ll respawn at a random spawn point. As you can see, the player can also attack enemies with a little attack animation, and they have health bars above their head with their names, as well, which that’ll all be done, as well. We’ll go through how to do that – how to set up the UI for that.
There are also pickups. These pickups will be both dropped when enemies die, and they will also be positioned around the world, if you want. These can be really whatever you want. We’re gonna be designing them around health pickups and gold pickups.
And another feature we’re gonna be creating is a chat box. This will allow players to chat to each other in the game. When they type in a message, it will be synced across the entire network. So all players will see that message pop up instantly, along with the player name and their message.
For the menu, we’re gonna be creating a lobby system. This will allow the players to enter in a PlayerName, then either create or find a room. If you create a room, you’ll be sent to the lobby where you can wait for more players to join. And if you go to Find a Room, you’ll be taken to the lobby browser, where there will be a large list of all the different rooms that you can join, showing the room name, as well as how many players are currently in there. And then when all the players are in the lobby, you can see who is in there and then you can start the game. We’ll be doing all this with Unity’s UI system. Unity has a very good built-in UI system that we’ll be using. We’ll be talking about canvases, text, buttons, input fields, sliders, all the different sorts of UI elements. We’ll be using a wide range of different ones.
So yeah, Zenva is an online learning academy with over 400,000 students. We feature a wide range of courses for people who are just starting out, or for someone who just wants to learn something new. The courses are also very versatile, with video course that you can follow along with the included project files. There are also lesson summaries that you can choose to read through, if you wish. So, with all that said, let’s get started on our project.
Transcript 2
Hey everyone and welcome back. In this lesson we’re gonna be setting up our project. We’ll be setting the folder structure and importing some assets that we need.
First of all, let’s go down to our folders here. At the moment we’ve got out Photon folder and the default scenes folder that you get when you create a new Unity project. Let’s start with our scenes folder. Let’s go inside there, and we’ll just delete this sample scene here. Let’s create two new scenes, we want to create a new scene called Menu for the menu. And then another scene called game, where the actual gameplay will take place.
While we’re here actually, let’s add these to our Build Settings. Let’s go up to File, Build Settings, and let’s add these scenes in the build. Layout our idea, just so that we don’t have to do that later on and if we forget to. Put the game in and then we will put the menu above since we do want to launch into the menu scene.
Once we’ve got that done, let’s now go back to our assets folder and create the rest of our folders. Let’s create a new folder here and we’ll just call this one animations. As we do need to have an animation for the actual attack when the player attacks. If you do want to make anymore custom animations, you can just put them in here.
Okay, the next folder we want is Prefabs. This is going to be stuff like all of the non-network required Prefabs. I’ll explain that a bit later. Along with the Prefabs folder we need the Resources folder, and this is where we’re gonna be putting in all of the Prefabs that we need that are going to be spawned over the network. Again, I will explain this later once we actually get into creating these prefabs. Okay, we got that. Now we need a Scripts folder to store all of our scripts.
And finally we need a folder called Sprites. Sprites and let’s actually open the sprites folder because we need to import a few different sprite sheets while we’re here. We’ll open this up. There is going to be three included sprites, three included different files. In the project files that you can download – or you can choose to use your own. Actually, there is four, but we’re only going to import three; and we’re going to be using the other one later on, once we actually do our tilemap.
The first one we’re adding in is just a white square. The reason we need a white square here is for when we have the health bars. We’re not going to be using a slider, instead we’re just going to be using a image with a specific fill amount. In order to do that you need to have an actual sprite, you can’t just set it to none. We’ve got this here, let’s go up to our texture type. Change that from default to 2D and UI. Then click on apply. Just like that.
A second we need is the characters sprite sheet. These two sprite sheets we are going to be implementing in next are all free assets. They’re public domain sprites that you can use. With this we just want to go up here and change the texture type again to 2D and UI here, click on apply. And actually we also want to change it from the sprite mode from single to multiple. Then what we can click apply again.
Then open up the sprite editor here, and inside of the sprite editor we can actually individually cut these out. Now we can do that by hand but it will take some time. So what we can do is click on slice up here. Make sure it is on automatic. And then click on slice, just like that. As you can see they’re all automatically sliced up, now like so. We can click on apply. Wait for that to go, it might take a while since there is quite a lot of different sprites here. So it might take some time, there we go. Then we can click on the X.
What we want to do now is actually change the pixels per unit, because at the moment it’s 100. If we were to drag this into our project, for example, once we set it up with all the character and all that. We’ll see that this is a very small sprite, and the reason for that is because we need to set the pixels per unit to however many pixels we want in one Unity unit. These characters here are about 16 by 16. And since we want the character to fill up the whole tile. We’ll set the pixels per unit to 16, then click on apply.
Okay, with that done, we can drag in our next sprite sheet which is items. In here we can go click on that. We can change it from default to 2D and UI. We can click on apply. We can the change single to multiple, apply that again. Then click on sprite editor and do the exact same thing. We can go slice, set that to automatic, click on slice. Wait for it, yep there we go, got all our sprites here.
We’re not going to be using all these, really we’re just going to be using the heart and a couple of these gems to have as treasure. Again you can choose what sort of sprite that you want. We’re just going to be using those though so we can click on apply. Takes some time since there are quite a lot of sprites in this sheet. There we go, we can click on the X now. And we have all of our sprites in the game – actually no, first thing we need to do is click on the items here and change the pixels per unit from 10 to 21, as that is how many pixels there are per tile on this sprite sheet. So can click apply. Wait for that to do it’s thing and there we are, we are finished.
Now what we need to do is, we’ll just set up the cameras and that for the different scenes. If we go to our scenes folder, we will open up the game scene first of all. Don’t save the sample scene. Inside of here, we want to change our main camera from perspective to orthographic since we are working with 2D. Orthographic is what you would use as it doesn’t capture depth, where as perspective objects that are further away are smaller and closer up they are larger. Where as orthographic – it doesn’t matter the distance between objects, they are all the same size.
Here we can change the size of the camera here, but we will just keep that at five for now. We can also change the background since we don’t really want a skybox since it is going to be a side-on view. And it might look a bit weird. So we can click on here and go solid color instead, and I reckon we can just keep it like this for now. We can change this color to something else later on, but we will just have this for now.
Now we can go to our menu scene, we’ll save the game scene. And do the exact same thing: change the camera from perspective to orthographic, and we’ll change skybox to solid color – and for this we can actually set a color that we want for the menu. So whatever you sorta want for your menu scene, we can maybe have a green like that. There we go.
Now something else we want to do is also add in our tags and sorting layers that we’ll be using. To do that, we can go up here to the layers button here and just click on edit layers. In here will pop up with a list of what we can select, so let’s open up our tags and let’s add in a new tag. Click on the plus here. The tag we want to enter in is enemy. Now we already have a player tag, Unity already has the player tag pre-built into the editor. So we just need to add the enemy tag there and that’s, of course, is gonna be on our enemies tagged as them.
Then we can go on to our sorting layers here. What we want to do is we wanna create a bunch of short sorting layers. What these are, these basically decide which sprites get rendered on top of other sprites. Of course, we want the background to spawn right at the back, we want the UI to be spawned right at the front. We want the players to be spawned on top of the terrain but behind the UI. We will create a few of those.
First one, let’s create is going to be BG for background element. Then we will create another one here, this is going to be pickup for all of our pickups. Then we will create another and this is going to be called Enemy. The next is going to be our Player and then finally we have our UI. This is the order of how the sprites are going to be rendered.
Save that and that is our project set up pretty much done. In the next lesson, we will start to actually set up our tilemap using Tiled and then import it into Unity using Tile TNT! See ya!
Transcript 3
Welcome back everyone. In this lesson, we are going to be creating an actual map using Tiled. And Tiled is a free software which is pretty popular among many of the 2D map makers, and what it allows us to do is set up a tileset and pretty much just paint in the tilemap. And along with Tiled, Tiled Map Editor, we’re also going to be using Tiled2Unity – actually SuperTiled2Unity – which is able to then take this tilemap and convert it into something that can be used inside of Unity. So yeah.
We just wanna go on itch.io and download these both. So, we can then click on download for the Tiled Map Editor. No thanks, just take me to downloads. And you just wanna then download the version for your specific version of Windows pretty much. So once that finishes downloading, you will have a setup window pop up. We’ll just go through these things here and just set it up and yeah. So when it’s done, we’ll be back and we’ll be ready to create our tilemap.
Okay, so when that’s finished you should see that Tiled has now opened, and what we can do is we can choose to create a new map, a new tileset, or open a file. So for this one, we are just going to create a new map. We’ll keep all these settings the same, for now, since we’re just focusing on a tutorial right now, I’m just gonna accept the map width to about 30 by 30. You can, of course, set this to much more if you want, but we’ll just set it 30 by 30 for now. And the tileset we are going to use is going to be 32 by 32 pixels per tile. So that’s all good. We can click save as and we’ll just save this inside of a folder on our desktop for now.
And here we are in our map. Now, to move around in Tiled you can use the middle mouse button to drag. You can use scroll wheel to go up and down, and then Control and scroll wheel to zoom in and out. Oh, and scroll wheel to scroll horizontally.
So, with our map here, we want to start adding in some tiles. So what we’re gonna do is we’re gonna click on the bottom right here where it says new tileset, and we’re just gonna enter in a name for our tileset. We’ll just call this Tiles for now. So we can click on browse and find that asset. Here we are, I got it loaded up. Everything’s all good here. We can click save as now and here we go. We got our tilemap here. Everything’s set up. There are quite a few tiles in here for us to use.
So back in our actual tilemap here – not our tilemap but our actual map where we can start to create our tiles. What we want to do is, we want to divide this up into two separate layers. The first layer is going to be the background tiles, the tiles, of course, that we’re gonna be able to walk along. And the second tiles is going to be the collision tiles, and these are gonna be tiles that the player’s gonna be able to collide in. So this can be walls, mountains, tree, water, all the sort of things that you don’t want the player to be able to walk over.
So up here in our layers window, we’re gonna rename by double-clicking on the tile layer one. We’re just gonna call this background and then down here, we’ll click on this icon, open it up and click tile layer to create a new tile layer, and we’ll just call this one collision. Now, there’s also a rendering – rendering sorting as well so the collision tiles will render on top of the background tiles since that is now on top.
So yeah, we can now go in here, choose our tiles. Select the tile that you want. You can click to draw. You can also then go up here to the eraser to rub it out. Click on the stamp to go again. Select tile and then draw again. So yeah, it’s pretty intuitive up here. There are various other things as well. You click on here to draw a large box. So yeah, just use these tools. Create whatever sort of map you want. Make sure that if you do want the player to be able to collide with something that you do select the collision layer and then draw on that. But if you want something for the players to walk on top of, then draw that, of course, on the background layer.
So here we go. I’ve created my tilemap, and now what we can do is go back into Unity and, basically, import this. Now what we can do is download SuperTiled2Unity. The link for this will be in the lesson summary down below and what this is, is basically a tool for Unity that allows us to drag in a Tiled tilemap and then easily convert it to something that we can use inside of Unity.
So, with this here, we can just click on download again and what we want to do is just download the latest Unity package here. There’s one from two days ago, so we’ll download that and with this download, what we want to do now is actually drag this into our Unity project. So just drag that in like so. Wait for this to download. It’s just gonna be like when we imported Photon. We have all of this stuff here. We’ll keep all that. So, actually, we’ll just remove the examples folder here, since we don’t need that, and then we’ll just click on the import button.
So back here in Unity, what we want to do is create a new folder, and we’ll just call this one Tilemap and inside of that we want to drag in the three files that we’ll be using and that is going to be our background, our png file which has all the different tiles on it, the tileset as well, the .tmx, and the Tiled Map file which is our actual tilemap. So we just drag those three files in, wait for them to import, and once again, you should see that they each have their own little icons. The tileset has its icon and the tmx has its own icon.
So, first thing you want to do is click on our tiled.tmx, and we want to change the pixels per unit from 100 to 32, as that is how large each of our tiles are. We can just click apply then and after that we also want to do one more thing on here. We want to click tiles as object and then click apply. And what this will do is actually make it so that each tile is its own object that we can apply a collider to. So after that, you should see that the icon has changed. The tileset here, we also want to change the pixels per unit from 100 to 32. Click on apply. And after that it’s just converting all the tiles to the new pixels per unit and now what we can do is actually drag in our map.
So we can just drag it into the scene like so, and if we click on the scene view, you can see if you’re in 2D mode. Just click on this button to toggle 2D mode. You can see that we have our map. It’s all here. We have all our tiles. We can click on the individual tiles, move them around if we wish. Now, the anchor point for this map is in the top left corner. So what we do want to do is make sure that we have it in the center. Now my map is 30 by 30, so that means that 15 to 15 is gonna be the middle. So we’ll set X here to negative 15 and Y to 15 so that it is nice in the middle here and zero, zero is directly into the center of the map.
Okay, now inside of here we want to add our colliders. So if you remember, we have the background and collision layers, and so what we do want to do is only add colliders onto the collision layer. So, we can open up collision here, select all the tiles inside of collision, and then what we’re going to do is, in the inspector, add a box collider 2D component to that. So as you can see now, all of our collider tiles has its own box collider on it. So we won’t be able to walk on the water. We won’t be able to walk through trees or walls and it should be blocking us just fine.
So yeah, I’ll see you all then in the next lesson.
Interested in continuing? Check out the full RPG – Multiplayer Projects course, which is part of our Multiplayer Game Development Mini-Degree.