You can access the full course here: AR Projects – Job Training App
Table of contents
Part 1
Setting up the EasyAR App
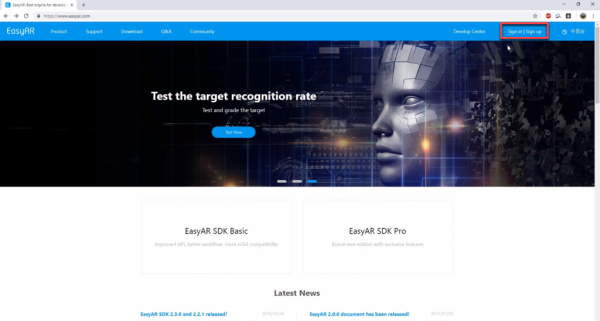
To run our augmented reality app, we’re going to be using the EasyAR SDK. Let’s go to the www.easyar.com website and create an account by clicking on the Sign Up button.
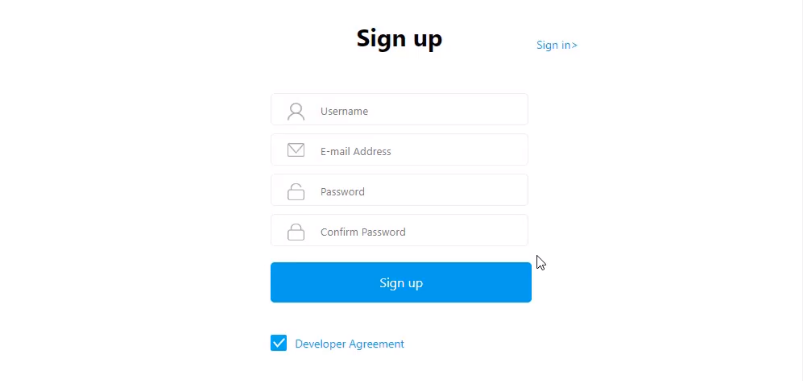
This will take you to the sign up page. Enter in the form to create your account, or sign in if you’ve already made one.
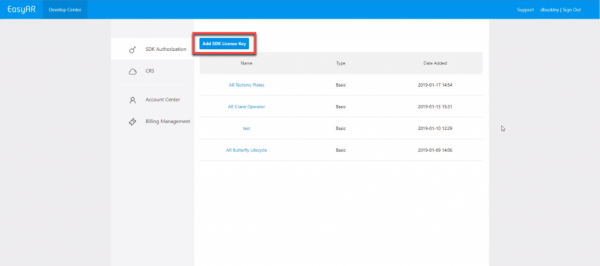
After you’ve signed up / logged in, you’ll be redirected to the Develop Center. This is a list which will display all of our apps. Let’s click on Add SDK Licence Key to add a new app.
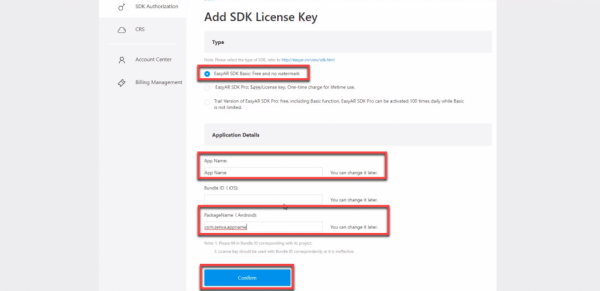
Here, we need to fill in some information.
- For the Type, select EasyAR SDK Basic: Free and no watermark
- The App Name is the name of the app
- The Bundle ID needs to be filled in if your building for iOS
- The PackageName needs to be filled in if your building for Android
- Format: “com.[company name].[product name]”
Once all the required info is filled in, click on the Confirm button.
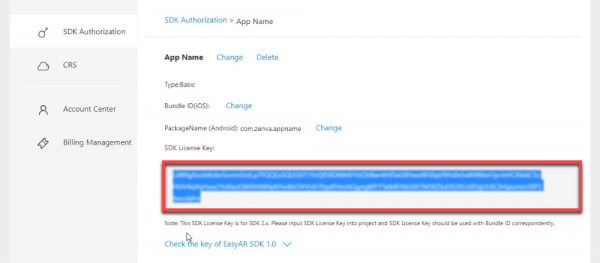
You’ll be redirected back to the Develop Center and the your app will be displayed in the list. Click on it to view the details.

What we want to do here, is copy the SDK License Key as we’ll be needing this in Unity. Also take note of what the Bundle ID / PackageName is as we’ll need to enter that in Unity also.
Installing the SDK
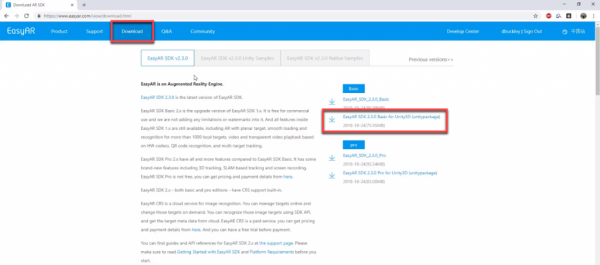
Now it’s time to install the SDK. Let’s go back to the EasyAR website and navigate to the Download page. Here, we want to download EasyAR SDK 2.3.0 Basic for Unity3D (unitypackage).
When the download’s done, open up the ZIP file. Extract the unity package file.
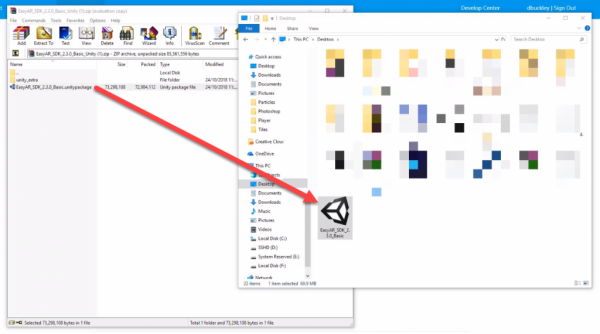
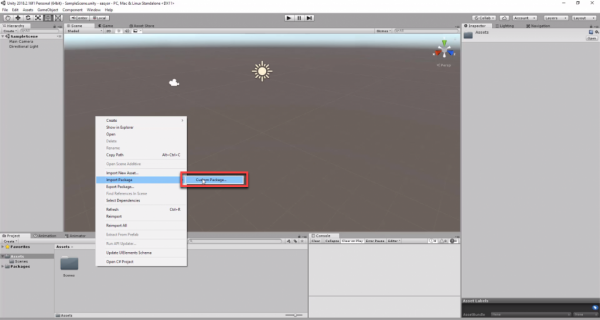
In Unity, right click in the Project window and select Import Package > Custom Package… Find the EasyAR unity package and import that.
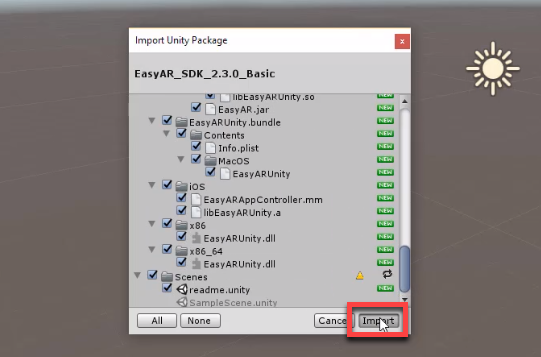
This will open a window with all the files that are going to be added. Simply click on the Import button to import the assets.
Setting up the Project
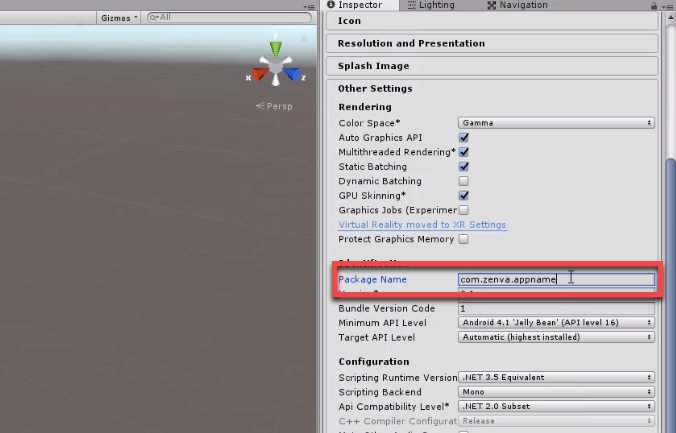
With the EasyAR SDK installed, we need to do a few things for it to properly work. First, let’s go to the Player Settings (Edit > Project Settings > Player) and scroll down to the Package Name field. Enter in the package name / bundle identified we made back on the EasyAR site.
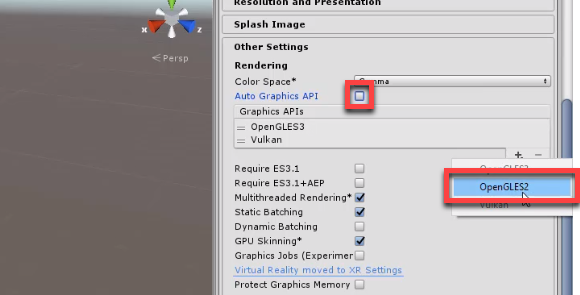
Above that, let’s disable Auto Graphics API and add OpenGLES2 to the Graphics APIs list. We need to do this because EasyAR only works with the OpenGLES2 graphics api.
We’re now finished with setting up the SDK and ready to create apps with EasyAR!
Part 2
The steps in the video for this particular lesson have been updated, please see the information below for the additional step.
Setting up the Scene
To begin, let’s drag the EasyAR_Startup prefab (EasyAR > Prefabs) into the scene. This is basically the powerhouse for the AR engine. Clicking on the object, we can paste in our EasyAR SDK key to the Key property. We also want to delete our main camera, as the EasyAR object already has one built in.
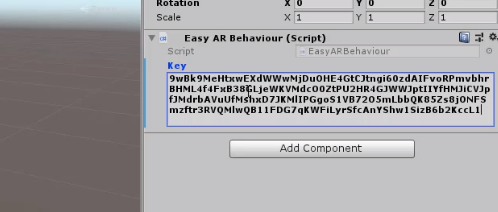
Image Targets
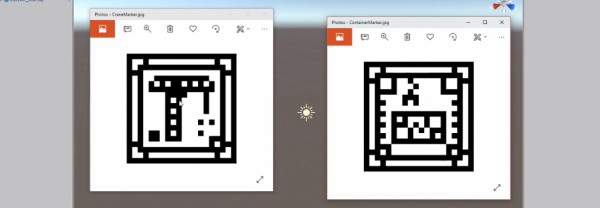
What’s an image target? An image target is a specific image that the app can identify. This is a unique image such as a QR code. The app can find the position, rotation and scale of the image target, and then render models and other things on top.
Here’s the image targets for the crane and container. In our case, we’re going to be creating 4. One for the: crane, container, truck and dashboard.
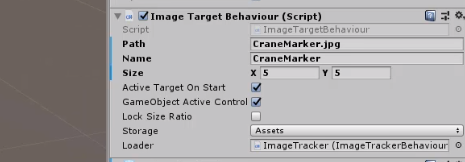
To add an image target, drag the ImageTarget prefab (EasyAR > Prefabs > Primitives) into the scene. Selecting it, we need to fill in the properties.
- Path – the file path to the image target (located in the StreamingAssets folder). We also include the .jpg file extension
- Name – the name of the image target, not including the file extension
- Size – reference to the real life size of the image target (it doesn’t matter what this is, we’ll just set it to 5 x 5)
- Storage – the way the image targets are stores (change this from App to Assets)
- Loader – linking to the ImageTrackerBaseBehaviour script inside of the EasyAR object
Also rename the object to ImageTarget_Crane.
Now, let’s duplicate this image target 3 times, one for the: truck, container and dashboard. All we need to change with each of these is the Path and Name.
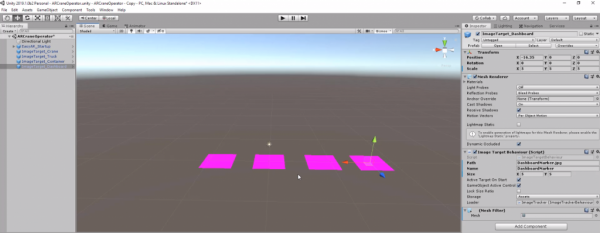
The following step has been updated, and differs from the video:
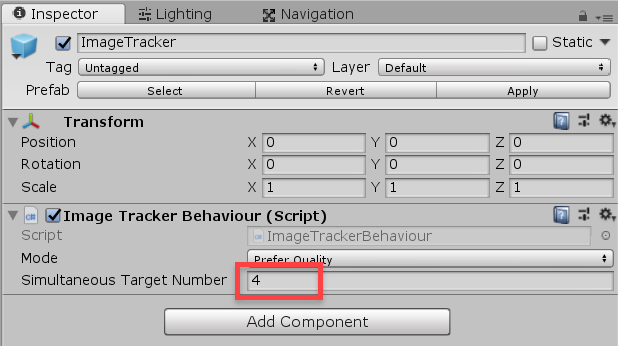
By default, EasyAR can only track and render 1 image target at a time. To increase this, select the ImageTracker object (child of the EasyAR_Startup object) and change Simultaneous Target Number from 1 to 4.
Transcript Part 1
Hey everyone. My name is Daniel Buckley and I’ll be your instructor for this course. In this course, we’ll be learning how to create an AR crane operator game. This is a look at what we’ll be making.
As you can see, we have our crane here, which can rotate. It can pick up a container and place it in a truck. As well as this, we also have an AR dashboard. And all of these four different things are actually image targets, which are these little QR codes that you can print out. And you can place them anywhere you want and the app will be able to render models and various different things on top.
So let’s have a look at some of the stuff we’ll be learning this course. First of all, we’ll be learning how to use the EasyAR SDK. This is an augmented reality SDK, which allows you to use image targets. Like I mentioned, these are little QR codes that you can print out and the app is able to identify them. It can figure out their position, their rotation, their scale, and then it can render models, images, particle flex, whatever you want on top of them. As well as the crane controller, this will feature the crane being able to rotate, move the hook, lift, down, pick up the container and place it in the truck.
Something pretty cool as well with this project, is we’re going to be having the controls actually part of the AR app. It’s going to be a little dashboard that you can choose to place wherever you want, and you’ll actually be tapping on the buttons on the screens to be able to move the crane.
To do that, we’ll be creating a touch input manager and this will be able to detect touches from the screen, figure out where in the game world they are touching. And if they’re touching any objects, then that object will be triggered. If it’s a button, then whatever that button is connected to will be triggered. This is a script that is also very versatile, and can be used in many other projects.
ZENVA is an online learning academy with 350,000 students. We feature a wide range of courses for people who are just starting out, or for people who just want to learn something new. The courses are also very versatile in how you want to learn with them. You can choose to just review them and soak the information up that way, or you can follow along with the included project files. So, with that all said, let’s get started on the project.
Transcript Part 2
Hey everyone, this is gonna be a tutorial on how to download the Android SDK with Unity. First of all what you wanna do is you wanna open up the Unity hub and navigate over to the Installs tab. In here you wanna download a version of Unity that is 2019 or higher.
Here, I’m gonna download a version of Unity that is 2019, and when you click on download, and you wanna make sure that you have Android Build Support and Android SDK and NDK tools selected. With those selected, you can then click on next. Click that you agree, and the download will begin.
Alright, when the download’s finished, either open up a new Unity project or open up your existing project that you want to use with the new version. Now what you want to do, is you want to do two things. First of all, change our build platform from PC Mac and Linux Standalone over to Android. So to do that, let’s go to File, Build settings and let’s switch over to the Android Build Platform. So, click on Android here, and then we want to click on the Switch Platform button down at the bottom of the window. This may take time depending on how large your project is. If it’s a empty project then it shouldn’t take too long, but if you do have quite a few assets it can take some time.
So, once that’s done we can exist out of the Build Settings window and what we want to do now is check to see whether or not the SDK is installed. So to do that, let’s go up to Edit and down to Preferences here. Once we open this, click on External Tools and we should see that we have the JDK Installed with Unity ticked, We have Android STK, Android NDK and the Graddle Installed with Unity ticked as well. That means that we have our STK installed and we’re ready to publish to Android.
To build to your Android device, make sure that you have your device plugged into your computer and then what you wanna do is in your Unity project, again making sure that the platform is set on Android, go to the Build Settings menu and File, Build Settings and click on the Build and Run button down here.
This will prompt you to save your APK at a certain location, and when you save it there, and click save, it will begin the build and, when that’s complete it should then launch onto your device. Make sure that you do click the Build and Run button and not just the Build button, otherwise it won’t launch on your device.
Transcript Part 3
Hey everyone, this video’s gonna show you how to build a Unity app to an iPhone or iOS device.
First of all, what we want to do is we want to navigate over to the Installs tab. Here, you want to make sure that you have a version of Unity that is 2019 or higher. If you don’t, you can install that. But if you do, we want to make sure that we have the iOS component installed. Click on those three little dots, and click on Add Component. And here, you want to make sure that you have iOS Build Support ticked and installed. And we can open up now our existing project or create a new one.
Now that we’re in our project, we need to change our build platform from PC, Mac, and Linux Standalone over to iOS. So to do that, go File, Build Settings, and then what we want to do is we want to select the iOS Build Platform, and then click on Switch Platform. This may take some time depending on the size of your project. If it’s a small project, it shouldn’t take too long. But the larger it is, the longer it will take. Once that’s done, we can exit out of that window. And as you can see, we are now in the iOS Build Platform.
What we want to do now is go to our Project Settings window. So to do that, go Edit, Project Settings. This will take us to the Project Settings window and we want to make sure that we’re on the Player tab. Here, scroll down to where it says Bundle Identifier. This is basically the identifier for the app. It’s gotta be unique for the app and the way it’s structured is you have com, dot, your company name, dot, your product name. In this example here, I’m just going to enter in Zenva for the company and Test Project for the project name. Now we’re ready to build our scene. To do this, we can go up to File, Build Settings. In here, we want to first of all make sure that we have all of our scenes we want to build in the Scenes In Build section.
We’re in our default scene at the moment, so we can just click on the Add Open Scenes button and that’ll add our current scene to the build. With that done now, we can click on the Build button. This’ll prompt us to choose a location to save it in. You can save this wherever you want, really. I’m just gonna also save this as TestApp and put in my folder. The name for the test app, that’s just for the file. We will change that later on in Xcode. Then once that’s done, click on Save and it’ll start to build. Again, this may take time depending on the size of your project.
Once that’s done, you want to navigate over to your app and find the Unity-iPhone.xcodeproject. You will need Xcode installed. You can download this on the App Store. When that’s done though, you can just double click on the Xcode project and it should open up in Xcode. Now that we’re in Xcode, we can click on our Unity-iPhone project to bring it up. But what we need to do first is connect our Apple ID to Xcode to be able to build apps. And to do that, you want to go Xcode, Preferences, and then you want to click on the Accounts tab. Here, you want to make sure that you have your current added.
I’ll put a link on the screen right now and the section below which can link you to a tutorial on how to set up your Apple ID account for Xcode. Once that’s done though, we can exit out.
And what we want to do now is go to where it says Signing, and we want to tick Automatically Manage Signing. Click Enable Automatic and this’ll basically just reduce the amount of options we have to enter in as it can reduce it down to just one. Here, we want to click on the Team dropdown, and select our team or creator. And this is for me it’s gonna be Zemva. But for you, it could be your name or your company. Once that’s done, we can also change the display name. This will be what the app shows up on the screen as on your iPhone. You can make that really whatever you want, it’s just a Bundle Identifier that has to be unique.
And that’s basically all there is to setting up. You can of course go onto more detail in more of the settings, if you want. But for the basics, this is all you really need to do. Now, you just need to make sure that you have your iPhone or your Apple device connected. You can see in the top left side of the screen I have my iPhone connected. And once that’s done, just click on the play button and it should start to build.
This is probably the most lengthy process in all of the process so far. So this can take time. It took me about 10 minutes to do this. Now that we’re done, we have our app on our phone. And if we click on it, it’ll boot up. But of course, we didn’t really do anything to our app so it’s just a blank scene. But yeah, that’s the basics of how to set up a project on Unity and build it to your iPhone, see ya.
Interested in continuing? Check out the full AR Projects – Job Training App course, which is part of our EdTech Mini-Degree.
