You can access the full course here: Intro to Multiplayer Game Development
Table of contents
Part 1
What’s Photon?
Photon is a networking framework for Unity. It’s very similar in structure to UNet (now deprecated).
How Does Multiplayer Work?
Here’s how multiplayer in Photon and many other games works.

Players connect to a server and send / receive messages. These can be updates to other players positions, when a player shoots, when you get hit, etc. If there’s things you want other players on the server to know that is not being done directly on their computer, it will be sent through the network.
For example, if player 1 shoots their gun, that message will be sent to the server and then received by player 2 on their computer. They will then show player 1 shooting their gun and spawning a bullet.
By default in Photon, messages can be sent up to 20 times a second.
Master Server
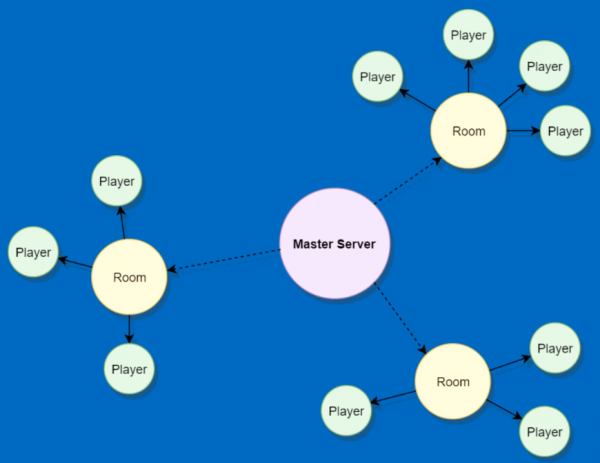
A master server is a server on Photon for each game, or even unique versions of a game. This is where all the players and rooms for that game are located. Players can view all the existing rooms, join them or create a new one. You can only see rooms from the master server you’re in. You cannot join a room of another game.
By default, Photon can allow up to 20 players at once connected to the server. This can be upgraded on their site. They also feature servers all around the world.
Rooms
Think of a room like a match or lobby. This is where a group of players can send messages to each other. Sync values, positions, rotations, animations, etc.
Players
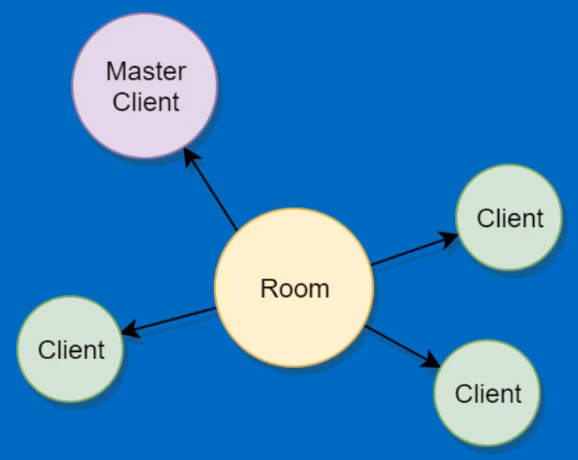
Players (aka clients) are the people that populate rooms. Each room has a master client (host). This is by default the player who creates the room and is useful for checking and running server side things.
Part 2
Setting up Photon
Before we can use Photon, we need to get an App Id. To do this, go to www.photonengine.com and click on the Sign In button. Either sign in or create a new account.
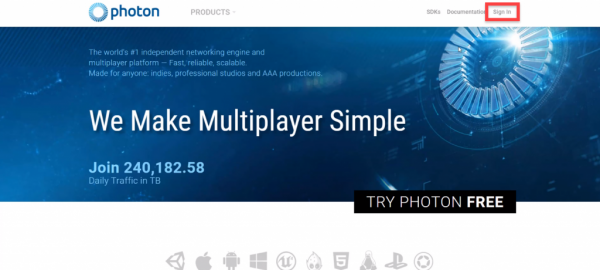
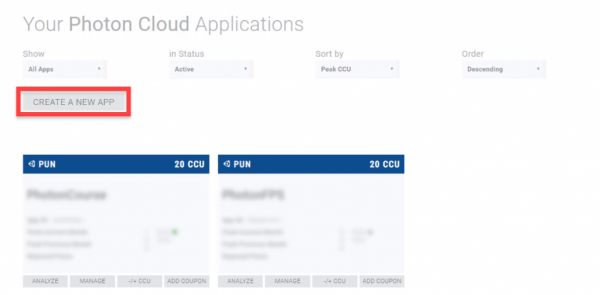
Once you sign in, you’ll be taken to the applications page. Here, we want to click on the CREATE A NEW APP button.
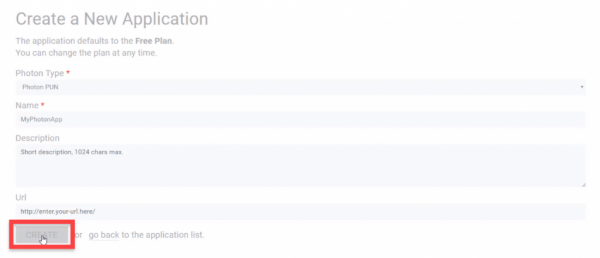
Here, we can fill out the info for our new application.
- Set Photon Type to Photon PUN
- Enter a name for your app
Then click on the CREATE button.
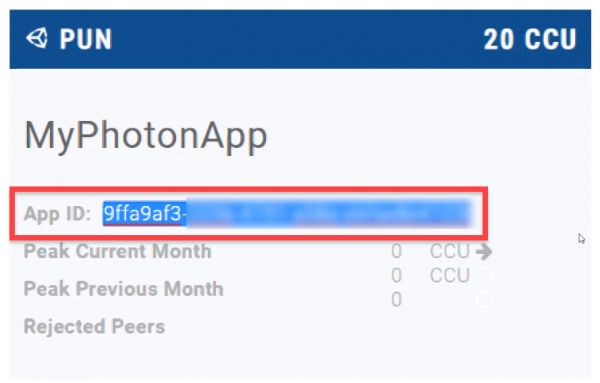
This will take you back to the applications page. Here, you want to find your app and copy the App ID. This is how Photon will know what your game/app is and to keep track of analytics.
Importing Photon into Unity
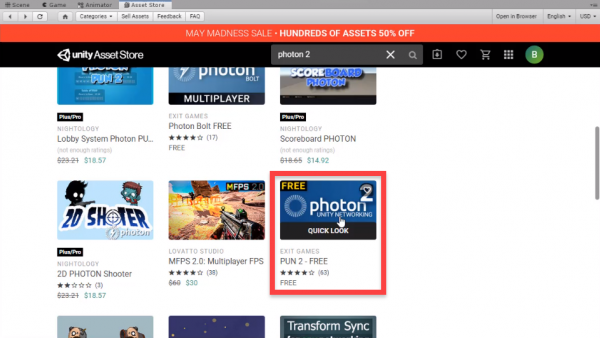
In Unity, create a new project and open up the Asset Store window (Window > Asset Store). Search for “photon 2” and download the PUN 2 – FREE asset.
When the import package window pops up, we’re going to disable some parts of the asset since we don’t need them.
- Photon > PhotonChat
- Photon > PhotonRealtime > Demos
- Photon > PhotonUnityNetwork > Demos
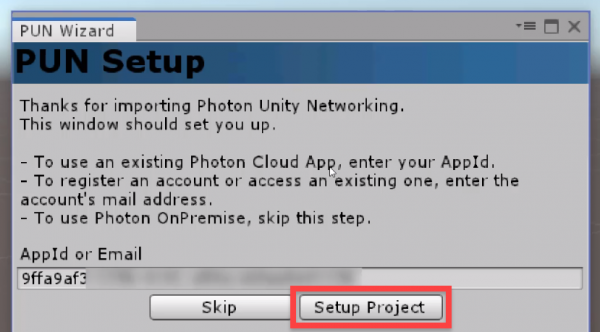
Click Import, then once that’s done the PUN Wizard window should open. Here, we just want to paste in our app id and click Setup Project.
Now Photon’s installed and ready to go!
Transcript 1
Hey, everyone, my name’s Daniel Buckley, and I will be instructor for this course. So this is what we’re going to be making. We are going to be making a 3D multiplayer game in Unity using Photon. Photon is a networking tool for Unity, and it’s one of the most popular ones currently in the world for the platform.
So the aim of our game is to hold the hat for a certain amount of time. This is going to be a multiplayer game where you can have as many players as you want really, but the aim of the game is to hold on to this hat, or any various object, for a certain amount of time. Once you hold on for that amount of time, you win the game. As you can see here, the players can also steal the hat from each other by running into each other, and this is just going to be a game that we can use to demonstrate many of the different features of Photon and networking inside of Unity.
We’re going to be creating a menu and lobby system which will allow players to join games and lobby up before jumping into the actual game. As you can see here, we have a lobby and there’s three players in it, and as the host, you will be able to start the game. We’ll also be working on a player controller. This player controller will be able to move, jump, and steal the hat from other players. When they hold on to the hat, their timer will increase, and if that timer reaches the maximum amount of time needed, then they will win the game.
All this stuff will also be done through networking, so we’ll be syncing the movement, the jumping, the stealing of the hat, through the network so that it appears on all other player screens at the same time. For all of this, we’ll be using Unity’s UI system, canvases, text, buttons, input fields, sliders, and more. These will be used on the menu to enter in the player name, the room name that you wanna join, as well as the buttons. In the game view here we have the sliders and the text to display the players and their current time, as well as who wins the game.
This is what our game loop is gonna look like. We’re gonna start on the menu, and then a player can either join or create a game, and that will place them inside the lobby. Once in the lobby, the host can start the game and that will load up the game scene, where they’ll begin to play the game. When a player who’s holding the hat reaches the winning time, that player wins the game, and all the players then go back to the menu.
ZENVA is an online learning academy with over 400,000 students. We feature a wide range of courses for people who are just starting out, or for people who just want to learn something new. The courses are also very versatile, allowing you to watch them whenever you want and however you want. There are included course project files that you can follow along to see the project and work along with it, and there’s also lesson summaries, so you can choose to read the course as well. With that all said, let’s get started on our project.
Transcript 2
Hey everyone. In this lesson, we’re gonna be talking about multiplayer in Unity and Photon, and actually work in all the different things that you really need before we actually get started.
So the first thing is what sort of multiplayer is there in Unity? Well, Unity used to have their own multiplayer network. If you’re watching this course sometime around early 2019, then you have UNet which is Unity’s old Unity Networking framework (it is now deprecated). So we won’t be able to use that. Instead, we’re gonna be using Photon. And Photon is the most popular Unity multiplayer framework. There are many popular games that use it, and it’s easy to use. If you’ve ever used UNet before, it’s basically the exact same thing, but with added features.
Alright. So, how does multiplayer work? Or what it is is we have multiple players connected together, and what they do is at its core, a multiplayer is basically just sending messages between computers. So, let’s just say player one here moves forward one unit, then that command or that actual new position of the player will be sent from the player- from the player over through the server to player two. So, on player two’s screen, player one is not one unit or at their new position.
And so, that’s how it works. You’ll be sending various amounts and messages every second. By default, I believe that Photon sends about 20 messages per second. You can, of course, tweak that, but it’s set at 20 to be nice, so it doesn’t have too much lag or too much problems with that. So yeah, that is at its core, is sending messages between computers.
Let’s just say you wanna do an attack. You cast the attack on your computer, and then you send that message over to player two’s computer, so if there are any visuals that go with that attack, those visuals can be displayed on their computer. And that is how you sync between computers, sync between states, positions, rotations, everything that you want to appear on other people’s computers, that is how you do it, through messages. And we’ll be going to some more detail on how to actually do this in code and in script, and also with Unity’s components, what stuff you need to set up, and all of that stuff in later lessons.
So the first concept we need to go over is a master server. What is a master server? Well, in Photon and even in Unity networking, a master server is basically the connection of rooms. I’ll go over rooms in a second. Players can connect to rooms, and there you can see a list of all the rooms. It’s basically like a sort of hub for your game. And each game has their own specific master sever, and even different versions of your game. You can specify it to have different master servers. So, if you’re on version one of your game, you can’t play with people who are on version two, for example. And of course, if you have your game, you can’t play with people who are in other games. You can only play with people on your game in your specific version of that game.
And the good thing about Photon is they have their own dedicated hosted servers all around the world. As you can see to the right, there are many locations around the world where you can basically connect your master server and your game to. In Photon, you can also do it so that for players it connects to the master server with the lowest ping. So you can try and always have the lowest ping possible, or you can just hard code it, so that you connect to a specific master server. Players on different master servers cannot play with each other. So you do need to keep that in mind when making your game.
And of course, with Photon, it is a service that you can choose to pay more to increase the capacity of the server. By default, your game can have up to 20 players at once with the free version of Photon, but you can of course pay for more, and yeah. Of course, you can also host your own server if you wish. That will, of course, require you to have your own server hardware setup and have all of the networking capabilities available. So, if you’re just starting out with networking, I recommend just keeping with the free Photon version as you can test it out. You test it out with your friends, with other people, with testers, and just to see if that is what you want. And if you do, you can wish to pay more further on later on in the future.
So this is what sort of the framework looks like. You have the master server and all the different rooms that players can create connect to that. And within those rooms, you have your own players. So these are very secluded areas away from each other. If one player and one room shoots their gun, then a player in another room won’t see that on their screen. Pretty much, if you’re in a room and all the messages you sent within that room only goes to the players in that room.
So let’s go over more about what a room is. Think of a room as a match or a lobby. These are groups of players who can send messages to each other and by sending messages to teach other, syncing values, positions, rotations, animations, et cetera. So yeah, think of your favorite game where you have your own lobby- you’re in match of 10, 20 players. It’s a self-contained version of the game where you are only communicating with each other and not other players in other matches on different apps, for example.
And in Photon and many multiplayer networks, players are also known as clients. The client is a computer that is connected to the network, and each room has a master client. You might know what a master client is by its other name- which is host. In Photon, a host by default is the player who created the room. And what it means to be a host is you can allow the host to do specific things. In our game, for example, when waiting in the lobby, only the host will be able to stop the game. And using the host for many other things is also a good idea.
If you have a first-person shooter for example or a game where you want to collect pickups, you won’t want players to detect picking up pickups on their own, on their own client. Because what that could do is if two players run into the same pickup at the same time, on their computer they will see that they’re the only one picking it up at that frame, whereas for the other person, that’ll be the same thing.
So what you wanna do is put these sort of processes through the host, so the host will check it. So when the player runs into a pickup, you check with the host. Am I in the pickup? If so, the player picks it up. And if not, you don’t. So there are only one ever person can pick up the pickup at a time. There are many different things, but we’ll go over these later on. But for now, this is just what a host is.
All right. So in the next lesson, we’ll be going over actually setting up our Photon app, connecting Photon and downloading the Photon assets inside of Unity to be able to use it. Alright. So see you all then.
Transcript 3
Hey everyone. In this lesson, we’re gonna be setting up our Photon app and importing the Photon assets we need inside of Unity. So the first thing that we need to do is go to photonengine.com, which will take us to Photon’s main website. And then what we wanna do is sign in or sign up. It’s pretty easy to make an account and you can easily register here, but I’ve already got one so I’m just gonna log in.
Alright, once you make your account or sign in you should be taken to the public cloud screen where you have your applications. If you are not on this screen you can just click on this icon up here and then click on your applications. I’ve already got two Photon applications here already set up, but what we need to do is create a new app. So we will click on the create a new app button right here. And this will take you over to the page where we can fill any information. The only things we need to add to here is the Photon type and the name.
For the Photon type we want to change this to Photon PUN. And Photon PUN is its Unity specific framework, which stands for Photon Unity Networking. And for the name, we can call it whatever we want. I am just going to call this, MyPhotonApp. You can also enter in a description and a website here if have- that you want to connect to your website. But I don’t so I am just going to click on the create button and this will take us back to our applications page where we now have our new Photon app ready to use pretty much.
As you can see we can have up to 20 concurrent players at once. This, of course, is upgradable and you can pay Photon to increase this number or you can choose to host your own server. But for now this is all we need. And the only actual piece of information we need here before opening it to Unity is the Photon App ID right here. So we can just click on that and copy that and pretty much get ready to use that inside of Unity, as we will need this. And that is about it for the Photon website.
So now let’s hop into Unity and begin pulling the Photon 2 assets. Alright, when you are inside of Unity the first thing you wanna do is go to the asset store window. If you don’t have this open you can go up here to Window, then Asset Store, and this will open up this window here. And the asset we want to download is going to be Photon 2. Then when you search for that, we just want to scroll down and find Photon 2 multiplayer free. So you can click on the import button or update if you’ve already downloaded before. And then we can just wait for that to download.
Now when we get to the import package window, we don’t actually need all of the assets that it comes with, so we are only going to choose the ones that we need. So, first of all, we can untick Photon chat, as we won’t be needing that. We need Photon libraries. And inside of Photon real-time, let’s not include the demos. And then inside of Photon Unity Networking, let’s also not include the demos, as we won’t be needing them. And everything else we need. So we can just click on import. And so pretty much the only things we’re not importing are the demos and Photon chat.
Once it’s done you should have a little window here called PUN Setup that pops up. And this will just ask for your App ID or email. We previously copied the App ID, so we will just paste that in like so and click on the setup project button. It will say we are done and we can click on close. And to the right here, we see it has the Photon service settings selected. We don’t need to go into this too much, but what we do now have is our Photon assets included in the project. So now in future lessons we can start to work on Photon.
And actually in the next lesson, we’re going to be setting up our project, setting up the folder structure, and creating an actual game level. So I will see you all then.
Interested in continuing? Check out the full Intro to Multiplayer Game Development course, which is part of our Multiplayer Game Development Mini-Degree.
